Working with Motion Capture data, cleaning
Good all the time of day!
I have been reading Habr for a long time, and all this time it seems to me that the theme of 3D and animation very rarely pleases the workers of this sphere with articles. Often thought to write this, and now the idea took shape. I will tell you how the primary stage of working with Mocap data (Mokap) occurs. Anyone who is interested - welcome under the cat, carefully, a lot of pictures (clickable).
So, you - an employee in the company, are engaged in 3D and animation. By order of the company for your project, they removed the character animation and sent the data to you (Either the company has its own Mokap Studio, which is most likely closer to the work that my post implies).
')
You have a set of animation files, most likely it will be files with the extension C3d, one of the most common standards.
This standard implies the presence in space of point-controllers attached to the body during filming. These points are attached in such a way as to organize immovable systems on the body for further binding to the bones of the character (more precisely, the bones will be attached to the points, and the real estate of the system is “conditional”, since the human body is very flexible and the points are placed on the muscle integument). Accordingly, in such systems there will be some offsets that the software averages, getting what you need.
In my work, I use the Autodesk Motionbuilder package.
Import Motion data.

Image 1
Motionbuilder will ask you what specifically to import from this file.
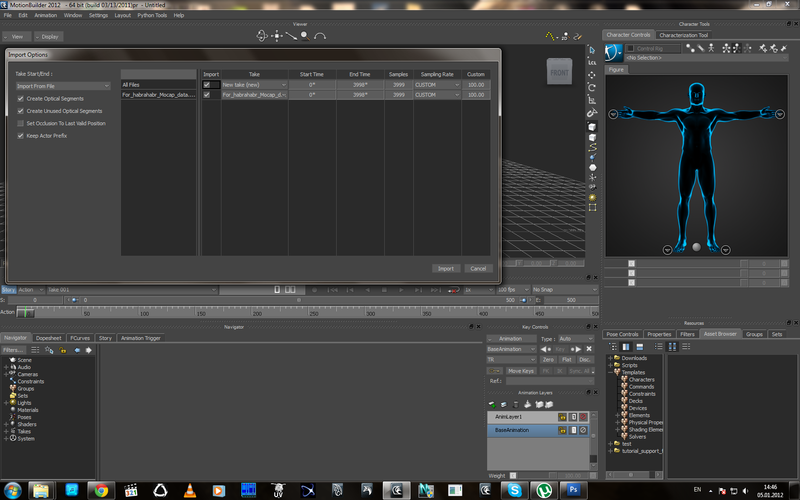
Image 2
Click on Import and look at the screen:
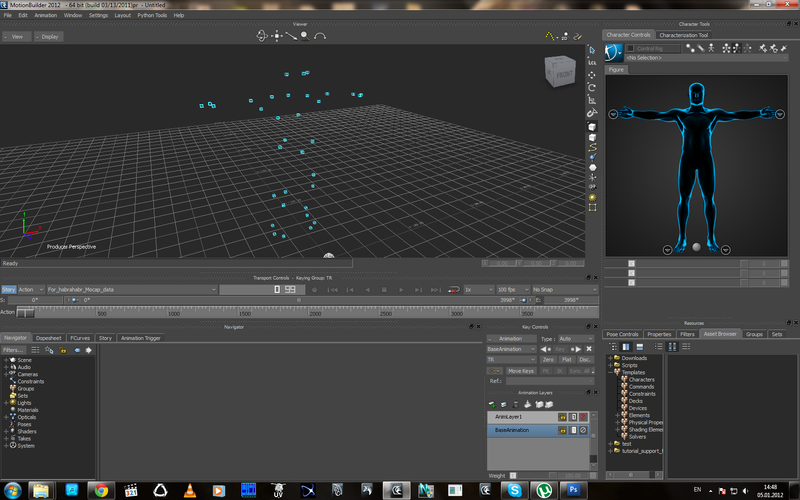
Image 3
A set of points highlighted in blue will appear in the viewport - these are the coordinates of the marker points. If you search the Internet - you can find a lot of lessons on how to attach markers to a character, if you say simply and quickly - a “doll” is created - Actor, which collects all the movements necessary for assigning to it, taken from the positions of the markers, and then with Actor ' and the movements are redirected to the character. But we are not interested.
All obtained data should be checked: the equipment is not perfect, the human factor, etc., besides, it depends on the agreement in which form you will receive the data.
In my case, there is no one to blame, because my duties include filming.
A little confusingly turns out, because here is a simple chain of operation of this scheme:
Shooting Mocap -> Data Processing (Cleaning / Cleaning) -> Data Processing applied to the character already and adjusting to its features.
This is a simplified diagram. We are interested in the second point - Cleaning.
And so, I look at the open data and immediately see several jambs:

Image 4
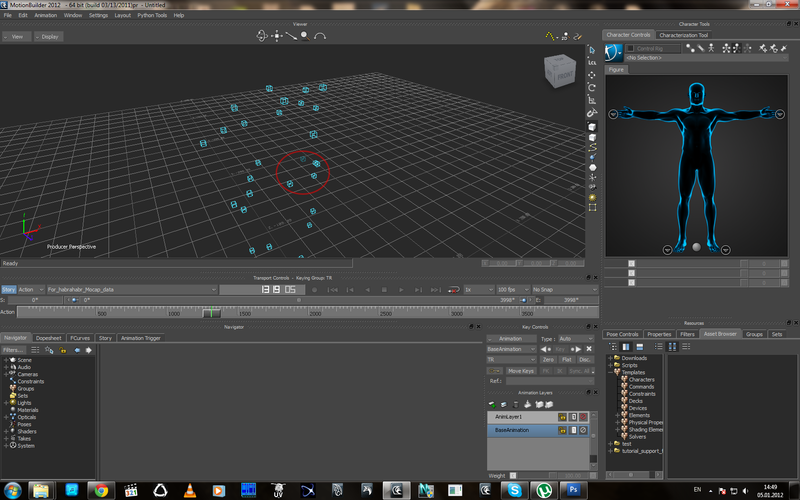
Image 5
Among the cloud of bright points in some segments of the animation points darken. This means that for any reason there is no data on the position of the marker for a given period of time. In principle, this happens often, for example, if the marker attached to the side of the belt is covered with a hand (Picture 5).

Image 6
If you select this point, then in the corresponding window we will see graphs of changes in the coordinates of this point along 3 axes, in places where the gray point will be displayed, but the color of the field will be absent, which means the absence of physical data. In this case, the graph is a restored one of the software algorithms, but at the moment of data loss on Actor at this point there is no position signal. If Actor had been put now, the absence of this point could, in principle, give an uncontrollable pelvic region twist (in one of the animations of the character I have twisted the body for 180, it looks fun, but the joint).
In addition, when viewing the animation in the video, I found that several points “jerk”, this is due to the fact that the system is optical, and the algorithm processing the image can change dynamically used cameras for a given point, which causes displacement. Unfortunately, it is not possible to show this in the video, but such moments are very clearly visible on the animation graphics:
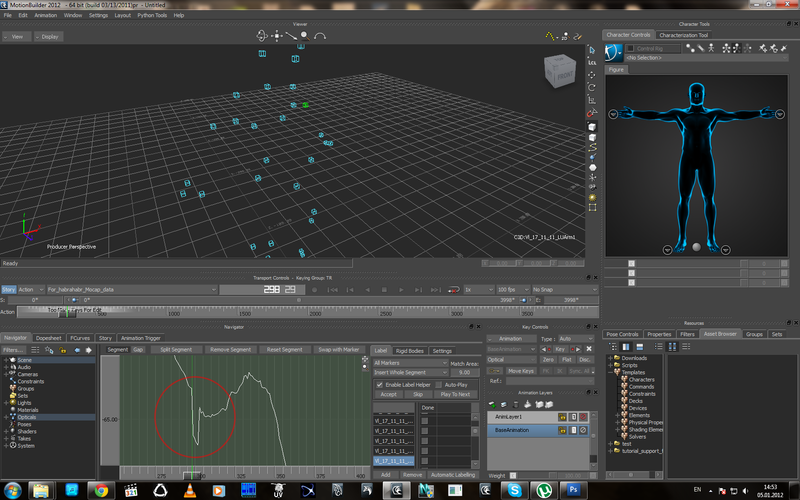
Image 7
In this case, you can see how the so-called "Peak" goes down.
Accordingly, there are two main reasons for the availability of the “Cleaning / Cleaning” item in the process. What we now do.
There are several ways to clean, but we will not dwell on them. I can only say that in mocap software there is usually the opportunity to check all the graphics of the movement of points right after the shooting and, if there are jambs, manually restore, for body movement, in my opinion, this work is better, more convenient and faster in Motionbuilder.
There are moments when the possibilities of Motionbuilder, on the contrary, are less suitable than direct manual cleaning of each frame manually through the Mocap software.
So, we need to clean this animation block.
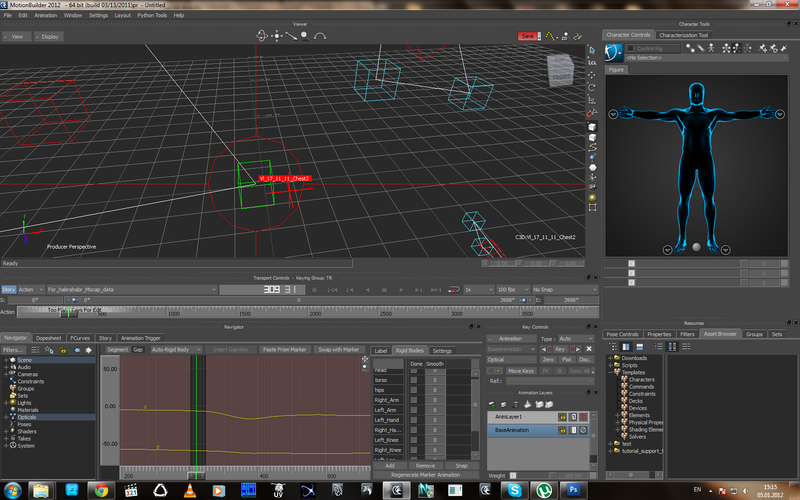
In motionbuilder there is a very useful option - to create “Rigidbodies” - rigid bodies - on the basis of groups of marker points. For example, markers that are responsible for the position and inclination of the head are fixed rigidly, most often it is a hat or a bandage. The markers then move in the same group. Accordingly, this is one of the examples of the RigidBody group that can be created:
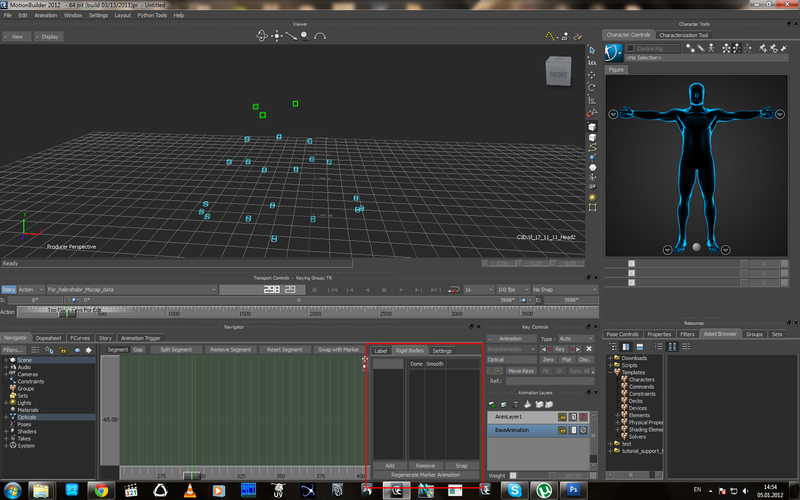
Image 8
At the bottom of the Rigidbodies tab, click Add and see the following picture:
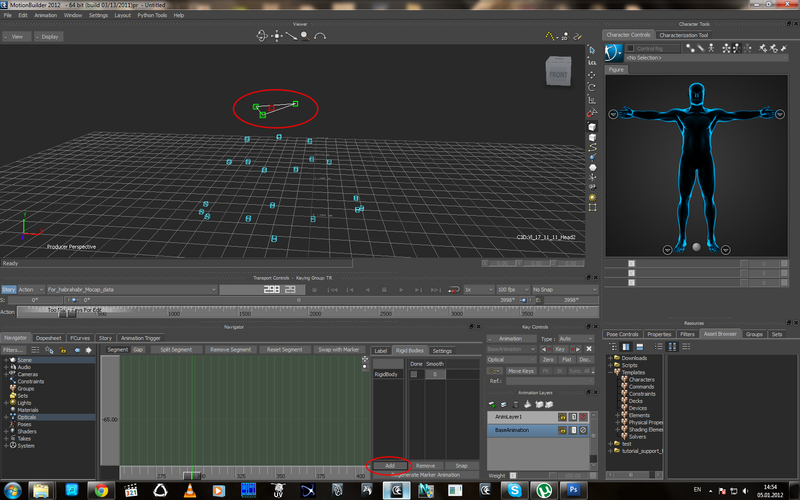
Image 9
Between the selected points formed a geometric figure with links.
Further, by analogy, groups of a point, for example, a back, a basin, the upper part of the arms, and the lower part of the arms, which are not moving relative to each other, should be divided into groups. The main thing - do not connect groups with each other.

Image 10
That's what it looks like with me, with the given scheme of location of marker points. For convenience, you should rename the group according to the position.
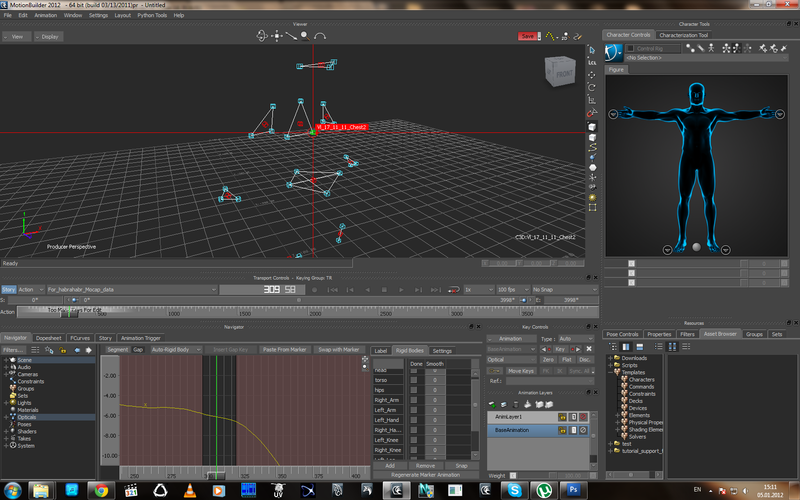
Why is this necessary? These groups will allow us to edit the position of points within the group. For example, the pelvic group, one of the points is missing, the pelvis moves only as a whole, respectively, the point without coordinates should move along with the others, and the Rigid body will “loosen” its position behind the other points based on the change in their position and the position of the “Rigid Body”. In addition, it will align the position of the jerking points:
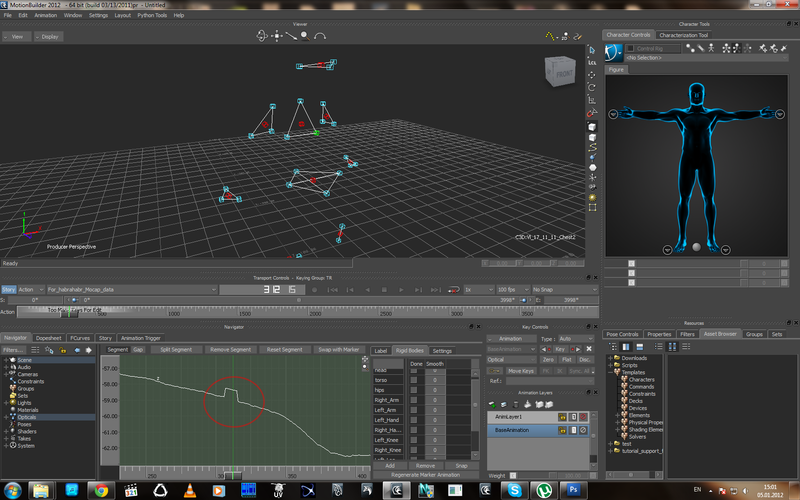
Picture 11

Picture 12
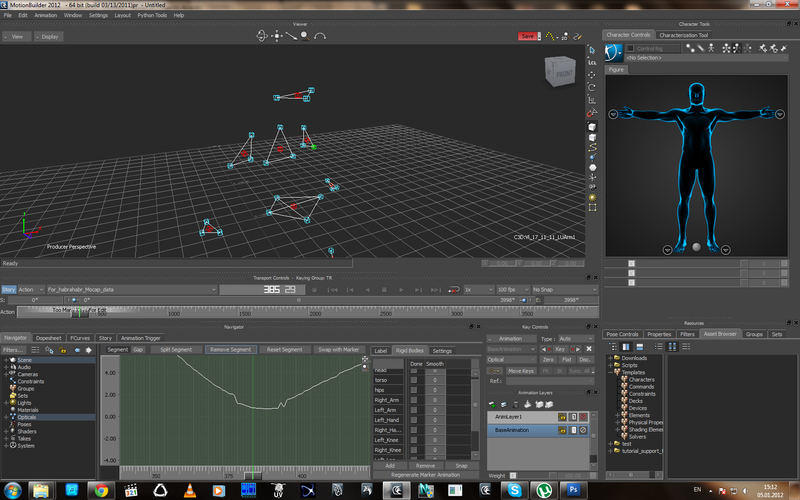
As can be seen from these two graphs - the point is twitching at once along two axes. IMPORTANT! in this time interval, the remaining points of the group do not twitch, move according to the general body movement. In order to align this moment, we will use the possibility of restoring the position of a point depending on the position of the general group and remove this segment:
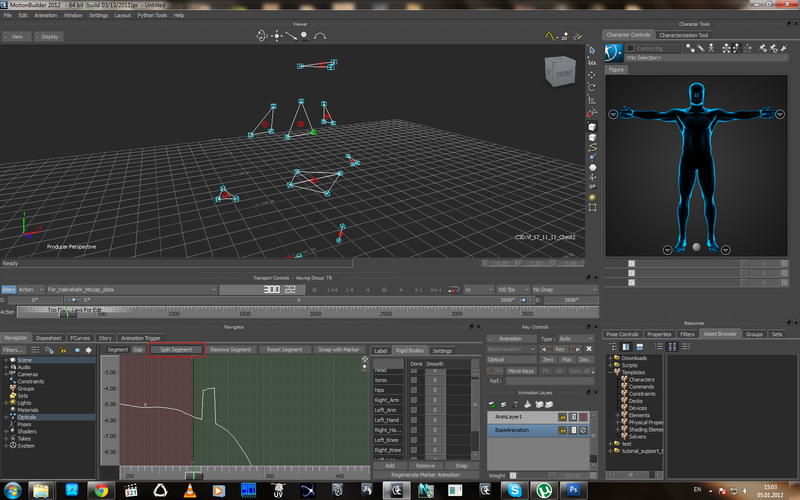
Picture 13

Picture 14
Picture 15
From the image it is clear that Motionbuilder filled the gap with the schedule, and the schedule is not even, but follows the changes in the position of the other points. In addition, a red crosshair appeared on the screen, I will return to it, but a little later.
Further, with the remaining jambs of this kind (wrong offset points) by analogy:
Picture 16
Picture 17
Picture 18
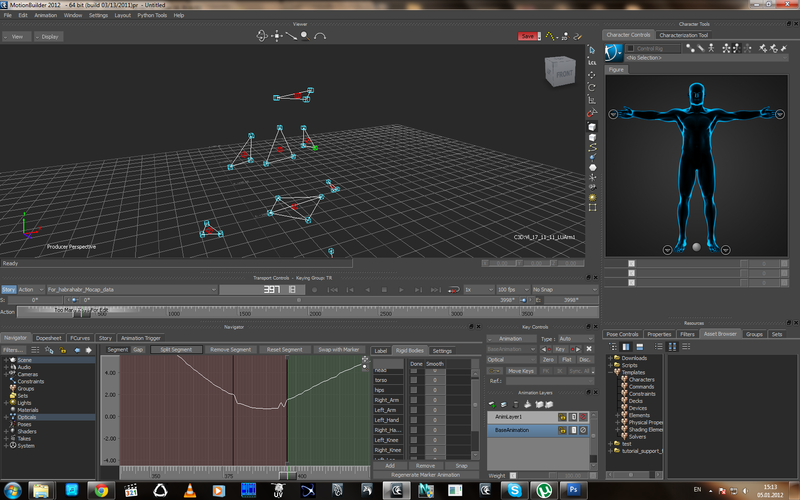
And now, what is this red crosshair?
Picture 19
As can be seen from the image - the crosshair appears at the moment of breaking the chart, when there is a theoretical position of the point (restored), but there is no actual one.
In the center of the cross with a circle - the theoretical position of the point (now highlighted, so that you can see the graph, if not selected, the point is displayed in dark color as having no coordinates), the red actual crosspoint of the short axes indicates the former actual position of the point, and the difference is also visible pregnant.
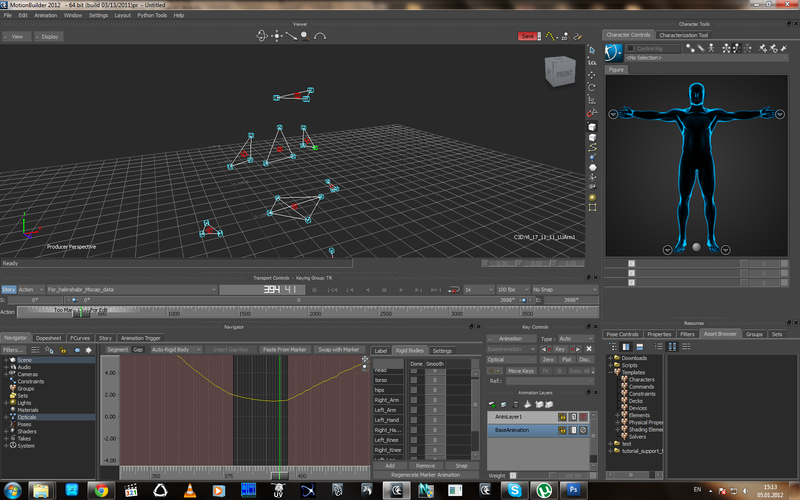
When you are sure that the work on straightening the jambs (cleaning) is finished, we select the points we need and press the Regenerate Marker Animation button below, so all the data obtained through the Rigid Body will be “baked” into the markers. Points can be selected and baked in parts or all at once, depending on the specific situation.
When the coordinates of the points are baked with groups in the frames of the gap will be the following picture:
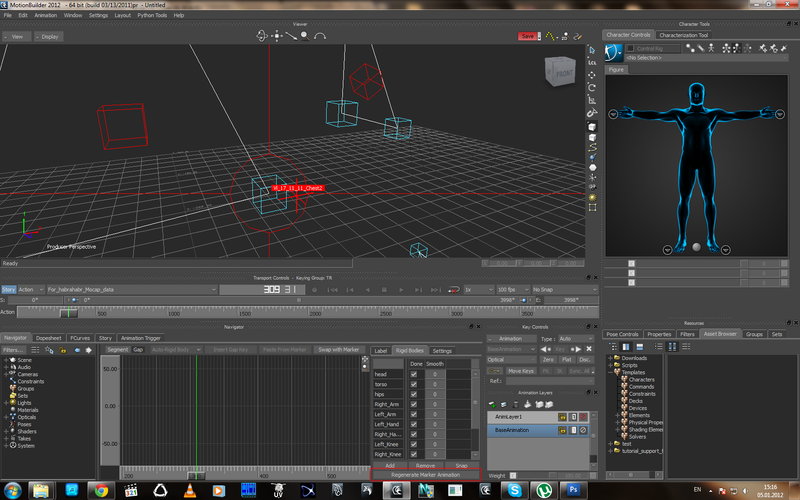
Image 20
Again, displaying the old and new position of the points, but now the point associated with the group already has the actual position and can be used in the Actor animation.
Then you can select points and add additional automatic filters on them, but we should not forget that they work according to certain algorithms and the more filters, the more computer-generated animation, taken from a person, because features of uneven human movements are lost.
I hope this article will be useful to someone.
Ps there are references to this method of editing and cleaning on the Internet, but in passing, I tried to describe the process with some theoretical tabs, so that it was clear what was being done and if there are questions - I will try to answer.
UPD: An example of using the optical system of markers:

Shooting the movements of an elephant. Reflecting light spheres - markers are attached to the subject. At the moment of motion capture, an object with markers must be in the field of view of several cameras. Each camera shoots in the infrared spectrum. Each camera around the lens ring with infrared LEDs. Thus, marker points on her side are highlighted for each camera.
I have been reading Habr for a long time, and all this time it seems to me that the theme of 3D and animation very rarely pleases the workers of this sphere with articles. Often thought to write this, and now the idea took shape. I will tell you how the primary stage of working with Mocap data (Mokap) occurs. Anyone who is interested - welcome under the cat, carefully, a lot of pictures (clickable).
So, you - an employee in the company, are engaged in 3D and animation. By order of the company for your project, they removed the character animation and sent the data to you (Either the company has its own Mokap Studio, which is most likely closer to the work that my post implies).
')
You have a set of animation files, most likely it will be files with the extension C3d, one of the most common standards.
This standard implies the presence in space of point-controllers attached to the body during filming. These points are attached in such a way as to organize immovable systems on the body for further binding to the bones of the character (more precisely, the bones will be attached to the points, and the real estate of the system is “conditional”, since the human body is very flexible and the points are placed on the muscle integument). Accordingly, in such systems there will be some offsets that the software averages, getting what you need.
In my work, I use the Autodesk Motionbuilder package.
Import Motion data.
Image 1
Motionbuilder will ask you what specifically to import from this file.
Image 2
Click on Import and look at the screen:
Image 3
A set of points highlighted in blue will appear in the viewport - these are the coordinates of the marker points. If you search the Internet - you can find a lot of lessons on how to attach markers to a character, if you say simply and quickly - a “doll” is created - Actor, which collects all the movements necessary for assigning to it, taken from the positions of the markers, and then with Actor ' and the movements are redirected to the character. But we are not interested.
All obtained data should be checked: the equipment is not perfect, the human factor, etc., besides, it depends on the agreement in which form you will receive the data.
In my case, there is no one to blame, because my duties include filming.
A little confusingly turns out, because here is a simple chain of operation of this scheme:
Shooting Mocap -> Data Processing (Cleaning / Cleaning) -> Data Processing applied to the character already and adjusting to its features.
This is a simplified diagram. We are interested in the second point - Cleaning.
And so, I look at the open data and immediately see several jambs:
Image 4
Image 5
Among the cloud of bright points in some segments of the animation points darken. This means that for any reason there is no data on the position of the marker for a given period of time. In principle, this happens often, for example, if the marker attached to the side of the belt is covered with a hand (Picture 5).
Image 6
If you select this point, then in the corresponding window we will see graphs of changes in the coordinates of this point along 3 axes, in places where the gray point will be displayed, but the color of the field will be absent, which means the absence of physical data. In this case, the graph is a restored one of the software algorithms, but at the moment of data loss on Actor at this point there is no position signal. If Actor had been put now, the absence of this point could, in principle, give an uncontrollable pelvic region twist (in one of the animations of the character I have twisted the body for 180, it looks fun, but the joint).
In addition, when viewing the animation in the video, I found that several points “jerk”, this is due to the fact that the system is optical, and the algorithm processing the image can change dynamically used cameras for a given point, which causes displacement. Unfortunately, it is not possible to show this in the video, but such moments are very clearly visible on the animation graphics:
Image 7
In this case, you can see how the so-called "Peak" goes down.
Accordingly, there are two main reasons for the availability of the “Cleaning / Cleaning” item in the process. What we now do.
There are several ways to clean, but we will not dwell on them. I can only say that in mocap software there is usually the opportunity to check all the graphics of the movement of points right after the shooting and, if there are jambs, manually restore, for body movement, in my opinion, this work is better, more convenient and faster in Motionbuilder.
There are moments when the possibilities of Motionbuilder, on the contrary, are less suitable than direct manual cleaning of each frame manually through the Mocap software.
So, we need to clean this animation block.
In motionbuilder there is a very useful option - to create “Rigidbodies” - rigid bodies - on the basis of groups of marker points. For example, markers that are responsible for the position and inclination of the head are fixed rigidly, most often it is a hat or a bandage. The markers then move in the same group. Accordingly, this is one of the examples of the RigidBody group that can be created:
Image 8
At the bottom of the Rigidbodies tab, click Add and see the following picture:
Image 9
Between the selected points formed a geometric figure with links.
Further, by analogy, groups of a point, for example, a back, a basin, the upper part of the arms, and the lower part of the arms, which are not moving relative to each other, should be divided into groups. The main thing - do not connect groups with each other.
Image 10
That's what it looks like with me, with the given scheme of location of marker points. For convenience, you should rename the group according to the position.
Why is this necessary? These groups will allow us to edit the position of points within the group. For example, the pelvic group, one of the points is missing, the pelvis moves only as a whole, respectively, the point without coordinates should move along with the others, and the Rigid body will “loosen” its position behind the other points based on the change in their position and the position of the “Rigid Body”. In addition, it will align the position of the jerking points:
Picture 11
Picture 12
As can be seen from these two graphs - the point is twitching at once along two axes. IMPORTANT! in this time interval, the remaining points of the group do not twitch, move according to the general body movement. In order to align this moment, we will use the possibility of restoring the position of a point depending on the position of the general group and remove this segment:
Picture 13
Picture 14
Picture 15
From the image it is clear that Motionbuilder filled the gap with the schedule, and the schedule is not even, but follows the changes in the position of the other points. In addition, a red crosshair appeared on the screen, I will return to it, but a little later.
Further, with the remaining jambs of this kind (wrong offset points) by analogy:
Picture 16
Picture 17
Picture 18
And now, what is this red crosshair?
Picture 19
As can be seen from the image - the crosshair appears at the moment of breaking the chart, when there is a theoretical position of the point (restored), but there is no actual one.
In the center of the cross with a circle - the theoretical position of the point (now highlighted, so that you can see the graph, if not selected, the point is displayed in dark color as having no coordinates), the red actual crosspoint of the short axes indicates the former actual position of the point, and the difference is also visible pregnant.
When you are sure that the work on straightening the jambs (cleaning) is finished, we select the points we need and press the Regenerate Marker Animation button below, so all the data obtained through the Rigid Body will be “baked” into the markers. Points can be selected and baked in parts or all at once, depending on the specific situation.
When the coordinates of the points are baked with groups in the frames of the gap will be the following picture:
Image 20
Again, displaying the old and new position of the points, but now the point associated with the group already has the actual position and can be used in the Actor animation.
Then you can select points and add additional automatic filters on them, but we should not forget that they work according to certain algorithms and the more filters, the more computer-generated animation, taken from a person, because features of uneven human movements are lost.
I hope this article will be useful to someone.
Ps there are references to this method of editing and cleaning on the Internet, but in passing, I tried to describe the process with some theoretical tabs, so that it was clear what was being done and if there are questions - I will try to answer.
UPD: An example of using the optical system of markers:
Shooting the movements of an elephant. Reflecting light spheres - markers are attached to the subject. At the moment of motion capture, an object with markers must be in the field of view of several cameras. Each camera shoots in the infrared spectrum. Each camera around the lens ring with infrared LEDs. Thus, marker points on her side are highlighted for each camera.
Source: https://habr.com/ru/post/135755/
All Articles