Free cloud-based PHP-MySQL hosting for a small site based on Amazon AWS
This instruction does not claim absolute accuracy, any novelty and is intended for taking the very first steps. Therefore, do not judge especially strictly.
Suppose we want to seize a small project somewhere in a safe and not particularly braking place. And since the site is small, we will not bother and we want from the hosting something simplest. PHP, MySQL and FTP access will be enough for our purposes.
To solve this problem, the Web service from Amazon is ideal, which surprisingly combines the ability to withstand heavy loads with a free package of resources for the first year after registration . The free package includes a lot of things, but at the moment we will be interested in:
And if you wish, all this can be registered and prepared for work in half an hour, but you will need a credit card that Amazon will accept (and will withdraw $ 2) and a cell phone on hand (the home one will not work).
Registration procedure usually does not cause questions. The only advice is to enter real or close to real data. Semenov Gorbunkovykh from Gorky Street has not been registered for a long time, and if you incorrectly indicate the index of the city, the system will give a hidden refusal at the code verification stage by telephone.
Before you drive in credit card data, you need to make sure that it allows at least 85p for Mastercard and 75p for Visa to be removed. Depending on the region and type of credit card, we may be asked to confirm your cell phone at the end of the registration process. There are 3 rules here - you need to enter the number without the eight and the country code (10 digits), do not forget to choose the country correctly and begin to enter the code from the keyboard only after the synthesized telephone lady has stopped speaking and is hiding while waiting. If you are not asked to confirm, then Amazon really liked your credit card and they have not yet had problems with users from your address range. But since we are most interested in the EC2 service (for which verification is obligatory), it will be necessary to confirm the 4 digits by phone anyway. After registration, 1 dollar will be removed from the card (and then it will not be returned) and immediately provide access to the S3 file storage service and to the smart management console.
By the way, from the very beginning, all the pictures from this message lay exactly on the S3 service and 5 GB of space on it are also included in the free annual package (but the free limit ran out in less than a day). On S3, you can create a shopping cart ( Create Bucket ), enable the Enabled checkbox on the Website tab and easily organize the file storage. For example, if you call the cart as the word test86 and put the 8585z file in it, then from the browser it will be visible at the addresses test86.s3.amazonaws.com/test85.7z and s3.amazonaws.com/test86/test85.7z . Please note that without changing additional options when downloading, only the owner of this basket can see the files. To open access to view one or several files, select them and select Actions / Make Public in the menu. In addition to S3 , Amazon has a lot of interesting services, but today we will only talk about EC2 .
')
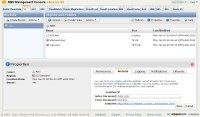
Right from the S3 management page, you can click on the top EC2 tab and agree to add this service to your account. If at the verification stage, the credit cards are not transferred to the phone number verification procedure, then it will be transferred from here and will need to be confirmed. After confirmation, something like this will open.
and one more dollar will be written off the card.
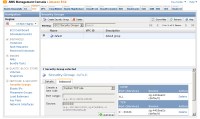
Without losing time, click on the Security Groups link on the left. It is better not to touch the group created by default, but it doesn’t suit us in terms of access rights (all ports take any actions). Therefore we will create our own group with more limited rights.
and call it, for example, web .

After creation we will add some rules in the Inbound tab .

By analogy, let's add for sharing ( Source: 0.0.0.0/0 ), to ports 20-21 , TCP ports 1024-1048 , HTTP and HTTPS . I would be careful not to allow SSH access from any address, so it’s better to enter the Source line : either your static IP or your provider's subnet (something like 211.207.171.0/24 ). The result should be something like
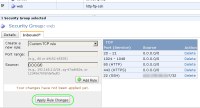
Click on Apply Rule Changes and go to the next step.
The keys are needed for access to the server via SSH and they can be created in the process of deploying the image of the selected OS, but in IE and Chrome there are periodic glitches with the impact of the key file for downloading. Therefore, it is better to do this in advance, and if it does, repeat.
To generate keys, select Key Pairs in the menu and press a couple of buttons.
The server will think a little and give us the key .pem file, which must be carefully hidden in a safe place and not shown to anyone.
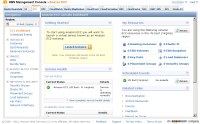
So, we have a key and an additional user group. Now you can safely press Launch Instance from the EC2 Dashboard menu.

We agree on the Classic Wizard .

Our choice is 32-bit or 64-bit Amazon Linux AMI .
Leave all the default settings.

We include protection against deletion.
Tags do not need to drive.

We will use already generated keys.
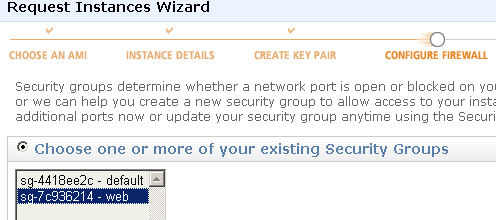
In the firewall configuration, we leave only the Security Group index- web .
Check the installation and run.

After launch, our micro-server will appear in the Instances list.
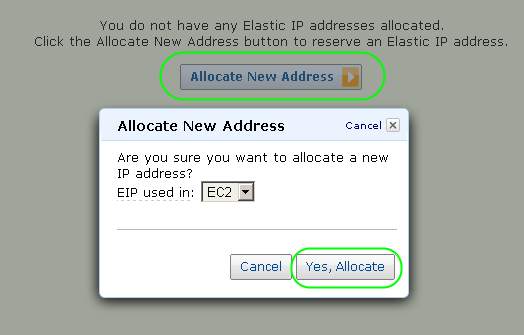
In the Elastic IPs menu, first reserve yourself an IP address.
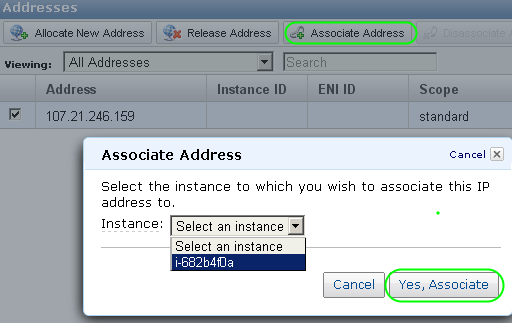
And then we assign it to our running server.
Please note that reserving an IP address not assigned to a running server is not included in the free package. For this you have to pay a cent per hour. As soon as the IP is assigned to the running north, it immediately becomes free.
In our example, Amazon gave the server the address 107.21.246.159 and in the future we will often use it, but in your case in all actions and commands you will need to replace it with the address that you personally issued.
For this purpose, you can use a lot of various programs, but all further instructions are written for Windows and free PuTTY ( direct download link ).
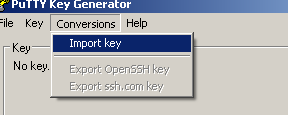
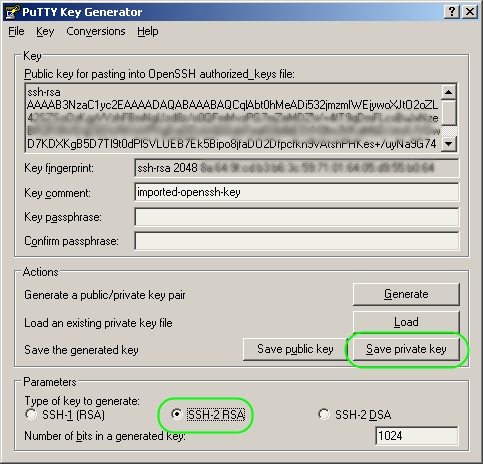
From the archive, we first need puttygen.exe . Run, select Conversions / Import key .
and re-save the private key as an SSH2 RSA .ppk file. At this stage, it does not hurt to properly lock the key.
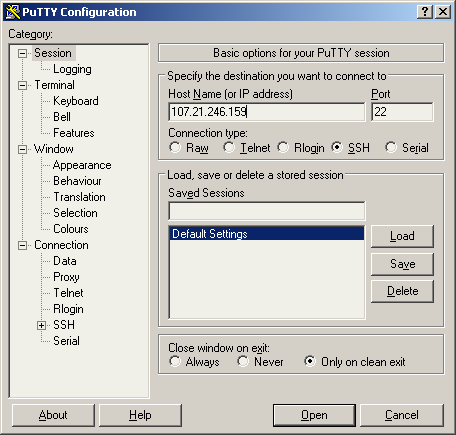
After that, run putty.exe , drive in our IP in the Host Name field.
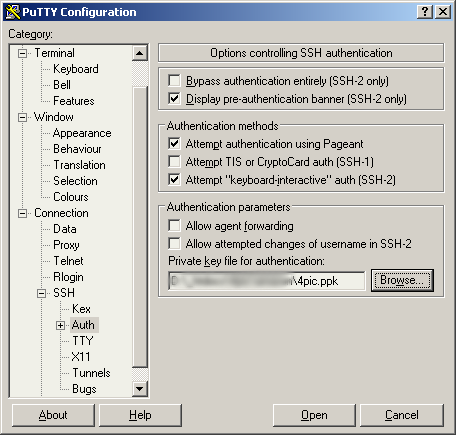
in the section SSH-Auth specify the path to the .ppk key.
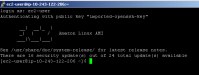
and click the Open button. In the terminal window there should not be any error messages, and in the sentence:
need to enter ec2-user .
Now we will configure via SSH.
During the setup, sometimes you have to press the y button to agree with the suggestions to install everything along with the dependencies. After entering each command, you need to wait until the end of the work and only then enter the next one.
Immediately after entering it would be nice to upgrade. For this we say:
In the system, the Midnight Commander will not interfere with us (there’s a more familiar editor for mouse-cars):
Create a user group virtwww :
Add users:
and set the passwords more complicated:
Just in case, once again we will establish the rights to the directory:
Now our server is fully ready to install services.
Install MySQL:
Add it to autorun:
and run:
After that, set the password to the root user:
do not forget to write something of your own instead of s10ZniYpar00L
We prohibit connecting to the database without a password:
and update the privileges:
Remove the test base:
and exit the MySQL server management console:
Install vSFTPd:
Add it to autorun and try to run it:
Editing configuration:
Change the parameter values:
Add to the end of the file:
Do not forget to enter your IP here
F2 save the changes, exit the editor through F10 and restart the FTP server:
Now you can try to connect to our server via FTP with any client that supports PASV mode.
We use our IP, the user www , the password from step number 8 as the host name. The PASV mode is turned on forcibly. Connect and try to upload any file to the / var / www folder. If it does not work, we say:
and try again.
Something like this is what FlashFXP looks like:

If it was flooded from the very beginning, then it is not necessary to change the rights from 750 to 755 (this is an additional security hole)
and check file permissions. It must be created with the rights 0644 . If everything is the same, then go to step 11.
First we install Apache:
After it php:
Separate regexp line:
and a whole bunch of modules and dependencies for PHP:
Add Apache to autorun and try to run it:
If everything started, adjust the configuration for the Amazon server and webserver user:
We are looking for and correct the following lines in the text.
TraceEnable Off may have to be added.
F2 save the changes, exit the editor through F10 and restart Apache:
Allow file modification via ftp:
Remove the main pest hole in the PHP config:
We look for the magic_quotes_gpc line and set it to the On position:
For compatibility, it does not hurt to include short tags:
F2 save the changes, exit the editor through F10 and restart Apache:
If at any stage the Apache stops running, roll back the changes and see what happened in the logs:
and
After everything has started, we close the terminal:
and return to the management console in the barser.
In principle, this step can be skipped, but this is undesirable. Balancing is included in the free package and I do not see why give up such a useful thing, which can be used to support the liveliness of the site. In this mode, the Load Balancers system periodically simply accesses any URL on the server and draws conclusions from the response time. This logically follows the most common error in the configuration. The default is to ping the index page of the site, and who knows how much it can weigh in an arbitrary case? As a result, with each check, a bit of traffic seems to be spent, but for a month it can drop a whole bucket. Therefore, we will create a special ping.html page for this system and enter a single page without unicode, spaces and line breaks . As a result, exactly 1 byte of traffic will always be spent on checking. This file must be downloaded via ftp to the root of the site before creating the balancer.
The name can be arbitrary, but unique if there are several balancers.

The purpose of the test is ping.html
We will check our already running server


Hooray and all! You can open our IP address in the browser, upload PHP scripts via FTP and chat with MySQL. Example:
Do not forget to periodically monitor the costs of resources in the account management section and try not to miss the moment when your free hosting suddenly becomes paid. If you exceed the limits of any of the free services, it does not stop, but becomes paid.
Rates for exceeding free rates for S3 and EC2
Instead of a conclusion: Do not think that all the described manipulations are optimal and provide at least some level of security. The server in this form is suitable only for testing and hosting home pages with a dozen visitors per month. It is possible to bring all this to mind and it is not even difficult for a literate person. The ambush is that it’s not the day or the year that becomes literate, and in general in one person the writer on the common php and the expert in setting up servers are rarely combined. Therefore, before you let go of all this disgrace in free floating, ask for a couple of bottles of brandy, some familiar bearded Unixoid to connect to your server via SSH. He will lose his temper, dig for about 10 minutes, repeatedly call the writer of this text a ram (and he will be right), but after that everything will work differently and better.
Upd You can read more about Amazon AWS here:
habrahabr.ru/blogs/infosecurity/107631
habrahabr.ru/blogs/hosting/62362
habrahabr.ru/blogs/hosting/55058
And about Ubuntu in English
alestic.com
And also probably transfer the topic to the hosting.
Combat mission.
Suppose we want to seize a small project somewhere in a safe and not particularly braking place. And since the site is small, we will not bother and we want from the hosting something simplest. PHP, MySQL and FTP access will be enough for our purposes.
To solve this problem, the Web service from Amazon is ideal, which surprisingly combines the ability to withstand heavy loads with a free package of resources for the first year after registration . The free package includes a lot of things, but at the moment we will be interested in:
- Linux based virtual server with SSH access.
- 30GB of space in Elastic Block Storage plus 1GB for backups.
- 15 GB of traffic per month.
- Dedicated external IP address.
And if you wish, all this can be registered and prepared for work in half an hour, but you will need a credit card that Amazon will accept (and will withdraw $ 2) and a cell phone on hand (the home one will not work).
Step 1: Register on Amazon.
Registration procedure usually does not cause questions. The only advice is to enter real or close to real data. Semenov Gorbunkovykh from Gorky Street has not been registered for a long time, and if you incorrectly indicate the index of the city, the system will give a hidden refusal at the code verification stage by telephone.
Before you drive in credit card data, you need to make sure that it allows at least 85p for Mastercard and 75p for Visa to be removed. Depending on the region and type of credit card, we may be asked to confirm your cell phone at the end of the registration process. There are 3 rules here - you need to enter the number without the eight and the country code (10 digits), do not forget to choose the country correctly and begin to enter the code from the keyboard only after the synthesized telephone lady has stopped speaking and is hiding while waiting. If you are not asked to confirm, then Amazon really liked your credit card and they have not yet had problems with users from your address range. But since we are most interested in the EC2 service (for which verification is obligatory), it will be necessary to confirm the 4 digits by phone anyway. After registration, 1 dollar will be removed from the card (and then it will not be returned) and immediately provide access to the S3 file storage service and to the smart management console.
By the way, from the very beginning, all the pictures from this message lay exactly on the S3 service and 5 GB of space on it are also included in the free annual package (but the free limit ran out in less than a day). On S3, you can create a shopping cart ( Create Bucket ), enable the Enabled checkbox on the Website tab and easily organize the file storage. For example, if you call the cart as the word test86 and put the 8585z file in it, then from the browser it will be visible at the addresses test86.s3.amazonaws.com/test85.7z and s3.amazonaws.com/test86/test85.7z . Please note that without changing additional options when downloading, only the owner of this basket can see the files. To open access to view one or several files, select them and select Actions / Make Public in the menu. In addition to S3 , Amazon has a lot of interesting services, but today we will only talk about EC2 .
')
Step 2: Preparing to create an EC2 server.
Right from the S3 management page, you can click on the top EC2 tab and agree to add this service to your account. If at the verification stage, the credit cards are not transferred to the phone number verification procedure, then it will be transferred from here and will need to be confirmed. After confirmation, something like this will open.
and one more dollar will be written off the card.
Step 3: Add a custom group.
Without losing time, click on the Security Groups link on the left. It is better not to touch the group created by default, but it doesn’t suit us in terms of access rights (all ports take any actions). Therefore we will create our own group with more limited rights.
and call it, for example, web .
After creation we will add some rules in the Inbound tab .
By analogy, let's add for sharing ( Source: 0.0.0.0/0 ), to ports 20-21 , TCP ports 1024-1048 , HTTP and HTTPS . I would be careful not to allow SSH access from any address, so it’s better to enter the Source line : either your static IP or your provider's subnet (something like 211.207.171.0/24 ). The result should be something like
Click on Apply Rule Changes and go to the next step.
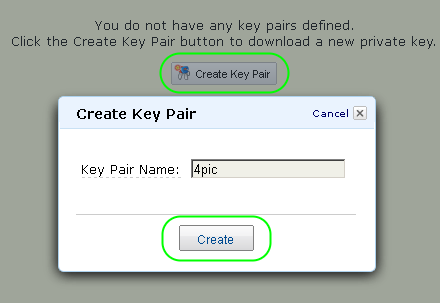
Step 4: Create SSH keys.
The keys are needed for access to the server via SSH and they can be created in the process of deploying the image of the selected OS, but in IE and Chrome there are periodic glitches with the impact of the key file for downloading. Therefore, it is better to do this in advance, and if it does, repeat.
To generate keys, select Key Pairs in the menu and press a couple of buttons.
The server will think a little and give us the key .pem file, which must be carefully hidden in a safe place and not shown to anyone.
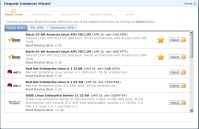
Step 5: Deploy the operating system image.
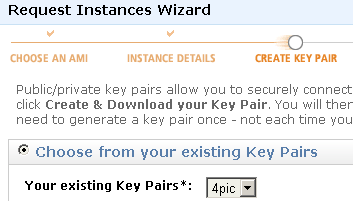
So, we have a key and an additional user group. Now you can safely press Launch Instance from the EC2 Dashboard menu.
We agree on the Classic Wizard .
Our choice is 32-bit or 64-bit Amazon Linux AMI .
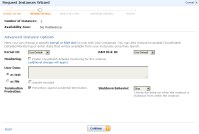
Leave all the default settings.
We include protection against deletion.
Tags do not need to drive.
We will use already generated keys.
In the firewall configuration, we leave only the Security Group index- web .
Check the installation and run.
After launch, our micro-server will appear in the Instances list.
Step 6: Register the IP address for the server.
In the Elastic IPs menu, first reserve yourself an IP address.
And then we assign it to our running server.
Please note that reserving an IP address not assigned to a running server is not included in the free package. For this you have to pay a cent per hour. As soon as the IP is assigned to the running north, it immediately becomes free.
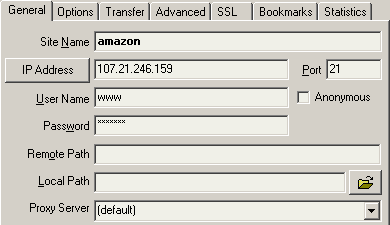
In our example, Amazon gave the server the address 107.21.246.159 and in the future we will often use it, but in your case in all actions and commands you will need to replace it with the address that you personally issued.
Step 7: Connect to the server via SSH.
For this purpose, you can use a lot of various programs, but all further instructions are written for Windows and free PuTTY ( direct download link ).
From the archive, we first need puttygen.exe . Run, select Conversions / Import key .
and re-save the private key as an SSH2 RSA .ppk file. At this stage, it does not hurt to properly lock the key.
After that, run putty.exe , drive in our IP in the Host Name field.
in the section SSH-Auth specify the path to the .ppk key.
and click the Open button. In the terminal window there should not be any error messages, and in the sentence:
login as: need to enter ec2-user .
Now we will configure via SSH.
During the setup, sometimes you have to press the y button to agree with the suggestions to install everything along with the dependencies. After entering each command, you need to wait until the end of the work and only then enter the next one.
Step 8: Update and prepare for server configuration.
Immediately after entering it would be nice to upgrade. For this we say:
sudo yum -y update In the system, the Midnight Commander will not interfere with us (there’s a more familiar editor for mouse-cars):
sudo yum install mc Create a user group virtwww :
sudo groupadd virtwww Add users:
sudo useradd www -g virtwww -d /var/www sudo useradd webserver -g virtwww and set the passwords more complicated:
sudo passwd www sudo passwd webserver Just in case, once again we will establish the rights to the directory:
sudo chown www:virtwww /var/www sudo chmod 0750 /var/www Now our server is fully ready to install services.
Step 9: Install MySQL.
Install MySQL:
sudo yum install mysql-server mysql Add it to autorun:
sudo /sbin/chkconfig --levels 235 mysqld on and run:
sudo service mysqld start After that, set the password to the root user:
mysql -u root USE mysql do not forget to write something of your own instead of s10ZniYpar00L
SET PASSWORD FOR 'root'@'localhost' = PASSWORD('s10ZniYpar00L'); We prohibit connecting to the database without a password:
DELETE FROM user WHERE password = ''; DELETE FROM user WHERE user.user= ''; and update the privileges:
FLUSH PRIVILEGES; Remove the test base:
DROP DATABASE test; and exit the MySQL server management console:
\q Step 10: Configure FTP.
Install vSFTPd:
sudo yum install vsftpd Add it to autorun and try to run it:
sudo /sbin/chkconfig --levels 235 vsftpd on sudo service vsftpd start Editing configuration:
sudo mcedit /etc/vsftpd/vsftpd.conf Change the parameter values:
anonymous_enable=NO local_enable=YES write_enable=YES Add to the end of the file:
pasv_enable=YES pasv_min_port=1024 pasv_max_port=1048 pasv_address=107.21.246.159 Do not forget to enter your IP here
F2 save the changes, exit the editor through F10 and restart the FTP server:
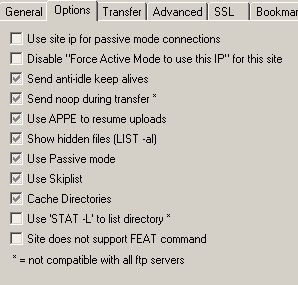
sudo service vsftpd restart Now you can try to connect to our server via FTP with any client that supports PASV mode.
We use our IP, the user www , the password from step number 8 as the host name. The PASV mode is turned on forcibly. Connect and try to upload any file to the / var / www folder. If it does not work, we say:
sudo chmod 0755 /var/www and try again.
Something like this is what FlashFXP looks like:
If it was flooded from the very beginning, then it is not necessary to change the rights from 750 to 755 (this is an additional security hole)
and check file permissions. It must be created with the rights 0644 . If everything is the same, then go to step 11.
Step 11: Install Apache and PHP.
First we install Apache:
sudo yum install httpd mod_ssl After it php:
sudo yum install php Separate regexp line:
sudo yum install pcre-devel and a whole bunch of modules and dependencies for PHP:
sudo yum -y install aspell aspell-en aspell-ru cvs php-gd php-intl php-mbstring php-mysql php-pdo php-soap php-xml php-xmlrpc php-pspell php-devel php-pear Add Apache to autorun and try to run it:
sudo /sbin/chkconfig --levels 235 httpd on sudo service httpd start If everything started, adjust the configuration for the Amazon server and webserver user:
sudo mcedit /etc/httpd/conf/httpd.conf We are looking for and correct the following lines in the text.
ServerTokens Prod TraceEnable Off KeepAlive On MaxKeepAliveRequests 256 KeepAliveTimeout 10 User webserver Group virtwww TraceEnable Off may have to be added.
F2 save the changes, exit the editor through F10 and restart Apache:
sudo service httpd restart Allow file modification via ftp:
sudo chown www:virtwww /var/www/html /var/www/icons /var/www/error /var/www/cgi-bin Remove the main pest hole in the PHP config:
sudo mcedit /etc/php.ini We look for the magic_quotes_gpc line and set it to the On position:
magic_quotes_gpc = On For compatibility, it does not hurt to include short tags:
short_open_tag = On F2 save the changes, exit the editor through F10 and restart Apache:
sudo service httpd restart If at any stage the Apache stops running, roll back the changes and see what happened in the logs:
sudo mcview /var/log/httpd/error_log and
sudo mcview /var/log/httpd/access_log After everything has started, we close the terminal:
exit and return to the management console in the barser.
Step 12: Enable Load Balancers .
In principle, this step can be skipped, but this is undesirable. Balancing is included in the free package and I do not see why give up such a useful thing, which can be used to support the liveliness of the site. In this mode, the Load Balancers system periodically simply accesses any URL on the server and draws conclusions from the response time. This logically follows the most common error in the configuration. The default is to ping the index page of the site, and who knows how much it can weigh in an arbitrary case? As a result, with each check, a bit of traffic seems to be spent, but for a month it can drop a whole bucket. Therefore, we will create a special ping.html page for this system and enter a single page without unicode, spaces and line breaks . As a result, exactly 1 byte of traffic will always be spent on checking. This file must be downloaded via ftp to the root of the site before creating the balancer.
The name can be arbitrary, but unique if there are several balancers.
The purpose of the test is ping.html
We will check our already running server
Hooray and all! You can open our IP address in the browser, upload PHP scripts via FTP and chat with MySQL. Example:
Do not forget to periodically monitor the costs of resources in the account management section and try not to miss the moment when your free hosting suddenly becomes paid. If you exceed the limits of any of the free services, it does not stop, but becomes paid.
Rates for exceeding free rates for S3 and EC2
Instead of a conclusion: Do not think that all the described manipulations are optimal and provide at least some level of security. The server in this form is suitable only for testing and hosting home pages with a dozen visitors per month. It is possible to bring all this to mind and it is not even difficult for a literate person. The ambush is that it’s not the day or the year that becomes literate, and in general in one person the writer on the common php and the expert in setting up servers are rarely combined. Therefore, before you let go of all this disgrace in free floating, ask for a couple of bottles of brandy, some familiar bearded Unixoid to connect to your server via SSH. He will lose his temper, dig for about 10 minutes, repeatedly call the writer of this text a ram (and he will be right), but after that everything will work differently and better.
Upd You can read more about Amazon AWS here:
habrahabr.ru/blogs/infosecurity/107631
habrahabr.ru/blogs/hosting/62362
habrahabr.ru/blogs/hosting/55058
And about Ubuntu in English
alestic.com
And also probably transfer the topic to the hosting.
Source: https://habr.com/ru/post/135713/
All Articles