Create apps for Windows Phone using Silverlight + XNA
The other day I saw this post with a list of materials for developing for Windows Phone, and, unfortunately, I did not meet there a single article on developing applications using both Silverlight and XNA at the same time. This great opportunity for developers came with the advent of Mango.
I wanted to fill this gap and tell you about the following:
The example from this article may be familiar to visitors of the first flow of the evening school of Stas Pavlov .
Let's first see what Silverlight and XNA gives us in one application.
First of all, the following possibilities have appeared for game developers:
And it is worth noting that not all pages should combine in themselves and Silverlight and XNA. I also want to draw attention to the fact that this feature is useful not only for game developers. For example, XNA has excellent built-in gesture support and very convenient texture methods. An example of a great non-game application using Silverlight and XNA - Holiday Photo .
As an example, I chose a very famous math game, Life, which was repeatedly written on Habré ( 1 , 2 , 3 and many others). In short, the game is a “zero-player game” , which means that the player sets only the initial state. Further, the state of each cell in each generation is calculated based on the states of the eight cells surrounding it according to fairly simple rules.
I just want to make a reservation that I use the simplest algorithm using 2 arrays, but this is not a post about algorithms and data structures. So the implementation of the optimal and fast algorithm will be one of your homework.
When creating a new project, you must select "Windows Phone Silverlight and XNA Application" . A new project will be created with 2 pages MainPage and GamePage .
')
MainPage is a usual Silverlight application page, on which the “Change to game page” button is located, when clicked, the GamePage page opens accordingly .
GamePage is our XNA page. If you look at the content of its xaml file, then instead of marking the page there will be just one line:
Thus, when we want to add controls to this page, we will need to replace this comment with our code, let's do it by placing the Start button.
Let's now launch our project, press the " Change to game page " button and see only the blue screen, our button is nowhere to be found. But there is nothing terrible in it, now we will fix it.
Open the GamePage.xaml.cs file, which contains all the logic of our XNA application. To display Silverlight elements, we need to create a special UIElementRenderer object:
Now in the drawing cycle, we need to render and draw the interface:
As you can see, we created a uiRenderer object, but never initialized it. There are several points of view on how to do this better. I prefer to catch updates of our interface and check for the presence of the renderer, and in its absence or inconsistency - create anew:
GamePage.xaml
GamePage.xaml.cs
Now run our project again. As you can see, our button now appears in the right place. Let's now draw the playing field.
Let's agree that our field will be 100x100 cells, each cell 30x30 pixels. Total our field will be 3000x3000 pixels.
Create a class Area:
In XNA, there is no way to draw a line, but you can draw a rectangle filled with any color or texture. Here we create 100 horizontal and 100 vertical lines filled with a point texture containing a black point 1x1 in size.
Now let's create and initialize our field in GamePage.xaml.cs:
When sharing XNA and Silverlight, there is no need to use a separate method for loading content, as it was in a pure XNA application (LoadContent). In general, you can download game content whenever you want, but you must make sure that the application is in XNA rendering mode (by calling the SetSharingMode method) while loading the graphic content. If you try to load graphic content during Silverlight rendering, it will cause an exception. You can upload non-graphic content any time you have ContentManager created. I usually load content in the OnNavigatedTo method:
Now we will draw our field in the OnDraw method:
As you can see, I draw the field in a separate spriteBatch. Why is this so - I will tell you a little later.
Let's launch our application: now we can admire our field with a button.
Make a small cosmetic change: add a semi-transparent substrate under the button and make the field white.
GamePage.xaml:
GamePage.xaml.cs:
The XNA Framework supports 10 different gestures, the story about them deserves a separate article (which, if you wish, I will write). In our application, we will use 2 types of gestures: Tap (click) and FreeDrag (free movement).
Let's start by adding points to our field. I do not want to give the full code of the Dots class here, you can download the example at the bottom of the article and see it yourself. We will now be interested only in the AddDot method, which is used to add points:
In this method we transfer the coordinates of the touch point, and on its basis we calculate the desired cell in the matrix. It's simple.
First, we need to enable gesture support in the OnNavigatedTo () method:
Now you can track them in the OnUpdate loop:
Do not forget to display our live cells on the screen in the OnDraw () method:
If you start the application now and try to add a point, it will instantly disappear. The reason for this is the update rate. You need to implement some delay to call dots.Update (). My example is the simplest implementation of this delay:
Where IsGameStarted is a flag that changes value when you click the Start button. The second homework is to implement the delay using the GameTime class.
Now we have a fully functional game, but we see only a small part of the field. Let's fix this by adding the ability to navigate the field.
In the simplest approximation, the camera is a certain matrix with the help of which we project our game world onto the screen as an image. The Matrix class has many corresponding methods, for example, CreateScale (), CreateTranslation (), CreateRotationX (). Just CreateTranslation () and we need. First, we find out how much we need to move our game world and create a matrix:
Then you need to draw a new projection. To do this, you need to transfer our matrix to spriteBatch:
That is why we needed the second spriteBatch: if we were to draw everything in one, our button would also move with the field, which we do not need. Homework - see what happens if you place the drawing of the game and the interface in one spriteBatch.
One problem remains - we do not take into account the shift of our camera when adding points. This is solved simply, the totalShift must also be passed to the AddDot () method:
Now points will be added in the places we need. Homework: when you try to add a living cell outside the field, it will still be the wrong reaction: either adding to the mirror point, or going beyond the bounds of the array. Make it so that you can not go beyond the field.
Cheshire Cat
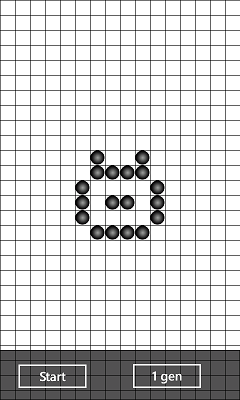
Actually, that's all. You have quite a workable game Life for Windows Phone and homework, on which you can smash your head for a couple of hours. You can also make various buns, such as the counter of generations, random filling and much more. You can find my final version in the Marketplace called SilverLife .
Download the source code of the application .
Have a good New Year holidays!
I wanted to fill this gap and tell you about the following:
- Using Silverlight and XNA on the same page
- Simplest gesture processing in XNA
- Camera basics in XNA
The example from this article may be familiar to visitors of the first flow of the evening school of Stas Pavlov .
Let's first see what Silverlight and XNA gives us in one application.
What does this give to the developer?
First of all, the following possibilities have appeared for game developers:
- Fast UI creation using Silverlight controls
- Easy navigation between pages using the Navigation Service
- Using WebClient to integrate various social services
- Creating an Interface in Expression Blend
And it is worth noting that not all pages should combine in themselves and Silverlight and XNA. I also want to draw attention to the fact that this feature is useful not only for game developers. For example, XNA has excellent built-in gesture support and very convenient texture methods. An example of a great non-game application using Silverlight and XNA - Holiday Photo .
Howto: Development of the first application on Silverlight + XNA
As an example, I chose a very famous math game, Life, which was repeatedly written on Habré ( 1 , 2 , 3 and many others). In short, the game is a “zero-player game” , which means that the player sets only the initial state. Further, the state of each cell in each generation is calculated based on the states of the eight cells surrounding it according to fairly simple rules.
I just want to make a reservation that I use the simplest algorithm using 2 arrays, but this is not a post about algorithms and data structures. So the implementation of the optimal and fast algorithm will be one of your homework.
Step 1. Creating a project and rendering the interface
When creating a new project, you must select "Windows Phone Silverlight and XNA Application" . A new project will be created with 2 pages MainPage and GamePage .
')
MainPage is a usual Silverlight application page, on which the “Change to game page” button is located, when clicked, the GamePage page opens accordingly .
GamePage is our XNA page. If you look at the content of its xaml file, then instead of marking the page there will be just one line:
<!--No XAML content is required as the page is rendered entirely with the XNA Framework--> Thus, when we want to add controls to this page, we will need to replace this comment with our code, let's do it by placing the Start button.
<Grid Name="Layout" LayoutUpdated="Layout_LayoutUpdated"> <Button Content="Start" Height="71" Name="button1" Width="160" Margin="25,717,295,12" Click="button1_Click" /> </Grid> Let's now launch our project, press the " Change to game page " button and see only the blue screen, our button is nowhere to be found. But there is nothing terrible in it, now we will fix it.
Open the GamePage.xaml.cs file, which contains all the logic of our XNA application. To display Silverlight elements, we need to create a special UIElementRenderer object:
UIElementRenderer uiRenderer; Now in the drawing cycle, we need to render and draw the interface:
private void OnDraw(object sender, GameTimerEventArgs e) { SharedGraphicsDeviceManager.Current.GraphicsDevice.Clear(Color.White); uiRenderer.Render(); spriteBatch.Begin(); spriteBatch.Draw(uiRenderer.Texture, Vector2.Zero, Color.White); spriteBatch.End(); // TODO: Add your drawing code here } As you can see, we created a uiRenderer object, but never initialized it. There are several points of view on how to do this better. I prefer to catch updates of our interface and check for the presence of the renderer, and in its absence or inconsistency - create anew:
GamePage.xaml
<Grid Name="Layout" LayoutUpdated="Layout_LayoutUpdated"> GamePage.xaml.cs
private void Layout_LayoutUpdated(object sender, EventArgs e) { int width = (int)ActualWidth; int height = (int)ActualHeight; // Ensure the page size is valid if (width <= 0 || height <= 0) return; // Do we already have a UIElementRenderer of the correct size? if (uiRenderer != null && uiRenderer.Texture != null && uiRenderer.Texture.Width == width && uiRenderer.Texture.Height == height) { return; } // Before constructing a new UIElementRenderer, be sure to Dispose the old one if (uiRenderer != null) uiRenderer.Dispose(); // Create the renderer uiRenderer = new UIElementRenderer(this, width, height); } Now run our project again. As you can see, our button now appears in the right place. Let's now draw the playing field.
2. Conclusion of XNA
Let's agree that our field will be 100x100 cells, each cell 30x30 pixels. Total our field will be 3000x3000 pixels.
Create a class Area:
public class Area { Texture2D point; Rectangle line; public Area(Texture2D point) { this.point = point; } public void Draw(SpriteBatch spriteBatch) { for (int i = 0; i < 100; i++) { line = new Rectangle(i*30, 0, 1, 3000); spriteBatch.Draw(point, line, Color.White); line = new Rectangle( 0, i*30, 3000, 1); spriteBatch.Draw(point, line, Color.White); } } } In XNA, there is no way to draw a line, but you can draw a rectangle filled with any color or texture. Here we create 100 horizontal and 100 vertical lines filled with a point texture containing a black point 1x1 in size.
Now let's create and initialize our field in GamePage.xaml.cs:
Texture2D point; Area area; When sharing XNA and Silverlight, there is no need to use a separate method for loading content, as it was in a pure XNA application (LoadContent). In general, you can download game content whenever you want, but you must make sure that the application is in XNA rendering mode (by calling the SetSharingMode method) while loading the graphic content. If you try to load graphic content during Silverlight rendering, it will cause an exception. You can upload non-graphic content any time you have ContentManager created. I usually load content in the OnNavigatedTo method:
protected override void OnNavigatedTo(NavigationEventArgs e) { // Set the sharing mode of the graphics device to turn on XNA rendering SharedGraphicsDeviceManager.Current.GraphicsDevice.SetSharingMode(true); // Create a new SpriteBatch, which can be used to draw textures. spriteBatch = new SpriteBatch(SharedGraphicsDeviceManager.Current.GraphicsDevice); // TODO: use this.content to load your game content here point = contentManager.Load<Texture2D>("point"); area = new Area(point); // Start the timer timer.Start(); base.OnNavigatedTo(e); } Now we will draw our field in the OnDraw method:
private void OnDraw(object sender, GameTimerEventArgs e) { SharedGraphicsDeviceManager.Current.GraphicsDevice.Clear(Color.CornflowerBlue); uiRenderer.Render(); spriteBatch.Begin(); area.Draw(spriteBatch) spriteBatch.End(); spriteBatch.Begin(); spriteBatch.Draw(uiRenderer.Texture, Vector2.Zero, Color.White); spriteBatch.End(); // TODO: Add your drawing code here } As you can see, I draw the field in a separate spriteBatch. Why is this so - I will tell you a little later.
Let's launch our application: now we can admire our field with a button.
Make a small cosmetic change: add a semi-transparent substrate under the button and make the field white.
GamePage.xaml:
<Grid Name="Layout" LayoutUpdated="Layout_LayoutUpdated"> <Rectangle Height="100" HorizontalAlignment="Left" Margin="0,700,0,0" Name="rectangle1" Stroke="Black" StrokeThickness="1" VerticalAlignment="Top" Width="480" Fill="#B1000000" /> <Button Content="Start" Height="71" Name="button1" Width="160" Margin="25,717,295,12" Click="button1_Click" /> <Button Content="1 gen" Height="72" HorizontalAlignment="Left" Margin="254,716,0,0" Name="button2" VerticalAlignment="Top" Width="160" Click="button2_Click" /> </Grid> GamePage.xaml.cs:
private void OnDraw(object sender, GameTimerEventArgs e) { SharedGraphicsDeviceManager.Current.GraphicsDevice.Clear(Color.White); uiRenderer.Render(); ... 3. Work with gestures
The XNA Framework supports 10 different gestures, the story about them deserves a separate article (which, if you wish, I will write). In our application, we will use 2 types of gestures: Tap (click) and FreeDrag (free movement).
Let's start by adding points to our field. I do not want to give the full code of the Dots class here, you can download the example at the bottom of the article and see it yourself. We will now be interested only in the AddDot method, which is used to add points:
public void AddDot(int x, int y, Vector2 shift) { DotX = (int)(x / DotSize ); DotY = (int)(y / DotSize ); DotsNow[DotX, DotY] = !DotsNow[DotX, DotY]; } In this method we transfer the coordinates of the touch point, and on its basis we calculate the desired cell in the matrix. It's simple.
First, we need to enable gesture support in the OnNavigatedTo () method:
TouchPanel.EnabledGestures = GestureType.Tap | GestureType.FreeDrag; Now you can track them in the OnUpdate loop:
private void OnUpdate(object sender, GameTimerEventArgs e) { while (TouchPanel.IsGestureAvailable) { GestureSample gesture = TouchPanel.ReadGesture(); if (gesture.GestureType == GestureType.Tap) { dots.AddDot((int)gesture.Position.X, (int)gesture.Position.Y); } } } Do not forget to display our live cells on the screen in the OnDraw () method:
dots.Draw(spriteBatch); If you start the application now and try to add a point, it will instantly disappear. The reason for this is the update rate. You need to implement some delay to call dots.Update (). My example is the simplest implementation of this delay:
i++; if (IsGameStarted && Math.IEEERemainder(i, 15) == 0) { i = 0; dots.Update(); } Where IsGameStarted is a flag that changes value when you click the Start button. The second homework is to implement the delay using the GameTime class.
Now we have a fully functional game, but we see only a small part of the field. Let's fix this by adding the ability to navigate the field.
4. Work with the camera
In the simplest approximation, the camera is a certain matrix with the help of which we project our game world onto the screen as an image. The Matrix class has many corresponding methods, for example, CreateScale (), CreateTranslation (), CreateRotationX (). Just CreateTranslation () and we need. First, we find out how much we need to move our game world and create a matrix:
while (TouchPanel.IsGestureAvailable) { GestureSample gesture = TouchPanel.ReadGesture(); if (gesture.GestureType == GestureType.Tap) { dots.AddDot((int)gesture.Position.X, (int)gesture.Position.Y, totalShift); } if (gesture.GestureType == GestureType.FreeDrag) { shift = gesture.Delta; totalShift += shift; } } matrix *= Matrix.CreateTranslation(totalShift.X, totalShift.Y, 0); Then you need to draw a new projection. To do this, you need to transfer our matrix to spriteBatch:
spriteBatch.Begin(SpriteSortMode.Deferred, null, null, null, null, null, matrix); area.Draw(spriteBatch); dots.Draw(spriteBatch); spriteBatch.End(); That is why we needed the second spriteBatch: if we were to draw everything in one, our button would also move with the field, which we do not need. Homework - see what happens if you place the drawing of the game and the interface in one spriteBatch.
One problem remains - we do not take into account the shift of our camera when adding points. This is solved simply, the totalShift must also be passed to the AddDot () method:
public void AddDot(int x, int y, Vector2 shift) { DotX = (int)(Math.Abs(x-shift.X) / DotSize ); DotY = (int)(Math.Abs(y-shift.Y) / DotSize ); DotsNow[DotX, DotY] = !DotsNow[DotX, DotY]; } Now points will be added in the places we need. Homework: when you try to add a living cell outside the field, it will still be the wrong reaction: either adding to the mirror point, or going beyond the bounds of the array. Make it so that you can not go beyond the field.
Cheshire Cat
Conclusion
Actually, that's all. You have quite a workable game Life for Windows Phone and homework, on which you can smash your head for a couple of hours. You can also make various buns, such as the counter of generations, random filling and much more. You can find my final version in the Marketplace called SilverLife .
Download the source code of the application .
Have a good New Year holidays!
Source: https://habr.com/ru/post/135706/
All Articles