Multiboot flash drive on GRUB2 with several partitions under Ubuntu
Everyone knows about bootable flash drives, and many have a card with several systems. But when using them, many inconveniences arise, for example:
Today I will tell you how to avoid all these disadvantages comfortably and relatively quickly.
')
So let's get started. I chose the Transcend JetFlash 16G as an experimental animal; the flash drive model is not crucial, only in the breakdown of 512 megabytes of memory there is no sense :)
First, format the memory, create a clean MBR and partitions. Under Linux means mass, I used the standard Ubuntu utility.

Install GRUB2:
In the example, / media / ALKID is a mounted partition of a flash drive (any other than NTFS; the first partition will be used for personal files, so it is preferable to put, say, the second partition);
/ dev / sdd is the flash drive itself.
If rude answers like this:
This means that there is not enough space for the bootloader and you need to move the beginning of the first section, say, 1 mb ahead.
Then simply copy the system files to the USB flash drive, iso-images can be unpacked with a regular archiver.
And now the hard part :)
The fact is that for each system the settings are slightly, yes, different. For some distros you will have to choose the parameters yourself, but I will help with the most popular systems.
For any Linux distribution on a separate section:
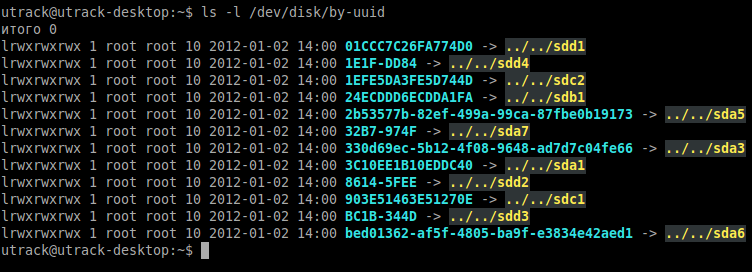
where BC1B-344D is the UUID of the partition (you can find it with the command 'ls -l / dev / disk / by-uuid').
Because of the similar structure with them, there is one quandary: for each, you will have to change the name of the casper folder, for example, the BT5 in the example is in the casper folder, and the next section will have Mint, and in the casper2 folder. You can connect it as follows:
Next, Dr.Web on the second section in the drweb folder:
Kaspersky next to it in the kav folder:
You can change the language to Russian directive kav_lang = ru.
Partition Editor on the NTFS partition in the / sys / pwizard folder:
In principle, there are no problems with it, besides from the whole image you can leave only the files BZIMAGE and tinycore.gz.
Partition Doctor:
memtest86:
And boot from the first hard disk, if you accidentally left a USB flash drive in the connector:
Some BIOSes perceive the card as hd0, so it is advisable to leave the hd1 download close by in a similar way.
If you find the system you need in the article, you can delete the syslinux, isolinux, boot / grub, etc. folders from the copied images, but if you haven’t found them, look for hints in them :)
For example, for the same Linux Mint in the file /isolinux/isolinux.cfg :
All we need to do is connect the modules necessary for the FS with insmod, replace the kernel with linux and move the append section after the kernel name and specify the system partition. Like this:
Done , you can reboot and experience the new system!
- Slow loading from iso-images
- Confusion in multiple system files (try splitting Ubuntu and BackTrack without crutches!)
- Impossibility to put several systems of the same type (again, without using crutches)
- And of course, this whole farceress gets in the way when you just need to transfer several files.
Today I will tell you how to avoid all these disadvantages comfortably and relatively quickly.
')
So let's get started. I chose the Transcend JetFlash 16G as an experimental animal; the flash drive model is not crucial, only in the breakdown of 512 megabytes of memory there is no sense :)
First, format the memory, create a clean MBR and partitions. Under Linux means mass, I used the standard Ubuntu utility.
Install GRUB2:
sudo grub-install --no-floppy --root-directory=/media/ALKID /dev/sdd
sudo grub-mkconfig -o /media/ALKID/boot/grub/grub.cfg
In the example, / media / ALKID is a mounted partition of a flash drive (any other than NTFS; the first partition will be used for personal files, so it is preferable to put, say, the second partition);
/ dev / sdd is the flash drive itself.
If rude answers like this:
utrack@utrack ~ $ sudo grub-install --no-floppy --root-directory=/media/fpart2 /dev/sdd
[sudo] password for utrack:
/usr/sbin/grub-setup: : Your embedding area is unusually small. core.img won't fit in it..
/usr/sbin/grub-setup: : . GRUB (blocklists). , ..
/usr/sbin/grub-setup: : blocklists.
This means that there is not enough space for the bootloader and you need to move the beginning of the first section, say, 1 mb ahead.
Then simply copy the system files to the USB flash drive, iso-images can be unpacked with a regular archiver.
And now the hard part :)
The fact is that for each system the settings are slightly, yes, different. For some distros you will have to choose the parameters yourself, but I will help with the most popular systems.
For any Linux distribution on a separate section:
menuentry 'BackTrack 5 R1' --class gnu-linux --class gnu --class os {
recordfail
set gfxpayload=$linux_gfx_mode
insmod gzio
insmod part_msdos
insmod ext2
insmod fat
search --no-floppy --fs-uuid --set=root BC1B-344D
linux /casper/vmlinuz file=/preseed/custom.seed boot=casper text splash vga=791 --
initrd /casper/initrd.gz
}
where BC1B-344D is the UUID of the partition (you can find it with the command 'ls -l / dev / disk / by-uuid').
Because of the similar structure with them, there is one quandary: for each, you will have to change the name of the casper folder, for example, the BT5 in the example is in the casper folder, and the next section will have Mint, and in the casper2 folder. You can connect it as follows:
menuentry 'Mint Default' --class ubuntu --class gnu-linux --class gnu --class os {
recordfail
set gfxpayload=$linux_gfx_mode
insmod gzio
insmod part_msdos
insmod ext2
insmod fat
search --no-floppy --fs-uuid --set=root 1E1F-DD84
linux /casper2/vmlinuz live-media-path=/casper2/ nopersistent boot=casper initrd=/casper2/initrd.lz quiet splash --
initrd /casper2/initrd.lz
}
Next, Dr.Web on the second section in the drweb folder:
menuentry "Dr.Web" {
recordfail
set gfxpayload=$linux_gfx_mode
insmod gzio
insmod part_msdos
insmod ext2
insmod fat
search --no-floppy --fs-uuid --set=root 8614-5FEE
linux /drweb/boot/vmlinuz ID=HOpnMxLPodF82zUr usbroot root=/dev/ram0 realroot=/dev/sd[az][0-9]/drweb init=/linuxrc init_opts=4 quiet vga=791 splash=silent,theme:drweb CONSOLE=/dev/tty1 dokeymap looptype=squashfs usbroot=/dev/sd[az][0-9]/drweb slowusb vga=791 CONSOLE=/dev/tty1 SDELAY=12 USBWAIT=15
initrd /drweb/boot/initrd
}
Kaspersky next to it in the kav folder:
menuentry "Kaspersky RD 10" {
set gfxpayload=$linux_gfx_mode
insmod gzio
insmod part_msdos
insmod ext2
insmod fat
insmod ntfs
search --no-floppy --fs-uuid --set=root 8614-5FEE
linux /kav/boot/rescue subdir=/kav root=/dev/ram0 vga=791 init=/linuxrc looptype=squashfs loop=/kav/image.squashfs nodevfs kav_lang=en udev aufs quiet noresume doscsi kav_lang=en cdroot=/dev/sd[az][0-9]
initrd /kav/boot/rescue.igz
}
You can change the language to Russian directive kav_lang = ru.
Partition Editor on the NTFS partition in the / sys / pwizard folder:
menuentry 'pwhe6 - Partition Editor' {
recordfail
set gfxpayload=$linux_gfx_mode
insmod gzio
insmod part_msdos
insmod ext2
insmod fat
insmod ntfs
search --no-floppy --fs-uuid --set=root 01CCC7C26FA774D0
linux /sys/pwizard/BZIMAGE ramdisk_size=102400 root=/dev/ram0 rw
initrd /sys/pwizard/tinycore.gz
}
In principle, there are no problems with it, besides from the whole image you can leave only the files BZIMAGE and tinycore.gz.
Partition Doctor:
menuentry 'Partition Doctor'{
recordfail
set gfxpayload=$linux_gfx_mode
insmod gzio
insmod part_msdos
insmod ext2
insmod fat
search --no-floppy --fs-uuid --set=root BC1B-344D
linux /partdoc/memdisk
initrd /partdoc/partdoc.ima
}
memtest86:
menuentry "Memory test (memtest86+)" {
insmod part_msdos
insmod ext2
insmod fat
search --no-floppy --fs-uuid --set=root 8614-5FEE
linux16 /memtest.bin
}
And boot from the first hard disk, if you accidentally left a USB flash drive in the connector:
menuentry "hd0"{
insmod part_msdos
insmod ntfs
insmod fat
insmod ext2
set root='(hd0)'
chainloader +1
}
Some BIOSes perceive the card as hd0, so it is advisable to leave the hd1 download close by in a similar way.
If you find the system you need in the article, you can delete the syslinux, isolinux, boot / grub, etc. folders from the copied images, but if you haven’t found them, look for hints in them :)
For example, for the same Linux Mint in the file /isolinux/isolinux.cfg :
label live
menu label Start Linux Mint
kernel /casper/vmlinuz
append file=/cdrom/preseed/mint.seed boot=casper initrd=/casper/initrd.lz quiet splash --
All we need to do is connect the modules necessary for the FS with insmod, replace the kernel with linux and move the append section after the kernel name and specify the system partition. Like this:
menuentry 'Mint Default' --class ubuntu --class gnu-linux --class gnu --class os {
insmod ext2
insmod fat
search --no-floppy --fs-uuid --set=root 1E1F-DD84
linux /casper/vmlinuz boot=casper initrd=/casper/initrd.lz quiet splash --
initrd /casper/initrd.lz
}
Done , you can reboot and experience the new system!
Source: https://habr.com/ru/post/135637/
All Articles