The simplest robot bug on arduino
Having read on the Internet and including on Habré about creating various robots, I decided to make my own. Especially since my arduino has been idle for a long time.

For not having money on the chassis for the robot, I decided to make the cheapest and simplest. An ultrasonic rangefinder was chosen as the sense organs.

')
I wanted to build a cheap and easy-to-make platform for my arduin.
I tried to use my radio-controlled jeep, but the power of the motorshield was not enough for normal movement (I even accidentally burned the driver of the engine). There was a need for an h bridge, consisting of 4 transistors. It was too lazy to understand the circuit of the toy (and I didn’t want to break it), but for soldering one had to rummage through the bins of the motherland and look for transistors.
At my disposal there were several motors, aluminum sheets trimming and a Soviet metal constructor.
Traveling on the Internet, I often stumbled upon beam-robots, which had neither wheels nor tracks, and most importantly, did not have gearboxes.
The whole secret was in the motors, which were located at an angle to the floor. The robot was standing right on the shafts.
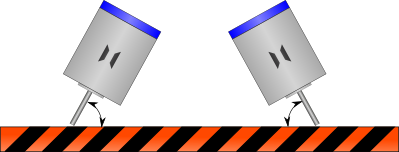
This allows you not to care about the gear ratios, engine power. The motors themselves are gearboxes due to the small diameter of the shaft.
I cut out the motor holder from an aluminum sheet, attached it to the frame from the designer and screwed the arduino holder. It seems nothing complicated, dremel, screwdriver and a maximum of 15 minutes of time.
As mentioned above, the arduino controls the motors through the motorshield, they have separate power, so as not to burn the microprocessor. Later I added a shutdown button. An ultrasonic distance meter SRF05 is connected to the boards. He knows how to work in 2 modes, I will not dwell in detail, I will just say that in the 1st mode it is necessary to use 2 contacts (one trigger for sending a sound, a second data reception), and the 2nd one, respectively, for which he was chosen. For the sensor, an adapter was soldered, turning on the sensor in the second mode (it grounded one contact).
The video below will show the simplest algorithm-saw the wall, turn it. Here I will give a more meaningful code. There are explanations in the comments.
The algorithm is as follows:
1) rotate around its axis and find the maximum distance
2) turn towards the maximum distance
3.1) if we were able to turn, we were going straight ahead for a certain moment.
3.2) if we could not go ahead
4.1) if you are stuck (we go forward, and the distance does not change) we drive back and return to point 1
4.2) if you reached the wall, stop and return to point 1
Source:
For one evening really build the simplest robot. Of course there are deficiencies, for example, the sensor should be hung on the servomotor and the wires should be brought into normal form. I hope you enjoy such a robot.
For not having money on the chassis for the robot, I decided to make the cheapest and simplest. An ultrasonic rangefinder was chosen as the sense organs.
')
Idea
I wanted to build a cheap and easy-to-make platform for my arduin.
I tried to use my radio-controlled jeep, but the power of the motorshield was not enough for normal movement (I even accidentally burned the driver of the engine). There was a need for an h bridge, consisting of 4 transistors. It was too lazy to understand the circuit of the toy (and I didn’t want to break it), but for soldering one had to rummage through the bins of the motherland and look for transistors.
At my disposal there were several motors, aluminum sheets trimming and a Soviet metal constructor.
Design
Traveling on the Internet, I often stumbled upon beam-robots, which had neither wheels nor tracks, and most importantly, did not have gearboxes.
The whole secret was in the motors, which were located at an angle to the floor. The robot was standing right on the shafts.
This allows you not to care about the gear ratios, engine power. The motors themselves are gearboxes due to the small diameter of the shaft.
Construction
Frame
I cut out the motor holder from an aluminum sheet, attached it to the frame from the designer and screwed the arduino holder. It seems nothing complicated, dremel, screwdriver and a maximum of 15 minutes of time.
Electronics
As mentioned above, the arduino controls the motors through the motorshield, they have separate power, so as not to burn the microprocessor. Later I added a shutdown button. An ultrasonic distance meter SRF05 is connected to the boards. He knows how to work in 2 modes, I will not dwell in detail, I will just say that in the 1st mode it is necessary to use 2 contacts (one trigger for sending a sound, a second data reception), and the 2nd one, respectively, for which he was chosen. For the sensor, an adapter was soldered, turning on the sensor in the second mode (it grounded one contact).
Programming
The video below will show the simplest algorithm-saw the wall, turn it. Here I will give a more meaningful code. There are explanations in the comments.
The algorithm is as follows:
1) rotate around its axis and find the maximum distance
2) turn towards the maximum distance
3.1) if we were able to turn, we were going straight ahead for a certain moment.
3.2) if we could not go ahead
4.1) if you are stuck (we go forward, and the distance does not change) we drive back and return to point 1
4.2) if you reached the wall, stop and return to point 1
Source:
#include <AFMotor.h> #define MaxRange 23 // #define MaxTries 3 // int srfPin = 16; // Pin for SRF05 int ledPin = 2; // AF_DCMotor motorL(2); AF_DCMotor motorR(1); boolean isInRange(int value,int leftBorder,int rightBorder){ return (value>leftBorder && value<rightBorder); } // int getDistance(){ delay(50); int duration=0; // pinMode(srfPin, OUTPUT); digitalWrite(srfPin, LOW); // , delayMicroseconds(2); digitalWrite(srfPin, HIGH); // 10 delayMicroseconds(10); digitalWrite(srfPin, LOW); // pinMode(srfPin, INPUT); duration = pulseIn(srfPin, HIGH); // return duration/58; // } // void goForward(){ motorL.setSpeed(255); motorR.setSpeed(255); motorL.run(FORWARD); motorR.run(FORWARD); } void goBackward(){ motorL.setSpeed(255); motorR.setSpeed(255); motorL.run(BACKWARD); motorR.run(BACKWARD); } void turnLeft(){ motorL.setSpeed(255); motorR.setSpeed(255); motorL.run(BACKWARD); motorR.run(FORWARD); } void turnRight(){ motorL.setSpeed(255); motorR.setSpeed(255); motorL.run(FORWARD); motorR.run(BACKWARD); } void stopMovement(){ motorL.run(RELEASE); motorR.run(RELEASE); } // int getMaxDistanseAround(){ unsigned long timeStart=millis(); int maxFound=0; // if(random(100)<50){turnLeft();}else{turnRight();} // while(millis()-timeStart<3000){ int curDistance=getDistance(); if( curDistance > maxFound ){ maxFound=curDistance; } } return maxFound; } // boolean turnToDistance(int distance){ unsigned long timeStart=millis(); // if(random(100)<50){turnLeft();}else{turnRight();} // while(millis()-timeStart<3000){ // // , if( isInRange(getDistance(),distance-5,distance+5)){ // usb Serial.print("Turned to "); Serial.println(getDistance()); // ( ) goBackward(); delay(200); stopMovement(); blinkLed(); return true;// 1, .. } } Serial.println("distance not found"); return false;// } // , float getMySpeed(){ int secToMeas=2; float firstDistance=getDistance(); goForward(); delay(secToMeas*1000); stopMovement(); float newDistance=getDistance(); return (firstDistance-getDistance())/secToMeas/100; } // void blinkLed(){ digitalWrite(ledPin, HIGH); delay(1000); digitalWrite(ledPin, LOW); } float mySpeedSm=0;// /c float mySpeedM=0;// /c void setup() { Serial.begin(9600); // set up Serial library at 9600 bps // .. // randomSeed(analogRead(0)); // , pinMode(ledPin, OUTPUT); Serial.println("Testing systems"); blinkLed(); // getDistance(); if(getDistance()>0){ Serial.println("Ultrasonic sensor ready"); } delay(1000/4); // motorL.setSpeed(255); motorR.setSpeed(255); stopMovement(); blinkLed(); delay(1000/3); Serial.println("Getting averange speed"); blinkLed(); mySpeedSm=getMySpeed(); mySpeedM=mySpeedSm/100; blinkLed(); blinkLed(); blinkLed(); } int tries=MaxTries; // void loop(){ // int maxDist=getMaxDistanseAround(); Serial.print("Found max distance"); Serial.println(maxDist); delay(500); // if(turnToDistance(maxDist)){ tries=MaxTries;// int lastDistance=getDistance(); // while(lastDistance>MaxRange){ goForward(); delay(500); // int newDist=getDistance(); if(isInRange(newDist,lastDistance-2,lastDistance+2)){ goBackward(); delay(1000); lastDistance=0; } else{ lastDistance=newDist; } } }else{ // // tries--; if(tries==0){// - if(getDistance()>MaxRange*2){ goForward(); delay(1000); } else{ goBackward(); delay(1000); } } } stopMovement(); delay(500); } Video
Conclusion
For one evening really build the simplest robot. Of course there are deficiencies, for example, the sensor should be hung on the servomotor and the wires should be brought into normal form. I hope you enjoy such a robot.
Source: https://habr.com/ru/post/135529/
All Articles