Recall the 386SX and its features
Despite the apparent antiquity, this computer can be used, for example, to train the x86 and C assembler, as a typewriter and to run old DOS games. It works fine with the Windows 3.1 operating system in which you can quite work with the old word and exel. It also runs an early version of Delphi. One of the nice features is the ability to run MapleV, in which you can perform symbolic calculations. You can also install Windows 95, but it is quite slow.
This computer can also be used as a Web server for displaying static pages and an ftp server. The only pity is that the maximum amount of hard disk supported (information available to utilities for working with a hard disk, for example fdisk) is only 504 MB. But they can be outsmarted by formatting the disk on another computer to the maximum possible for fat16-2GB. You can also create another 3 primary partition on 2GB. Total: 8GB, the maximum available in the BIOS. Below is more detailed information. In addition, you can connect to it a CDROM, which is perfectly readable from both Dos and Windows. To do this, you must specify in BIOS that there is no slave IDE disk (disk D).
Consider this unit in more detail:
Let's start with the hard drive. It is released by Quantum and can be tagged at 365MB or 730MB, depending on the number of cylinders, heads and sectors. At one time it was marked up at 365Mb.

This M396F motherboard contains:
')
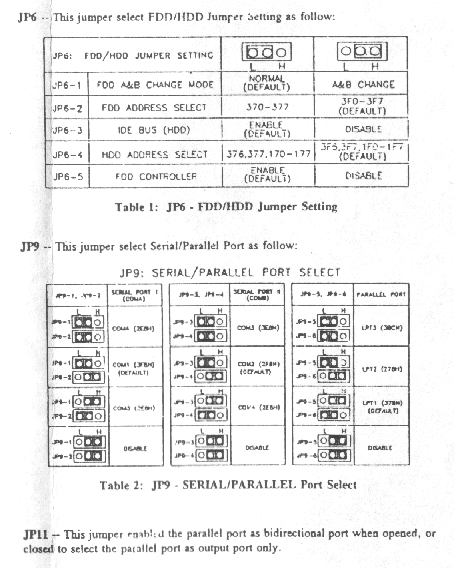
This F825K4PTI227W card (W83757AF, W83758P) contains the controllers: COM port, LTP port, IDE, FDD and game port.

Unfortunately, the instruction from her was lost. I quote found with a description of the location of the jumpers. Previously, it was necessary to use handles to specify hardware interrupts and port addresses. This is not what it is now - inserted into the USB or PCI connector, installed the drive - and it’s ready (automatic selection of free ports and interrupts).
Decode:
X - Close Jumper (L)
: - Open Jumper (H)
COM-A DIS 1,2 ::
COM-A 3F8 1.2 X: = COM1
COM-A 3EF 1,2: X = COM3
COM-A 2EF 1,2 XX = COM1
COM-B DIS 3,4 ::
COM-B 2F8 3,4 X: = COM2
COM-B 2EF 3,4: X = COM4
COM-B 2EF 3,4 X: = COM2
LPT-C DIS 5.6 ::
LPT-C 378 5.6 X: = LPT1
LPT-C 278 5.6: X = LPT2
FDD-D DIS 7:
FDD-D EN 7 X
HDD-E DIS 8:
HDD-E EN 8 X
16-bit VGA Cirrus logic CL-GD5402-75QC video card with 1 MB of memory (this is the maximum for this card). Initially, it had 2 RAM chips V53C104P10L (256Kb each), then another 2 M514256A-80R (256Kb each) was added from the non-working video card.
This COMPEX ReadyLink RL2000A card allows you to organize a network connection using twisted pair or coaxial cable. The maximum speed of work is 10 Mbps. A feature of this card is support for plug-and-play, those do not have to manually set interrupts and input / output ports with jumpers. To configure them, use a special utility that is supplied on a diskette with a card driver. The package includes a driver for Windows (9x and NT), batch for dos.
230-watt AT power supply.

We connected all expansion cards to the motherboard, as well as the keyboard and printer. At this stage we will not connect the network card.

Epson LQ-400 dot matrix printer. The test page was printed on another computer to test its performance. Fortunately, the ribbon is almost dry.
Turn on the computer and go to the BIOS. To do this, when loading, press Del.

Before us appears the main menu AMI BIOS:

I will give a brief description of each line:
Go to the menu STANDARD CMOS SETUP:

Consider the parameters of the hard disk, the remaining parameters are obvious. Noteworthy is the fact that the drive supports 3.5 "at 2.88MB. To automatically determine the parameters of the hard disk, you can use the AUTO DETECT HARD DISK item of the main menu. It determines the correct configuration of disks up to 8GB (checked for interest)!
Let's exit their current Esc and go to the ADVANCED CMOS SETUP main menu:
Press Esc and go to the HARD DISK UTILITY item of the main menu:
With the help of this utility, you can perform low-level formatting and verification of the hard disk.
We exit the BIOS without saving the parameters and restart the system:
We see information about what is loaded MS Dos.
Then run Norton Commander:
Let's use the System Info program from the Norton Utilitus package.
General information:

CPU performance:
Hard Drive Speed:
The performance index of the entire system:
Let's write the simplest program in assembler, which displays only one line:

Then we will try to print the program text on our matrix printer:
Here's what we got:

Compile the program into an object file:
Run the linker to get the executable com file and run the resulting program:

Consider the then popular Borland C 3.0 integrated development environment:
Compile the program:
and run:

Consider the well-known Lexicon:

Most of all I liked the game of chess:

Directly open the file format djvu can not. To open, you need to convert the page of interest to the pgm format, and then open it for viewing. Conversion time on this computer for one page is about 5 minutes.


Scrolling too slowly enough:
He quickly considers simple integrals.

We park the hard drive heads and turn off the power:

Start the system with the command win:
After loading, the "desktop" appears:
Start the program manager:
Then Windows commander:

And finally - MapleV - a system of symbolic calculations:

We calculate a simple integral, taken by the method "in parts":

Now we will start the well-known Exel table processor:

Now all the above written in a more visual form:
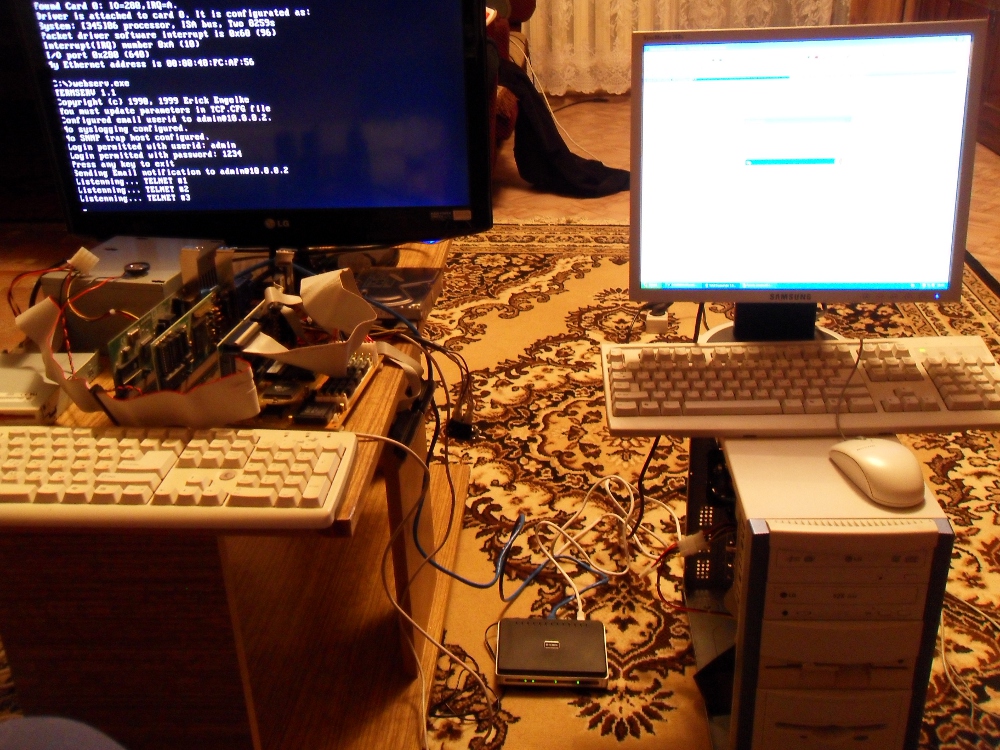
We insert the network card described above into the 6th slot of the motherboard and connect the twisted pair cable to it:
We connect to the 2nd computer through a router:
We turn it on with a special utility that came with the network card and set it up for a free hardware interrupt and a port. In our case, select 0x0a interrupt and 0x280 port. We copy from diskette the packet driver of our card. Also disable the plug-and-play mode. Configure the web and ftp server configuration file that works with the card using the packet driver:

We start the packet driver of our rlpnpapd.com card and make sure that the interrupt and the port match the settings of our card. The driver will communicate with the server using software interrupt 0x60:
We start the server:
Everything, now you can connect to it using http and ftp protocols. On this server you can place a static Web site. Connect to it using a second computer:
Connect to ftp to share files:
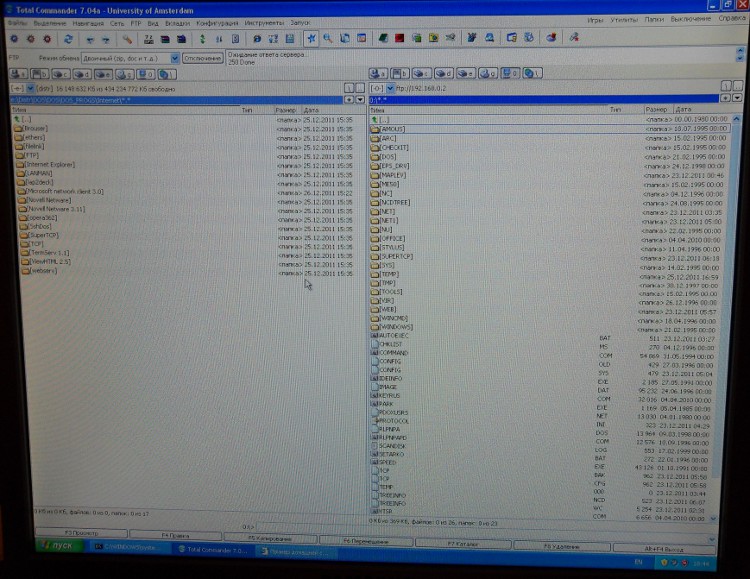

Unfortunately, the ftp server has no permissions. But for sharing files between two computers, this is not critical. It is much more pleasant and more convenient to work through the network than to transfer data on diskettes or remove the hard drive and connect it to another computer.
Here is a short video review on the network:
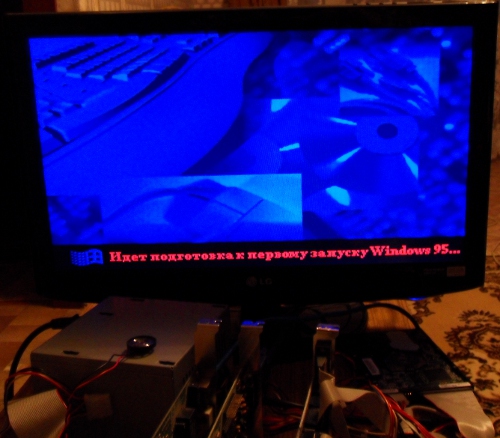
I decided to install 95 on this computer. I took another hard drive for this, formatted it in fat16 for a maximum size of 2GB (on another computer) and ... our 386 accepted it (BIOS recognized correctly initially), despite persistent information output to all disk utilities, that the size of the disk is 504Mb. Created 3 more sections and all 8 GB became available!
I will give the process of installing Windows 95:


Run the installed Windows:
Desktop:
General information about the system:
Information that the disk has 4 sections of 2047 MB, despite the total volume of 504 MB:

These disks + recognized CDROM, unknown to the BIOS (set that the D: drive is missing (there this letter stands for IDE slave)):

CDROM itself:

Information about one of the sections of hard wild:
Total Commander running from disk:
Turning off our computer:

Unfortunately, the installation attempt failed.
The first part of the installation, as in the case of windows 95, produced on a nearby computer:
I connected the hard drive to 386 and launched it. Started fine:

Then, a critical error occurred - the initialization of the VFAT device failed:
I decided to try safe mode, but this did not lead to any result. After 30 minutes of waiting, the boot screen has not changed:
For the experiment I tried to run a fairly light version - Basic Linux. The system started successfully.
This computer can also be used as a Web server for displaying static pages and an ftp server. The only pity is that the maximum amount of hard disk supported (information available to utilities for working with a hard disk, for example fdisk) is only 504 MB. But they can be outsmarted by formatting the disk on another computer to the maximum possible for fat16-2GB. You can also create another 3 primary partition on 2GB. Total: 8GB, the maximum available in the BIOS. Below is more detailed information. In addition, you can connect to it a CDROM, which is perfectly readable from both Dos and Windows. To do this, you must specify in BIOS that there is no slave IDE disk (disk D).
Consider this unit in more detail:
Iron review
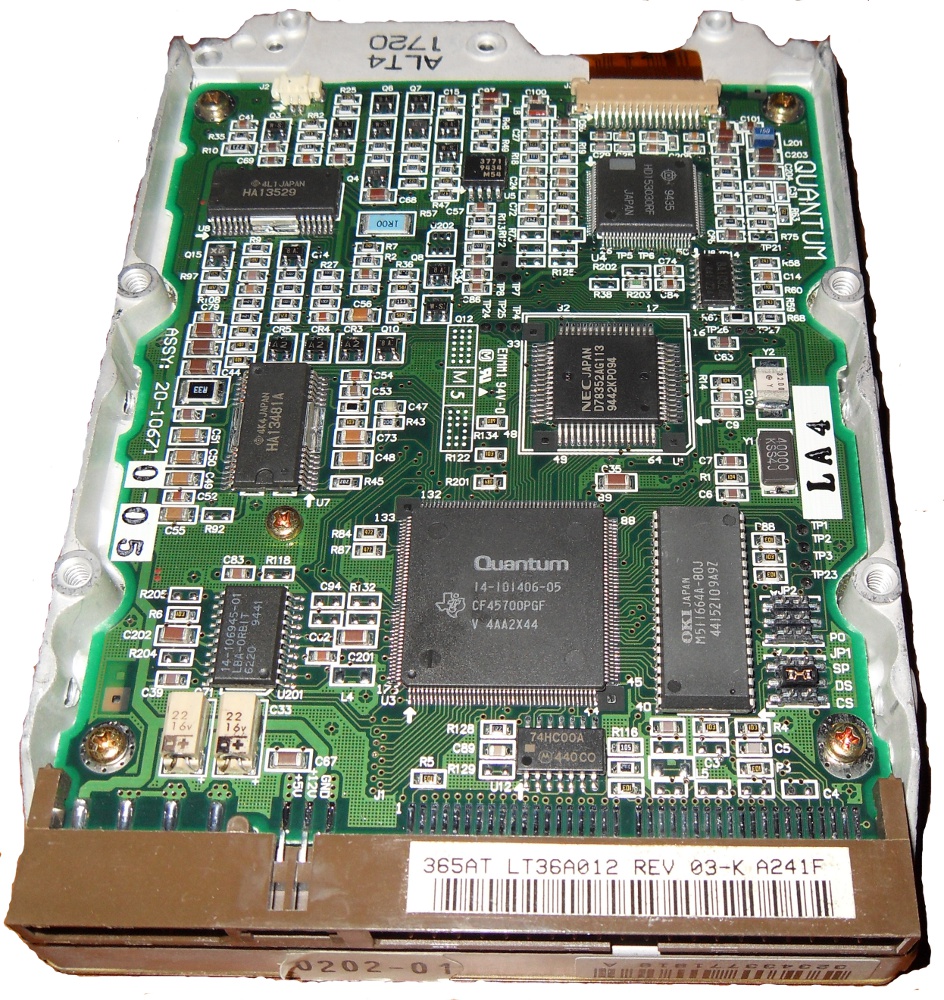
HDD
Let's start with the hard drive. It is released by Quantum and can be tagged at 365MB or 730MB, depending on the number of cylinders, heads and sectors. At one time it was marked up at 365Mb.
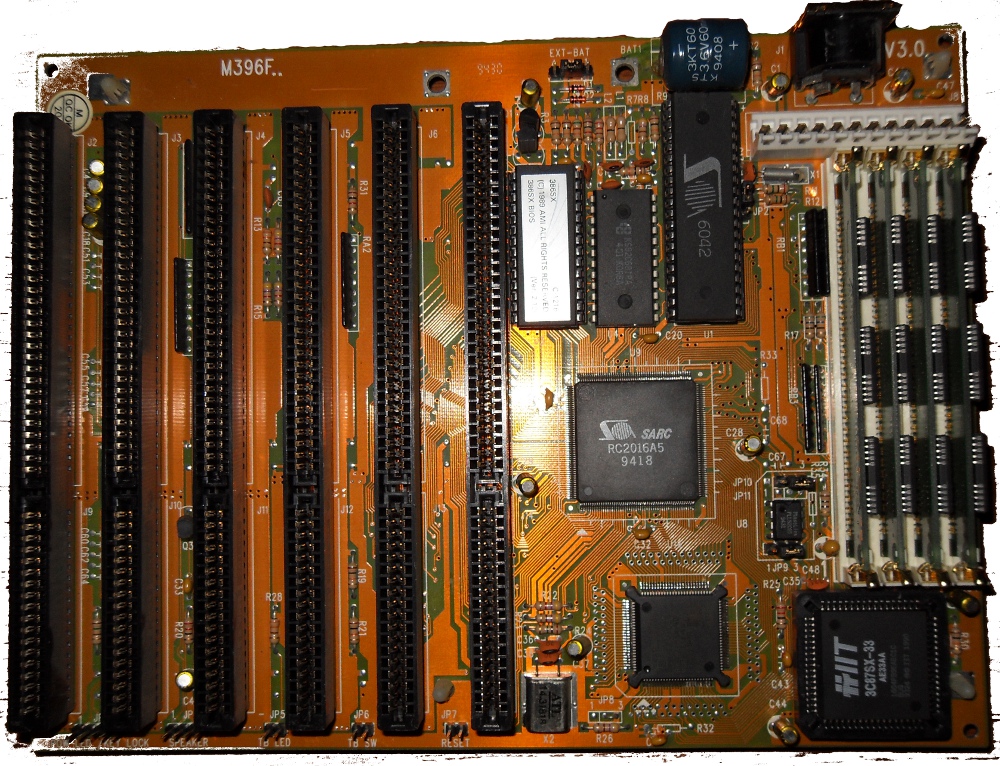
Mother card
This M396F motherboard contains:
- Soldered processor amd 386SX clock speed of 40 MHz. Our processor has a 16-bit external data bus. He himself is 32-bit.
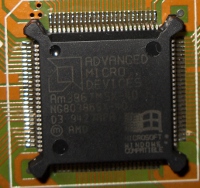
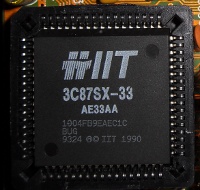
- Coprocessor 3C87-SX
- 6 ISA slots
- AMI bios
- 4MB of memory
- Does not contain CASH
Specification:
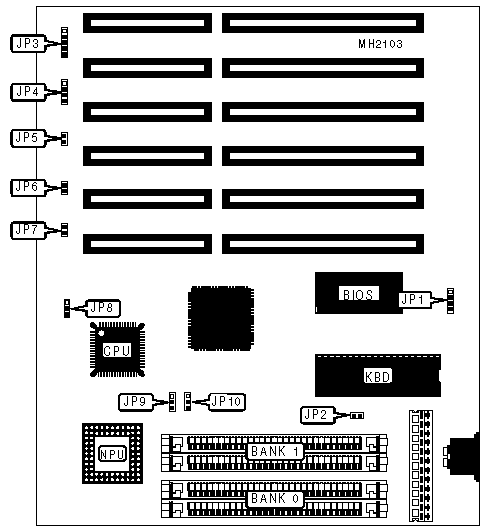
External devices
| Device | Connector | Device | Connector |
| External battery | JP1 | Turbo mode indicator | JP5 |
| Power Indicator and Keypad Lock | JP3 | Turbo switch | JP6 |
| Speaker | JP4 | Reset button | JP7 |
Monitor mode
| Mode | Jumper | Position |
| Color | JP2 | Is closed |
| Monochrome | JP2 | Is open |
')
CPU mode
| Frequency | JP8 | JP9 | JP10 |
| 16MHz | pins 2 & 3 closed | pins 1 & 2 closed | pins 1 & 2 closed |
| 20MHz | pins 2 & 3 closed | N / A | N / A |
| 25MHZ | pins 2 & 3 closed | pins 1 & 2 closed | pins 2 & 3 closed |
| 33MHz | pins 2 & 3 closed | pins 2 & 3 closed | pins 1 & 2 closed |
| 40MHz | pins 1 & 2 closed | pins 2 & 3 closed | pins 2 & 3 closed |
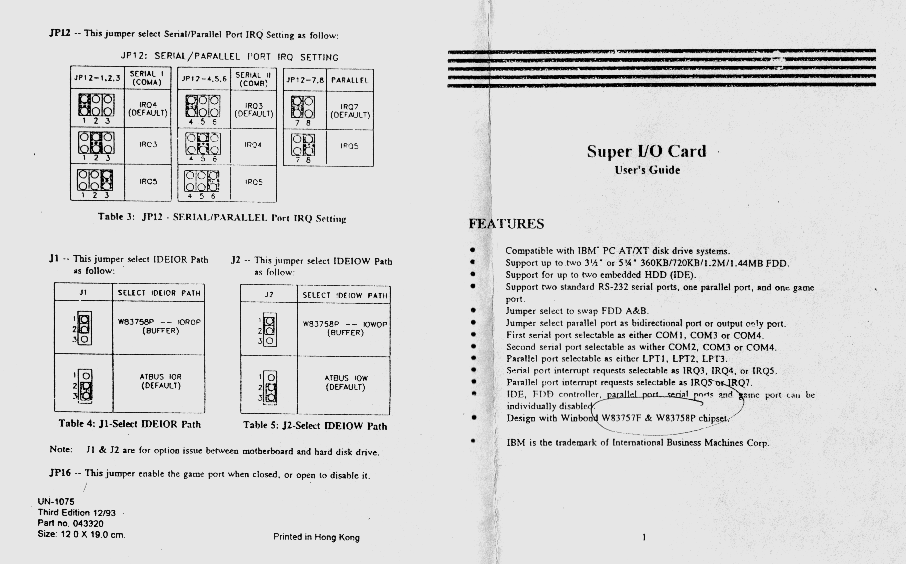
Multifunctional card
This F825K4PTI227W card (W83757AF, W83758P) contains the controllers: COM port, LTP port, IDE, FDD and game port.
Configuration
Unfortunately, the instruction from her was lost. I quote found with a description of the location of the jumpers. Previously, it was necessary to use handles to specify hardware interrupts and port addresses. This is not what it is now - inserted into the USB or PCI connector, installed the drive - and it’s ready (automatic selection of free ports and interrupts).
Decode:
X - Close Jumper (L)
: - Open Jumper (H)
COM-A DIS 1,2 ::
COM-A 3F8 1.2 X: = COM1
COM-A 3EF 1,2: X = COM3
COM-A 2EF 1,2 XX = COM1
COM-B DIS 3,4 ::
COM-B 2F8 3,4 X: = COM2
COM-B 2EF 3,4: X = COM4
COM-B 2EF 3,4 X: = COM2
LPT-C DIS 5.6 ::
LPT-C 378 5.6 X: = LPT1
LPT-C 278 5.6: X = LPT2
FDD-D DIS 7:
FDD-D EN 7 X
HDD-E DIS 8:
HDD-E EN 8 X
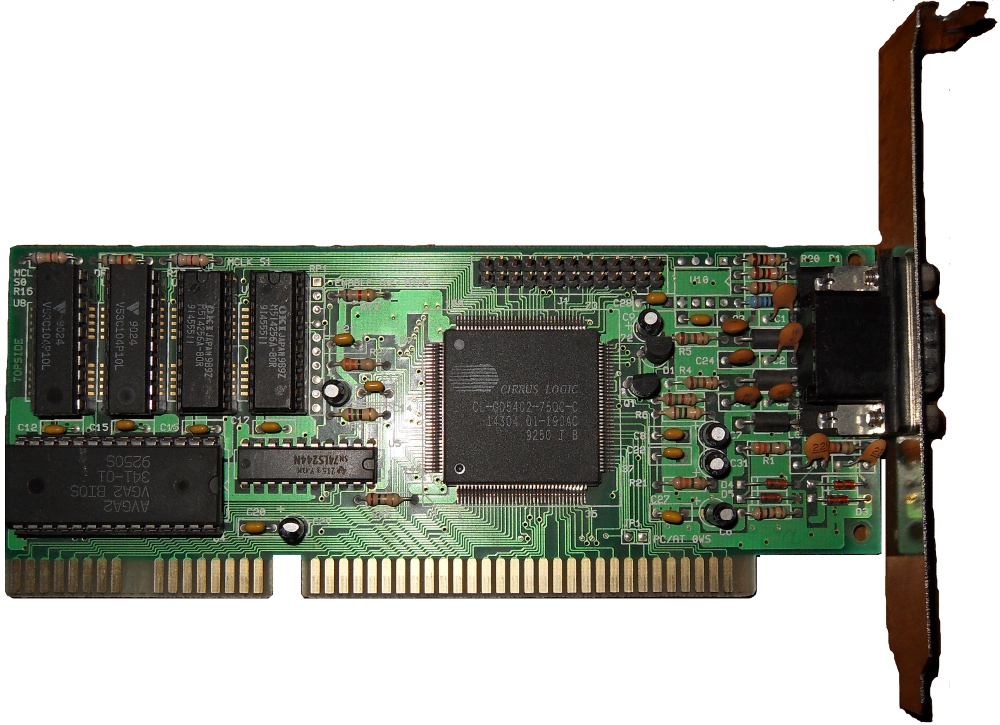
Video card
16-bit VGA Cirrus logic CL-GD5402-75QC video card with 1 MB of memory (this is the maximum for this card). Initially, it had 2 RAM chips V53C104P10L (256Kb each), then another 2 M514256A-80R (256Kb each) was added from the non-working video card.
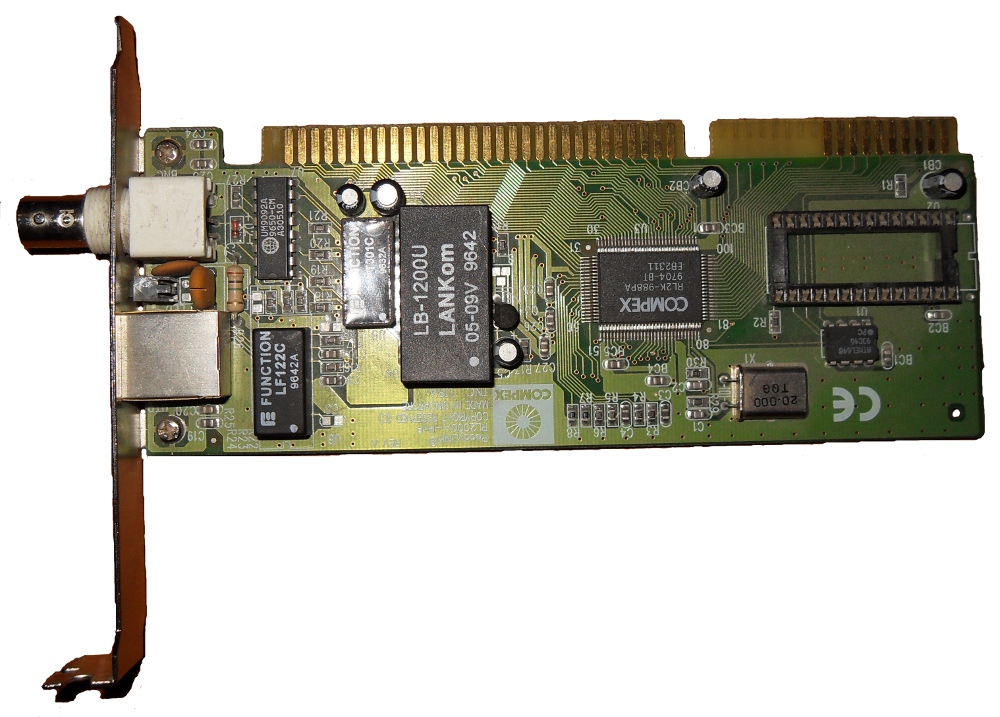
LAN card
This COMPEX ReadyLink RL2000A card allows you to organize a network connection using twisted pair or coaxial cable. The maximum speed of work is 10 Mbps. A feature of this card is support for plug-and-play, those do not have to manually set interrupts and input / output ports with jumpers. To configure them, use a special utility that is supplied on a diskette with a card driver. The package includes a driver for Windows (9x and NT), batch for dos.
Power Supply
230-watt AT power supply.
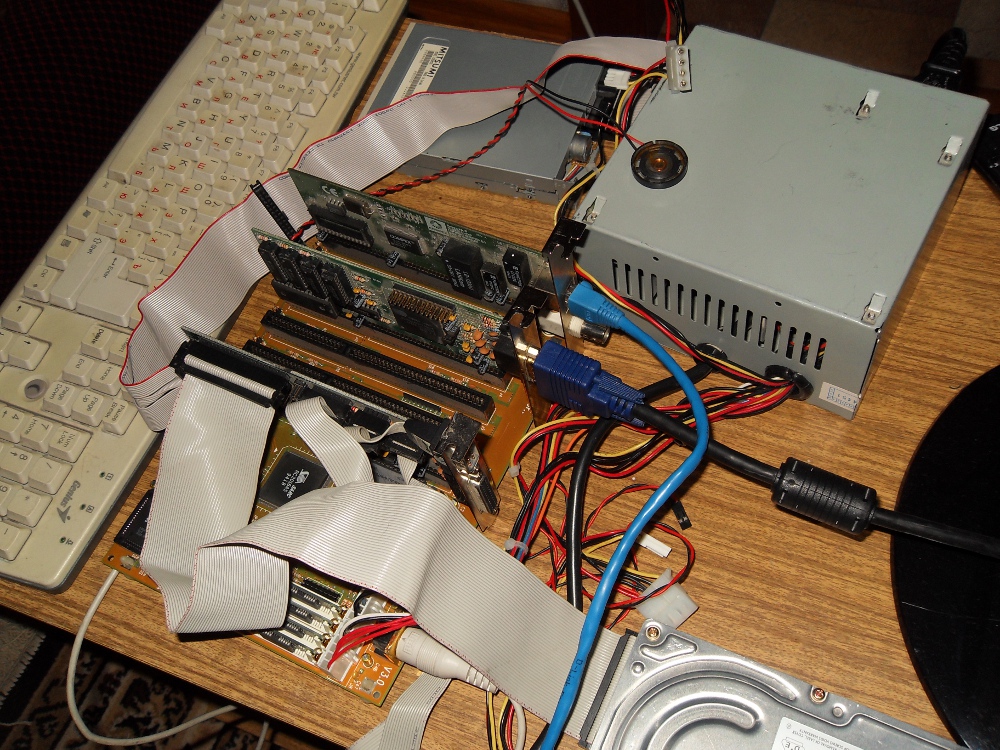
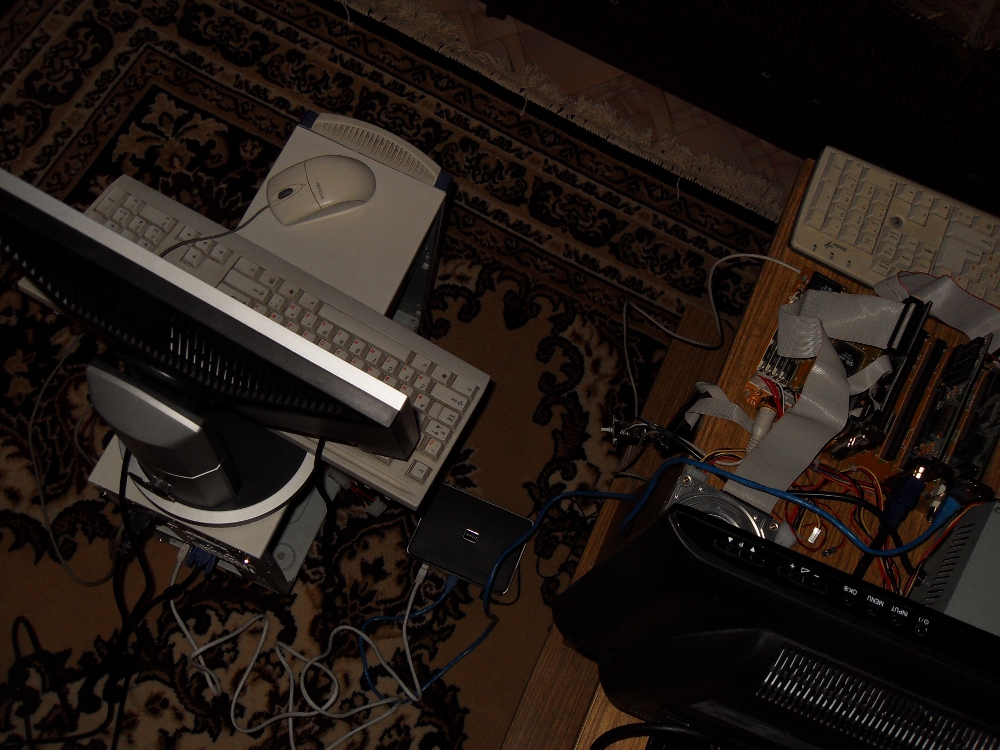
Computer assembly
We connected all expansion cards to the motherboard, as well as the keyboard and printer. At this stage we will not connect the network card.
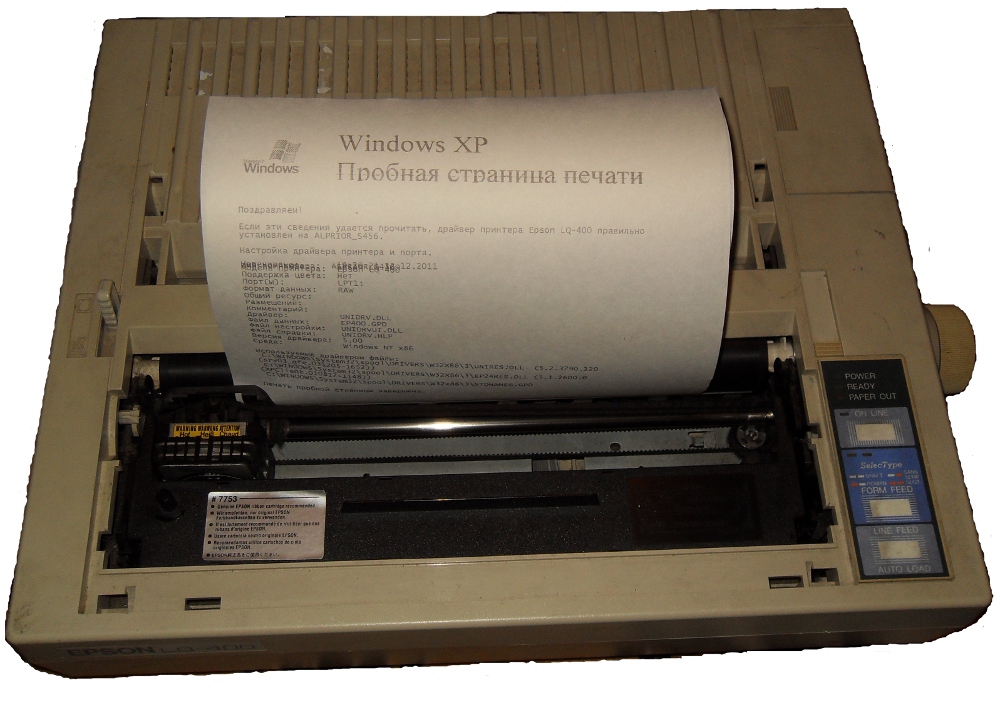
Printer
Epson LQ-400 dot matrix printer. The test page was printed on another computer to test its performance. Fortunately, the ribbon is almost dry.
Software
Turn on the computer and go to the BIOS. To do this, when loading, press Del.
Bios
Before us appears the main menu AMI BIOS:
I will give a brief description of each line:
| Main menu line of the SETUP program | Description |
| STANDARD CMOS SETUP | Allows you to set all the basic configuration of the computer. This menu bar provides the ability to set the number and types of hard and magnetic drives, the current date and time, the type of video subsystem. If the computer is used as a server, this line allows you to disable keyboard and monitor checking. |
| ADVANCED CMOS SETUP | Designed to set additional configuration parameters specific to your motherboard and BIOS. |
| ADVANCED CHIPSET SETUP | Manages various parameters of the motherboard |
| AUTO CONFIGURATION WITH BIOS DEFAULTS | Write default values to CMOS-memory of computer |
| AUTO CONFIGURATION WITH POWER-ON DEFAULTS | Write default values to CMOS-memory of computer |
| CHANGE PASSWORD | Serves to set or change the password requested when the computer is initially booted and when trying to access the Setup program. |
| HARD DISK UTILITY | Serves for servicing hard disk drives. Allows you to determine the type of disk, check its performance and format it |
| WRITE TO CMOS AND EXIT | Allows you to record all changes in the CMOS-memory and continue booting the computer |
| DO NOT WRITE TO CMOS AND EXIT | Allows you to continue to boot the computer without making changes to the CMOS-memory |
Go to the menu STANDARD CMOS SETUP:
Consider the parameters of the hard disk, the remaining parameters are obvious. Noteworthy is the fact that the drive supports 3.5 "at 2.88MB. To automatically determine the parameters of the hard disk, you can use the AUTO DETECT HARD DISK item of the main menu. It determines the correct configuration of disks up to 8GB (checked for interest)!
| Parameter | Description |
| Type | The numeric designation of the type of disk is determined by its parameters. There are a number of standard disc types. The volume of disks of standard types does not exceed 160 MB. If you want to specify the parameters manually, this field must be 47. |
| Cylinders (Cyln.) | The number of cylinders on the disk |
| Heads | Number of disk heads (surfaces) |
| Write Precompensation (WPcom) | The physical size of the sector depends on the length of the track, and, consequently, on the track number. However, 512 bytes should be stored in each sector. Therefore, to compensate for the size of the sector, the writing and reading of inner cylinders having a smaller diameter is accelerated. This parameter determines the number of the track on which the sector size compensation mechanism is activated. |
| Landing Zone (L Zone) | The number of the cylinder on which the magnetic head of the disk is automatically positioned (parked) when the computer is turned off. Usually for this field indicate the number of the last track of the disc. |
| Sectors (Sec.) | The number of sectors on each track of the disc. For the vast majority of disks, the sector size is 512 bytes. The MS-DOS operating system cannot work with devices whose sector size is not equal to 512 bytes. For such devices, you need to install additional drivers. |
| Size | Disk capacity. It is derived from other disk parameters. It is calculated automatically using the following simple formula: Size = Heads * Cylinders * Sectors * 512 |
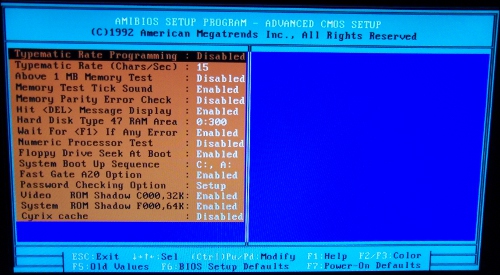
Let's exit their current Esc and go to the ADVANCED CMOS SETUP main menu:
| Parameter | Description |
| Typematic rate programming | Auto-repeat mode pressed key |
| Typematic rate | Auto-repeat speed in characters per second |
| Above 1 MB Memory Test | To disable extended memory checking, select “Disabled” for this parameter. Standard memory (first MB) is checked in any case. The BIOS memory test is very simple. Many errors he leaves unnoticed. More detailed check of the RAM should be performed using a special program, for example, CheckIt. |
| Memory Test Tick Sound | Beep when testing memory |
| Memory Parity Error Check | Check parity memory. If the memory modules do not contain parity bits, then the check should be disabled. |
| Hit del message display | Allows you to cancel the display at the time of loading messages on the screen: Hit Del if you want to run Setup |
| Hard Disk Type 47 RAM Area | Usually, the description of the configuration of hard disk drives with non-standard type 47 is located in RAM at 0: 300h. If necessary, this information can be moved to another location. Can be placed in the last kilobyte standard RAM 640 KB |
| Wait For F1 If Any Error | Defines the reaction to error detection during the initial boot of the computer. |
| Fast Gate A20 Option | Manages the address line A20. This line allows you to access the RAM, located above one megabyte. In order for the computer to be fully compatible with the IBM PC / XT, the A20 line must always remain inactive and the “Fast Gate A20 Option” parameter must be set to “Disabled”. In other cases, set this parameter to “Enabled”. |
| Video & Adapter ROM Shadow | The BIOS chip is a permanent storage device in which various service programs are recorded. Permanent memory is much slower than RAM. To improve performance, the most frequently used programs and data located in the BIOS ROM chip are being copied into RAM when the computer is booted and then taken from it. Programs accessing addresses belonging to the BIOS will work with fast RAM. This will greatly speed up the execution of programs actively accessing the BIOS. The area of RAM, which displays the ROM area, called the shadow memory. The use of shadow memory reduces the amount of available RAM, but it significantly speeds up the functions of the computer's BIOS and video subsystem. |
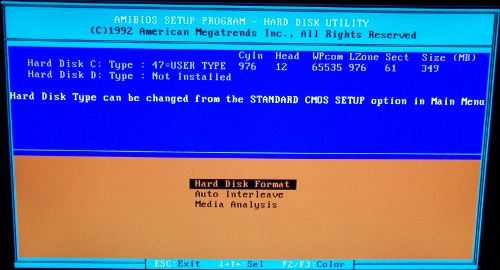
Press Esc and go to the HARD DISK UTILITY item of the main menu:
With the help of this utility, you can perform low-level formatting and verification of the hard disk.
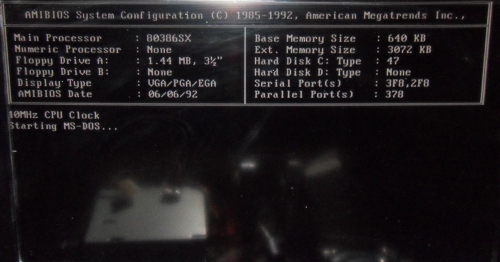
We exit the BIOS without saving the parameters and restart the system:
We see information about what is loaded MS Dos.
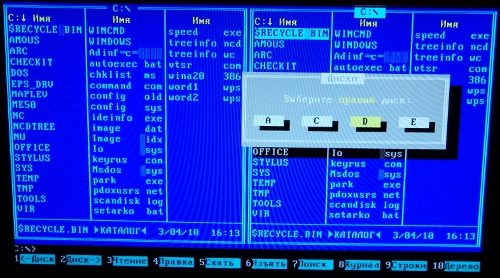
Then run Norton Commander:
System Information and Performance Tests
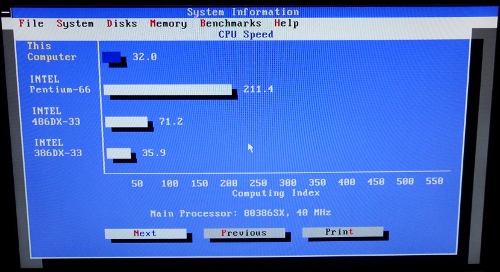
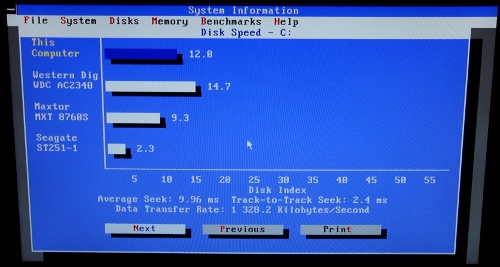
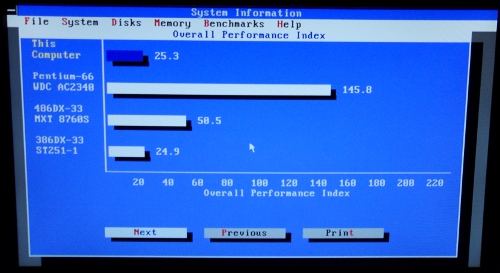
Let's use the System Info program from the Norton Utilitus package.
General information:
CPU performance:
Hard Drive Speed:
The performance index of the entire system:
Programming
Let's write the simplest program in assembler, which displays only one line:
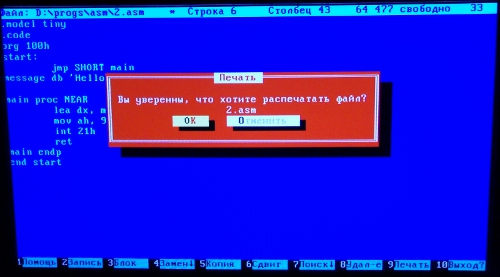
Then we will try to print the program text on our matrix printer:
Here's what we got:
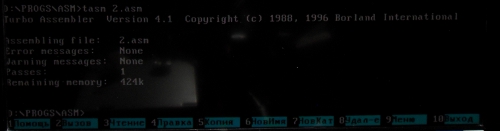
Compile the program into an object file:
Run the linker to get the executable com file and run the resulting program:
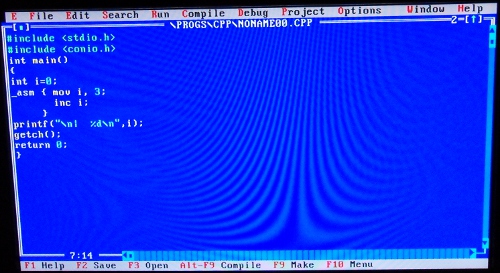
Consider the then popular Borland C 3.0 integrated development environment:
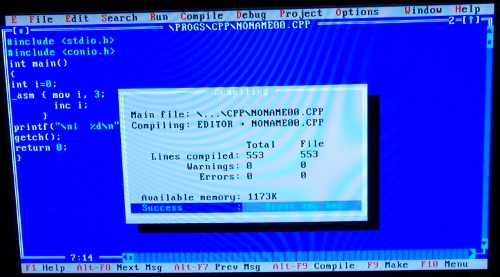
Compile the program:
and run:
Word processor
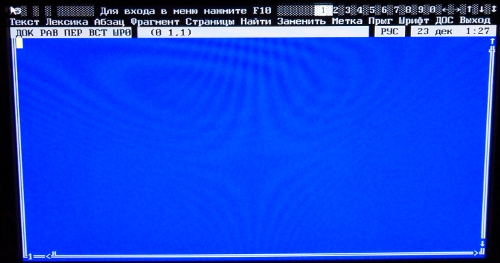
Consider the well-known Lexicon:
Games
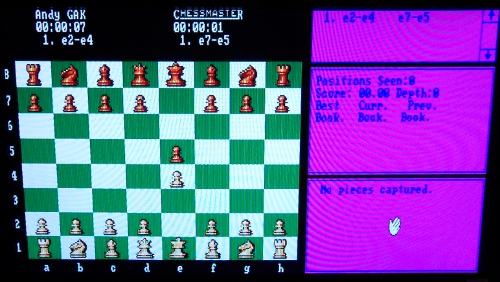
Most of all I liked the game of chess:
View DJVU files
Directly open the file format djvu can not. To open, you need to convert the page of interest to the pgm format, and then open it for viewing. Conversion time on this computer for one page is about 5 minutes.
Scrolling too slowly enough:
MAPLEV
He quickly considers simple integrals.
We park the hard drive heads and turn off the power:
Windows 3.1
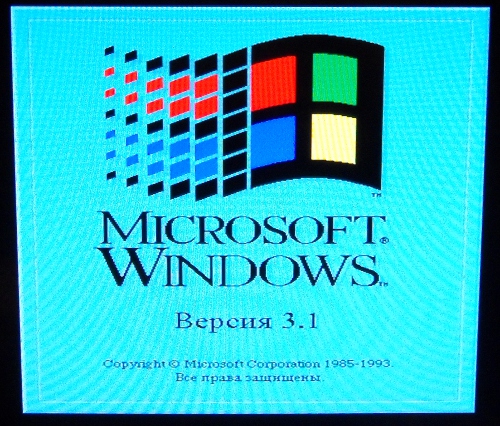
Start the system with the command win:
After loading, the "desktop" appears:
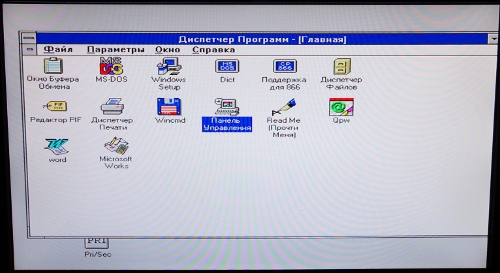
Start the program manager:
Then Windows commander:
And finally - MapleV - a system of symbolic calculations:
We calculate a simple integral, taken by the method "in parts":
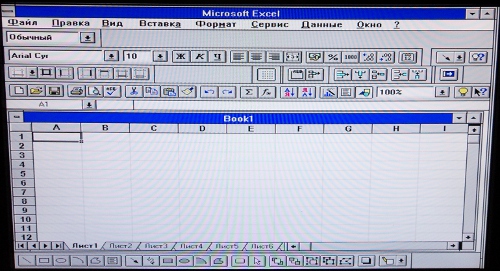
Now we will start the well-known Exel table processor:
Now all the above written in a more visual form:
We connect the network
We insert the network card described above into the 6th slot of the motherboard and connect the twisted pair cable to it:
We connect to the 2nd computer through a router:
We turn it on with a special utility that came with the network card and set it up for a free hardware interrupt and a port. In our case, select 0x0a interrupt and 0x280 port. We copy from diskette the packet driver of our card. Also disable the plug-and-play mode. Configure the web and ftp server configuration file that works with the card using the packet driver:
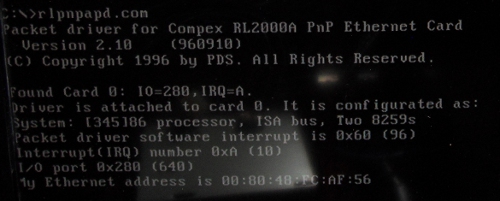
We start the packet driver of our rlpnpapd.com card and make sure that the interrupt and the port match the settings of our card. The driver will communicate with the server using software interrupt 0x60:
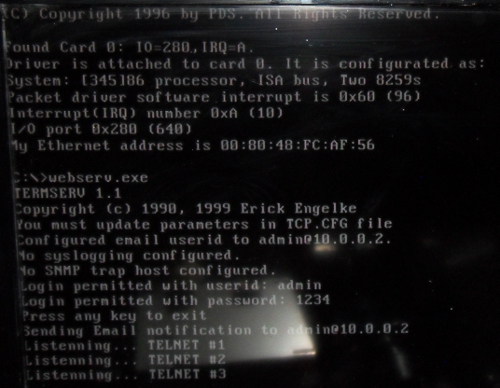
We start the server:
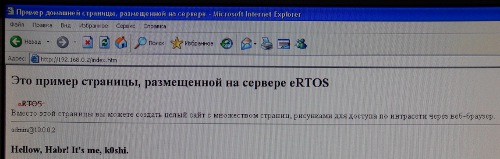
Everything, now you can connect to it using http and ftp protocols. On this server you can place a static Web site. Connect to it using a second computer:
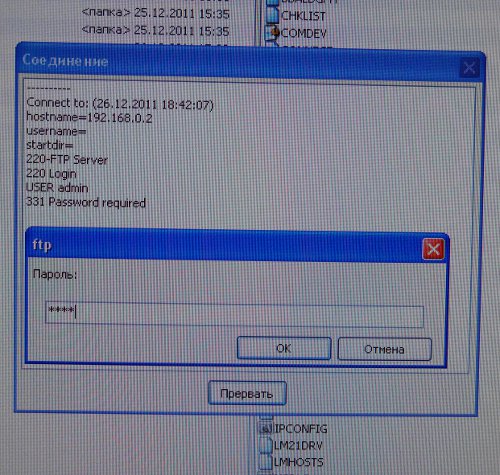
Connect to ftp to share files:
Unfortunately, the ftp server has no permissions. But for sharing files between two computers, this is not critical. It is much more pleasant and more convenient to work through the network than to transfer data on diskettes or remove the hard drive and connect it to another computer.
Here is a short video review on the network:
Windows 95
I decided to install 95 on this computer. I took another hard drive for this, formatted it in fat16 for a maximum size of 2GB (on another computer) and ... our 386 accepted it (BIOS recognized correctly initially), despite persistent information output to all disk utilities, that the size of the disk is 504Mb. Created 3 more sections and all 8 GB became available!
I will give the process of installing Windows 95:
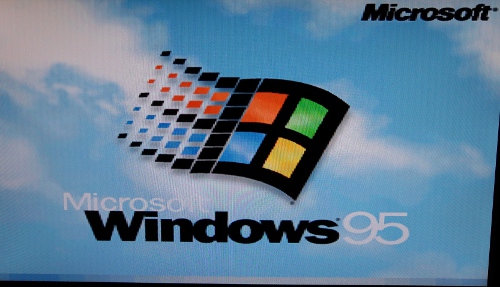
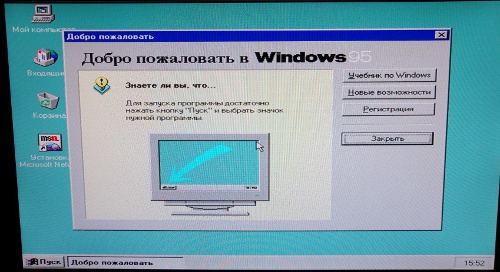
Run the installed Windows:
Desktop:
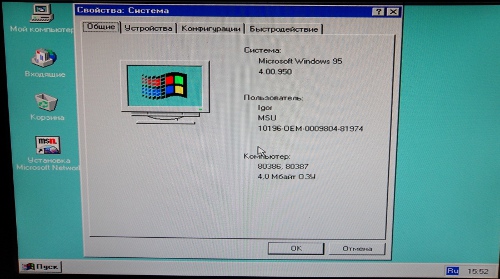
General information about the system:
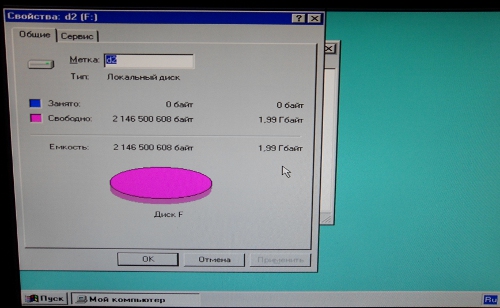
Information that the disk has 4 sections of 2047 MB, despite the total volume of 504 MB:
These disks + recognized CDROM, unknown to the BIOS (set that the D: drive is missing (there this letter stands for IDE slave)):
CDROM itself:
Information about one of the sections of hard wild:
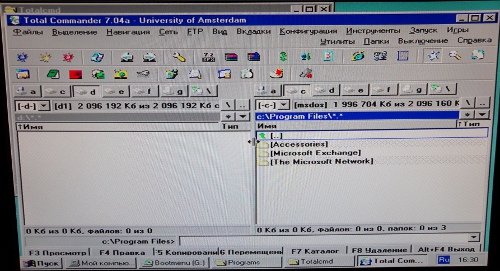
Total Commander running from disk:
Turning off our computer:
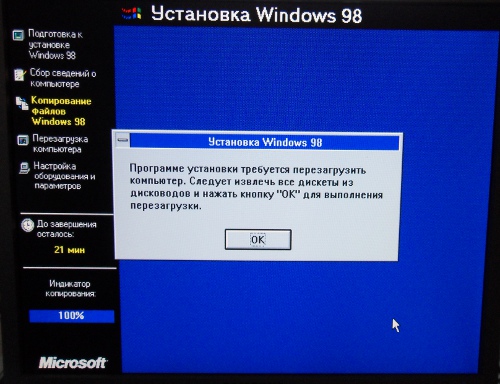
Windows 98SE
Unfortunately, the installation attempt failed.
The first part of the installation, as in the case of windows 95, produced on a nearby computer:
I connected the hard drive to 386 and launched it. Started fine:
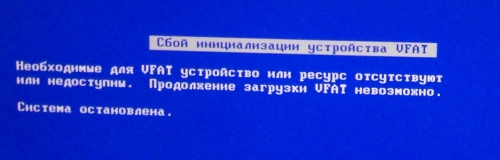
Then, a critical error occurred - the initialization of the VFAT device failed:
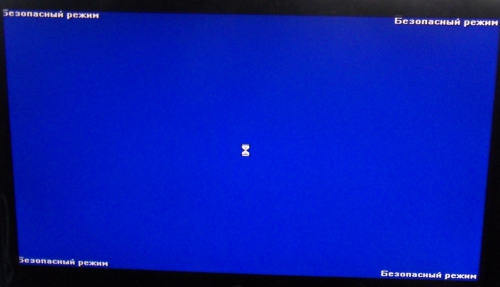
I decided to try safe mode, but this did not lead to any result. After 30 minutes of waiting, the boot screen has not changed:
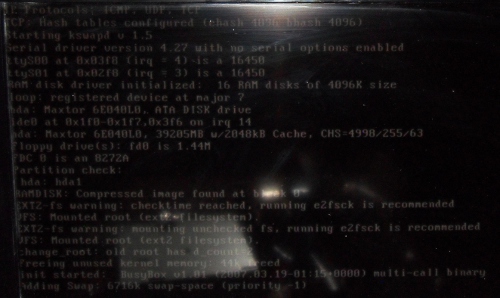
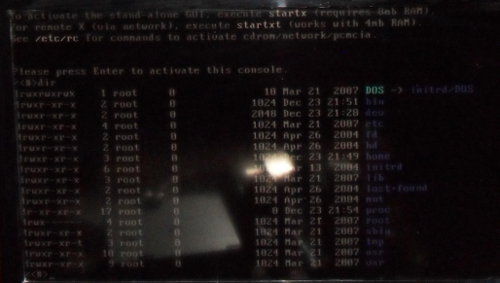
Linux
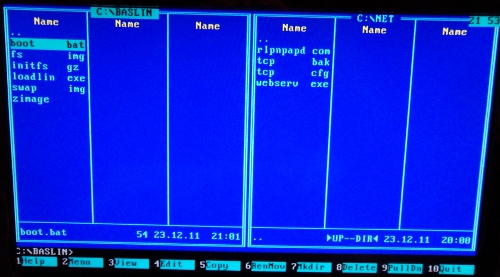
For the experiment I tried to run a fairly light version - Basic Linux. The system started successfully.
Source: https://habr.com/ru/post/135374/
All Articles