Viola Jones in own skin, part 1. Setting up the project under OpenCV
Hello my friends! Dear Habrayusers and Habrachitychiteli, I suggest you plunge into the wilds of developing a program for the recognition of emotions on the materials of my previous articles .
At the “entrance” of the automatic emotion recognition apparatus there should be a color or black and white image loaded into the module, or a video stream, and at the “output” - an array of rectangles described around faces and facial features, a text conclusion about the presence of a particular emotion on the found faces .
')
The work of the module consists of three main stages:
1. Preliminary preparation of the image for more convenient recognition of faces and facial features;
2. Face recognition and features developed by the modified Viola-Jones algorithm ;
3. Confirmation of the detected emotion, display on the screen of relevant information.
The planned program module, I previously named it “EmotionRecognitionTool v 0.1 by SkyNoName”, which implements Viola-Jones algorithm with its modification, for demonstration purposes it will be written in the Integrated Development Environment (IDE) Microsoft Visual Studio © 2010 in C or With ++ using the open library of computer vision OpenCV (Open Source Computer Vision library) latest version (but I had previously installed version 2.2), as well as videoInput version 0.1995 from the user theo watson . I will try to develop a module under Windows 7 Ultimate and Ubuntu 10.10 operating systems using the Cmake cross-platform build system .
In fact, the choice of funds is not limited in any way. You can build your applications, for example, in PHP using GD , using Qt cross-platform tools and in other programming languages. But I chose what is at hand at the moment ...
First you need to download, pay (;)) and install Microsoft Visual Studio from the official application download page .
Then download the OpenCV library . By the way, a new release of the library has recently been released with many additions and changes, namely version 2.3.1, but this is possible later. For minimal development, you can choose either 2.3 or 2.2 on the official download page .
Also, we need the Cmake build system, distributed with the Creative commons license (cc by-nd 3.0) . We swing .
When working with a video stream, we need the freely distributed VideoInput module, it can be picked up from Git (you can also use code from ready-made solutions fdlib and stasm ) to interact input and output from cameras and on cameras.
There should be no problem installing Visual Studio. However, as with the installation of OpenCV, the truth is that there is one point - you need to add some paths to the compiled dll files in the environment variable.
For version 2.2 for win32, this is done during installation: the checkbox on the item Add OpenCV to the system PATH for current user is checked.
For version “2.3.1 superpack”, the archive can be unpacked into the : \ OpenCV2.3.1 folder and then add the addresses
to the user’s PATH variable.
To do this, go to Start-Control Panel-All Controls-System (or select Properties when you click the right mouse button on the Computer icon), select Advanced system settings. In the system properties window, go to the Advanced tab and click on the Environment Variables ... button, a dialog box will open where you need to Create or Modify the PATH variable with the values of the addresses given above (I have pre-installed version 2.2, so this is the screenshot):

Install Cmake, the latest version of which is under Windows 2.8.6 and run Cmake-gui.
First, a window with empty fields will appear.
It is necessary in the Where the source code / Where source code field to specify the unpacked folder with OpenCV on the C drive:
Then, in the Where to build the binaries / Where to compile binaries (codes) field, specify the build folder attached to OpenCV:
Click the Confige button and point out the necessary generator there, in a different way Visual Studio compiler, in my VS2010 this is Visual Studio 10 Win64. After that the list of available parameters for compilation will be indicated. Because we have not yet generated a makefile, the main area of compilation will be red.
After that, you must select the files that will be compiled, check them, and click the Generate button.
We are waiting for the generation of the universal make-file to be completed and close cmake. As a result, we should add cmake manifests in the folder C: \ OpenCV2.3.1 \ build \, as well as the project OpenCV.sln.
Run this project (automatically open in the Microsoft Visual Studio environment) using the F7 key. With this project, OpenCV methods are linked, as well as examples of their use, available in samples. If in Cmake many parameters were checked with dummies, then the compilation will have to wait. The running compiler window is shown below:
For those who already had an earlier version of OpenCV before, or additional parameters were specified during the installation, Visual Studio will find all the unaccounted data and will display a message about the addition of update data and new files. If you want to "upgrade", then click Reload all:
It is time, after all dances with a tambourine, to make your own project template . For this you need:
I selected and created a project with the CLI interface (with command line support, Command Line Interface).
To do this, you need to go to the General Properties / Main properties of the project. The action plan is as follows: right-click the project name in the Solution Explorer / Project Explorer (solution) and select Properties:
Then, in the project properties window, select the Configuration properties section and its subsection VC ++ Directories / VC ++ Directories (Directories). Find in the list of parameters Include Directories / Included Directories (Directories):

After that, click on the edit field, a drop-down arrow will appear. Click on it. Select the item Edit / Edit:

In the window that opens, click on the icon to add a new directory and select the directories to include such:
After adding new directories, click the OK button:

Then, in the window that is already familiar to us, put the paths to the OpenCV libraries in the Library Directories / Library Directories (Directories) section (in my screenshot below, the paths to the library files of version 2.2 are shown):

You can go to the Linker / Linker section, select the Input subsection in it and set Additional Dependencies in the Additional Dependencies / Additional Dependencies section to the additional libraries that you want to use in your projects. For example,
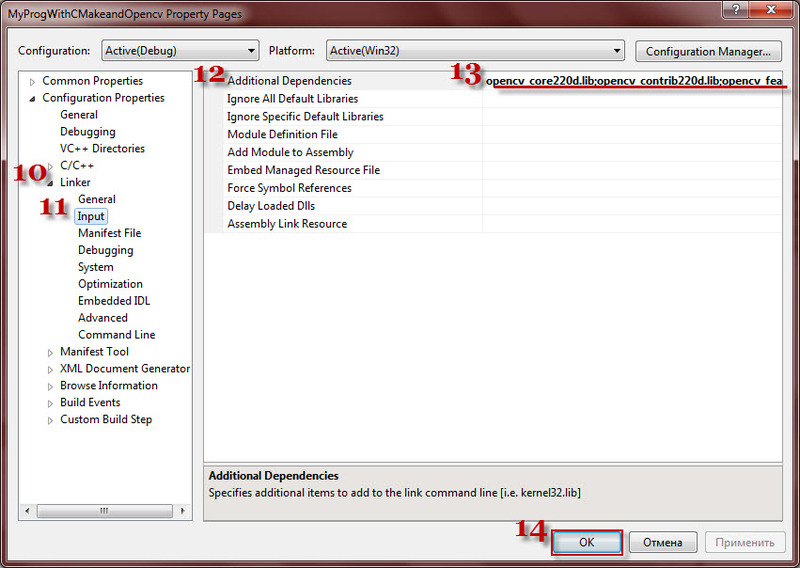
Once added, prescribed all the way, click OK.
Since we work mostly with images, as well as with finding objects, we add the following header files to the project template:
For more comfortable work and to use certain methods you need to connect libraries. Practically in any project they appear necessary:
Press F5 and try to compile the project. It should work out. Thus, we now have a single template for further development.
Starting from version 2.3, the developed project will be able to run successfully on another machine if transferred along with the required dll files, which are conveniently located in folders called “bin”, the path to which lies through the build \ x86 or build \ x64 folders.
Also, there are files that are used for advanced features (for example, the dll codec ffmpeg), they are folded into one place for convenience (hang out in the 3dparty folder).
Together with the executable file (.exe), your work should start even where special programs are not installed.
In the near future, the program will need to acquire its own user interface, more interactive and visual.
For the project to work correctly, the following minimum system configuration is required :
• processor: no lower than Intel Core 2 Duo E6550 2.33 GHz (2.33 GHz)
• RAM, RAM: SDRAM (Eng. Synchronous Dynamic Random Access Memory - synchronous dynamic memory with random access): not less than 2Gb (2Gb) DDR3 (double-data-rate three) from any manufacturer
• 150 Mb (MB) of free hard disk space
The recommended system configuration is:
• processor: Intel Core i3-370M 2.4 GHz (2.4 GHz)
• RAM, RAM: SDRAM 4Gb (4GB) DDR3
• 300 Mb (MB) of free hard disk space
At the end of development, both the module using the developed algorithm and its package implementation will be compiled. Accordingly, there are two types of possible software characteristics:
Minimum characteristics of the software (launch of release version 0.1):
• Windows XP SP3 / Vista / Windows 7 (32-bit),
- image viewer from any company.
Recommended software parameters (launch package version 0.1):
• Windows 7 (64-bit),
- image viewer from any company
- any development environment that supports working with the C ++ language (Microsoft Visual Studio 2010),
- pre-installed standard library OpenCV 2.2,
- universal compiler project Cmake 2.8.4,
- MySQL Database 6.0 database management system,
- GitBash console panel of a single free GitHub repository (GitVersion 1.7.4),
- PSPad Editor, for working with the xml format
• Linux,
- Linux kernel - 2.2.14 or higher with the following libraries:
- glibc 2.3.2 or higher
- XFree86-3.3.6 or higher
- gtk + 2.0 or higher
- fontconfig (also known as xft),
- libstdc ++ 5,
- gcc compiler for Linux,
- unpacked and ready for work MySQL for Linux,
- further, when working with the program, Linux will automatically find all the necessary service packs and packages - installers of programs.
The source code of this module must be open (in accordance with the GNU General Public License v3), because I want to. It can be copied from the release branch of the project from a single repository. The project will most likely be located at: github.com/kalian/EmotionRecognitionTool-v.-1.0 (the project’s check-out is free).
With this result, I will finish the first part of the narration of developing my own emotion recognition module.
Thanks again to all for your attention! SkyNoName was with you , wait for the continuation, I hope it will be before the New Year.
The following manuals and resources, forums, helped me in the preparation of this article.
For those who have just started developing applications using OpenCV, I recommend:
1. © «RoboCraft» - this resource was created for the purpose of informational reflection of the activities of the Kaliningrad RoboCraft team in the field of robotics. There are many examples of the implementation of digital image processing, and not only.
2. Blog programmer Andrew from Tomsk with the nickname Troyashka, who has long been familiar with OpenCV. His blog has a lot of useful information.
3. The forum of the site about computer vision Compvision.ru , in the depths of which there is a lot of information for beginners, I sat on it at the beginning of my acquaintance with OpenCV
Let's start with the design of the module
At the “entrance” of the automatic emotion recognition apparatus there should be a color or black and white image loaded into the module, or a video stream, and at the “output” - an array of rectangles described around faces and facial features, a text conclusion about the presence of a particular emotion on the found faces .
')
The work of the module consists of three main stages:
1. Preliminary preparation of the image for more convenient recognition of faces and facial features;
2. Face recognition and features developed by the modified Viola-Jones algorithm ;
3. Confirmation of the detected emotion, display on the screen of relevant information.
Choice of environment and development tools
The planned program module, I previously named it “EmotionRecognitionTool v 0.1 by SkyNoName”, which implements Viola-Jones algorithm with its modification, for demonstration purposes it will be written in the Integrated Development Environment (IDE) Microsoft Visual Studio © 2010 in C or With ++ using the open library of computer vision OpenCV (Open Source Computer Vision library) latest version (but I had previously installed version 2.2), as well as videoInput version 0.1995 from the user theo watson . I will try to develop a module under Windows 7 Ultimate and Ubuntu 10.10 operating systems using the Cmake cross-platform build system .
In fact, the choice of funds is not limited in any way. You can build your applications, for example, in PHP using GD , using Qt cross-platform tools and in other programming languages. But I chose what is at hand at the moment ...
First you need to download, pay (;)) and install Microsoft Visual Studio from the official application download page .
Then download the OpenCV library . By the way, a new release of the library has recently been released with many additions and changes, namely version 2.3.1, but this is possible later. For minimal development, you can choose either 2.3 or 2.2 on the official download page .
Also, we need the Cmake build system, distributed with the Creative commons license (cc by-nd 3.0) . We swing .
When working with a video stream, we need the freely distributed VideoInput module, it can be picked up from Git (you can also use code from ready-made solutions fdlib and stasm ) to interact input and output from cameras and on cameras.
Installation Procedure
There should be no problem installing Visual Studio. However, as with the installation of OpenCV, the truth is that there is one point - you need to add some paths to the compiled dll files in the environment variable.
For version 2.2 for win32, this is done during installation: the checkbox on the item Add OpenCV to the system PATH for current user is checked.
For version “2.3.1 superpack”, the archive can be unpacked into the : \ OpenCV2.3.1 folder and then add the addresses
C:\OpenCV2.3.1\build\bin;
C:\OpenCV2.3.1\build\x64\mingw\bin;
C:\OpenCV2.3.1\build\x64\vc9\bin;
C:\OpenCV2.3.1\build\x64\vc10\bin;
C:\OpenCV2.3.1\build\x86\mingw\bin;
C:\OpenCV2.3.1\build\x86\vc9\bin;
C:\OpenCV2.3.1\build\x86\vc10\bin;
to the user’s PATH variable.
To do this, go to Start-Control Panel-All Controls-System (or select Properties when you click the right mouse button on the Computer icon), select Advanced system settings. In the system properties window, go to the Advanced tab and click on the Environment Variables ... button, a dialog box will open where you need to Create or Modify the PATH variable with the values of the addresses given above (I have pre-installed version 2.2, so this is the screenshot):
Install Cmake, the latest version of which is under Windows 2.8.6 and run Cmake-gui.
First, a window with empty fields will appear.
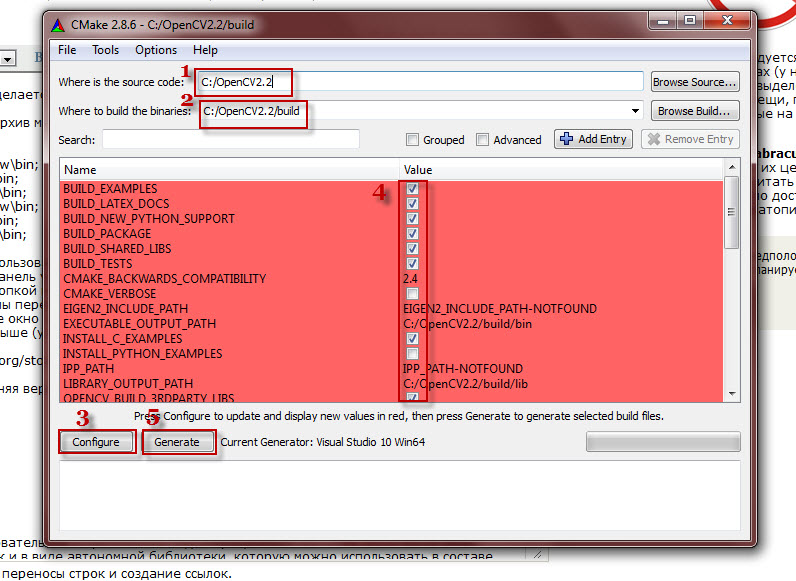
It is necessary in the Where the source code / Where source code field to specify the unpacked folder with OpenCV on the C drive:
C:/OpenCV2.3.1Then, in the Where to build the binaries / Where to compile binaries (codes) field, specify the build folder attached to OpenCV:
C:/OpenCV2.3.1/buildClick the Confige button and point out the necessary generator there, in a different way Visual Studio compiler, in my VS2010 this is Visual Studio 10 Win64. After that the list of available parameters for compilation will be indicated. Because we have not yet generated a makefile, the main area of compilation will be red.
After that, you must select the files that will be compiled, check them, and click the Generate button.
We are waiting for the generation of the universal make-file to be completed and close cmake. As a result, we should add cmake manifests in the folder C: \ OpenCV2.3.1 \ build \, as well as the project OpenCV.sln.
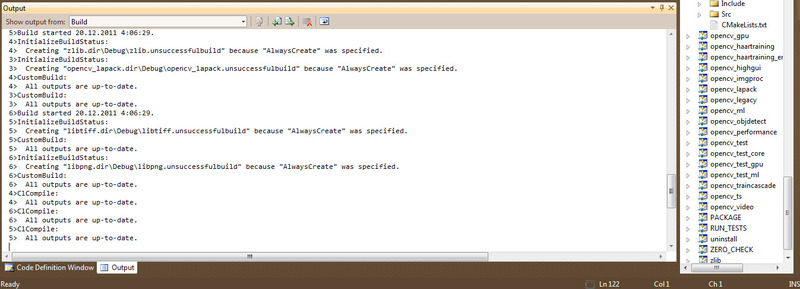
Run this project (automatically open in the Microsoft Visual Studio environment) using the F7 key. With this project, OpenCV methods are linked, as well as examples of their use, available in samples. If in Cmake many parameters were checked with dummies, then the compilation will have to wait. The running compiler window is shown below:
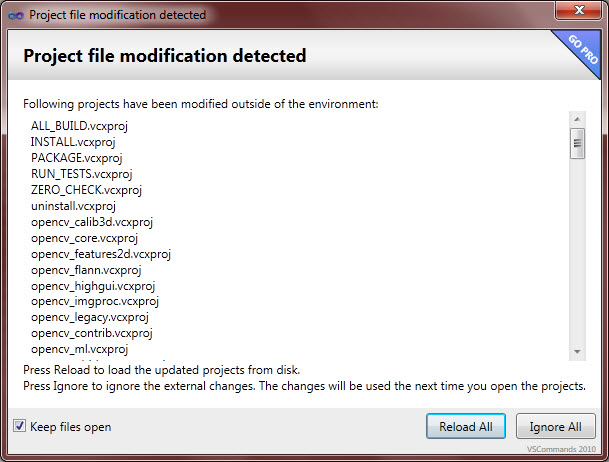
For those who already had an earlier version of OpenCV before, or additional parameters were specified during the installation, Visual Studio will find all the unaccounted data and will display a message about the addition of update data and new files. If you want to "upgrade", then click Reload all:
OpenCV project template
It is time, after all dances with a tambourine, to make your own project template . For this you need:
1. Create a new project in Microsoft Visual Studio.
I selected and created a project with the CLI interface (with command line support, Command Line Interface).
2. In the properties of the created project “bind” to it the necessary dll-, lib-files and directories.
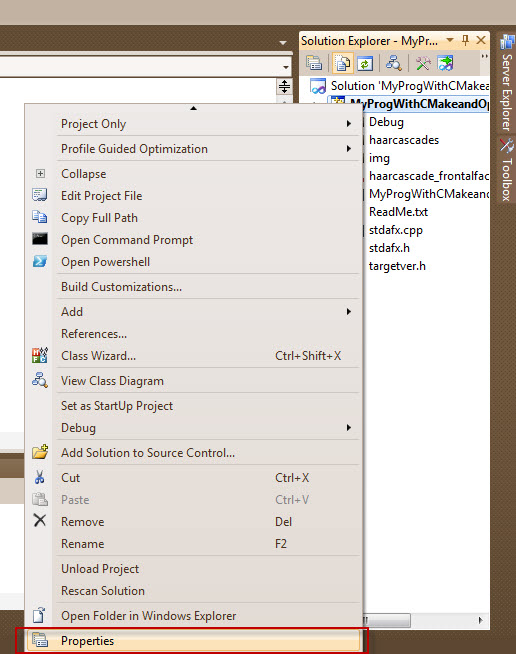
To do this, you need to go to the General Properties / Main properties of the project. The action plan is as follows: right-click the project name in the Solution Explorer / Project Explorer (solution) and select Properties:
Then, in the project properties window, select the Configuration properties section and its subsection VC ++ Directories / VC ++ Directories (Directories). Find in the list of parameters Include Directories / Included Directories (Directories):
After that, click on the edit field, a drop-down arrow will appear. Click on it. Select the item Edit / Edit:
In the window that opens, click on the icon to add a new directory and select the directories to include such:
C:\OpenCV2.3.1\include\
C:\OpenCV2.3.1\include\opencv
C:\OpenCV2.3.1\include\opencv2
C:\OpenCV2.3.1\include\opencv\3rdparty\include
C:\OpenCV2.3.1\include\opencv\modules
After adding new directories, click the OK button:
Then, in the window that is already familiar to us, put the paths to the OpenCV libraries in the Library Directories / Library Directories (Directories) section (in my screenshot below, the paths to the library files of version 2.2 are shown):
C:\OpenCV2.3.1\build\x64\vc9\lib
C:\OpenCV2.3.1\build\x64\vc10\lib
C:\OpenCV2.3.1\build\x86\vc9\lib
C:\OpenCV2.3.1\build\x86\vc10\lib
You can go to the Linker / Linker section, select the Input subsection in it and set Additional Dependencies in the Additional Dependencies / Additional Dependencies section to the additional libraries that you want to use in your projects. For example,
opencv_calib3d231.lib
opencv_features2d231d.lib
opencv_haartraining_engined.lib
opencv_video231d.lib
etc. If necessary, add them to this item:Once added, prescribed all the way, click OK.
3. To register the main headers and the necessary plug-in libraries.
Since we work mostly with images, as well as with finding objects, we add the following header files to the project template:
// #include <opencv2/objdetect/objdetect.hpp> #include <opencv2/features2d/features2d.hpp> #include <opencv2/highgui/highgui.hpp> #include <opencv2/calib3d/calib3d.hpp> #include <opencv2/imgproc/imgproc_c.h> #include <opencv2/imgproc/imgproc.hpp> For more comfortable work and to use certain methods you need to connect libraries. Practically in any project they appear necessary:
// #include <stdio.h> #include <stdlib.h> #include <string.h> #include <assert.h> #include <math.h> #include <float.h> #include <limits.h> #include <time.h> #include <ctype.h> #include <conio.h> Press F5 and try to compile the project. It should work out. Thus, we now have a single template for further development.
Starting from version 2.3, the developed project will be able to run successfully on another machine if transferred along with the required dll files, which are conveniently located in folders called “bin”, the path to which lies through the build \ x86 or build \ x64 folders.
Also, there are files that are used for advanced features (for example, the dll codec ffmpeg), they are folded into one place for convenience (hang out in the 3dparty folder).
Together with the executable file (.exe), your work should start even where special programs are not installed.
Requirements for the development of a project to recognize emotions
In the near future, the program will need to acquire its own user interface, more interactive and visual.
For the project to work correctly, the following minimum system configuration is required :
• processor: no lower than Intel Core 2 Duo E6550 2.33 GHz (2.33 GHz)
• RAM, RAM: SDRAM (Eng. Synchronous Dynamic Random Access Memory - synchronous dynamic memory with random access): not less than 2Gb (2Gb) DDR3 (double-data-rate three) from any manufacturer
• 150 Mb (MB) of free hard disk space
The recommended system configuration is:
• processor: Intel Core i3-370M 2.4 GHz (2.4 GHz)
• RAM, RAM: SDRAM 4Gb (4GB) DDR3
• 300 Mb (MB) of free hard disk space
Software Characteristics
At the end of development, both the module using the developed algorithm and its package implementation will be compiled. Accordingly, there are two types of possible software characteristics:
Minimum characteristics of the software (launch of release version 0.1):
• Windows XP SP3 / Vista / Windows 7 (32-bit),
- image viewer from any company.
Recommended software parameters (launch package version 0.1):
• Windows 7 (64-bit),
- image viewer from any company
- any development environment that supports working with the C ++ language (Microsoft Visual Studio 2010),
- pre-installed standard library OpenCV 2.2,
- universal compiler project Cmake 2.8.4,
- MySQL Database 6.0 database management system,
- GitBash console panel of a single free GitHub repository (GitVersion 1.7.4),
- PSPad Editor, for working with the xml format
• Linux,
- Linux kernel - 2.2.14 or higher with the following libraries:
- glibc 2.3.2 or higher
- XFree86-3.3.6 or higher
- gtk + 2.0 or higher
- fontconfig (also known as xft),
- libstdc ++ 5,
- gcc compiler for Linux,
- unpacked and ready for work MySQL for Linux,
- further, when working with the program, Linux will automatically find all the necessary service packs and packages - installers of programs.
The source code of this module must be open (in accordance with the GNU General Public License v3), because I want to. It can be copied from the release branch of the project from a single repository. The project will most likely be located at: github.com/kalian/EmotionRecognitionTool-v.-1.0 (the project’s check-out is free).
With this result, I will finish the first part of the narration of developing my own emotion recognition module.
Thanks again to all for your attention! SkyNoName was with you , wait for the continuation, I hope it will be before the New Year.
The following manuals and resources, forums, helped me in the preparation of this article.
For those who have just started developing applications using OpenCV, I recommend:
1. © «RoboCraft» - this resource was created for the purpose of informational reflection of the activities of the Kaliningrad RoboCraft team in the field of robotics. There are many examples of the implementation of digital image processing, and not only.
2. Blog programmer Andrew from Tomsk with the nickname Troyashka, who has long been familiar with OpenCV. His blog has a lot of useful information.
3. The forum of the site about computer vision Compvision.ru , in the depths of which there is a lot of information for beginners, I sat on it at the beginning of my acquaintance with OpenCV
Source: https://habr.com/ru/post/135244/
All Articles