Homemade flow meter for car
Hello! Let me tell you about my attempt to make an on-board flow meter based on Arduino Nano. This is my second arduinka piece, the first was a walking spider. After experimenting with light bulbs and servo drives, I wanted to do something more useful.
Of course, it was possible to buy a finished product, maybe even for a lower price (although I did not find it for less). But it was not interesting, and it could not have those functions that I wanted to have. In addition, a hobby, like sports, rarely justifies costs in material form.
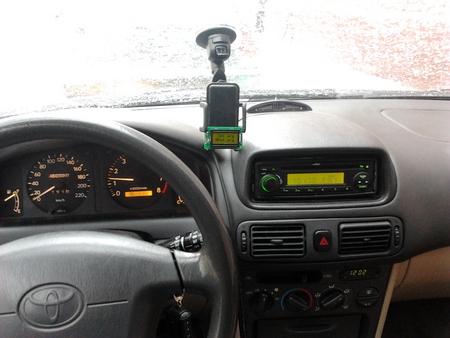
Before talking about the process, I’ll show a picture of how it looks now. The program is still in debugging stage, so the controller hangs on the wires in the cabin, and the display is stuck on double-sided tape) In the future, this will be installed humanly.
')
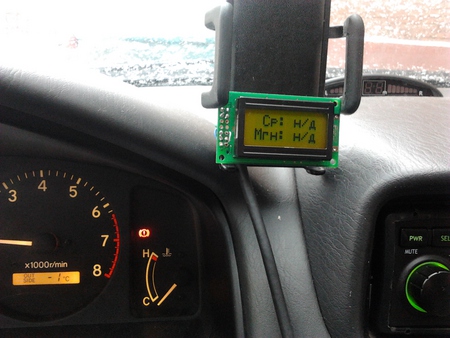
The device calculates and displays on the display kilometer fuel consumption: on the bottom line, instant, at the top - the average for the last kilometer.
The idea to do this thing came to me a long time ago, but this was hampered by the lack of information about what and how it works in my car. I have it quite old - Corolla E11 with a 4A-FE engine. I was aware of the engine that it is an injector and that the injectors have more or less constant performance, which is also what the control unit expects. Therefore, the basic idea of measuring the flow is the measurement of the total opening time of the injectors.
The computer, as suggested by a good person, and as the instructions later confirmed, controls the nozzle as follows: plus it is always served, and the minus opens and closes depending on the wishes of the computer. So, if you connect to the negative wire of the nozzle, you can track the moment of its opening, measuring the potential: when the computer closes the nozzle to ground, 14 volts drops to zero. This simple idea came to me far from immediately, since my knowledge in electronics is limited to the school course of physics and Ohm's law. Then it was necessary to turn + 14V into + 5V, which can be fed to the logic input of the controller. Here I somehow doped up to the shunting circuit known to all electronics, but before that I had to study the manuals and make sure that the nozzle resistance is negligible, and the logic input resistance is almost infinite.
To calculate the kilometer consumption, it was necessary to obtain data from the speed sensor. It turned out to be easier with him, since he produces steps 0 ... + 5B, the more steps, the more mileage. These steps went straight to the logical input without conversions.
I really wanted to display data on the LCD display. I considered various options and stopped at the text display of MELT for 234 rubles based on the Hitachi HD44780 microcontroller, which Arduino can work with since birth.
After long and painful reflections, the following scheme was drawn up:
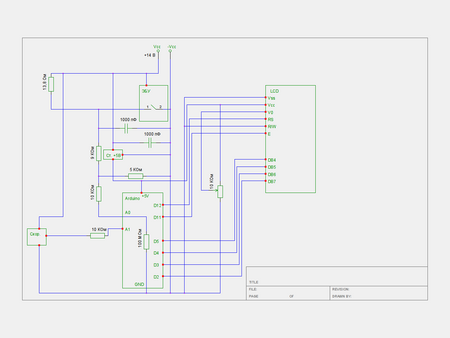
In addition to the resistors that lower the voltage from the injector, there is a voltage regulator in order to power the controller from the on-board network, as well as capacitors added to the advice of the grandfather and a good friend, in order to smooth out possible voltage peaks, and a resistor “just in case” for each logic input. And yes, I decided to send signals from the injector and the sensor to the analog inputs, which I did not regret afterwards, because in digital mode the analog inputs did not want to understand the difference between the closed and open injector, and in the analog one they clearly showed different voltage levels . Perhaps this is a flaw in my scheme, but everything was done for the first time, blindly and without testing on the layout, in general, at random.
Following the scheme, I laid out the layout of the printed circuit board (yes, I immediately rushed to print, because I didn’t really want to mess around with the tail of the wires on the circuit board):
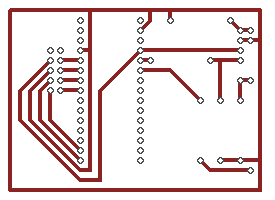
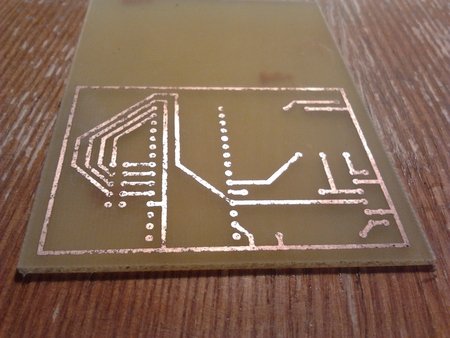
He hounded the board for the first time and with some violations of the technology, so the result was so-so. But after the tinning, everything came in order. Grass by the method of laser iron, studied by the well-known rollers on easyelectronics. After etching the board turned out like this:
In order to solder the elements to the board, it was necessary to make a hole in it. I did not want to buy an expensive Dremel type drill or a similar one, and in order to save a couple of thousand rubles, I skolhozil a microdrill from a motor and a collet clamp, which were bought in a radio store nearby:

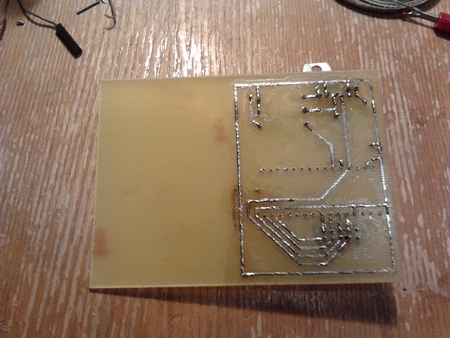
After drilling holes, tinning and soldering, the board began to look like this:
And from the front:
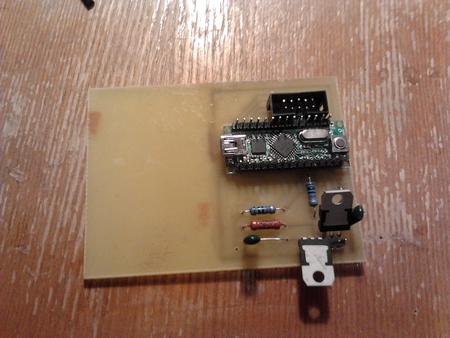
Here I foolishly soldered an extra stabilizer, which was later replaced by a resistor.
After the product was ready, I started testing in combat conditions, i.e., right on the machine. To do this, at my request, the wires from the nozzle and the sensor were brought to the salon. For the microcontroller, I wrote a test program that wrote raw data to the COM port — the number of pulses from the speed sensor and milliseconds during which the injector was open. After sitting in a car with a laptop and seeing that the data was true, I was overwhelmed with joy and went home to write a working version of the program.
After two or three testing sessions, the program began to show valid data. At first, I calculated the average consumption over a time interval (5-10 minutes), which caused an interesting effect: after five minutes of standing at a traffic light (not even a traffic jam, but a slight resemblance), the kilometer consumption jumped up to exorbitant values of 50-100 liters per 100 km. At first I was perplexed, but then I realized that this is a common thing, because the kilometer consumption, and I average by time: the watch ticks, gasoline flows, and the car costs. After that, I came up with the bright idea of averaging over mileage: in the current version, the program calculates how much gasoline was consumed over the last kilometer, and shows how many liters will go if you drive 100 km at the same pace. “Instant” consumption is calculated as the average for the last second and is updated every second.
The source code (if anyone is interested) I posted on PasteBin. There is still something to refine, even the style of the program itself, since it was written quite spontaneously.
Not yet the final result:
Of course, it was possible to buy a finished product, maybe even for a lower price (although I did not find it for less). But it was not interesting, and it could not have those functions that I wanted to have. In addition, a hobby, like sports, rarely justifies costs in material form.
Before talking about the process, I’ll show a picture of how it looks now. The program is still in debugging stage, so the controller hangs on the wires in the cabin, and the display is stuck on double-sided tape) In the future, this will be installed humanly.
')

The device calculates and displays on the display kilometer fuel consumption: on the bottom line, instant, at the top - the average for the last kilometer.
The idea to do this thing came to me a long time ago, but this was hampered by the lack of information about what and how it works in my car. I have it quite old - Corolla E11 with a 4A-FE engine. I was aware of the engine that it is an injector and that the injectors have more or less constant performance, which is also what the control unit expects. Therefore, the basic idea of measuring the flow is the measurement of the total opening time of the injectors.
The computer, as suggested by a good person, and as the instructions later confirmed, controls the nozzle as follows: plus it is always served, and the minus opens and closes depending on the wishes of the computer. So, if you connect to the negative wire of the nozzle, you can track the moment of its opening, measuring the potential: when the computer closes the nozzle to ground, 14 volts drops to zero. This simple idea came to me far from immediately, since my knowledge in electronics is limited to the school course of physics and Ohm's law. Then it was necessary to turn + 14V into + 5V, which can be fed to the logic input of the controller. Here I somehow doped up to the shunting circuit known to all electronics, but before that I had to study the manuals and make sure that the nozzle resistance is negligible, and the logic input resistance is almost infinite.
To calculate the kilometer consumption, it was necessary to obtain data from the speed sensor. It turned out to be easier with him, since he produces steps 0 ... + 5B, the more steps, the more mileage. These steps went straight to the logical input without conversions.
I really wanted to display data on the LCD display. I considered various options and stopped at the text display of MELT for 234 rubles based on the Hitachi HD44780 microcontroller, which Arduino can work with since birth.
After long and painful reflections, the following scheme was drawn up:

In addition to the resistors that lower the voltage from the injector, there is a voltage regulator in order to power the controller from the on-board network, as well as capacitors added to the advice of the grandfather and a good friend, in order to smooth out possible voltage peaks, and a resistor “just in case” for each logic input. And yes, I decided to send signals from the injector and the sensor to the analog inputs, which I did not regret afterwards, because in digital mode the analog inputs did not want to understand the difference between the closed and open injector, and in the analog one they clearly showed different voltage levels . Perhaps this is a flaw in my scheme, but everything was done for the first time, blindly and without testing on the layout, in general, at random.
Following the scheme, I laid out the layout of the printed circuit board (yes, I immediately rushed to print, because I didn’t really want to mess around with the tail of the wires on the circuit board):

He hounded the board for the first time and with some violations of the technology, so the result was so-so. But after the tinning, everything came in order. Grass by the method of laser iron, studied by the well-known rollers on easyelectronics. After etching the board turned out like this:

In order to solder the elements to the board, it was necessary to make a hole in it. I did not want to buy an expensive Dremel type drill or a similar one, and in order to save a couple of thousand rubles, I skolhozil a microdrill from a motor and a collet clamp, which were bought in a radio store nearby:

After drilling holes, tinning and soldering, the board began to look like this:

And from the front:

Here I foolishly soldered an extra stabilizer, which was later replaced by a resistor.
After the product was ready, I started testing in combat conditions, i.e., right on the machine. To do this, at my request, the wires from the nozzle and the sensor were brought to the salon. For the microcontroller, I wrote a test program that wrote raw data to the COM port — the number of pulses from the speed sensor and milliseconds during which the injector was open. After sitting in a car with a laptop and seeing that the data was true, I was overwhelmed with joy and went home to write a working version of the program.
After two or three testing sessions, the program began to show valid data. At first, I calculated the average consumption over a time interval (5-10 minutes), which caused an interesting effect: after five minutes of standing at a traffic light (not even a traffic jam, but a slight resemblance), the kilometer consumption jumped up to exorbitant values of 50-100 liters per 100 km. At first I was perplexed, but then I realized that this is a common thing, because the kilometer consumption, and I average by time: the watch ticks, gasoline flows, and the car costs. After that, I came up with the bright idea of averaging over mileage: in the current version, the program calculates how much gasoline was consumed over the last kilometer, and shows how many liters will go if you drive 100 km at the same pace. “Instant” consumption is calculated as the average for the last second and is updated every second.
The source code (if anyone is interested) I posted on PasteBin. There is still something to refine, even the style of the program itself, since it was written quite spontaneously.
Not yet the final result:

Source: https://habr.com/ru/post/135231/
All Articles