Viola Jones in her own skin, part 2. - Emotion? - OMG, Yes !!!
Hello everyone again! I decided to immediately try to release two articles, almost at the same time, so as not to interrupt the narrative chain, since The beginning of this article is very important!
So, many were waiting for examples of my program and an explanation of its work in terms of writing code. I am telling consistently so that everyone can repeat it on his computer. Pay more attention to the abundant comments in the code, they have power! And do not be afraid of a mega-small scroll, because a lot of information. Relocate to a place with good internet, there are a lot of schemes and photos in the article!
As a result, in the previous part , a project template was developed with the necessary headers connected and with the OpenCV library hooked up. Let's see what type of work still needs to be done and how to do it.
Also, hot on the heels , it turned out that you can sketch out approximate schemes of work.
standard
and Viola-Jones's modified method of working with photography.

')
Since classifiers are used in the emotion recognition module, a sequence of actions for their training and training has been developed.
So, in order to train a classifier , you will need:
• Preparing development tools, connecting the OpenCV library;
• Data preparation. Suitable for use:
- Test sets of "positive" and "negative" images (positive and negative images). “Positive” images contain an object of interest (face, mouth, nose, and so on),
"Negative" images contain only the background (background);
- .vec file, easily complemented, containing the same sets of images, only in a reduced size;
- The base of ready-made images, a lot of them. For example, FERET , used by the OpenCV developers;
• Crop positive images to the desired part, gluing in a row;
• Preparation of natural test images in the form of “object of interest in the background”;
• Selection of regions of interest ( ROI ) on a given set of natural test images, in essence, setting the coordinates of the place where the object of interest is located;
• Saving to a new data set;
• Creation of samples (training samples);
• Training. At this stage:
- Training classifier Haar;
- Create XML file.
The collected image sets are collected in the data folder, and in the haarcascades folder, the learning results of the cascades in the form of Haar classifiers in XML format are added.
For each classifier, expressed as an entity with subordinate attributes, you must create a separate XML-storage. DOM (Document Object Model), or in Russian, the object model of the document of such a classifier in general form is presented below. The root element is Storage, the length of the tree itself is 7.

There are many levels in a cascade - this can be seen in the example of the first level of the classifier:
This example shows what information is stored in the XML used. This is information about the classifier (haarcascade) and its size (size), level used (stage), predecessor, or parent of this level (parent), next level, or follower (next), the tree (tree) and its root node ( root node) with parameters (threshold, left, right). Next, information about the features themselves (features) is built up in the nodes of this tree, which are specified by rectangles with parameters (rects) with a certain angle of inclination (tilted). In a more specific example, it is necessary to split the levels and trees in a general sense, therefore the length of such a tree is equal to 9.
As a result of the work of the program, the output should be xml-files with the structure shown in the listing below. All xml-files will be identical in structure and DOM-model.
In order to train a classifier, we need large sets of images of “positive”, and large sets of images of “negative”, roughly speaking, the desired object and its background. It is important that the sets are of the same size, since glueing occurs and the coordinates where the object is located, that is, those coordinates that the classifier memorizes and thus learns, are indicated. When gluing a new set of images is obtained. An example of such a "glued" image from my database:

Such samples are created using the createsamples.cpp file, which in turn loads cvhaartrainig.h to work. I took them from the standard OpenCV library and “finished” for my needs. There are a lot of parameters to be specified when creating such samples, presented in the following listing are used by me, but this is not all parameters:
As a result, a .dat-file is also created immediately, where we can view the following information: the resulting image is assigned a name according to the coordinates of the marked features for further processing. The numbers in the example mean that the number of objects found is 5 and instances of the object are found in a rectangle with coordinates {30, 49}, and 469 and 250 in width and height:
Creation is also possible through a .vec file, which is used in OpenCV, and which is used to represent images, contains the name of the file and can be extended with additional code. You can make this add information through addVec to the vec-file:
The next stage after the creation of samples is the stage of training the classifier, and the parameters I specify are as follows:
The result of this stage are ready-to-use, trained classifiers. In the module that I am developing, a lot of classifiers will be used (for each facial feature that distinguishes this emotion), which I prepared in advance, because classifiers are trained for a long time. I taught them on different computers. Each classifier takes about three days with the weak computing power of a computer! So I advise, if there is a deadline, then take up the job now:
As soon as the source image is available, the module automatically recognizes the desired objects on it. The sequence of actions looks very simple, but behind this lies the difficulty of implementing these steps.
Let us examine the init () function, where images are loaded, resources are initialized, the database is connected to, and an image is prepared for further processing:
Then the image falls into the main loop of the module. The main work of my developed method of recognition is divided into functions that go in this order:
To test the performance and speed of the algorithm, tests were carried out with a full EmotionDB database (15 images - no longer needed for the test) and a simple array of images in a local directory (10 images). These images in the database and in the array have a different size, there are color, and there are black and white photographs, with different numbers of people on them.
For the tests, the built-in file OpenCV performance.cpp is used , where all data is calculated and the ROC curve is plotted. An example of the calculation of stages or stages of the classifier:
Although there are tilted faces in the test image set, the algorithm does not skip and identify such faces, but detection works at a lower speed than is possible in the simple case of a non-tilted face. In conditions of insufficient illumination and large fusion with the background of the desired objects, as well as interfering noise and noise in the image, the module works slower than with normal images, along with the standard Viola-Jones algorithm.
In conditions of poor visibility of the object (mixing with the background), the module copes with recognition better by using the proposed mechanism of preliminary image processing.
, - OpenCV - :
C , , . . , , , .
: (~250-300 ms), . 400 ms . , .
Thanks to all! ! ! SkyNoName
PS ! «», - …
So, many were waiting for examples of my program and an explanation of its work in terms of writing code. I am telling consistently so that everyone can repeat it on his computer. Pay more attention to the abundant comments in the code, they have power! And do not be afraid of a mega-small scroll, because a lot of information. Relocate to a place with good internet, there are a lot of schemes and photos in the article!
Project development
As a result, in the previous part , a project template was developed with the necessary headers connected and with the OpenCV library hooked up. Let's see what type of work still needs to be done and how to do it.
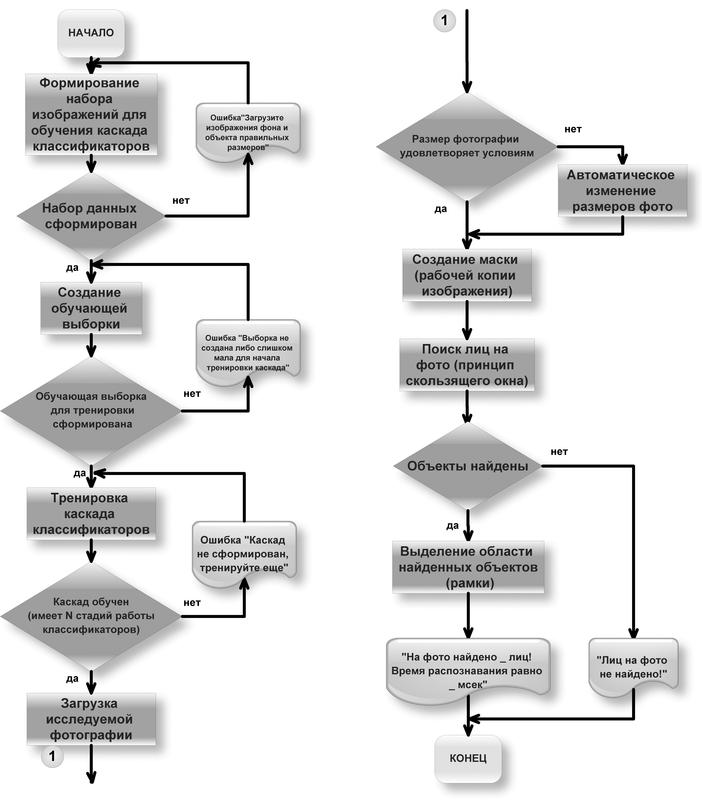
Also, hot on the heels , it turned out that you can sketch out approximate schemes of work.
standard
and Viola-Jones's modified method of working with photography.
')
Pre-training Classifiers
Since classifiers are used in the emotion recognition module, a sequence of actions for their training and training has been developed.
So, in order to train a classifier , you will need:
• Preparing development tools, connecting the OpenCV library;
• Data preparation. Suitable for use:
- Test sets of "positive" and "negative" images (positive and negative images). “Positive” images contain an object of interest (face, mouth, nose, and so on),
"Negative" images contain only the background (background);
- .vec file, easily complemented, containing the same sets of images, only in a reduced size;
- The base of ready-made images, a lot of them. For example, FERET , used by the OpenCV developers;
• Crop positive images to the desired part, gluing in a row;
• Preparation of natural test images in the form of “object of interest in the background”;
• Selection of regions of interest ( ROI ) on a given set of natural test images, in essence, setting the coordinates of the place where the object of interest is located;
• Saving to a new data set;
• Creation of samples (training samples);
• Training. At this stage:
- Training classifier Haar;
- Create XML file.
The collected image sets are collected in the data folder, and in the haarcascades folder, the learning results of the cascades in the form of Haar classifiers in XML format are added.
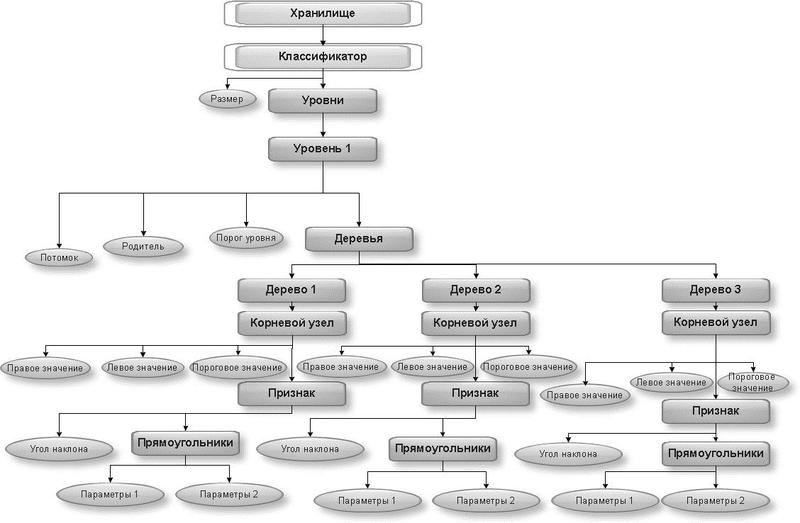
For each classifier, expressed as an entity with subordinate attributes, you must create a separate XML-storage. DOM (Document Object Model), or in Russian, the object model of the document of such a classifier in general form is presented below. The root element is Storage, the length of the tree itself is 7.
There are many levels in a cascade - this can be seen in the example of the first level of the classifier:
This example shows what information is stored in the XML used. This is information about the classifier (haarcascade) and its size (size), level used (stage), predecessor, or parent of this level (parent), next level, or follower (next), the tree (tree) and its root node ( root node) with parameters (threshold, left, right). Next, information about the features themselves (features) is built up in the nodes of this tree, which are specified by rectangles with parameters (rects) with a certain angle of inclination (tilted). In a more specific example, it is necessary to split the levels and trees in a general sense, therefore the length of such a tree is equal to 9.
Classifier file structure
As a result of the work of the program, the output should be xml-files with the structure shown in the listing below. All xml-files will be identical in structure and DOM-model.
<storage> <classifier1> <size></size> <stages> <_><!-- #of stage --> <trees> <_><!-- #of tree --> <_><!-- root node --> <feature> <rects><_></_><_></_></rects> <tilted></tilted> </feature> <threshold></threshold> <left_val></left_val> <right_val></right_val> </_></_></trees> <stage_threshold></stage_threshold> <parent></parent> <next></next> … </_></stages> <_></classifier1> </storage> Preparation of new data sets
In order to train a classifier, we need large sets of images of “positive”, and large sets of images of “negative”, roughly speaking, the desired object and its background. It is important that the sets are of the same size, since glueing occurs and the coordinates where the object is located, that is, those coordinates that the classifier memorizes and thus learns, are indicated. When gluing a new set of images is obtained. An example of such a "glued" image from my database:
Such samples are created using the createsamples.cpp file, which in turn loads cvhaartrainig.h to work. I took them from the standard OpenCV library and “finished” for my needs. There are a lot of parameters to be specified when creating such samples, presented in the following listing are used by me, but this is not all parameters:
void reateTrainingSamples( const char* filename,// , , const char* imgfilename,// int bgcolor, // int bgthreshold,// , 8- const char* bgfilename, // int count, int invert = 20,// int maxintensitydev = 40,// double maxxangle = 1.1,// X double maxyangle = 1.1, // Y double maxzangle = 0.5, // Z int showsamples = 0,// , int winwidth = 24,// int winheight = 24// ); As a result, a .dat-file is also created immediately, where we can view the following information: the resulting image is assigned a name according to the coordinates of the marked features for further processing. The numbers in the example mean that the number of objects found is 5 and instances of the object are found in a rectangle with coordinates {30, 49}, and 469 and 250 in width and height:
../../ kalian2.png/0005_0030_0049_0469_0250.jpg 5 30 49 469 250Creation is also possible through a .vec file, which is used in OpenCV, and which is used to represent images, contains the name of the file and can be extended with additional code. You can make this add information through addVec to the vec-file:
addVec (oldvecname, newvecname, samplwidth, samplheight);// , newvecname , , oldvecname, . Parameters and stages of training classifier
The next stage after the creation of samples is the stage of training the classifier, and the parameters I specify are as follows:
void reateCascadeClassifier( const char* dirname,// , const char* vecfilename,// vec- const char* bgfilename, // , int npos,// int nneg, // int nstages,// int numprecalculated,// , int numsplits,// , : 1 – , 2 - float minhitrate = 0.995F,// float maxfalsealarm = 0.5F,// float weightfraction = 0.95F,// , 90 int mode = 3,// , , . 0, BASIC – , -, , 2, ALL , 45 , 3 int symmetric = 1,// , , 0, int equalweights = 1,// 0, int winwidth = 24,// int winheight = 24,// int boosttype = 3,// , 0 – Discrete AdaBoost, 1 – Real AdaBoost, 2 – LogitBoost, 3 – Gentle AdaBoost int stumperror = 0 );// , Discrete AdaBoost The result of this stage are ready-to-use, trained classifiers. In the module that I am developing, a lot of classifiers will be used (for each facial feature that distinguishes this emotion), which I prepared in advance, because classifiers are trained for a long time. I taught them on different computers. Each classifier takes about three days with the weak computing power of a computer! So I advise, if there is a deadline, then take up the job now:
• face_identify_classifier.xml – , • eyes_identify_classifier.xml – , • eyebrows_identify_classifier.xml – , • mouth_identify_classifier.xml – , • nose_identify_classifier.xml – , ... • happysmile_kalian_classifier.xml – , • happyeyes_kalian_classifier.xml – , , • happyeyebrows_kalian_classifier.xml – , • surprisingeyes_kalian_classifier.xml – , , • openingmouth_kalian_classifier.xml – , • surprisingeyebrows_kalian_classifier.xml – «» ( ) Apparatus for automatic recognition of emotions
As soon as the source image is available, the module automatically recognizes the desired objects on it. The sequence of actions looks very simple, but behind this lies the difficulty of implementing these steps.
Let us examine the init () function, where images are loaded, resources are initialized, the database is connected to, and an image is prepared for further processing:
- Initially, using the special function cvLoad (), the created classifiers for detection and recognition are loaded, I have them located in the haarcascades folder of my project (... \ haarcascades \). The following is the creation of storage:
storage = cvCreateMemStorage(0);:// , , , void init(){// , // haarcascades cascade = (CvHaarClassifierCascade*)cvLoad( "haarcascades/mouth_disugst_classifier.xml" );// //cascade1 = (CvHaarClassifierCascade*)cvLoad( "haarcascades/ eyes_identify_classifier.xml" );// cascade1 = (CvHaarClassifierCascade*)cvLoad( "haarcascades/face_identify_classifier.xml" );// cascade7 = (CvHaarClassifierCascade*)cvLoad( "haarcascades/haarcascade_frontalface_alt_tree.xml" );// cascade2 = (CvHaarClassifierCascade*)cvLoad( "haarcascades/haarcascade_eye.xml" );// //cascade3 = (CvHaarClassifierCascade*)cvLoad( "haarcascades/haarcascade_mcs_nose.xml" );// cascade3 = (CvHaarClassifierCascade*)cvLoad( "haarcascades/haarcascade_kalian_nose.xml" );// cascade4 = (CvHaarClassifierCascade*)cvLoad( "haarcascades/haarcascade_profileface.xml" );// // cascade5 = (CvHaarClassifierCascade*)cvLoad( "haarcascades/smiled_01.xml" );//1 cascade8 = (CvHaarClassifierCascade*)cvLoad( "haarcascades/smiled_02.xml" );//2 cascade9 = (CvHaarClassifierCascade*)cvLoad( "haarcascades/smiled_03.xml" );//3 cascade10 = (CvHaarClassifierCascade*)cvLoad( "haarcascades/smiled_04.xml" );//4 cascade6 = (CvHaarClassifierCascade*)cvLoad( "haarcascades/haarcascade_mcs_eyepair_big.xml" );// ... // storage = cvCreateMemStorage(0); - Using the function
cvNamedWindow();A window appears in which the results of operations with the image and on the image will appear. - If you use a camera, you will need a code to capture from the camera:
// CvCapture* capture = cvCreateCameraCapture(CV_CAP_ANY); //cvCaptureFromCAM( 0 ); assert( capture ); //cvSetCaptureProperty(capture, CV_CAP_PROP_FRAME_WIDTH, 640);//1280); //cvSetCaptureProperty(capture, CV_CAP_PROP_FRAME_HEIGHT, 480);//960); // double width = cvGetCaptureProperty(capture, CV_CAP_PROP_FRAME_WIDTH); double height = cvGetCaptureProperty(capture, CV_CAP_PROP_FRAME_HEIGHT); printf("[i] %.0f x %.0f\n", width, height ); IplImage* frame=0; cvNamedWindow("capture", CV_WINDOW_AUTOSIZE); printf("[i] press Enter for capture image and Esc for quit!\n\n"); int counter=0; char filename[512]; while(true){ // frame = cvQueryFrame( capture ); // cvShowImage("capture", frame); char c = cvWaitKey(33); if (c == 27) { // ESC break; } else if(c == 13) { // Enter // sprintf(filename, "Image%d.jpg", counter); printf("[i] capture... %s\n", filename); cvSaveImage(filename, frame); counter++; } - The program includes a cycle in which the image or an array of images is loaded into memory:
image = cvLoadImage( array_1[j], 1 ); printf("\n[i] Image loaded\n", image); assert( image!= 0 );
If the data is stored in the database, then at this stage, the connection of the required mysql.h header to the database is made, the preliminary connection and loading of data from the database into the memory if necessary:#include <mysql.h> … // void comlinePrint(char *); … // MYSQL conn; // MYSQL_RES *res; // MYSQL_ROW row; // if(!mysql_init(&conn)) comlinePrint("Error: MySql - \n"); // if(!mysql_real_connect(&conn,"localhost","kalian","","user",0,NULL,0)) comlinePrint("Error: SQL \n"); // , // if(mysql_query(&conn, "SET NAMES 'cp1251'") != 0) { // - // comlinePrint ("Error: \n"); exit(1); } // if(mysql_query(&conn,"INSERT INTO `user` VALUES(NULL, '', '','', 22, '', '','') ") != 0) { // - // comlinePrint ("Error: \n"); exit(1); } void comlinePrint(char * str) { printf(stderr, str); exit(1); } // mysql_close(&conn);} - Next, the image is resized. The width and height of the image are checked and, depending on the conditions, the image is enlarged or reduced by n times:
if(image->width>700 && image->height>700){ resPic = cvCreateImage( cvSize(image->width/1.5, image->height/1.5), image->depth, image->nChannels ); cvResize(image, resPic, 1); cvShowImage("resizing", resPic); printf ("\n[i] Image has been resized", image); comlinePrint(); else if(image->width<200 && image->height<200){ resPicMal = cvCreateImage( cvSize(image->width*2, image->height*2), image->depth, image->nChannels ); cvResize(image, resPicMal, 1); cvShowImage("resizing", resPicMal);
Then the image falls into the main loop of the module. The main work of my developed method of recognition is divided into functions that go in this order:
- imageGray (); // convert the original image to halftone

- SobelPreparation (resPic, dst2); // initial processing by Sobel operator

- OtsuThresholdPreparation (resPic, ots1, ots2); // binarization by the Otsu method

- ImageCannyPreparation (resPic, dst); // selection of borders by the Kanni detector (the result is shown in the screenshot from cvSub)
- dilate (); // thickening of the found boundaries * - can be not used, according to the results of the program's tests using this function, in most cases the results do not improve, and sometimes even worse than without it
- cvSub (gray, img1, img1); // subtraction of the binary from the original

- detect_and_draw (resPic); // identification of the face and its features in the image
- recognizeResult (resPic); // calculation of emotion
- cvShowImage (& resPic); // recognition result
- (cvWaitKey (1000)); // waiting for a key to be pressed
- cvReleaseImage (& resPic) // freeing memory resources
Customizable parameters for detecting faces and their features
- Image preparation functions I am sure you will write without problems yourself, since Implementing functions in OpenCV have the same names as the names of the algorithms used, so only screenshots of the program at each stage are given. Although I may attach the code at the very end.
- The search for objects in the module is performed using the function detect_and_draw (resPic) , in the body of which the array is initially set, which contains colors for the rectangles with which faces and features will be highlighted. Then, using the cvHaarDetectObjects () function, all the sections in the picture that correspond to the faces and features of people's faces are returned to the sequence of objects . In code, it looks like this:
CvSeq* objects1 = cvHaarDetectObjects( img, cascade1, storage, 1.1, 4, 0|CV_HAAR_DO_CANNY_PRUNING, cvSize( 10, 20 ));// /* CvSeq: CvSeq* cvHaarDetectObjects( const CvArr* image,// , CvHaarClassifierCascade* cascade,// CvMemStorage* storage,// double scale_factor = 1.1,// int min_neighbors = 4,// int flags = 0|CV_HAAR_DO_CANNY_PRUNING,// CvSize min_size = cvSize(0,0)// ); */
The function of the function, and the result of the work of the entire module depends on the parameters cvHaarDetectObjects () :
The minimum adjacent threshold is how intense each part of the face is. It is necessary to configure manually, because without a threshold the detector generates many of the same recognitions in one place. Usually isolated detections are false , so it makes sense to discard them . It also makes sense to combine multiple detections for each face area into a single entity .
OpenCV makes these both conditions before returning the list of detected objects.
The merge step first groups the rectangles that contain a large number of overlaps, and then finds the averaged rectangle for the group.
Then all the rectangles in the group are replaced with the calculated average rectangle.
There are small groups between isolated rectangles and large groups, which can be both individuals and false detections.
The minimum adjacent threshold sets the clipping level for dropping or saving groups of rectangles depending on how many raw detections are in the group. By default, this parameter is three, which means merging a group of three or more rectangles and discarding groups with fewer rectangles. If there is a noticeable lack of recognition of a large number of faces and facial features , then the threshold value should be reduced to a smaller number . If it is set to zero, the function will return a complete list of raw Haar classifier detections.
To make the minimum scale larger than the default, you can set a new value for this parameter. If you decide to use a value that is different from the standard, then you need to make sure that the standard proportions remain (ratio of width to height). In this case, the aspect ratio will be 1: 1.
The fourth parameter of the function determines how fast OpenCV will zoom in for facial detections along with each pass taken through the image. Setting a larger value makes the detector work faster (due to fewer passes of the scanning window), but if the minimum scale is too high, then there is a possibility of too fast transitions between scales and omission of faces . By default, in OpenCV, this parameter is set to 1.1, or in other words, the scale increases with a factor of 1.1 (10%) with each pass.
The flag variable of the cvHaarDetectObject () function can take several values:- 0;
- CV_HAAR_DO_CANNY_PRUNING;
- CV_HAAR_FIND_BIGGEST_OBJECT;
- CV_HAAR_DO_ROUGH_SEARCH;
- CV_HAAR_DO_CANNY_PRUNING;
- CV_HAAR_SCALE_IMAGE.
If the “practical cropping” flag is selected (0 | CV_HAAR_DO_CANNY_PRUNING), then the detector skips those areas of the image that are unlikely to have a face inside, which reduces the computation time and possibly eliminates some false detections. Skipped areas are identified by a detector that detects such “unnecessary” edges across the entire image, before launching the facial detector. Again, the choice of setting this type of flag is a compromise between choosing the speed and finding more faces. Setting the flag will increase the processing speed, but may lead to the omission of some individuals.
The minimum size for which the search is performed, you need to set as small as possible, since what scale of the face will be - not defined. By default, it is (0, 0), which means the use of such a scale, which is recorded in the classifier xml-file.
An example of poor recognition of facial features at the stage of a poorly trained classifier with incorrectly selected search parameters:
An example of good facial recognition at the stage of a well-trained classifier: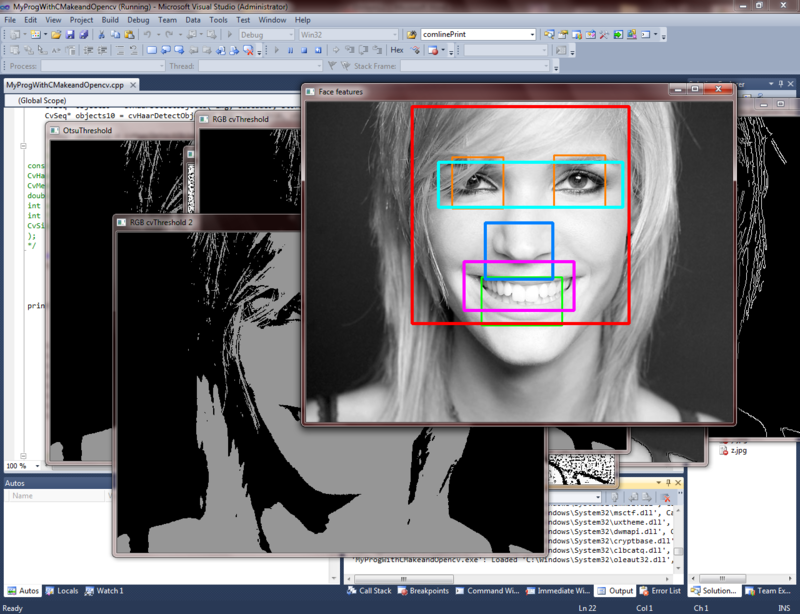
- Functions recognizeResult (resPic); information is transmitted, what type of classifier worked in the function detect_and_draw (resPic); in other words, which object was found. And if the classifiers found satisfy the conditions of the type of emotion, then information is output that the emotion is defined.
For example, if the following classifiers worked:• happysmile_kalian_classifier.xml, • happyeyes_kalian_classifier.xml, • happyeyebrows_kalian_classifier.xml
- this is the emotion of joy .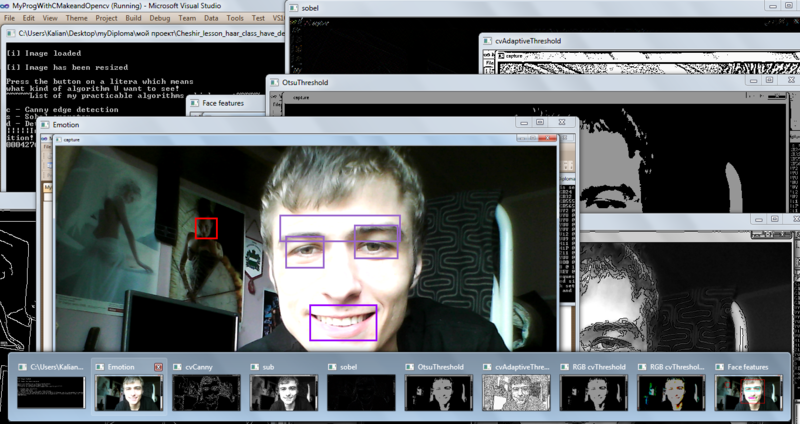
- Emotion? - Yes !!!
Testing module and algorithm
To test the performance and speed of the algorithm, tests were carried out with a full EmotionDB database (15 images - no longer needed for the test) and a simple array of images in a local directory (10 images). These images in the database and in the array have a different size, there are color, and there are black and white photographs, with different numbers of people on them.
For the tests, the built-in file OpenCV performance.cpp is used , where all data is calculated and the ROC curve is plotted. An example of the calculation of stages or stages of the classifier:
int* numclassifiers = new int[cascade->count]; numclassifiers[0] = cascade->stage_classifier[0].count; for( i = 1; i < cascade->count; i++ ) { numclassifiers[i] = numclassifiers[i-1] + cascade->stage_classifier[i].count; } Although there are tilted faces in the test image set, the algorithm does not skip and identify such faces, but detection works at a lower speed than is possible in the simple case of a non-tilted face. In conditions of insufficient illumination and large fusion with the background of the desired objects, as well as interfering noise and noise in the image, the module works slower than with normal images, along with the standard Viola-Jones algorithm.
In conditions of poor visibility of the object (mixing with the background), the module copes with recognition better by using the proposed mechanism of preliminary image processing.
, - OpenCV - :
| / | Viola-Jones OpenCV | EmoRec (prep. + Viola-Jones + OpenCV) |
|---|---|---|
| (10 ) | 89%, ~7 (7475 ms) | 93%, ~7 (7412 ms) |
| EmotionDB (15 ) | 92%, ~12 (12167 ms) | 94%, ~12 (11870 ms) |
| * — % , (), |
findings
C , , . . , , , .
: (~250-300 ms), . 400 ms . , .
,
- Viola Jones ?
- ?
- ?
- . , . . ?
Thanks to all! ! ! SkyNoName
PS ! «», - …
Source: https://habr.com/ru/post/134857/
All Articles