Zend_Tool Integration into NetBeans
Zend_Tool is a great tool in the Zend Framework. On the Internet, they write that it is not yet as perfect as similar utilities of competing frameworks, but I think that something is better than nothing. The utility is a zf.sh file in Linux or zf.bat in Windows. For it to work, the path to the PHP interpreter must be specified in the PATH system variable. For convenience, I also point out the path to the utility itself: then it can be called from any place.
The command line interface is a good thing - as they say, feel power at the fingertips . But no less convenient to have the same functionality in your favorite IDE's. By the way, it is implemented in Zend Studio - a voracious and not very free, although powerful development environment. And for fans of NetBeans, developers offer the ability to integrate a command-line utility into the IDE. When I tried to activate it, everything was not obvious, although it was quite simple, I had to google and experiment for a while.
So, what is needed is that everything works (under Windows 7 in my case):
1. Specify the path to php.exe and zf.bat in the system variable PATH. We specify the latter only for the convenience of working from the command line, since for the IDE we later specify the full path to the file.
')
2. In the user's home folder, execute 2 commands in the command line:
The first command creates a
3. Edit in a text editor .zf.ini. It should contain 2 lines:
The first line is clear, the format of the record is the same as in the system variable PATH, the lines are separated by a semicolon. It is imperative that the path to the Zend library is indicated here, and it is important that the path is indicated one level higher, i.e. ended with '\ library'.
The second line is the command provider class, it comes with NetBeans and is located at
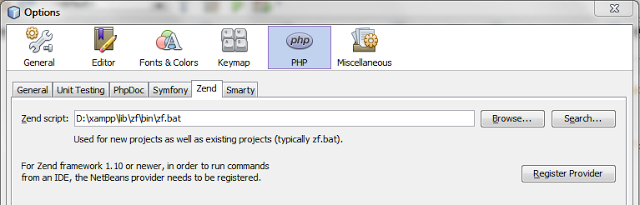
4. Now you need to run NetBeans and open the settings (Tool / Options menu).
Add the path to the Zend library to the global path for inclusions.

Specify the path to the zf.bat utility and then click the “Register Provider” button.
Now, if you create a new project based on the Zend Framework, using the NetBeans "New Project ..." menu, the zf utility will be enabled and you will receive the initial structure of the sample project with presets and two controllers.
To launch Zend_Tool, right-click on the project name in the Projects window and select the Zend / Run command ... menu and get a list of commands.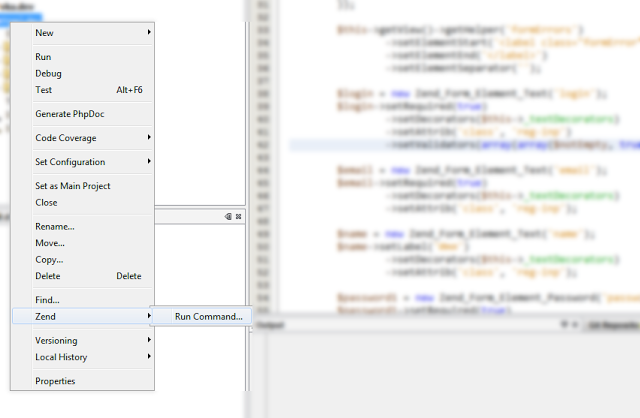
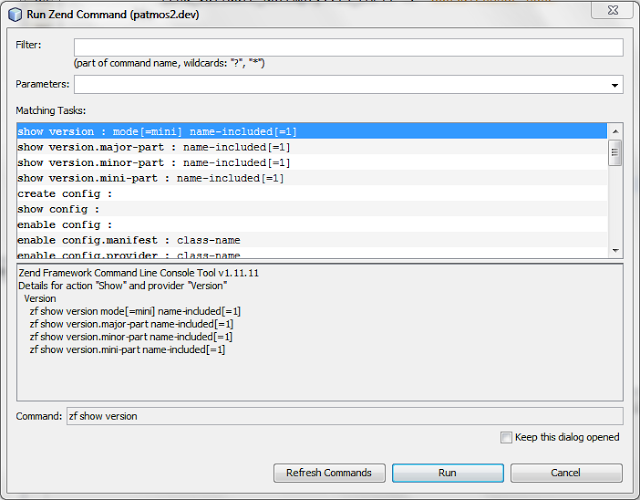
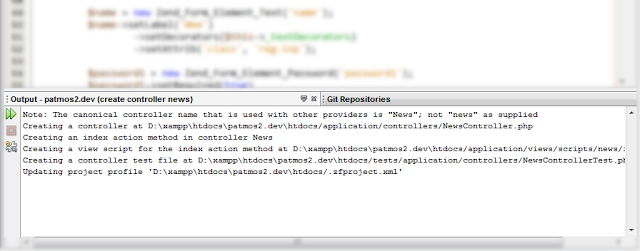
Understand the above dialogue is simple and it makes no sense to describe. If you run a command, its results are displayed in the Output window.
Well, that's all, now you can enjoy some convenience in the work.
PS Several links on the subject of Zend_Tool:
http://framework.zend.com/manual/en/zend.tool.project.html
http://www.kilinjal.com/blog/how-configure-zend-tool-netbeans
http://netbeans.org/kb/docs/php/zend-framework-screencast.html
http://blog.stfalcon.com/2010/07/podderzhka-zend-framework-v-netbeans-69/
http://devzone.zend.com/article/3811-Using-Zend_Tool-to-start-up-your-ZF-Project
The command line interface is a good thing - as they say, feel power at the fingertips . But no less convenient to have the same functionality in your favorite IDE's. By the way, it is implemented in Zend Studio - a voracious and not very free, although powerful development environment. And for fans of NetBeans, developers offer the ability to integrate a command-line utility into the IDE. When I tried to activate it, everything was not obvious, although it was quite simple, I had to google and experiment for a while.
So, what is needed is that everything works (under Windows 7 in my case):
1. Specify the path to php.exe and zf.bat in the system variable PATH. We specify the latter only for the convenience of working from the command line, since for the IDE we later specify the full path to the file.
')
2. In the user's home folder, execute 2 commands in the command line:
zf --setup storage-directory
zf --setup config-file
The first command creates a
.zf folder in the current user's home folder ( :\Users\<_> ). The second creates a .zf.ini file in the user's home folder ( :\Users\<_>\.zf.ini ).3. Edit in a text editor .zf.ini. It should contain 2 lines:
php.includepath = "D:\xampp\lib\zf\library;.;"
basicloader.classes.0 = "NetBeansCommandsProvider"
The first line is clear, the format of the record is the same as in the system variable PATH, the lines are separated by a semicolon. It is imperative that the path to the Zend library is indicated here, and it is important that the path is indicated one level higher, i.e. ended with '\ library'.
The second line is the command provider class, it comes with NetBeans and is located at
C:\Program Files\NetBeans 7.0\php\zend\NetBeansCommandsProvider.php . I copied it to the D:\xampp\lib\zf\library folder for convenience, so when you specified the path to the original location in php.includepath zf utility worked in NetBeans and did not work on the command line.4. Now you need to run NetBeans and open the settings (Tool / Options menu).
Add the path to the Zend library to the global path for inclusions.
Specify the path to the zf.bat utility and then click the “Register Provider” button.
Now, if you create a new project based on the Zend Framework, using the NetBeans "New Project ..." menu, the zf utility will be enabled and you will receive the initial structure of the sample project with presets and two controllers.
To launch Zend_Tool, right-click on the project name in the Projects window and select the Zend / Run command ... menu and get a list of commands.
Understand the above dialogue is simple and it makes no sense to describe. If you run a command, its results are displayed in the Output window.
Well, that's all, now you can enjoy some convenience in the work.
PS Several links on the subject of Zend_Tool:
http://framework.zend.com/manual/en/zend.tool.project.html
http://www.kilinjal.com/blog/how-configure-zend-tool-netbeans
http://netbeans.org/kb/docs/php/zend-framework-screencast.html
http://blog.stfalcon.com/2010/07/podderzhka-zend-framework-v-netbeans-69/
http://devzone.zend.com/article/3811-Using-Zend_Tool-to-start-up-your-ZF-Project
Source: https://habr.com/ru/post/134845/
All Articles