Recognition and speech synthesis in any iOS application in an hour
Introduction:
The toolbox itself is called NDEV. To get the necessary code (it’s not enough) and documentation (there’s a lot of it), you need to register on the website in the “cooperation program” Site:
dragonmobile.nuancemobiledeveloper.com/public/index.php
')
This is the whole "hemorrhoids" if the clients of your application are less than half a million and they use services less than 20 times a day. After registration, you will receive a Silver membership, which will allow you to use these services for free.
Developers are offered step-by-step instructions for integrating speech recognition and synthesis services into their iOS application:
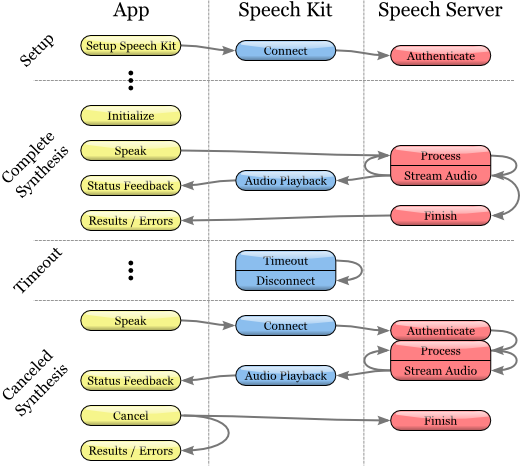
The toolkit (SDK) contains the components of both the client and the server. The diagram illustrates their interaction at the top level:
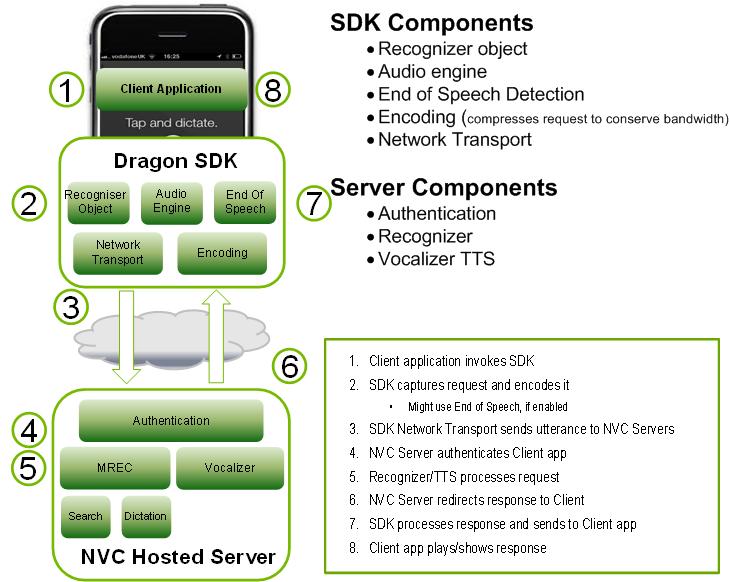
The Dragon Mobile SDK bundle consists of various code samples and project templates, documentation, and a software platform (framework) that simplifies the integration of voice services into any application.
The Speech Kit framework allows you to easily and quickly add speech recognition and synthesis services (TTS, Text-to-Speech) to your applications. This platform also provides access to speech processing components located on the server through asynchronous “clean” network APIs, minimizing overhead and resource consumption.
The Speech Kit platform is a full-featured high-level framework that automatically manages all low-level services.
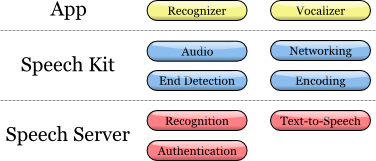
Speech Kit Architecture
Main part
At the application level, the developer has two main services: speech recognition and speech synthesis from text.
The platform performs several consistent processes:
Provides full control of the audio system for recording and playback.
The network component manages connections to the server and automatically restores connections that have elapsed timeout with each new request.
The speech end detector detects when the user has finished speaking and automatically stops recording if necessary.
The coding component compresses and decompresses audio streaming, reducing bandwidth requirements and reducing average latency.
The server system is responsible for most of the operations involved in the speech processing cycle. The process of recognition or speech synthesis is performed entirely on the server, processing or synthesizing the audio stream. In addition, the server performs authentication in accordance with the configuration of the developer.
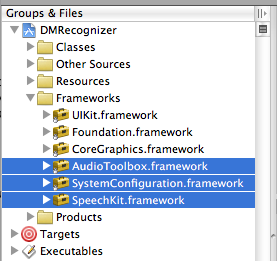
In this particular article, we will focus on developing for iOS. The Speech Kit framework can be used just like any standard iPhone software platform, such as Foundation or UIKit. The only difference is that the Speech Kit is a static framework, and is entirely contained in the compilation of your application. Speech Kit is directly related to some of the key operating components of the iPhone OS, which need to be included in the application as interdependent, so that they are available while the application is running. In addition to Foundation, you need to add the System Configuration and Audio Toolbox components to the Xcode project:
1. Start by selecting software platforms (Framework group) within your project.
2. Then click the right or command button of the “Platforms” (Frameworks) and in the appeared menu choose: Add ‣ Existing frameworks (Existing frameworks) ...
3. Finally, select the required frameworks and click the Add button. The selected platforms are displayed in the Frameworks folder (see figure above).
To start using the SpeechKit software platform, add it to your new or existing project:
1. Open your project and select the group in which you want the Speech Kit platform to be located, for example: file: Frameworks.
2. From the menu, select Project (Project) ‣ Add to Project ...
3. Next, find the SpeechKit.framework framework into which you unpacked the Dragon Mobile SDK toolkit and select Add.
4. To make sure the Speech Kit is in your project and does not refer to the original location, select Copy items ... and then Add.
5. As you can see, the Speech Kit platform has been added to your project, which you can extend to access public headers.
Speech Kit Platform Required
The Speech Kit framework provides a single top-level header that provides access to the full application programming interface (API), up to and including classes and constants. You need to import Speech Kit headers into all the source files where you are going to use the Speech Kit services:
#import <SpeechKit / SpeechKit.h>
Now you can start using text-to-speech (speech synthesis) services.
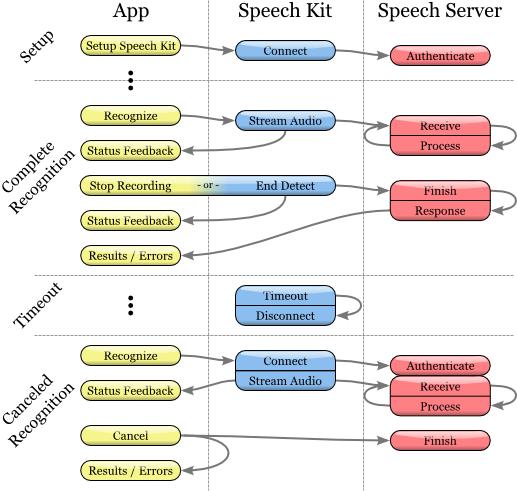
The Speech Kit platform is a network service and needs some basic settings before starting to use recognition classes or speech synthesis.
This installation performs two basic operations:
First, it identifies and authorizes your application.
Secondly, - establishes a connection with a speech server, - this allows you to make quick requests for speech processing and, consequently, improves the quality of customer service.
Note
The specified network connection requires the authorization of the credentials and server settings specified by the developer. Required credentials are provided through the Dragon Mobile SDK portal: dragonmobile.nuancemobiledeveloper.com .
Kit Setup Setup
The key for the SpeechKitApplicationKey application is requested by the software platform and must be installed by the developer. The key serves as the password for your application for speech processing servers and should be kept confidential to prevent misuse.
Your unique credentials, including the Application Key, provided through the developer portal, imply the introduction of several additional lines of code to set these rights. Thus, the process is reduced to copying and pasting lines in the source file. You need to install your application key before initializing the Speech Kit system. For example, you can configure an application key as follows:
const unsigned char [] SpeechKitApplicationKey = {0x12, 0x34, ..., 0x89};
The setup method, setupWithID: host: port, contains 3 parameters:
Application ID
Server Address
Port
The ID parameter identifies your application and is used in conjunction with your application key, providing authorization for access to voice servers.
Host and port settings define a voice server, which can vary from application to application. Thus, you should always use the values specified by the authentication parameters.
The framework is configured using the following example:
[SpeechKit setupWithID: @ "NMDPTRIAL_Acme20100604154233_aaea77bc5b900dc4005faae89f60a029214d450b"
host: @ "10.0.0.100"
port: 443];
Note
The setupWithID: host: port method is a class method and does not generate an object (instance). This method is designed to make a one-time call while the application is running, it configures the main network connection. This is an asynchronous method that runs in the background, establishes a connection, and performs authorization. The method does not report a connection / authorization error. The success or failure of this installation becomes known using the SKRecognizer and SKVocalizer classes.
At this stage, the voice server is fully configured, and the platform begins to establish a connection. This connection will remain open for some time, acting as a guarantee that subsequent voice requests are processed promptly as long as voice services are actively used. If the connection times out, it is interrupted, but will be restored automatically at the same time as the next voice request.
The application is configured and ready to recognize and synthesize speech.
Speech recognition
Recognition technology allows users to dictate instead of typing where text input is usually required. Speech Recognizer provides a list of text results. It is not tied to any user interface (UI) object, so the selection of the most appropriate result and the selection of alternative results are left to the user interface of each application.
Speech recognition process
Initiating the recognition process
1. Before using the speech recognition service, make sure that the original Speech Kit platform is configured by you using the setupWithID method: host: port.
2. Then create and initialize the SKRecognizer object:
3. recognizer = [[SKRecognizer alloc] initWithType: SKSearchRecognizerType
4. detection: SKShortEndOfSpeechDetection
5. language: @ "en_US"
6. delegate: self];
7. The initWithType: detection: language: delegate method initializes the recognizer and starts the speech recognition process.
Typical parameter - NSString *, this is one of the typical recognition constants defined by the Speech Kit platform and accessible through the SKRecognizer.h header. Nuance can provide you with other values for your unique recognition needs, in which case you will need to add the NSString extension.
The detection parameter sets the “end of speech definition” model and must match one of the SKEndOfSpeechDetection types.
The language parameter defines the language of speech as a string in the format of the ISO 639 language code, followed by the underscore “_”, followed by the country code in the ISO 3166-1 format.
Note
For example, English, which is spoken in the United States, has the designation en_US. An updated list of supported languages for recognition is available on the FAQ: dragonmobile.nuancemobiledeveloper.com/faq.php .
8. The delegate receives the recognition result or error message, as described below.
Getting recognition results
For recognition results, refer to the delegate method recognizer: didFinishWithResults:
- (void) recognizer: (SKRecognizer *) recognizer didFinishWithResults: (SKRecognition *) results {
[recognizer autorelease];
// perform any actions on the results
}
The delegation method will be applied only upon successful completion of the process; the list of results will contain zero or more results. The first result can always be found using the firstResult method. Even in the absence of an error, there may be advice (suggestion) from the speech server, which is present in the object of recognition results. Such advice (suggestion) should be presented to the user.
Error processing
To get information about any recognition errors, use the delegation method recognizer: didFinishWithError: suggestion :. In case of an error, only this method will be called; on the contrary, if successful, this method will not be called. In addition to the error, as mentioned in the previous section, advice may or may not be present as a result.
- (void) recognizer: (SKRecognizer *) recognizer didFinishWithError: (NSError *) error suggestion: (NSString *) suggestion {
[recognizer autorelease];
// inform the user about the error and advice
}
Recording stage management
If you want to get information about when the recognizer starts or ends recording audio, use the delegation methods recognizerDidBeginRecording: and recognizerDidFinishRecording :. So, there may be a delay between the initialization of recognition and the actual start of the recording, and the message recognizerDidBeginRecording: may signal to the user that the system is ready to listen.
- (void) recognizerDidBeginRecording: (SKRecognizer *) recognizer {
// Update UI to indicate that the system is recording
}
The message recognizerDidFinishRecording: is sent before the voice server finishes receiving and processing the sound file, and therefore, before the result is available.
- (void) recognizerDidFinishRecording: (SKRecognizer *) recognizer {
// Update UI to indicate that the recording has stopped and speech is still being processed
}
This message is sent regardless of the presence of a record end detection model. The message is sent in the same way by calling the stopRecording method, and by the signal for detecting the end of the recording.
Installation of "sound icons" (signals)
In addition, “sound icons” can be used to play sound signals before and after recording, as well as after canceling a recording session. You need to create a SKEarcon object and set the setEarcon: forType: Speech Kit Platform method for it. The example below demonstrates how the sound icons are set up in the example application.
- (void) setEarcons {
// Play “sound icons”
SKEarcon * earconStart = [SKEarcon earconWithName: @ "earcon_listening.wav"];
SKEarcon * earconStop = [SKEarcon earconWithName: @ "earcon_done_listening.wav"];
SKEarcon * earconCancel = [SKEarcon earconWithName: @ "earcon_cancel.wav"];
[SpeechKit setEarcon: earconStart forType: SKStartRecordingEarconType];
[SpeechKit setEarcon: earconStop forType: SKStopRecordingEarconType];
[SpeechKit setEarcon: earconCancel forType: SKCancelRecordingEarconType];
}
When a higher-level code block is called (after you set up the main Speech Kit software platform using the setupWithID: host: port method), the earcon_listening.wav audio file plays and the earcon_done_listening.wav audio file plays when recording is completed. If the recording session is canceled, the earcon_cancel.wav audio file sounds for the user. The `ʻearconWithName: method works only for audio files that are supported by the device.
Sound level display
In some cases, especially with long dictations, it is convenient to provide the user with a visual display of the sound power of his speech. The recording interface supports this feature when applying the audioLevel attribute, which returns the relative power level of the recorded sound in decibels. The range of this value is characterized by a floating point and is between 0.0 and -90.0 dB where 0.0 is the highest power level and -90.0 is the lower limit of the sound power. This attribute must be available during recording, in particular, between the receipt of recognizerDidBeginRecording: and recognizerDidFinishRecording :. In general, you will need to use a timer method, such as performSelector: withObject: afterDelay: to regularly display the power level.
Text to Speech
The SKVocalizer class provides developers with a speech synthesis network interface.
Speech synthesis process
Initialization of the process of speech synthesis
1. Before using the speech synthesis service, make sure that the main software platform is configured with the Speech Kit using the setupWithID method: host: port.
2. Then create and initialize a SKVocalizer object for text-to-speech:
3. vocalizer = [[SKVocalizer alloc] initWithLanguage: @ "en_US"
4. delegate: self];
five.
1. The initWithLanguage method: delegate: initializes the speech synthesis service with the default language.
Language parameter - NSString * which defines the language as an ISO 639 language code, an underscore “_” and the country code following them in ISO 3166-1 format. For example, English, which is used in the United States, has the format en_US. Each supported language has one or more unique voices, male or female.
Note
An updated list of supported languages for speech synthesis is available at: dragonmobile.nuancemobiledeveloper.com/faq.php . The list of supported languages will be updated when new language support (s) appears. New languages will not necessarily require updating the existing Dragon Mobile SDK.
The delegated parameter defines the object for receiving status and error messages from the speech synthesizer.
2. Method initWithLanguage: delegate: uses the default voice selected by Nuance. To select a different voice, use the initWithVoice: delegate: method instead of the previous one.
The voice parameter is NSString *, it defines the sound model. For example, the voice for British English by default is Samantha (Samantha).
Note
An updated list of supported voices, mapped to supported languages, is posted on the site:
dragonmobile.nuancemobiledeveloper.com/faq.php .
5. To start the text-to-speech process, you need to use the speakString: or speakMarkupString: method. These methods send the requested string to the voice server and initialize the stream processing and playback of audio on the device.
6. [vocalizer speakString: @ "Hello world."]
Note
The speakMarkupString method is used in exactly the same way as the speakString method with the only difference that the NSString * class is executed by the speech synthesis markup language used to describe synthesized speech. Recent discussions of markup languages for speech synthesis are beyond the scope of this document, but you can find more detailed information on this topic provided by W3C at www.w3.org/TR/speech-synthesis .
Speech synthesis is a network service and, therefore, the methods mentioned above are asynchronous - in general, the error message is not displayed immediately. Any errors are presented as messages to the delegate.
Manage the response response of the speech synthesis system
Synthesized speech will not be reproduced instantly. Most likely there will be a small time delay, during which the request is sent to the voice service and redirected back. The optional delegational method of vocalizer: willBeginSpeakingString: is used to coordinate the user interface and is intended to indicate the point at which the sound begins to play.
- (void) vocalizer: (SKVocalizer *) vocalizer willBeginSpeakingString: (NSString *) text {
// Update the user interface to indicate the start of speech playback
}
The NSString * class in the message serves as a reference to the original string executed by one of the methods: speakString or speakMarkupString, and can be used during the sequential playback of a track when the corresponding text-to-speech requests are made.
At the end of the speech, a message is sent to the vocalizer: didFinishSpeakingString: withError. This message is always sent both in case of successful completion of the playback process and in case of an error. If successful, the error is “zeroed out”.
- (void) vocalizer: (SKVocalizer *) vocalizer didFinishSpeakingString: (NSString *) text withError: (NSError *) error {
if (error) {
// Display the error dialog for the user
} else {
// Update user interface, indicate that playback is complete
}
}
After these manipulations, you just have to debug the appropriate service and use.
The toolbox itself is called NDEV. To get the necessary code (it’s not enough) and documentation (there’s a lot of it), you need to register on the website in the “cooperation program” Site:
dragonmobile.nuancemobiledeveloper.com/public/index.php
')
This is the whole "hemorrhoids" if the clients of your application are less than half a million and they use services less than 20 times a day. After registration, you will receive a Silver membership, which will allow you to use these services for free.
Developers are offered step-by-step instructions for integrating speech recognition and synthesis services into their iOS application:
The toolkit (SDK) contains the components of both the client and the server. The diagram illustrates their interaction at the top level:
The Dragon Mobile SDK bundle consists of various code samples and project templates, documentation, and a software platform (framework) that simplifies the integration of voice services into any application.
The Speech Kit framework allows you to easily and quickly add speech recognition and synthesis services (TTS, Text-to-Speech) to your applications. This platform also provides access to speech processing components located on the server through asynchronous “clean” network APIs, minimizing overhead and resource consumption.
The Speech Kit platform is a full-featured high-level framework that automatically manages all low-level services.
Speech Kit Architecture
Main part
At the application level, the developer has two main services: speech recognition and speech synthesis from text.
The platform performs several consistent processes:
Provides full control of the audio system for recording and playback.
The network component manages connections to the server and automatically restores connections that have elapsed timeout with each new request.
The speech end detector detects when the user has finished speaking and automatically stops recording if necessary.
The coding component compresses and decompresses audio streaming, reducing bandwidth requirements and reducing average latency.
The server system is responsible for most of the operations involved in the speech processing cycle. The process of recognition or speech synthesis is performed entirely on the server, processing or synthesizing the audio stream. In addition, the server performs authentication in accordance with the configuration of the developer.
In this particular article, we will focus on developing for iOS. The Speech Kit framework can be used just like any standard iPhone software platform, such as Foundation or UIKit. The only difference is that the Speech Kit is a static framework, and is entirely contained in the compilation of your application. Speech Kit is directly related to some of the key operating components of the iPhone OS, which need to be included in the application as interdependent, so that they are available while the application is running. In addition to Foundation, you need to add the System Configuration and Audio Toolbox components to the Xcode project:
1. Start by selecting software platforms (Framework group) within your project.
2. Then click the right or command button of the “Platforms” (Frameworks) and in the appeared menu choose: Add ‣ Existing frameworks (Existing frameworks) ...
3. Finally, select the required frameworks and click the Add button. The selected platforms are displayed in the Frameworks folder (see figure above).
To start using the SpeechKit software platform, add it to your new or existing project:
1. Open your project and select the group in which you want the Speech Kit platform to be located, for example: file: Frameworks.
2. From the menu, select Project (Project) ‣ Add to Project ...
3. Next, find the SpeechKit.framework framework into which you unpacked the Dragon Mobile SDK toolkit and select Add.
4. To make sure the Speech Kit is in your project and does not refer to the original location, select Copy items ... and then Add.
5. As you can see, the Speech Kit platform has been added to your project, which you can extend to access public headers.
Speech Kit Platform Required
The Speech Kit framework provides a single top-level header that provides access to the full application programming interface (API), up to and including classes and constants. You need to import Speech Kit headers into all the source files where you are going to use the Speech Kit services:
#import <SpeechKit / SpeechKit.h>
Now you can start using text-to-speech (speech synthesis) services.
The Speech Kit platform is a network service and needs some basic settings before starting to use recognition classes or speech synthesis.
This installation performs two basic operations:
First, it identifies and authorizes your application.
Secondly, - establishes a connection with a speech server, - this allows you to make quick requests for speech processing and, consequently, improves the quality of customer service.
Note
The specified network connection requires the authorization of the credentials and server settings specified by the developer. Required credentials are provided through the Dragon Mobile SDK portal: dragonmobile.nuancemobiledeveloper.com .
Kit Setup Setup
The key for the SpeechKitApplicationKey application is requested by the software platform and must be installed by the developer. The key serves as the password for your application for speech processing servers and should be kept confidential to prevent misuse.
Your unique credentials, including the Application Key, provided through the developer portal, imply the introduction of several additional lines of code to set these rights. Thus, the process is reduced to copying and pasting lines in the source file. You need to install your application key before initializing the Speech Kit system. For example, you can configure an application key as follows:
const unsigned char [] SpeechKitApplicationKey = {0x12, 0x34, ..., 0x89};
The setup method, setupWithID: host: port, contains 3 parameters:
Application ID
Server Address
Port
The ID parameter identifies your application and is used in conjunction with your application key, providing authorization for access to voice servers.
Host and port settings define a voice server, which can vary from application to application. Thus, you should always use the values specified by the authentication parameters.
The framework is configured using the following example:
[SpeechKit setupWithID: @ "NMDPTRIAL_Acme20100604154233_aaea77bc5b900dc4005faae89f60a029214d450b"
host: @ "10.0.0.100"
port: 443];
Note
The setupWithID: host: port method is a class method and does not generate an object (instance). This method is designed to make a one-time call while the application is running, it configures the main network connection. This is an asynchronous method that runs in the background, establishes a connection, and performs authorization. The method does not report a connection / authorization error. The success or failure of this installation becomes known using the SKRecognizer and SKVocalizer classes.
At this stage, the voice server is fully configured, and the platform begins to establish a connection. This connection will remain open for some time, acting as a guarantee that subsequent voice requests are processed promptly as long as voice services are actively used. If the connection times out, it is interrupted, but will be restored automatically at the same time as the next voice request.
The application is configured and ready to recognize and synthesize speech.
Speech recognition
Recognition technology allows users to dictate instead of typing where text input is usually required. Speech Recognizer provides a list of text results. It is not tied to any user interface (UI) object, so the selection of the most appropriate result and the selection of alternative results are left to the user interface of each application.
Speech recognition process
Initiating the recognition process
1. Before using the speech recognition service, make sure that the original Speech Kit platform is configured by you using the setupWithID method: host: port.
2. Then create and initialize the SKRecognizer object:
3. recognizer = [[SKRecognizer alloc] initWithType: SKSearchRecognizerType
4. detection: SKShortEndOfSpeechDetection
5. language: @ "en_US"
6. delegate: self];
7. The initWithType: detection: language: delegate method initializes the recognizer and starts the speech recognition process.
Typical parameter - NSString *, this is one of the typical recognition constants defined by the Speech Kit platform and accessible through the SKRecognizer.h header. Nuance can provide you with other values for your unique recognition needs, in which case you will need to add the NSString extension.
The detection parameter sets the “end of speech definition” model and must match one of the SKEndOfSpeechDetection types.
The language parameter defines the language of speech as a string in the format of the ISO 639 language code, followed by the underscore “_”, followed by the country code in the ISO 3166-1 format.
Note
For example, English, which is spoken in the United States, has the designation en_US. An updated list of supported languages for recognition is available on the FAQ: dragonmobile.nuancemobiledeveloper.com/faq.php .
8. The delegate receives the recognition result or error message, as described below.
Getting recognition results
For recognition results, refer to the delegate method recognizer: didFinishWithResults:
- (void) recognizer: (SKRecognizer *) recognizer didFinishWithResults: (SKRecognition *) results {
[recognizer autorelease];
// perform any actions on the results
}
The delegation method will be applied only upon successful completion of the process; the list of results will contain zero or more results. The first result can always be found using the firstResult method. Even in the absence of an error, there may be advice (suggestion) from the speech server, which is present in the object of recognition results. Such advice (suggestion) should be presented to the user.
Error processing
To get information about any recognition errors, use the delegation method recognizer: didFinishWithError: suggestion :. In case of an error, only this method will be called; on the contrary, if successful, this method will not be called. In addition to the error, as mentioned in the previous section, advice may or may not be present as a result.
- (void) recognizer: (SKRecognizer *) recognizer didFinishWithError: (NSError *) error suggestion: (NSString *) suggestion {
[recognizer autorelease];
// inform the user about the error and advice
}
Recording stage management
If you want to get information about when the recognizer starts or ends recording audio, use the delegation methods recognizerDidBeginRecording: and recognizerDidFinishRecording :. So, there may be a delay between the initialization of recognition and the actual start of the recording, and the message recognizerDidBeginRecording: may signal to the user that the system is ready to listen.
- (void) recognizerDidBeginRecording: (SKRecognizer *) recognizer {
// Update UI to indicate that the system is recording
}
The message recognizerDidFinishRecording: is sent before the voice server finishes receiving and processing the sound file, and therefore, before the result is available.
- (void) recognizerDidFinishRecording: (SKRecognizer *) recognizer {
// Update UI to indicate that the recording has stopped and speech is still being processed
}
This message is sent regardless of the presence of a record end detection model. The message is sent in the same way by calling the stopRecording method, and by the signal for detecting the end of the recording.
Installation of "sound icons" (signals)
In addition, “sound icons” can be used to play sound signals before and after recording, as well as after canceling a recording session. You need to create a SKEarcon object and set the setEarcon: forType: Speech Kit Platform method for it. The example below demonstrates how the sound icons are set up in the example application.
- (void) setEarcons {
// Play “sound icons”
SKEarcon * earconStart = [SKEarcon earconWithName: @ "earcon_listening.wav"];
SKEarcon * earconStop = [SKEarcon earconWithName: @ "earcon_done_listening.wav"];
SKEarcon * earconCancel = [SKEarcon earconWithName: @ "earcon_cancel.wav"];
[SpeechKit setEarcon: earconStart forType: SKStartRecordingEarconType];
[SpeechKit setEarcon: earconStop forType: SKStopRecordingEarconType];
[SpeechKit setEarcon: earconCancel forType: SKCancelRecordingEarconType];
}
When a higher-level code block is called (after you set up the main Speech Kit software platform using the setupWithID: host: port method), the earcon_listening.wav audio file plays and the earcon_done_listening.wav audio file plays when recording is completed. If the recording session is canceled, the earcon_cancel.wav audio file sounds for the user. The `ʻearconWithName: method works only for audio files that are supported by the device.
Sound level display
In some cases, especially with long dictations, it is convenient to provide the user with a visual display of the sound power of his speech. The recording interface supports this feature when applying the audioLevel attribute, which returns the relative power level of the recorded sound in decibels. The range of this value is characterized by a floating point and is between 0.0 and -90.0 dB where 0.0 is the highest power level and -90.0 is the lower limit of the sound power. This attribute must be available during recording, in particular, between the receipt of recognizerDidBeginRecording: and recognizerDidFinishRecording :. In general, you will need to use a timer method, such as performSelector: withObject: afterDelay: to regularly display the power level.
Text to Speech
The SKVocalizer class provides developers with a speech synthesis network interface.
Speech synthesis process
Initialization of the process of speech synthesis
1. Before using the speech synthesis service, make sure that the main software platform is configured with the Speech Kit using the setupWithID method: host: port.
2. Then create and initialize a SKVocalizer object for text-to-speech:
3. vocalizer = [[SKVocalizer alloc] initWithLanguage: @ "en_US"
4. delegate: self];
five.
1. The initWithLanguage method: delegate: initializes the speech synthesis service with the default language.
Language parameter - NSString * which defines the language as an ISO 639 language code, an underscore “_” and the country code following them in ISO 3166-1 format. For example, English, which is used in the United States, has the format en_US. Each supported language has one or more unique voices, male or female.
Note
An updated list of supported languages for speech synthesis is available at: dragonmobile.nuancemobiledeveloper.com/faq.php . The list of supported languages will be updated when new language support (s) appears. New languages will not necessarily require updating the existing Dragon Mobile SDK.
The delegated parameter defines the object for receiving status and error messages from the speech synthesizer.
2. Method initWithLanguage: delegate: uses the default voice selected by Nuance. To select a different voice, use the initWithVoice: delegate: method instead of the previous one.
The voice parameter is NSString *, it defines the sound model. For example, the voice for British English by default is Samantha (Samantha).
Note
An updated list of supported voices, mapped to supported languages, is posted on the site:
dragonmobile.nuancemobiledeveloper.com/faq.php .
5. To start the text-to-speech process, you need to use the speakString: or speakMarkupString: method. These methods send the requested string to the voice server and initialize the stream processing and playback of audio on the device.
6. [vocalizer speakString: @ "Hello world."]
Note
The speakMarkupString method is used in exactly the same way as the speakString method with the only difference that the NSString * class is executed by the speech synthesis markup language used to describe synthesized speech. Recent discussions of markup languages for speech synthesis are beyond the scope of this document, but you can find more detailed information on this topic provided by W3C at www.w3.org/TR/speech-synthesis .
Speech synthesis is a network service and, therefore, the methods mentioned above are asynchronous - in general, the error message is not displayed immediately. Any errors are presented as messages to the delegate.
Manage the response response of the speech synthesis system
Synthesized speech will not be reproduced instantly. Most likely there will be a small time delay, during which the request is sent to the voice service and redirected back. The optional delegational method of vocalizer: willBeginSpeakingString: is used to coordinate the user interface and is intended to indicate the point at which the sound begins to play.
- (void) vocalizer: (SKVocalizer *) vocalizer willBeginSpeakingString: (NSString *) text {
// Update the user interface to indicate the start of speech playback
}
The NSString * class in the message serves as a reference to the original string executed by one of the methods: speakString or speakMarkupString, and can be used during the sequential playback of a track when the corresponding text-to-speech requests are made.
At the end of the speech, a message is sent to the vocalizer: didFinishSpeakingString: withError. This message is always sent both in case of successful completion of the playback process and in case of an error. If successful, the error is “zeroed out”.
- (void) vocalizer: (SKVocalizer *) vocalizer didFinishSpeakingString: (NSString *) text withError: (NSError *) error {
if (error) {
// Display the error dialog for the user
} else {
// Update user interface, indicate that playback is complete
}
}
After these manipulations, you just have to debug the appropriate service and use.
Source: https://habr.com/ru/post/134825/
All Articles