Creating graphics primitives in Assembler
I would like to consider something interesting and useful in the use plan, so the choice fell on the assembler, namely the creation of primitive graphics.
An assembler language is a low-level programming language, or a program that translates the source code of a program into assembly language into a program language. The language, by some standards, is complicated, but after all, the creation of graphics primitives originates here. I want to consider an assembler for Windows, namely MASM , which, along with Visual Studio, not so long ago used to create graphic primitives. About it with illustrations and details Further.
Consider a small structure, which is necessary for creating applications under Windows:
1) put all the constants, structures and functions related to Windows at the beginning of our .asm file - save time and effort;
2) use the includelib directive to indicate the import libraries - this will indicate to the compiler that the program will use the functions from these import libraries;
3) declare API prototype functions, structures and / or constants in the included file using the same names as in the Windows include files, at least try, as this will save everyone from headaches in the future;
4) use the makefile to automate the compilation process.
')
I’ll retreat somewhere and somehow, but in general we should have a great program that draws us a rather interesting primitive one. Consider an example of the structure of the program in Assembler (see Listing 1)
In Windows, the window itself is responsible for redrawing itself. In order for a window to redraw, it must receive a WM_PAINT message.
Usually use one of three methods:
a) the workspace can be restored if its contents are formed using any calculations;
b) the sequence of events that form the workspace can be saved and then “played” indefinitely;
c) you can create a virtual window and send the entire output to a virtual window, and when the WM_PAINT message is received by the main window, copy the contents of the virtual window to the main window (used to demonstrate an application written later).
To set the current position, use the MoveToEx () function, where the function is described as follows:
WINGDIAPI BOOL WINAPI MoveToEx (HDC, int, int, LPPOINT);
The first argument is the device context, the second and third are the coordinates of the point where the current graphical position is set. The last argument is a pointer to a POINT structure in which the function will write the coordinates of the old current position.
To draw a line, use the LineTo () function, where the function is described as follows:
WINGDIAPI BOOL WINAPI LineTo (HDC, int, int);
The first argument is the device context, the second and third arguments are the coordinates of the points.
To draw a rectangle, use the Rectangle () function, where the function is described as follows:
WINGDIAPI BOOL WINAPI Rectangle (HDC, int, int, int, int);
The first argument is the device context, all other arguments are the coordinates of the upper left and lower right corners of the rectangle.
To draw an ellipse, you need to call the Ellipse () function, where the function is described as follows:
WINGDIAPI BOOL WINAPI Ellipse (HDC, int, int, int, int);
The first argument is the device context.
Note: the ellipse is bounded by a rectangle and it is through the coordinates of this rectangle that the drawn ellipse is determined. The second and third arguments are the coordinates of the upper left corner of the rectangle, the fourth and fifth arguments are the coordinates of the lower right corner.
To draw a rectangle with rounded edges, use the RoundRect () function, where the function is described as follows:
WINGDIAPI BOOL WINAPI RoundRect (HDC, int, int, int, int, int, int);
The first five arguments are completely identical to the arguments of the Rectangle () function. The last two arguments contain the width and height of the ellipse defining the arcs.
To write a primitive, consider the steps that are needed to create and draw graphics:
1) obtaining a descriptor for the program;
2) window class registration;
3) creating a window;
4) window display on the screen;
5) update the contents of the screen in the window;
6) exit from the program.
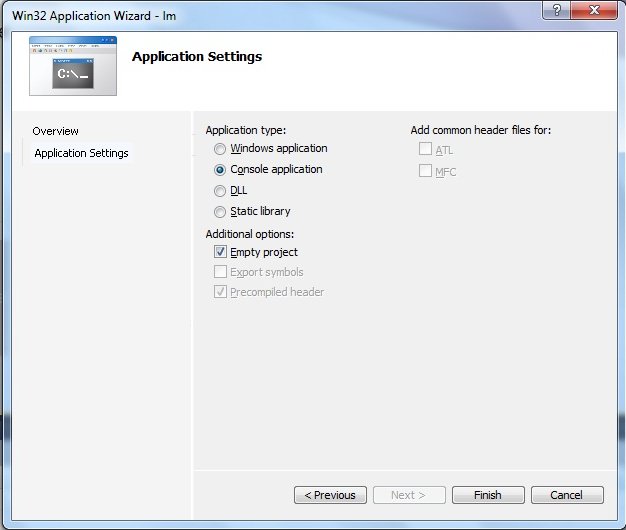
Let's start creating, but first we will create a new project in Visual Studio: File -> New Project

Choose an empty project: Empty project
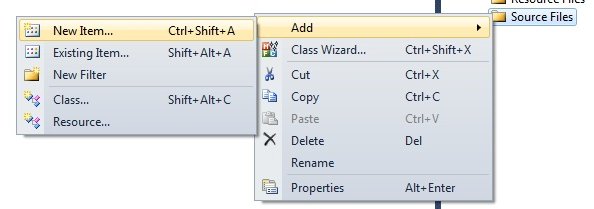
Create a new file: right-click on Source -> Add -> New Item
Create a new file (.asm):
The first way is to add when creating a new file file.asm (I created this way)
2nd way - to change the extension of the file after it is created (file.txt -> rename -> file.asm)

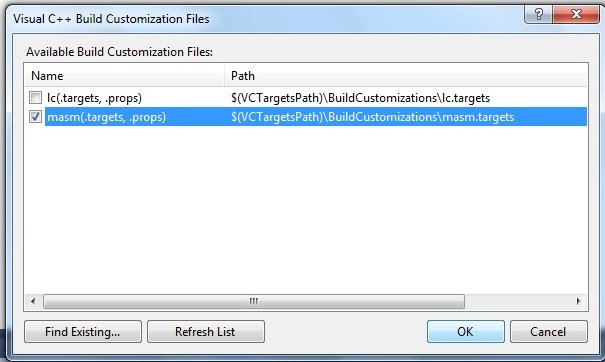
Use masm in Visual Studio: right click on project -> Build Customization

Set this same masm: put a tick in front of the masm
We start writing this very primitive, and the listing itself, see below.

In the course of actions and writing code I put down comments, but in order to understand the full essence, I will consider in more detail everything I did and wrote.
The line from .386 transmits to MASM that the 80386 processor instruction set is being used. The string .model stdcall, flat transmits to MASM that a flat memory model will be used. And the transfer of parameters itself was used by the type STDCALL as the default.
I connected windows.inc at the beginning of the code, since it contains the system structures and constants that were required to implement the primitives in the program. Since the program calls the Windows API functions that are in user32.dll (CreateWindowEx and others) and kernel32.dll (ExitPocess and others), they must also be registered.
We describe the prototype of the main function PROC.
Next comes .data, where: szClassName is the name of our window class and szTitleName is the name of our window.
The .code contains all instructions where code should be located between <tag name> and end <tag name>.
The first instruction is to call GetModuleHandle to get the handle to our program. It is used as a parameter passed to API functions that are called by our program.
Next comes the initialization of the window class - it defines some important window characteristics, such as the icon, the cursor, the function responsible for the window, and so on. Here we also describe the descriptor of the application itself, the icon descriptor and the cursor descriptor. There is no menu descriptor in the implemented application, since this would increase the program code, but it did not add functionality, especially since it is primitive and is not needed here at all. Parameters that can or have been used to create the window:
1) cbSize: sets the size of the total WDNCLASSEX structure in bytes;
2) style: sets the style of the window;
3) cbClsExtra: set the number of additional bytes that need to be reserved for the program itself;
4) hInstance: sets the module descriptor;
5) hIcon: sets the icon handle, and its retrieval proceeds by calling the LoadIcon function;
6) hCursor: sets the descriptor of the cursor, and its receipt proceeds by calling the function LoadCursor;
7) hbrBackground: sets the background color;
8) lpszMenuName: set the menu descriptor for windows;
9) lpszClassName: set the name of the window class.
After registering the window class with the RegisterClassEx function, CreateWindowEx is called to create our window based on this class.
WndProc PROC USES ebx edi esi, _hwnd: DWORD, _wmsg: DWORD, _wparam: DWORD, _lparam: DWORD is an important and important procedure. _wmsg - the transmitted message. It is worth saying that _wmsg is not a msg structure, but it is just a number. _wparam and _lparam are additional parameters used by some messages.
In the end, they came to the final part, where the given figures, their coordinates and return values are described. This is the key part, because this is where the logic of the program's actions is located. Here we also describe the release of the context and return the values, where further we send a message of completion. The only message that remains to be processed is wmdestroy — this message will be sent to the window when it is closed. At that time, when the window procedure gets it, the window has already disappeared from the screen. After running wmdestroy, PostQuitMessage is called, which sends an exit message and this causes GetMessage to return a zero value to eax, and this is an exit from the program.
An assembler language is a low-level programming language, or a program that translates the source code of a program into assembly language into a program language. The language, by some standards, is complicated, but after all, the creation of graphics primitives originates here. I want to consider an assembler for Windows, namely MASM , which, along with Visual Studio, not so long ago used to create graphic primitives. About it with illustrations and details Further.
Getting started
Consider a small structure, which is necessary for creating applications under Windows:
1) put all the constants, structures and functions related to Windows at the beginning of our .asm file - save time and effort;
2) use the includelib directive to indicate the import libraries - this will indicate to the compiler that the program will use the functions from these import libraries;
3) declare API prototype functions, structures and / or constants in the included file using the same names as in the Windows include files, at least try, as this will save everyone from headaches in the future;
4) use the makefile to automate the compilation process.
')
I’ll retreat somewhere and somehow, but in general we should have a great program that draws us a rather interesting primitive one. Consider an example of the structure of the program in Assembler (see Listing 1)
Listing 1. Sample program structure
.type_process ;
.model ;

include lib ; inc
includelib lib ; lib

.DATA ; p
;

.DATA? ; p
; pp

.CODE ;
Definition of graphic primitives
Device Context and WM_PAINT
In Windows, the window itself is responsible for redrawing itself. In order for a window to redraw, it must receive a WM_PAINT message.
Usually use one of three methods:
a) the workspace can be restored if its contents are formed using any calculations;
b) the sequence of events that form the workspace can be saved and then “played” indefinitely;
c) you can create a virtual window and send the entire output to a virtual window, and when the WM_PAINT message is received by the main window, copy the contents of the virtual window to the main window (used to demonstrate an application written later).
Setting the current position
To set the current position, use the MoveToEx () function, where the function is described as follows:
WINGDIAPI BOOL WINAPI MoveToEx (HDC, int, int, LPPOINT);
The first argument is the device context, the second and third are the coordinates of the point where the current graphical position is set. The last argument is a pointer to a POINT structure in which the function will write the coordinates of the old current position.
Line drawing
To draw a line, use the LineTo () function, where the function is described as follows:
WINGDIAPI BOOL WINAPI LineTo (HDC, int, int);
The first argument is the device context, the second and third arguments are the coordinates of the points.
Drawing a rectangle
To draw a rectangle, use the Rectangle () function, where the function is described as follows:
WINGDIAPI BOOL WINAPI Rectangle (HDC, int, int, int, int);
The first argument is the device context, all other arguments are the coordinates of the upper left and lower right corners of the rectangle.
Drawing an ellipse
To draw an ellipse, you need to call the Ellipse () function, where the function is described as follows:
WINGDIAPI BOOL WINAPI Ellipse (HDC, int, int, int, int);
The first argument is the device context.
Note: the ellipse is bounded by a rectangle and it is through the coordinates of this rectangle that the drawn ellipse is determined. The second and third arguments are the coordinates of the upper left corner of the rectangle, the fourth and fifth arguments are the coordinates of the lower right corner.
Draw a rounded rectangle
To draw a rectangle with rounded edges, use the RoundRect () function, where the function is described as follows:
WINGDIAPI BOOL WINAPI RoundRect (HDC, int, int, int, int, int, int);
The first five arguments are completely identical to the arguments of the Rectangle () function. The last two arguments contain the width and height of the ellipse defining the arcs.
Writing and parsing .asm code
To write a primitive, consider the steps that are needed to create and draw graphics:
1) obtaining a descriptor for the program;
2) window class registration;
3) creating a window;
4) window display on the screen;
5) update the contents of the screen in the window;
6) exit from the program.
Let's start creating, but first we will create a new project in Visual Studio: File -> New Project
Choose an empty project: Empty project
Create a new file: right-click on Source -> Add -> New Item
Create a new file (.asm):
The first way is to add when creating a new file file.asm (I created this way)
2nd way - to change the extension of the file after it is created (file.txt -> rename -> file.asm)
Use masm in Visual Studio: right click on project -> Build Customization
Set this same masm: put a tick in front of the masm
We start writing this very primitive, and the listing itself, see below.
Listing 2. Writing code in assembler
.386
.model stdcall, flat
option casemap:none

includelib kernel32.lib
include kernel32.inc
includelib user32.lib
include user32.inc
include windows.inc
include gdi32.inc

.data

hwnd dd 0
hInst dd 0
szTitleName db '. №6', 0
szClassName db ' Win32', 0
msg MONMSGSTRUCT <?>
wc WNDCLASS <?>
ps PAINTSTRUCT <?>

.code

Main PROC
invoke GetModuleHandle, 0 ; . ,
mov hInst, eax ; .
mov wc.style, CS_HREDRAW + CS_VREDRAW + CS_GLOBALCLASS
mov wc.lpfnWndProc, offset WndProc ;
mov wc.cbClsExtra, 0
mov wc.cbWndExtra, 0
mov eax, hInst ;
mov wc.hInstance, eax ; hInstance
invoke LoadIcon, 0, IDI_APPLICATION
mov wc.hIcon, eax ; hIcon
invoke LoadCursorA, 0, IDC_ARROW
mov wc.hCursor, eax ; hCursor
mov wc.hbrBackground, WHITE_BRUSH ;
mov dword ptr wc.lpszMenuName, 0 ;
mov dword ptr wc.lpszClassName, offset szClassName ;
invoke RegisterClassA, offset wc ;
invoke CreateWindowEx, 0, offset szClassName, offset szTitleName, \
WS_OVERLAPPEDWINDOW, CW_USEDEFAULT, CW_USEDEFAULT, \
CW_USEDEFAULT, CW_USEDEFAULT, 0, 0, hInst, 0
mov hwnd, eax ;
invoke ShowWindow, hwnd, SW_SHOWNORMAL ;
invoke UpdateWindow, hwnd ;
cycle1: ;
invoke GetMessage, offset msg, 0, 0, 0
cmp ax, 0
je end_c
invoke TranslateMessage, offset msg ;
invoke DispatchMessage, offset msg ;
;
jmp cycle1
end_c:
invoke ExitProcess, 0 ;
Main ENDP

WndProc PROC USES ebx edi esi, _hwnd:DWORD, _wmsg:DWORD, _wparam:DWORD, _lparam:DWORD
local _hdc:DWORD
cmp _wmsg, WM_DESTROY
je wmdestroy
cmp _wmsg, WM_PAINT
je wmpaint
invoke DefWindowProcA, _hwnd, _wmsg, _wparam, _lparam ;.
jmp exit_proc
wmpaint:
invoke BeginPaint, _hwnd, offset ps ;
mov _hdc, eax
invoke Rectangle, _hdc, 170, 120, 310, 260 ;
invoke Rectangle, _hdc, 120, 120, 170, 140 ;
invoke Rectangle, _hdc, 310, 120, 360, 140 ;
invoke Rectangle, _hdc, 170, 260, 190, 310 ;
invoke Rectangle, _hdc, 290, 260, 310, 310 ;
invoke Rectangle, _hdc, 210, 80, 270, 120 ;
invoke Rectangle, _hdc, 220, 85, 225, 90 ;
invoke Rectangle, _hdc, 250, 85, 255, 90 ;
invoke Rectangle, _hdc, 225, 105, 255, 120 ;
invoke EndPaint, _hdc, offset ps ;
mov eax, 0 ; - 0
jmp exit_proc
wmdestroy:
invoke PostQuitMessage, 0 ; WM_QUIT
mov eax, 0 ; - 0
exit_proc:
ret
WndProc ENDP
END Main
Result
In the course of actions and writing code I put down comments, but in order to understand the full essence, I will consider in more detail everything I did and wrote.
Debriefing
The line from .386 transmits to MASM that the 80386 processor instruction set is being used. The string .model stdcall, flat transmits to MASM that a flat memory model will be used. And the transfer of parameters itself was used by the type STDCALL as the default.
I connected windows.inc at the beginning of the code, since it contains the system structures and constants that were required to implement the primitives in the program. Since the program calls the Windows API functions that are in user32.dll (CreateWindowEx and others) and kernel32.dll (ExitPocess and others), they must also be registered.
We describe the prototype of the main function PROC.
Next comes .data, where: szClassName is the name of our window class and szTitleName is the name of our window.
The .code contains all instructions where code should be located between <tag name> and end <tag name>.
The first instruction is to call GetModuleHandle to get the handle to our program. It is used as a parameter passed to API functions that are called by our program.
Next comes the initialization of the window class - it defines some important window characteristics, such as the icon, the cursor, the function responsible for the window, and so on. Here we also describe the descriptor of the application itself, the icon descriptor and the cursor descriptor. There is no menu descriptor in the implemented application, since this would increase the program code, but it did not add functionality, especially since it is primitive and is not needed here at all. Parameters that can or have been used to create the window:
1) cbSize: sets the size of the total WDNCLASSEX structure in bytes;
2) style: sets the style of the window;
3) cbClsExtra: set the number of additional bytes that need to be reserved for the program itself;
4) hInstance: sets the module descriptor;
5) hIcon: sets the icon handle, and its retrieval proceeds by calling the LoadIcon function;
6) hCursor: sets the descriptor of the cursor, and its receipt proceeds by calling the function LoadCursor;
7) hbrBackground: sets the background color;
8) lpszMenuName: set the menu descriptor for windows;
9) lpszClassName: set the name of the window class.
After registering the window class with the RegisterClassEx function, CreateWindowEx is called to create our window based on this class.
WndProc PROC USES ebx edi esi, _hwnd: DWORD, _wmsg: DWORD, _wparam: DWORD, _lparam: DWORD is an important and important procedure. _wmsg - the transmitted message. It is worth saying that _wmsg is not a msg structure, but it is just a number. _wparam and _lparam are additional parameters used by some messages.
In the end, they came to the final part, where the given figures, their coordinates and return values are described. This is the key part, because this is where the logic of the program's actions is located. Here we also describe the release of the context and return the values, where further we send a message of completion. The only message that remains to be processed is wmdestroy — this message will be sent to the window when it is closed. At that time, when the window procedure gets it, the window has already disappeared from the screen. After running wmdestroy, PostQuitMessage is called, which sends an exit message and this causes GetMessage to return a zero value to eax, and this is an exit from the program.
Source: https://habr.com/ru/post/134495/
All Articles