Google+-like navigation
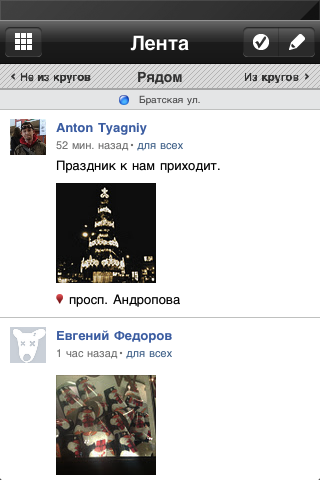
Recently installed the google + app on the iPad, and met something fresh from the navigation menu. In principle, updating the tape through paging on ScrollView does not represent much new technologies, but in combination with the upper text bar (on which, by the way, the font changes interestingly) and the cyclical behavior looks quite comfortable and interesting. For people who have no idea what it looks like in a google + iphone-client, you can try to present it in the picture below:
Therefore, I decided to spend several hours to make the same convenient control, and in the future I think it will come in handy many times. The implementation was not as simple personally as I expected, so I decided to share the method of creating such a control, I think it may be needed by many developers, or at least a normally working cyclical scrollView will also provide interest. By the way, first of all I naturally started looking for similar engines on stackoverflow and other code resources, but I could not find it. I didn’t make a special emphasis on the design part, everything will be primitive, but at the same time universal.
')
1st step . We need a UIViewController - where the main elements will be a UIScrollView to scroll left-right, 3 UIViews (which will be displayed as pages) and the upper bar to display floating text.
Let's start with a general description:
Here I think there can be no difficulties, we create a UIScrollView with the paging enabled for 3 pages, it’s worth paying attention only to that each UIView is assigned a tag, later it will be used for the top bar. In this example, the result was tested on 3 pages, but for future universality, there is already an array of pages.
2nd step . Now it is necessary to process the delegate from UIScrollView to calculate positions and replace pages. A little in words:
UIScrollView holds constant contentSize equal to mainScroll.frame.size.width * 3
When moving to the right, we use the following rule (the active position is highlighted in bold):
view1, view2 , view3, shift
view2, view2, view3 , now it is recalculated and we get the following composition
view2, view3 , view1
When moving to the left, the rearrangement will occur in the opposite direction.
Now create the appropriate code. To begin, use the delegate from UIScrollView
Ask why such an unusual logic? Answer: so that we receive an event of the type “changed page” only with full dragging of the page to 320px. No matter how I played with roundf, truncf, ceilf, I could not get the result I needed. Now we can catch the moment when the extreme page has become central and can do a UIView permutation, change the order in the pages array, and fictitiously move the UIScrollView position back to the center. All of the above is described in the code below:
In this second step is over and we already have a fully working UIScrollView with three pages that can scroll right and left cyclically.
3rd step . Adding a top bar with changing text. Here begins the most tricks and miscalculations. This moment is most coordinate attached now and is not universal, if you want to make a composition of 3, 4, 4, or other number of floating inscriptions, you will have to change the calculation logic.
Let's turn to implementation. Header file:
We will need 5 UILabel 3 basic and 2 auxiliary for mirroring, the step between them will be 120. I will not give the full text of the creation, only the frame and the inscription, since only they carry the meaning, the font for the central inscription is Helvetica 14, for the rest of Helvetica 12
Go to the main method of moving:
And all we have to do is to register the change of texts with a complete page shift, since at this moment there is a substitution of contentOffset.
Well, in the end we got the finished engine, not inferior to google +.
You can see the result in the video below. Sorry to use screen capture demo. The screen flick which I always used became paid, I had to look for an alternative solution.
Download the original project here: https://github.com/katleta3000/Google-Navi
Therefore, I decided to spend several hours to make the same convenient control, and in the future I think it will come in handy many times. The implementation was not as simple personally as I expected, so I decided to share the method of creating such a control, I think it may be needed by many developers, or at least a normally working cyclical scrollView will also provide interest. By the way, first of all I naturally started looking for similar engines on stackoverflow and other code resources, but I could not find it. I didn’t make a special emphasis on the design part, everything will be primitive, but at the same time universal.
')
1st step . We need a UIViewController - where the main elements will be a UIScrollView to scroll left-right, 3 UIViews (which will be displayed as pages) and the upper bar to display floating text.
Let's start with a general description:
mainScroll = [[UIScrollView alloc] initWithFrame:CGRectMake(0, 0, self.view.frame.size.width, self.view.frame.size.height)]; [self.view addSubview:mainScroll]; mainScroll.backgroundColor = [UIColor clearColor]; mainScroll.contentSize = CGSizeMake(self.view.frame.size.width*3, self.view.frame.size.height); mainScroll.pagingEnabled = YES; mainScroll.scrollEnabled = YES; mainScroll.delegate = self; scrollBar = [[YOScrollBar alloc] initWithFrame:CGRectMake(0, 0, 320, 27)]; [self.view addSubview:scrollBar]; pages = [[NSMutableArray alloc] initWithCapacity:3]; UIView *view1 = [[UIView alloc] initWithFrame:CGRectMake(0, 0, self.view.frame.size.width, self.view.frame.size.height)]; [mainScroll addSubview:view1]; view1.tag = 0; [pages addObject:view1]; view1.backgroundColor = [UIColor lightGrayColor]; [view1 release]; UIView *view2 = [[UIView alloc] initWithFrame:CGRectMake(self.view.frame.size.width, 0, self.view.frame.size.width, self.view.frame.size.height)]; [mainScroll addSubview:view2]; [pages addObject:view2]; view2.tag = 1; view2.backgroundColor = [UIColor grayColor]; [view2 release]; UIView *view3 = [[UIView alloc] initWithFrame:CGRectMake(self.view.frame.size.width*2, 0, self.view.frame.size.width, self.view.frame.size.height)]; [mainScroll addSubview:view3]; [pages addObject:view3]; view3.tag = 2; view3.backgroundColor = [UIColor blackColor]; [view3 release]; pageIndex = (int)[pages count]/2; [mainScroll setContentOffset:CGPointMake(self.view.frame.size.width, 0)];Here I think there can be no difficulties, we create a UIScrollView with the paging enabled for 3 pages, it’s worth paying attention only to that each UIView is assigned a tag, later it will be used for the top bar. In this example, the result was tested on 3 pages, but for future universality, there is already an array of pages.
2nd step . Now it is necessary to process the delegate from UIScrollView to calculate positions and replace pages. A little in words:
UIScrollView holds constant contentSize equal to mainScroll.frame.size.width * 3
When moving to the right, we use the following rule (the active position is highlighted in bold):
view1, view2 , view3, shift
view2, view2, view3 , now it is recalculated and we get the following composition
view2, view3 , view1
When moving to the left, the rearrangement will occur in the opposite direction.
Now create the appropriate code. To begin, use the delegate from UIScrollView
- (void)scrollViewDidScroll:(UIScrollView *)scrollView { float indexF = (mainScroll.contentOffset.x / mainScroll.frame.size.width); int indexI = (int)indexF; float rez = indexF - (float)indexI; if (rez == 0.f) { // } [scrollBar scroll:mainScroll.contentOffset]; }Ask why such an unusual logic? Answer: so that we receive an event of the type “changed page” only with full dragging of the page to 320px. No matter how I played with roundf, truncf, ceilf, I could not get the result I needed. Now we can catch the moment when the extreme page has become central and can do a UIView permutation, change the order in the pages array, and fictitiously move the UIScrollView position back to the center. All of the above is described in the code below:
int newPageIndex = indexI; int center; if (newPageIndex < pageIndex) { // for (int i=0; i < [pages count]-1; i++) { UIView *moveView = [pages objectAtIndex:i]; moveView.frame = CGRectMake(moveView.frame.origin.x + moveView.frame.size.width, moveView.frame.origin.y, moveView.frame.size.width, moveView.frame.size.height); }// UIView *moveView = [pages lastObject]; moveView.frame = CGRectMake(0, moveView.frame.origin.y, moveView.frame.size.width, moveView.frame.size.height); // view for (int i=[pages count]-1; i > 0; i--) [pages exchangeObjectAtIndex:i-1 withObjectAtIndex:i]; // center = (int)[pages count]/2; // pageIndex = center; newPageIndex = pageIndex; // UIView *view = [pages objectAtIndex:center]; [scrollBar changePage:view.tag]; [mainScroll setContentOffset:CGPointMake(center*mainScroll.frame.size.width, 0) animated:NO]; }else if (newPageIndex > pageIndex) { // for (int i=1; i < [pages count]; i++) { UIView *moveView = [pages objectAtIndex:i]; moveView.frame = CGRectMake(moveView.frame.origin.x - moveView.frame.size.width, moveView.frame.origin.y, moveView.frame.size.width, moveView.frame.size.height); } UIView *moveView = [pages objectAtIndex:0]; moveView.frame = CGRectMake(([pages count]-1)*moveView.frame.size.width, moveView.frame.origin.y, moveView.frame.size.width, moveView.frame.size.height); // view for (int i=0; i < [pages count]-1; i++) [pages exchangeObjectAtIndex:i withObjectAtIndex:i+1]; // center = (int)[pages count]/2; // pageIndex = center; newPageIndex = pageIndex; // UIView *view = [pages objectAtIndex:center]; [scrollBar changePage:view.tag]; [mainScroll setContentOffset:CGPointMake(center*mainScroll.frame.size.width, 0) animated:NO]; }In this second step is over and we already have a fully working UIScrollView with three pages that can scroll right and left cyclically.
3rd step . Adding a top bar with changing text. Here begins the most tricks and miscalculations. This moment is most coordinate attached now and is not universal, if you want to make a composition of 3, 4, 4, or other number of floating inscriptions, you will have to change the calculation logic.
Let's turn to implementation. Header file:
@interface YOScrollBar : UIView { UIImageView *background; NSMutableArray *labels; UILabel *labelLeft, *labelCenter, *labelRight, *labelMirrowLeft, *labelMirrowRight; float step; } - (void)scroll:(CGPoint)point; - (void)changePage:(int)pageIndex; - (void)selectCenter; @endWe will need 5 UILabel 3 basic and 2 auxiliary for mirroring, the step between them will be 120. I will not give the full text of the creation, only the frame and the inscription, since only they carry the meaning, the font for the central inscription is Helvetica 14, for the rest of Helvetica 12
labelMirrowLeft = [[UILabel alloc] initWithFrame:CGRectMake(-109, 5, 60, 14)]; labelMirrowLeft.text = @""; labelLeft = [[UILabel alloc] initWithFrame:CGRectMake(9, 5, 60, 14)]; labelLeft.text = @""; labelCenter = [[UILabel alloc] initWithFrame:CGRectMake(129, 5, 60, 14)]; labelCenter.text = @""; labelRight = [[UILabel alloc] initWithFrame:CGRectMake(249, 5, 60, 14)]; labelRight.text = @""; labelMirrowRight = [[UILabel alloc] initWithFrame:CGRectMake(369, 5, 60, 14)]; labelMirrowRight.text = @"";Go to the main method of moving:
- (void)scroll:(CGPoint)point { float k = step/320; CGPoint pointT = CGPointMake(-(point.x-320)*k, 0); float fontT = (step - abs((int)pointT.x))/step*2; if (pointT.x > 0) { // labelLeft.font = [UIFont fontWithName:@"Helvetica" size:14.f-fontT]; }else if (pointT.x < 0) { // labelRight.font = [UIFont fontWithName:@"Helvetica" size:14.f-fontT]; } labelCenter.font = [UIFont fontWithName:@"Helvetica" size:12.f+fontT]; labelLeft.frame = CGRectMake(9 + pointT.x, labelLeft.frame.origin.y, labelLeft.frame.size.width, labelLeft.frame.size.height); labelCenter.frame = CGRectMake(129 + pointT.x, labelCenter.frame.origin.y, labelCenter.frame.size.width, labelCenter.frame.size.height); labelRight.frame = CGRectMake(249 + pointT.x, labelRight.frame.origin.y, labelRight.frame.size.width, labelRight.frame.size.height); labelMirrowLeft.frame = CGRectMake(-111 + pointT.x, labelMirrowLeft.frame.origin.y, labelMirrowLeft.frame.size.width, labelMirrowLeft.frame.size.height); labelMirrowRight.frame = CGRectMake(369 + pointT.x, labelMirrowRight.frame.origin.y, labelMirrowRight.frame.size.width, labelMirrowRight.frame.size.height); }And all we have to do is to register the change of texts with a complete page shift, since at this moment there is a substitution of contentOffset.
- (void)changePage:(int)pageIndex { if (pageIndex == 0) { labelMirrowLeft.text = @""; labelLeft.text = @""; labelCenter.text = @""; labelRight.text = @""; labelMirrowRight.text = @""; }else if (pageIndex == 1) { labelMirrowLeft.text = @""; labelLeft.text = @""; labelCenter.text = @""; labelRight.text = @""; labelMirrowRight.text = @""; }else if (pageIndex == 2) { labelMirrowLeft.text = @""; labelLeft.text = @""; labelCenter.text = @""; labelRight.text = @""; labelMirrowRight.text = @""; } }Well, in the end we got the finished engine, not inferior to google +.
You can see the result in the video below. Sorry to use screen capture demo. The screen flick which I always used became paid, I had to look for an alternative solution.
Download the original project here: https://github.com/katleta3000/Google-Navi
Source: https://habr.com/ru/post/134415/
All Articles