Drawing on Canvas via WebSockets, or how our demo worked on HTML5 Camp
At the opening of HTML5 Camp , we showed a few demos using new web technologies. There were both third-party projects and solutions like the Disney Tron Legacy and Santa's Media Queries , as well as a number of examples prepared specifically for the event.
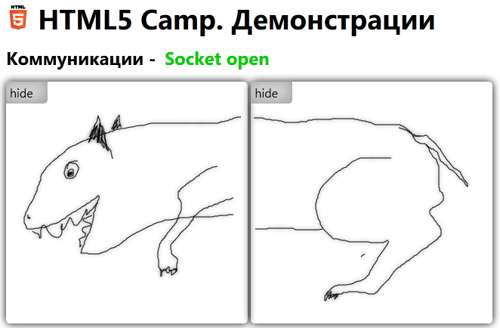
One such example was a chat that runs on top of web sockets with advanced functionality that allows you to draw in real time together. This is somewhat reminiscent of a well-known children's game, when participants take turns or simultaneously draw different parts of an animal, and then put the fragments together and watch what happened.
')
In this article I will briefly tell you how such a painter works and what difficulties I had to face. Immediately, I note that this is not a finished product, but only a prototype.
It all started with the fact that it was necessary to adjust the work of web sockets. In our case, we cost a little blood, taking as a basis a ready-made chat client with
html5labs.com . Please note that there is an implementation both via native web sockets, if supported by the browser, or with fallback via Silverlight otherwise.
An example that you can download from the link above contains both the server implementation of support for web sockets and the client part. In this article, we limit ourselves to the client. In the demo example, we only need to know about the server that it supports interaction via web sockets at a specific address and sends the received message to all clients.
Some important details:
To figure out how things work, let's start with a simple text chat:
To send the form, we hang an event that will intercept the message and send it via a web socket:
In the code above, we check that the connection is ready for use and send the object as a json string, while simultaneously adding the message to the chat log. (A terrible function with regular expressions just escapes "&", "<" and ">".
Now let's figure out where the connection to the web socket comes from. To start working with web sockets, you need to create an appropriate object:
Further (inside) it is necessary to hang several event handlers from an open socket — at least for opening, closing and receiving a message (and, preferably, for an error):
Since new messages are sent to everyone en masse, it would be good to filter your own, for this sender (randomly generated id) is checked in the code.
At this point, if you have not yet been familiar with web sockets (again, leaving the server part outside the article), you should already be inspired by the ease of implementation of text interaction. Well, the most interesting thing is that it’s also very easy to write a joint drawing artist on top of a text chat.
To dwell on how to draw on top of canvas, perhaps, would be superfluous, since there are examples on the net and so much more. I will focus only on three interesting points.
First, quite unexpectedly, it turned out that Firefox still does not support offsetX / offsetY in MouseEvent to determine the coordinates of the mouse relative to the block over which the cursor is located. See also my article " T & P. Canvas and Offset ". This is not a very big problem, but the code, of course, complicates if you need to make it completely cross-browser.
Secondly, also unexpectedly, it turned out that Chrome does not include Shadow when rendering to Canvas and, in general, different anti-aliasing and slightly different algorithms are used in different browsers.
(clickable)
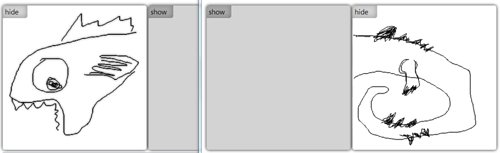
And, thirdly, to simulate the game in the example, two canvases are used, respectively, when sending messages it was necessary to understand on which canvas and what exactly it would be necessary to draw.
Now, actually, to transfer drawing through web sockets. If in a text chat the message was sent when the form was sent, then when drawing it seems reasonable to send it directly during the drawing process, so we add the necessary code to the onmousemove event, hung on the canvas:
Pay attention to the code sending the message - in structure it is no different from the code for text.
It remains to update the reception of messages:
Here, too, everything is identical with the only difference: instead of adding text to the log, we simply draw a line from the socket using the same mechanism as our own lines (if you wish, you can change the color):
A little more gloss is added through box-shadow and hiding the second half when drawing, so as not to see what the other player is painting:
The ready example can be downloaded from Ya.Disk .
One such example was a chat that runs on top of web sockets with advanced functionality that allows you to draw in real time together. This is somewhat reminiscent of a well-known children's game, when participants take turns or simultaneously draw different parts of an animal, and then put the fragments together and watch what happened.
')
In this article I will briefly tell you how such a painter works and what difficulties I had to face. Immediately, I note that this is not a finished product, but only a prototype.
Web sockets
It all started with the fact that it was necessary to adjust the work of web sockets. In our case, we cost a little blood, taking as a basis a ready-made chat client with
html5labs.com . Please note that there is an implementation both via native web sockets, if supported by the browser, or with fallback via Silverlight otherwise.
An example that you can download from the link above contains both the server implementation of support for web sockets and the client part. In this article, we limit ourselves to the client. In the demo example, we only need to know about the server that it supports interaction via web sockets at a specific address and sends the received message to all clients.
Some important details:
- Internet Explorer. In IE, web sockets are supported natively, starting from version 10, we used IE10 PP4 .
- Firefox. In Firefox, web sockets are available through the vendor prefix, so you need to use MozWebSocket instead of the WebSocket object.
- Opera. In Opera, web sockets were required to be manually enabled via settings: opera: config -> websockets -> enable.
To figure out how things work, let's start with a simple text chat:
<form id="myform"> <input type="text" id="chat" placeholder="type and press enter to chat" /> </form> <ul id="log"></ul> To send the form, we hang an event that will intercept the message and send it via a web socket:
$("#myform").submit(function (event) { event.preventDefault(); // if we're connected // conn -- opened websocket connection if (conn.readyState === 1) { conn.send(JSON.stringify({ sender:sender, // sender ID type:'chat', chat:$('#chat').val() })); log.html('<li class="you">' + $('#chat').val().replace(/[<>&]/g, function (m) { return entities[m]; }) + '</li>' + log[0].innerHTML); $('#chat').value = ''; } }); In the code above, we check that the connection is ready for use and send the object as a json string, while simultaneously adding the message to the chat log. (A terrible function with regular expressions just escapes "&", "<" and ">".
Now let's figure out where the connection to the web socket comes from. To start working with web sockets, you need to create an appropriate object:
if (conn.readyState === undefined || conn.readyState > 1) { // ws -- WebSocket or MozWebSocket conn = new ws('ws://yousite.com:port/chat'); ... } Further (inside) it is necessary to hang several event handlers from an open socket — at least for opening, closing and receiving a message (and, preferably, for an error):
conn.onopen = function () { state.toggleClass('success'); state.text('Socket open'); }; conn.onmessage = function (event) { var message = JSON.parse(event.data); if (message.type == 'chat') { // filter own messages if (message.sender != sender) { log.html('<li class="them">' + message.chat.replace(/[<>&]/g, function (m) { return entities[m]; }) + '</li>' + log[0].innerHTML); } } else { $('#connected').text(message); } }; conn.onclose = function (event) { state.toggleClass('fail'); state.text('Socket closed'); }; Since new messages are sent to everyone en masse, it would be good to filter your own, for this sender (randomly generated id) is checked in the code.
At this point, if you have not yet been familiar with web sockets (again, leaving the server part outside the article), you should already be inspired by the ease of implementation of text interaction. Well, the most interesting thing is that it’s also very easy to write a joint drawing artist on top of a text chat.
Drawing
To dwell on how to draw on top of canvas, perhaps, would be superfluous, since there are examples on the net and so much more. I will focus only on three interesting points.
First, quite unexpectedly, it turned out that Firefox still does not support offsetX / offsetY in MouseEvent to determine the coordinates of the mouse relative to the block over which the cursor is located. See also my article " T & P. Canvas and Offset ". This is not a very big problem, but the code, of course, complicates if you need to make it completely cross-browser.
Secondly, also unexpectedly, it turned out that Chrome does not include Shadow when rendering to Canvas and, in general, different anti-aliasing and slightly different algorithms are used in different browsers.
(clickable)
And, thirdly, to simulate the game in the example, two canvases are used, respectively, when sending messages it was necessary to understand on which canvas and what exactly it would be necessary to draw.
Now, actually, to transfer drawing through web sockets. If in a text chat the message was sent when the form was sent, then when drawing it seems reasonable to send it directly during the drawing process, so we add the necessary code to the onmousemove event, hung on the canvas:
// canvas - "canvas" object // canvas.source - jquery object for canvas // canvas.context - canvas.source[0].getContext("2d") canvas.source.bind("mousemove", function(e) { if (canvas.isPainting) { var line = {x1:canvas.lastPoint.x, y1:canvas.lastPoint.y, x2: e.offsetX, y2: e.offsetY}; drawLine(canvas.part, line); if (conn.readyState === 1) { conn.send(JSON.stringify({ sender:sender, type:"canvas", part:canvas.part, line:line })); } canvas.lastPoint = {x: e.offsetX, y: e.offsetY}; } }); Pay attention to the code sending the message - in structure it is no different from the code for text.
It remains to update the reception of messages:
conn.onmessage = function (event) { var message = JSON.parse(event.data); if (message.type == 'chat') { ... } else if (message.type == 'canvas') { if (message.sender != sender) { drawLine(message.part, message.line); } } else { ... } }; Here, too, everything is identical with the only difference: instead of adding text to the log, we simply draw a line from the socket using the same mechanism as our own lines (if you wish, you can change the color):
// c1 and c2 - global vars function drawLine(part, line) { var ctx = (part == 1) ? c1.context : c2.context; ctx.beginPath(); ctx.moveTo(line.x1, line.y1); ctx.lineTo(line.x2, line.y2); ctx.closePath(); ctx.stroke(); }; A little more gloss is added through box-shadow and hiding the second half when drawing, so as not to see what the other player is painting:
The ready example can be downloaded from Ya.Disk .
Source: https://habr.com/ru/post/134097/
All Articles