“Simple business” - working with documents has become even easier
The “Simple Business” program is designed in such a way that, in addition to solving current business problems, users have the ability to maintain a full-fledged organization’s document flow — create, edit and exchange documents of various types. Documents in the “Simple Business” program are processed by means of the built-in editor, and to speed up the process of working with documentation, you can use sets of document templates. The latest version of the system "Simple Business" 1.6. ( www.prostoy.ru ) special attention was paid to the work with documents, the basic ones were improved and new functions were added, the “Document Import Wizard” was added, as well as many document templates.
Creating new templates is a function available only to the owner of the organization and the administrator of the program. This operation is performed on the “Documents” tab in the organization window, using the “Document Import Wizard”.
In the Wizard window, the user is offered three options for working with documents: import from a standard set, create documents independently, or import documents from a third-party organization.
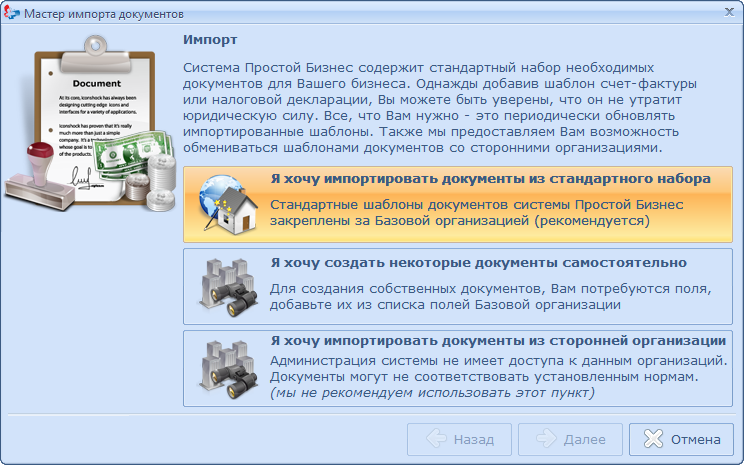
The command “I want to import documents from the standard set” opens a window with a list of documents available for import, in which the user marks the required positions with flags.

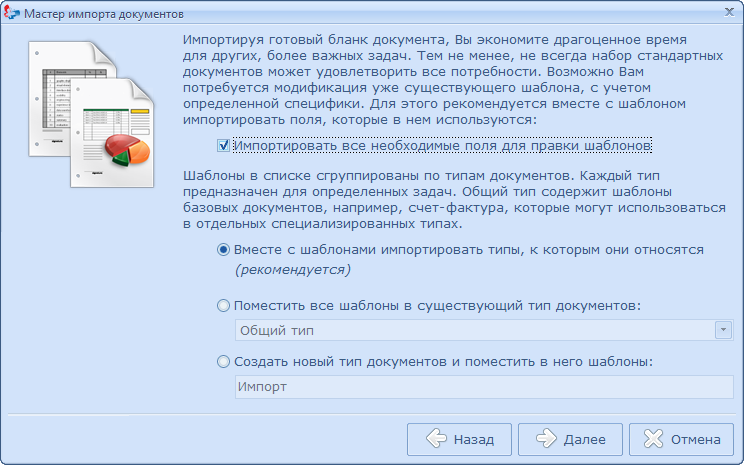
Next, you need to select a group (type of documents) to host the basic templates. The import process is displayed on the user's screen. Imported templates can be used from the list of documents.
When choosing the command “I want to create some documents on my own,” the user may not use the entire template, but select only the required fields by selecting the flags.

The command “I want to import documents from a third-party organization” enables the use of templates from other organizations participating in the Simple Business system. In the upper part of the window is the search bar, where the user enters the name of the organization. Having selected the necessary entry from the generated list, you can start the import process similar to the import of the basic set of documents. However, only document templates that the owner of the organization has marked as “Allow Export” can be imported from a third-party organization.
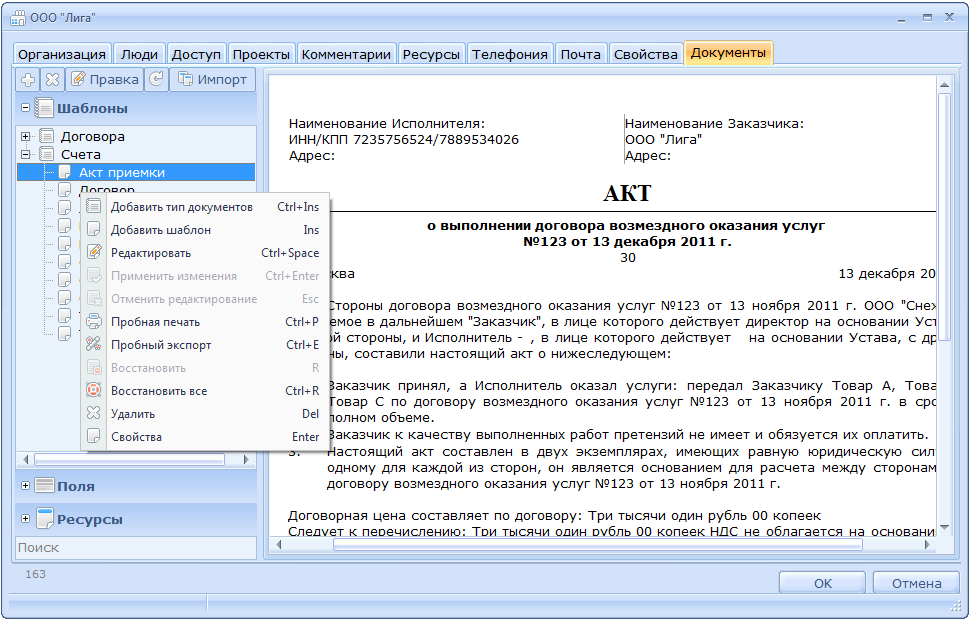
Work with document templates is performed on the “Documents” tab using the toolbar buttons: adding (button ) or delete (button
  a) selected template or document type; Template editing (Edit button); update for imported templates, fields and resources (button
  ), call the window "Document Import Wizard" (button "Import").
By default, new templates are added to the General Type group, but the user can independently group documents according to their type. To do this, use the toolbar button. or the “Add Document Type” context menu command (keyboard Ctrl + Ins on the keyboard).
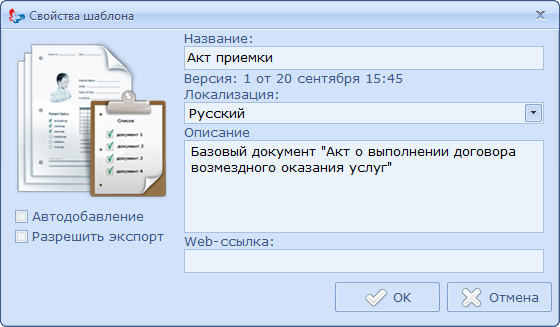
For each new template, the user can define its properties: “Name”, “Version” (version number and date of template creation); “Localization” (set language: Russian, Ukrainian, English), “Description”, “Auto-add” (when selecting a template of this type, it will be automatically added to the list), “Allow export” (other organizations will be able to import the template).
After creating a template in the workspace, a window of the built-in editor similar to MS Word will open. In the upper part of the window there is a toolbar that allows you to change text parameters, add tables, fields or other resources to the template. Each toolbar button has a tooltip to find out its purpose.
Having typed the necessary text of the template, the user can save the changes by clicking on the “OK” button at the bottom of the window, or use the context menu command “Apply changes” (Ctrl + Enter on the keyboard). When you close the organization properties window, all changes are saved automatically.
You can work with documents in the document tree using the context menu commands. Using its commands, you can add a template or a new document type, edit the selected template, perform a test print, or export the template to a hard disk.
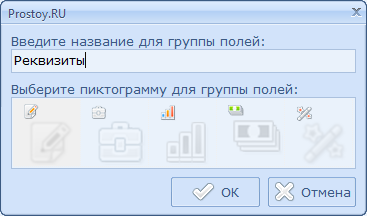
One of the important stages of editing a template is adding fields (elements whose values are inserted into a template). This operation is performed by the "Fields" command in the left part of the "Documents" window. You can create a field or group of fields by clicking on the toolbar, or by the context menu command “Create a group of fields” (Ctrl + Ins on the keyboard). In the window of the new group of fields the name of the group and its icon are indicated.
Similarly, a new field is created for which the user must specify the main parameters: “Name”, “Identifier” (the name of the field inside the document, which is used when writing the field formula); "Type of"; value "Default" and "Description".
When working with templates, the user can use resources - graphic objects (printing, signature, logo, etc.). Using the Resources command in the left part of the Documents window, you can upload image files in bmp, .jpeg, .jpg, .png, .ico, .tiff, .tif. Formats, and then apply them in working with templates.
For the convenience of maintaining current documentation, the creation of documents is possible directly in the task window. This feature is available to the owner or administrator of the organization, as well as to users with the appropriate rights. You can create a new document by clicking on the button. toolbar and selecting the menu item "Documents".

In the window that appears, the user can select the type of documents of the organization (field “Type of document package”), set the dates of documents (field “Date of documents”), assign documents the status “Paid” or “Close documents”; and also fill in with the “Table of ordered goods and services”, the records of which will be automatically inserted into the document.

The “General” command in the left part of the window will allow you to add documents, files, images from the scanner to the package. The “Print” button opens a window where you can set the basic parameters for printing a document.

The “Export” command opens the window for exporting documents, where the user can mark the necessary documents, and then select the export option: “Save to disk” (documents are saved on a PC) or “Publish to the network” (documents are published on the server with possibility of further downloading ). Documents are exported in doc, pdf, or zip-archive format.

Any of the selected templates, the user can edit using the "Edit" button. In the window that appears, you can go to the fields to fill in the data (the “Go to the General tab” command) or open the editing mode (the “Direct editing” command).
The functionality of working with documents in the “Simple Business” program is aimed at maximally simplifying document management in an organization. The ability to exchange templates, publish documents, ease of work in the built-in editor, access to documents from virtually any program object — all of these functions make keeping records in Simple Business easy and easy.
Creating new templates is a function available only to the owner of the organization and the administrator of the program. This operation is performed on the “Documents” tab in the organization window, using the “Document Import Wizard”.
In the Wizard window, the user is offered three options for working with documents: import from a standard set, create documents independently, or import documents from a third-party organization.
The command “I want to import documents from the standard set” opens a window with a list of documents available for import, in which the user marks the required positions with flags.
Next, you need to select a group (type of documents) to host the basic templates. The import process is displayed on the user's screen. Imported templates can be used from the list of documents.
When choosing the command “I want to create some documents on my own,” the user may not use the entire template, but select only the required fields by selecting the flags.
The command “I want to import documents from a third-party organization” enables the use of templates from other organizations participating in the Simple Business system. In the upper part of the window is the search bar, where the user enters the name of the organization. Having selected the necessary entry from the generated list, you can start the import process similar to the import of the basic set of documents. However, only document templates that the owner of the organization has marked as “Allow Export” can be imported from a third-party organization.
Work with document templates is performed on the “Documents” tab using the toolbar buttons: adding (button
) or delete (button a) selected template or document type; Template editing (Edit button); update for imported templates, fields and resources (button ), call the window "Document Import Wizard" (button "Import").By default, new templates are added to the General Type group, but the user can independently group documents according to their type. To do this, use the toolbar button.
or the “Add Document Type” context menu command (keyboard Ctrl + Ins on the keyboard).For each new template, the user can define its properties: “Name”, “Version” (version number and date of template creation); “Localization” (set language: Russian, Ukrainian, English), “Description”, “Auto-add” (when selecting a template of this type, it will be automatically added to the list), “Allow export” (other organizations will be able to import the template).
After creating a template in the workspace, a window of the built-in editor similar to MS Word will open. In the upper part of the window there is a toolbar that allows you to change text parameters, add tables, fields or other resources to the template. Each toolbar button has a tooltip to find out its purpose.
Having typed the necessary text of the template, the user can save the changes by clicking on the “OK” button at the bottom of the window, or use the context menu command “Apply changes” (Ctrl + Enter on the keyboard). When you close the organization properties window, all changes are saved automatically.
You can work with documents in the document tree using the context menu commands. Using its commands, you can add a template or a new document type, edit the selected template, perform a test print, or export the template to a hard disk.
One of the important stages of editing a template is adding fields (elements whose values are inserted into a template). This operation is performed by the "Fields" command in the left part of the "Documents" window. You can create a field or group of fields by clicking
on the toolbar, or by the context menu command “Create a group of fields” (Ctrl + Ins on the keyboard). In the window of the new group of fields the name of the group and its icon are indicated.Similarly, a new field is created for which the user must specify the main parameters: “Name”, “Identifier” (the name of the field inside the document, which is used when writing the field formula); "Type of"; value "Default" and "Description".
When working with templates, the user can use resources - graphic objects (printing, signature, logo, etc.). Using the Resources command in the left part of the Documents window, you can upload image files in bmp, .jpeg, .jpg, .png, .ico, .tiff, .tif. Formats, and then apply them in working with templates.
For the convenience of maintaining current documentation, the creation of documents is possible directly in the task window. This feature is available to the owner or administrator of the organization, as well as to users with the appropriate rights. You can create a new document by clicking on the button.
toolbar and selecting the menu item "Documents".In the window that appears, the user can select the type of documents of the organization (field “Type of document package”), set the dates of documents (field “Date of documents”), assign documents the status “Paid” or “Close documents”; and also fill in with the “Table of ordered goods and services”, the records of which will be automatically inserted into the document.
The “General” command in the left part of the window will allow you to add documents, files, images from the scanner to the package. The “Print” button opens a window where you can set the basic parameters for printing a document.
The “Export” command opens the window for exporting documents, where the user can mark the necessary documents, and then select the export option: “Save to disk” (documents are saved on a PC) or “Publish to the network” (documents are published on the server with possibility of further downloading ). Documents are exported in doc, pdf, or zip-archive format.
Any of the selected templates, the user can edit using the "Edit" button. In the window that appears, you can go to the fields to fill in the data (the “Go to the General tab” command) or open the editing mode (the “Direct editing” command).
The functionality of working with documents in the “Simple Business” program is aimed at maximally simplifying document management in an organization. The ability to exchange templates, publish documents, ease of work in the built-in editor, access to documents from virtually any program object — all of these functions make keeping records in Simple Business easy and easy.
')
Source: https://habr.com/ru/post/134013/
All Articles