ExtJS / Rails CRUD application in 7 minutes
This post will show you the simple steps for building a TODO web application using ExtJS, Ruby on Rails and Netzke. It will take you about 7 minutes, and if you are curious in advance if it is worth it, see the last part at once (by the way the biggest), where we will discuss the results. Our goal is to create a web application that allows you to add, edit and delete TODO tasks, as well as mark completed tasks. In addition to this, you can sort and search for tasks, edit several tasks at the same time, and that’s not all. You can track the time on your watch, let's get down to work.
When writing this tutorial, I used: Rails 3.0.1, netzke-core 0.6.2, netzke-basepack 0.6.1, Ruby 1.9.2, Ext 3.3.0.
Creating a Rails Application:
Add Netzke gems to your Gemfile:
If you later see errors related to pagination, you may need to install will_paginate until I find a better solution:
Install gems:
Connect the Ext library and, optionally, the icons from FamFamFam, for example:
Add the routes Netzke and root:
Create a welcome controller:
Remember to delete public / index.html.
')
In application layouts, standard JavaScript and CSS links are replaced with the netzke_init helper, so the result will look like this:
Note that netzke_init is all that is needed to connect Ext and Netzke JS and CSS files.
3 minutes has passed, we are ready to begin the really interesting part.
Let's create a Task model with the fields name, priority, notes, due date and the done flag:
Edit the migration file (db / migrate / xxx_create_tasks.rb) so that the “done” flag is cleared by default:
We make changes to the database:
We want our tasks to at least always have some name, so let's add the appropriate validations. And set the default_scope to get only unfinished tasks:
In order to see the Ext table as an interface to our model, we will not need to make a lot of effort. Simply declare Netzke GridPanel in app / views / welcome / index.html.erb:
Run the server:
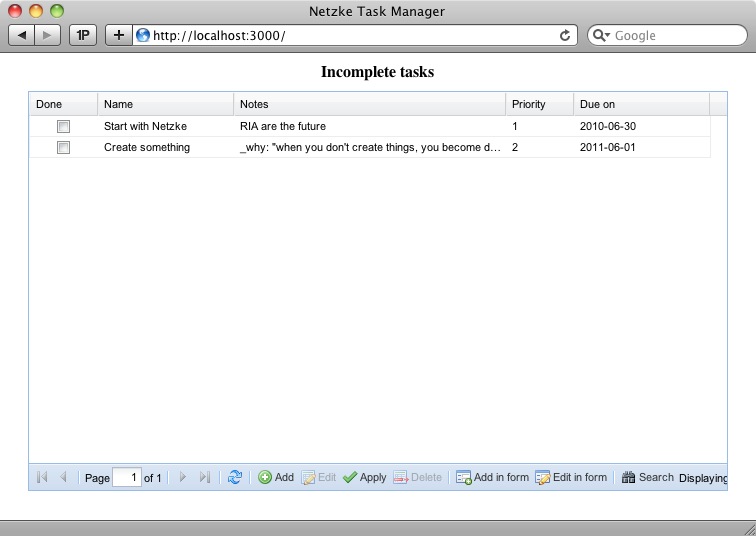
... and see how it looks on localhost : 3000 /:
This is all quite functional, and at the same time it looks decent. In a minute I will show you an impressive list of features that you have. But first, let's tweak the application a little to make it look even better - we still have time for it.
With Netzke :: Basepack :: GridPanel, you can easily customize columns (see the documentation on this). Let's do 2 simple things: 1) specify which columns we want to see, excluding created_at and updated_at created by default, and 2) change the header of the "due" column to "Due on".
Fine. Let's use the remaining 2 minutes for the final, purely visual modification. Let's display our table in the middle of the page, under the heading, without this thick blue header, and with a normal frame around. We will also set the default width for some columns and make them occupy the entire width of the table.
In order to put the table in the middle of the page, let's quickly add some css styles to the layout of our application (after the netzke_init helper):
To add a name, turn on the frame and turn off the header:
Here it is! Stop your watch, and let's discuss what we got:
Since Netzke :: Basepack :: GridPanel is a very powerful component, we got a bunch of features for free.
Adding, modifying, and deleting entries can easily happen like this:
Even if your table contains tens of thousands of records, this is not a problem for the Netzke table, all thanks to inline pagination.
Some actions of the buttons at the bottom of the table are duplicated in the context menu:
In our application, we use fields with integer, boolean, string, text, and date in the Task model - and each of the fields gets its own column type, the user cannot enter letters in the priority field.
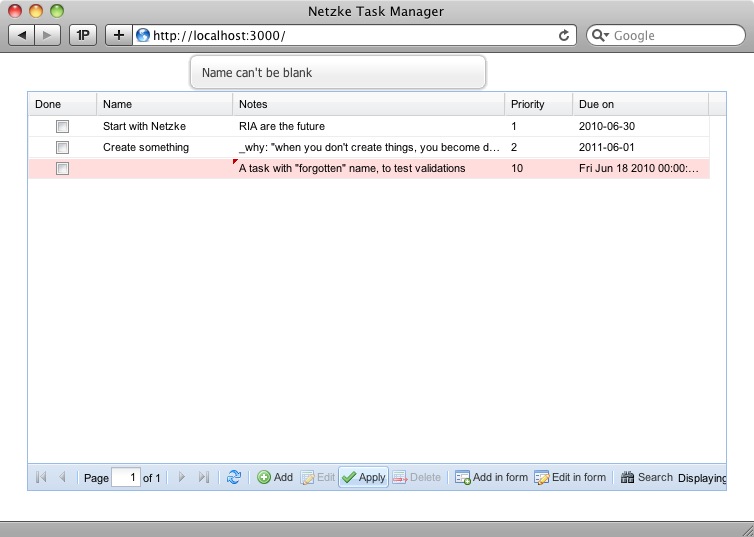
Rails validations are supported, and work even with multiple editing!
Click on the column header to enable server-side sorting:
Smart filters are enabled by default for each column, of course, given the type of column.
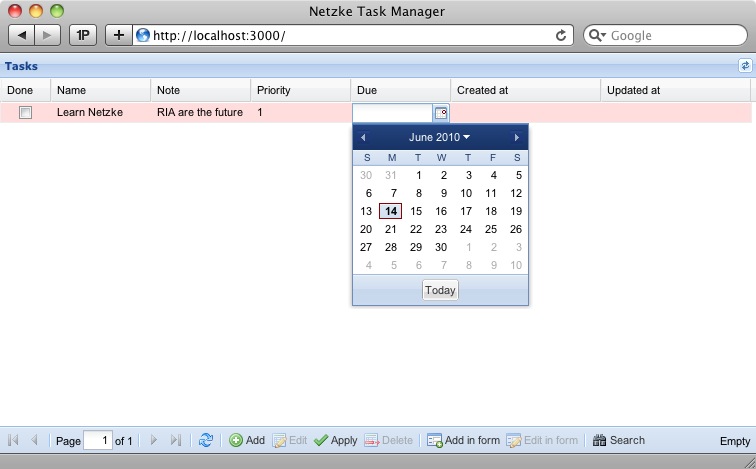
Example with date:
A priority:
Sometimes adding / changing a record is much more convenient with the form. Of course, Netzke has this option. Even multi-editing is supported, just select the necessary entries and click “Edit in form”.

This article is not covered, but the Netzke grid panel also supports one-to-many ("belongs_to") connections (see the link to the demo below).
You have learned a small part of the things that Netzke provides, for example, Netzke :: Basepack :: GridPanel - a powerful, customizable and extensible component that you can use in your RIA applications. You can see more examples of using GridPanel and other components in the demo . Basically, Netzke was conceived as a framework that allows you to create your own powerful components - from scratch, or using existing ones.
Follow me on Twitter and get Netzke news and don’t forget to bookmark the project’s official website .
Share your Netzke experience in the Google group , and (last but not least), please remember: Netzke is a multi-faceted project where a larger community will mean faster development. Thank!
UPD d43 suggested where to watch the demo with ExtJS 4.
When writing this tutorial, I used: Rails 3.0.1, netzke-core 0.6.2, netzke-basepack 0.6.1, Ruby 1.9.2, Ext 3.3.0.
Initial steps
Creating a Rails Application:
> rails new netzke_task_manager && cd netzke_task_managerAdd Netzke gems to your Gemfile:
gem 'netzke-core', :git => "git://github.com/skozlov/netzke-core.git" gem 'netzke-basepack', :git => "git://github.com/skozlov/netzke-basepack.git" If you later see errors related to pagination, you may need to install will_paginate until I find a better solution:
gem 'will_paginate', '~>3.0.pre2' Install gems:
bundle installConnect the Ext library and, optionally, the icons from FamFamFam, for example:
> ln -s ~/code/extjs/ext-3.3.0 public/extjs
> ln -s ~/assets/famfamfam-silk public/images/icons
Add the routes Netzke and root:
NetzkeTaskManager::Application.routes.draw do netzke root :to => "welcome#index" # ... end Create a welcome controller:
> rails g controller welcome indexRemember to delete public / index.html.
')
In application layouts, standard JavaScript and CSS links are replaced with the netzke_init helper, so the result will look like this:
<!DOCTYPE html> <html> <head> <title>Netzke Task Manager</title> <%= netzke_init %> <%= csrf_meta_tag %> </head> <body> <%= yield %> </body> </html> Note that netzke_init is all that is needed to connect Ext and Netzke JS and CSS files.
3 minutes has passed, we are ready to begin the really interesting part.
Creating a model
Let's create a Task model with the fields name, priority, notes, due date and the done flag:
> rails g model Task done:boolean name:string notes:text priority:integer due:dateEdit the migration file (db / migrate / xxx_create_tasks.rb) so that the “done” flag is cleared by default:
t.boolean :done, :default => false We make changes to the database:
rake db:migrateWe want our tasks to at least always have some name, so let's add the appropriate validations. And set the default_scope to get only unfinished tasks:
class Task < ActiveRecord::Base validates_presence_of :name default_scope :conditions => {:done => false} end Adding Netzke grid panel
In order to see the Ext table as an interface to our model, we will not need to make a lot of effort. Simply declare Netzke GridPanel in app / views / welcome / index.html.erb:
<%= netzke :tasks, :class_name => "Basepack::GridPanel", :model => "Task" %> Run the server:
> rails s... and see how it looks on localhost : 3000 /:
This is all quite functional, and at the same time it looks decent. In a minute I will show you an impressive list of features that you have. But first, let's tweak the application a little to make it look even better - we still have time for it.
With Netzke :: Basepack :: GridPanel, you can easily customize columns (see the documentation on this). Let's do 2 simple things: 1) specify which columns we want to see, excluding created_at and updated_at created by default, and 2) change the header of the "due" column to "Due on".
<%= netzke :tasks, :class_name => "Basepack::GridPanel", :model => "Task", :columns => [:done, :name, :notes, :priority, {:name => :due, :header => "Due on"}] %> Fine. Let's use the remaining 2 minutes for the final, purely visual modification. Let's display our table in the middle of the page, under the heading, without this thick blue header, and with a normal frame around. We will also set the default width for some columns and make them occupy the entire width of the table.
In order to put the table in the middle of the page, let's quickly add some css styles to the layout of our application (after the netzke_init helper):
<style type="text/css" media="screen"> h1 { text-align: center; margin: 10px;} .netzke-component { width: 700px; margin: auto; } </style> To add a name, turn on the frame and turn off the header:
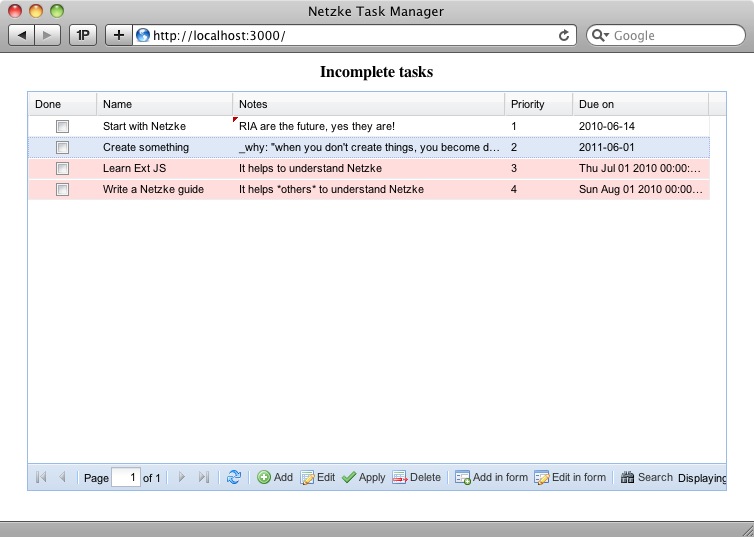
<h1>Incomplete tasks</h1> <%= netzke :tasks, :class_name => "Basepack::GridPanel", :model => "Task", :columns => [:id, :done, :name, {:name => :notes, :width => 200}, {:name => :priority, :width => 50}, {:name => :due, :header => "Due on"} ], # Standard Ext.grid.EditorGridPanel configuration options: :border => true, :header => false, :view_config => { :force_fit => true # force the columns to occupy all the available width } %> Here it is! Stop your watch, and let's discuss what we got:
The discussion of the results
Since Netzke :: Basepack :: GridPanel is a very powerful component, we got a bunch of features for free.
Simultaneous editing of multiple lines
Adding, modifying, and deleting entries can easily happen like this:
Pagination
Even if your table contains tens of thousands of records, this is not a problem for the Netzke table, all thanks to inline pagination.
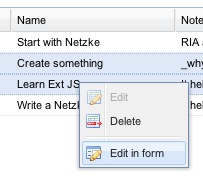
Context menu
Some actions of the buttons at the bottom of the table are duplicated in the context menu:
Automatic attribute type detection
In our application, we use fields with integer, boolean, string, text, and date in the Task model - and each of the fields gets its own column type, the user cannot enter letters in the priority field.
Rails Validation Support
Rails validations are supported, and work even with multiple editing!
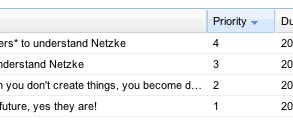
Server side sorting
Click on the column header to enable server-side sorting:
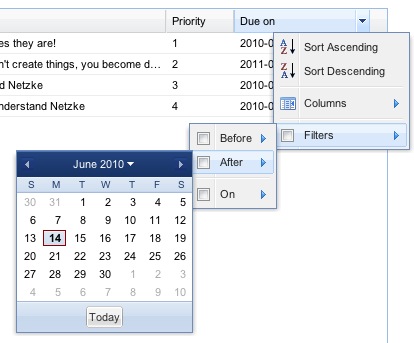
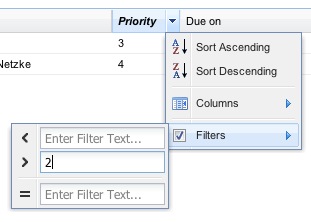
Server-side filtering
Smart filters are enabled by default for each column, of course, given the type of column.
Example with date:
A priority:
Add / (multi) edit form entries
Sometimes adding / changing a record is much more convenient with the form. Of course, Netzke has this option. Even multi-editing is supported, just select the necessary entries and click “Edit in form”.
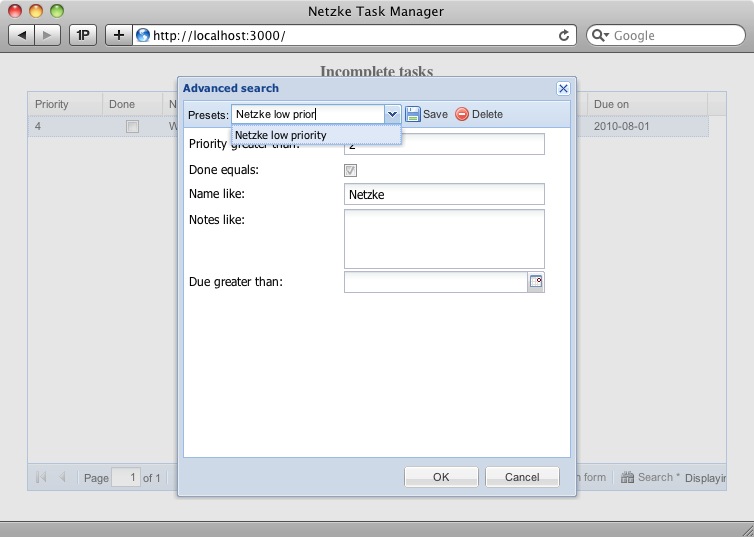
Advanced search using templates
And further...
This article is not covered, but the Netzke grid panel also supports one-to-many ("belongs_to") connections (see the link to the demo below).
Conclusion
You have learned a small part of the things that Netzke provides, for example, Netzke :: Basepack :: GridPanel - a powerful, customizable and extensible component that you can use in your RIA applications. You can see more examples of using GridPanel and other components in the demo . Basically, Netzke was conceived as a framework that allows you to create your own powerful components - from scratch, or using existing ones.
Follow me on Twitter and get Netzke news and don’t forget to bookmark the project’s official website .
Share your Netzke experience in the Google group , and (last but not least), please remember: Netzke is a multi-faceted project where a larger community will mean faster development. Thank!
UPD d43 suggested where to watch the demo with ExtJS 4.
Source: https://habr.com/ru/post/133935/
All Articles