FPGA programming. The study of the phenomenon of "bounce of contacts" and the method of getting rid of it
 We continue to study FPGA and VHDL language . In this article, focused on beginners, we will study the phenomenon of "contact bounce" and consider how to get rid of it.
So, the purpose of the work: To study the phenomenon of “ contact bounce ”, to create a project in the Xilinx ISE Project Navigator : When you click on the button, the register value is increased by 1.
Part 1. What is “contact bounce”?
“Treading is a phenomenon that occurs in electrical and electronic switches, in which, instead of some stable signal, they produce random high-frequency oscillations at the output” (c) Wikipedia.
Simply put, when you press and release the button, it does not immediately go to the desired state. For some time, the contacts of the button “rattle” among themselves, which will be perceived by the microcontroller as multiple pulses. The number of these pulses can exceed thousands. You can clearly see the bounce on the oscillogram, which shows the moment when the button is released:
')

Part 2. Creating a project.
In my previous article , the creation of a new project for the Spartan-3E Starter Kit in the Xilinx ISE Project Navigator v12.3 was described in detail. Let's create the project again, let's call it, for example, drebezg_habr and make some changes to it:
1. We need one button and eight LEDs. Add the btn input signal and 8 led output signals to the ports:
entity drebezg_habr is
Port ( clk : in STD_LOGIC ;
btn : in STD_LOGIC ;
led : out STD_LOGIC_VECTOR ( 7 downto 0 ) ) ;
end drebezg_habr ;
2. In the pin.ucf file, we write the names of the legs, corresponding to the button and each LED:
NET "clk" LOC = "C9" ;
NET "led <0>" LOC = "F12" ;
NET "led <1>" LOC = "E12" ;
NET "led <2>" LOC = "E11" ;
NET "led <3>" LOC = "F11" ;
NET "led <4>" LOC = "C11" ;
NET "led <5>" LOC = "D11" ;
NET "led <6>" LOC = "E9" ;
NET "led <7>" LOC = "F9" ;
NET "btn" LOC = "K17" ;
NET "btn" PULLUP ;
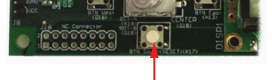
Leg K17 corresponds to the lower button available:
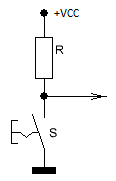
The word PULLUP connects the button as follows (right inside the FPGA):
Part 3. Programming.
Go to the file drebezg_habr.vhd. Let's create an 8-bit register counter, which we will try to add by one by pressing the button once: between architecture and begin we write
signal count_led : std_logic_vector ( 7 downto 0 ) ;
And immediately, after the word begin, we send this counter to our LEDs:
led <= count_led ;
Now our task is to add one to the count_led counter when the button is pressed. Immediately, a decision is made to make a variable that would keep the previous state of the button and compare it with its current state. Let's do this:
architecture Behavioral of drebezg_habr is
signal count_led : std_logic_vector ( 7 downto 0 ) ;
signal old_btn : std_logic ;
begin
process ( clk )
begin
if rising_edge ( clk ) then
old_btn <= btn ;
if old_btn = ' 0 ' and btn = ' 1 ' then
count_led <= count_led + 1 ;
end if ;
end if ;
end process ;
led <= count_led ;
end behavioral ;
We broadcast, we sew, we test. I am sure that the result will not suit you at all, because the diodes will simply blink completely irregularly. This is due to the fact that if old_btn = '0' and btn = '1' then there are a lot of events when the button is pressed and released just because of the contact bounce. To get rid of this phenomenon, we need to wait for the well-established value of the logical unit. To do this, we will add a counter, which is incremented by 1, while the button has the value of a logical unit. The counter is reset if the button takes the value of a logical zero. Thus, no matter how many pulses there are when pressing a button due to bounce, a moment will come when the value of btn is clearly set to a logical unit, the counter reaches a certain value, and we can judge that the button was actually pressed. Now we don’t need the old_btn variable.
architecture Behavioral of drebezg_habr is
signal count_led : std_logic_vector ( 7 downto 0 ) ;
constant clk_freq : integer : = 50 _000_000 ; - quartz frequency
constant btn_wait : integer : = clk_freq / 4 ; - we will wait for 0.25 seconds to establish the unit
signal count : integer range 0 to btn_wait : = 0 ;
begin
process ( clk )
begin
if rising_edge ( clk ) then
if btn = ' 1 ' then
count <= count + 1 ;
if count = btn_wait then
count_led <= count_led + 1 ;
count <= 0 ;
end if ;
else
count <= 0 ;
end if ;
end if ;
end process ;
led <= count_led ;
end behavioral ;
The btn_wait value was chosen 0.25 seconds so that the count_led value is not added too often while the button is in the squeezed state.
Another form of debugging (even more reliable) is adding count to 1 when btn is a logical one, and subtracting from count 1 when btn is zero. Moreover, if the count value drops to 0, then the button is not pressed, or there was a bounce. Well, if count counted to the cherished btn_wait, it means there was a click =)
As a homework, I can advise you to add a project: make an addition count_led after the button has been pressed and released.
So, we got acquainted in practice with the phenomenon of “bounce of contacts” and learned how to get rid of it. This phenomenon can be observed not only in buttons, toggle switches and other such things, but even sometimes in various protocols, such as RS-232.
Project sources here . I wish you all success in the development of FPGA!
Source: https://habr.com/ru/post/133871/
All Articles