Monetizing Android applications using AdMob ads with the option of paid disconnection. Part one
Hello! At Habrahabr, there was already an article about how to make paid advertising shutdown in an Android application, where it was proposed to use the open-source Android Billing Library . In this article I want to talk about how to implement this functionality using the system of internal payments Android Market In-app Billing, without using third-party libraries.
The article consists of two parts. In the first part, I will talk in detail about how to add advertising from Google AdMob to your application (this part is mainly aimed at beginners), and the second part - how to make it a paid outage.
To begin with, let's create a project for the simplest Android application in the Eclipse environment. I will not write about how this is done (you can read about it, for example, here ).
')
To work with AdMob, we need to install the Google AdMob Ads SDK, as well as the SDK for Android version 3.2 or higher (see here ). Also install the package Google Market Billing (it will be discussed in the second part of the article).
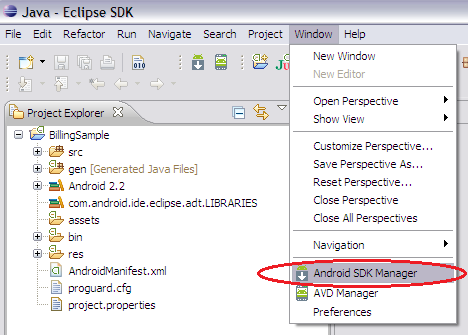
Open Android SDK Manager using Window > Android SDK Manager main menu command.
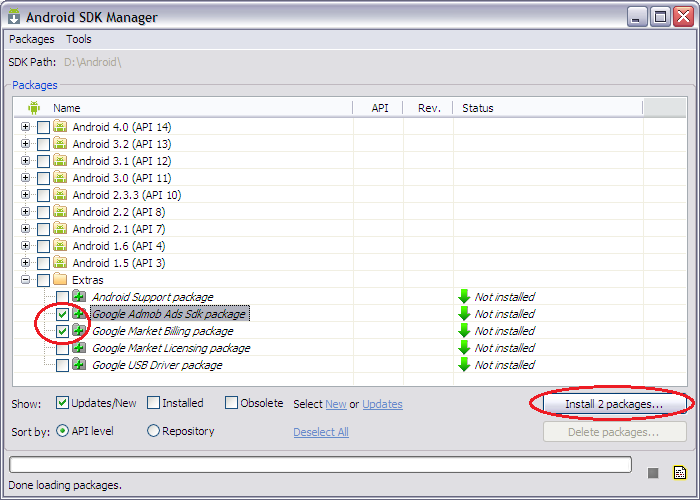
Select the required packages for installation and click on the “Install packages ...” button.
After installing the packages, connect the AdMob Ads SDK to the project. For this:

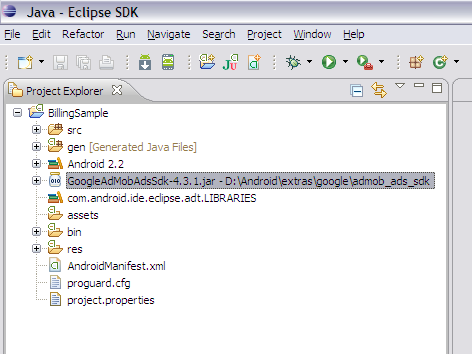
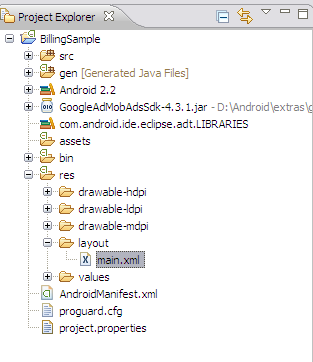
As a result, the GoogleAdMobAdsSdk-4.3.1.jar file should appear in the project structure.
Next, open the AndroidManifest.xml application configuration file and make the following changes:
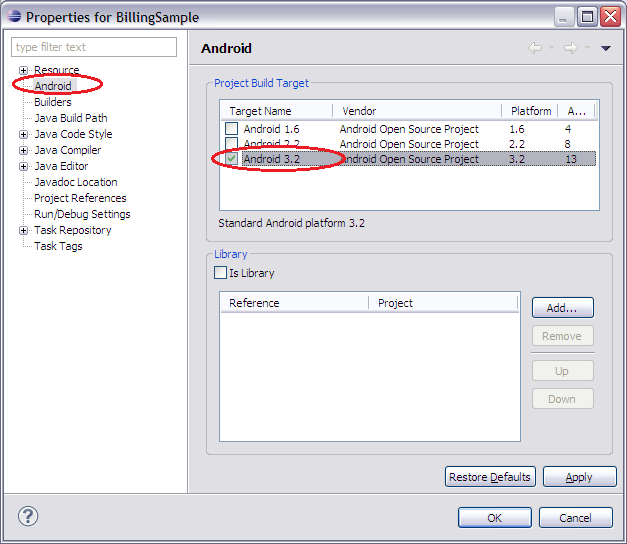
Now we need to call the project properties again. In the left part of the window, select "Android". Then on the right side, select Android 3.2 in the Project Build Target panel. If you installed a later Android SDK, select it.
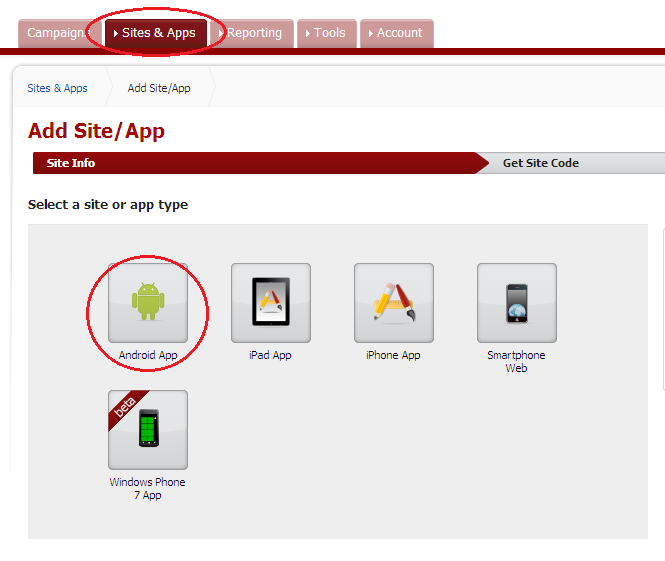
Next, go to the website www.admob.com (you can use your Google account for authorization). Here we need to get a “Publisher ID” for linking ads to our application. Go to the section "Sites & Apps" and select "Android App".
After entering the required fields, our application should appear in the "Sites & Apps" list. Now we hover the cursor on the name of the application and press the appeared button “Manage Settings”.

After that we get to the page that contains the “Publisher ID” for our application. Copy it, it will be useful to us further.

Back to the project again. Open the res / values / strings.xml file and create the following string value:

Now open the res / layout / main.xml file.
We make the following changes to the file:
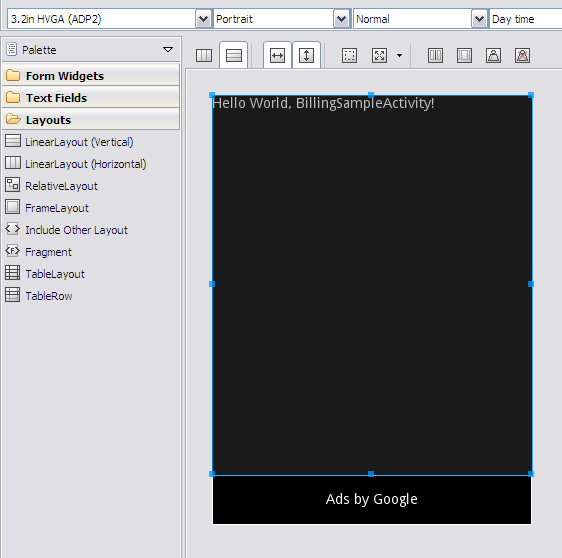
In the “Graphic Layout” mode, the markup looks like this:
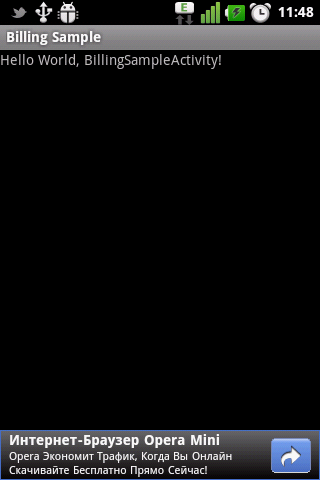
Now connect your device (or emulator) and click Run . We look what happened.
As a result of the actions we have done, we have added AdMob ads to our application. As you can see, this is not difficult to do.
The next step will be the development of functionality for paid disabling advertising using Android MArket In-app Billing, which I will discuss in the next part of the article.
The source code of the developed application can be downloaded here .
Thanks for attention. I hope that the material will be useful to someone. I will be glad to your comments.
The article consists of two parts. In the first part, I will talk in detail about how to add advertising from Google AdMob to your application (this part is mainly aimed at beginners), and the second part - how to make it a paid outage.
To begin with, let's create a project for the simplest Android application in the Eclipse environment. I will not write about how this is done (you can read about it, for example, here ).
')
Installing the necessary components
To work with AdMob, we need to install the Google AdMob Ads SDK, as well as the SDK for Android version 3.2 or higher (see here ). Also install the package Google Market Billing (it will be discussed in the second part of the article).
Open Android SDK Manager using Window > Android SDK Manager main menu command.
Select the required packages for installation and click on the “Install packages ...” button.
After installing the packages, connect the AdMob Ads SDK to the project. For this:
- Right-click the project in the “Project Explorer” and select “Properties” (project properties).
- In the left part of the window, select “Java Build Path”.
- Click the "Add External JARs ..." button.
- Select the GoogleAdMobAdsSdk-4.3.1.jar file located in the "% ANDROID% \ extras \ google \ admob_ads_sdk \" folder.
As a result, the GoogleAdMobAdsSdk-4.3.1.jar file should appear in the project structure.
Configuring Application Configuration
Next, open the AndroidManifest.xml application configuration file and make the following changes:
- Optionally, you can add the android: installLocation = "preferExternal" parameter in the manifest tag. Using this option allows you to install the application on a memory card.
- In the uses-sdk tag, add the parameter android: targetSdkVersion = "13" . Version 13 corresponds to the SDK for Android platform version 3.2. If you installed a later version of the SDK, then insert the appropriate version number.
- Next, add the ACCESS_NETWORK_STATE and INTERNET permissions.
- Lastly, add the activity tag with the parameters android: configChanges = "keyboard | keyboardHidden | orientation | screenLayout | uiMode | screenSize | smallestScreenSize" and android: name = "com.google.ads.AdActivity" in the body of the application tag.
<?xml version="1.0" encoding="utf-8"?> <manifest xmlns:android="http://schemas.android.com/apk/res/android" android:installLocation="preferExternal" package="com.sample.billing" android:versionCode="1" android:versionName="1.0" > <uses-sdk android:minSdkVersion="8" android:targetSdkVersion="13" /> <uses-permission android:name="android.permission.INTERNET" /> <uses-permission android:name="android.permission.ACCESS_NETWORK_STATE" /> <application android:debuggable="true" android:icon="@drawable/ic_launcher" android:label="@string/app_name" > <activity android:label="@string/app_name" android:name=".BillingSampleActivity" > <intent-filter > <action android:name="android.intent.action.MAIN" /> <category android:name="android.intent.category.LAUNCHER" /> </intent-filter> </activity> <activity android:configChanges="keyboard|keyboardHidden|orientation|screenLayout|uiMode|screenSize|smallestScreenSize" android:name="com.google.ads.AdActivity" /> </application> </manifest> Now we need to call the project properties again. In the left part of the window, select "Android". Then on the right side, select Android 3.2 in the Project Build Target panel. If you installed a later Android SDK, select it.
Getting AdMob Publisher ID
Next, go to the website www.admob.com (you can use your Google account for authorization). Here we need to get a “Publisher ID” for linking ads to our application. Go to the section "Sites & Apps" and select "Android App".
After entering the required fields, our application should appear in the "Sites & Apps" list. Now we hover the cursor on the name of the application and press the appeared button “Manage Settings”.
After that we get to the page that contains the “Publisher ID” for our application. Copy it, it will be useful to us further.
Adding an advertising banner to the application
Back to the project again. Open the res / values / strings.xml file and create the following string value:
<string name="admob_publisher_id"> Publisher ID</string> Now open the res / layout / main.xml file.
We make the following changes to the file:
- Add the xmlns: ads = " schemas.android.com/apk/lib/com.google.ads " parameter to the root LinearLayout root tag
- Add another LinearLayout and move the TextView into it.
- Add in the new LinearLayout parameter android: layout_weight = "1" . This is necessary so that it does not overlap the advertising banner.
- Add the com.google.ads.AdView component:
<com.google.ads.AdView android:id="@+id/adView" android:layout_width="wrap_content" android:layout_height="wrap_content" ads:adSize="BANNER" ads:adUnitId="@string/admob_publisher_id" ads:loadAdOnCreate="true" />
<?xml version="1.0" encoding="utf-8"?> <LinearLayout xmlns:android="http://schemas.android.com/apk/res/android" xmlns:ads="http://schemas.android.com/apk/lib/com.google.ads" android:layout_width="fill_parent" android:layout_height="fill_parent" android:orientation="vertical" > <LinearLayout android:id="@+id/linearLayout1" android:layout_width="match_parent" android:layout_height="match_parent" android:layout_weight="1" android:orientation="vertical" > <TextView android:layout_width="fill_parent" android:layout_height="match_parent" android:text="@string/hello" /> </LinearLayout> <com.google.ads.AdView android:id="@+id/adView" android:layout_width="wrap_content" android:layout_height="wrap_content" ads:adSize="BANNER" ads:adUnitId="@string/admob_publisher_id" ads:loadAdOnCreate="true" /> </LinearLayout> In the “Graphic Layout” mode, the markup looks like this:
Now connect your device (or emulator) and click Run . We look what happened.
Conclusion
As a result of the actions we have done, we have added AdMob ads to our application. As you can see, this is not difficult to do.
The next step will be the development of functionality for paid disabling advertising using Android MArket In-app Billing, which I will discuss in the next part of the article.
The source code of the developed application can be downloaded here .
Thanks for attention. I hope that the material will be useful to someone. I will be glad to your comments.
Used sources
To be continued ...Source: https://habr.com/ru/post/133858/
All Articles