Ext JS4 Dressing
Using ExtJS in your projects, you have to constantly see the same blue-and-blue interface, which is not always good. In the 4th version of this framework, a handy component appeared to change the appearance of your web application without manual editing of CSS, based on the use of the SASS metalanguage. With it, you can get an interface that does not look like a standard one by replacing just a couple of lines in the configuration file.
You can read more about SASS by reference, I’ll just say that this CSS extension allows you to create a style using variables, functions and the inclusion of one file into another.
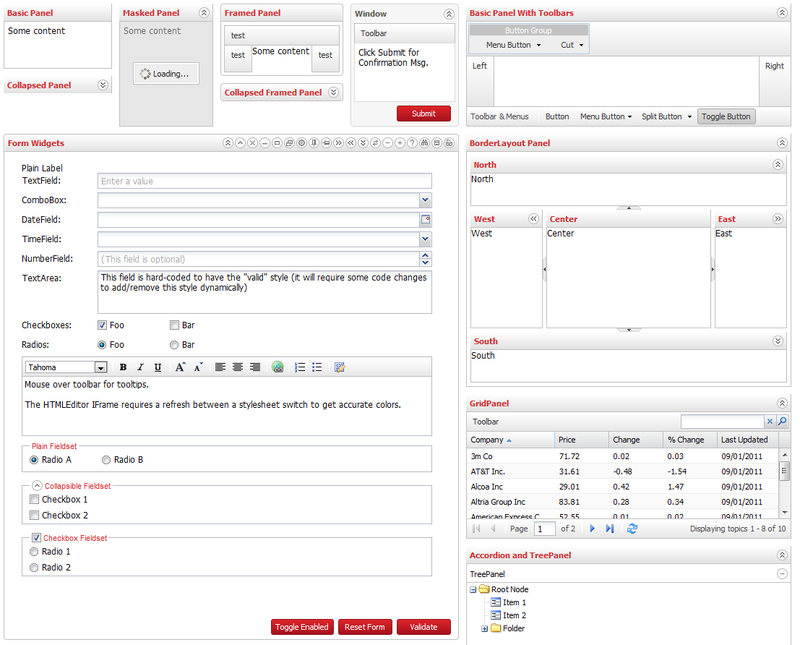
So, for decorating, I will take one of the standard examples ext - themes.js, which generates almost all interface elements so that you can see the result. This is how the page looks before decorating:

For decoration, we need the following components:
1. Ruby
2. Compass / SASS gem. To install, run the command line with ruby (Start Command Prompt with Ruby) and enter:
The current version of Ext JS (4.0.7 and earlier) is incompatible with the latest versions of SASS, so downgrade needs to be done:
Checking the installed version is performed by commands
Suppose our application is in the root of the site, and the ext components are in the
For styling that does not affect the standard Ext components, you need to copy resources from the Ext folder to other places:
Content
All folders from
Finally, you need to create a
After that, we check that the correct relative path to ext is specified in the resources / sass / config.rb file:
And because of the bug in the ExtJS code (version 4.0.7), you will have to correct the
to another:
This is done so that the pictures are actually used from the
So, when the preparations are finished, you can compile your own style. Open the Ruby command line, go to the resources / sass folder and enter:
If everything has been done correctly before, then in the
We update the page, and see that nothing has changed. This is normal, because we have not changed a single variable. Let's change a few. Open the
The result is amazing, but for complete beauty you need to fix some elements that are not in the subject. The full list of variables available for change lies in the files in the
In order to override them, you just need to copy the desired variable from there to our theme file, assign a new color and rebuild the theme. For example, to override the color of the panel header, we write:
All variables are reasonable names, so their purpose is easy to guess:
')
Sprites are used as icons in Ext, so in this case, changing variables is indispensable, however, since we copied the images into a separate folder, you can replace the sprite with icons there. Unfortunately, GIF is used there, so to use PNG you will have to dig a little.
The easiest way is to create an additional CSS file
So, let's replace the toolbar icons in the panel:
For compatibility with legacy CSS3-free browsers, Ext generates a special markup code based on images. Of course, when styling a picture, it should be replaced, and for this, the developers have provided a special component in the Sencha SDK Tools - Theme Slicer . To create images from the style you just need to enter one command:
Parameters used:
After these actions, the developers promise correct display in browsers older than IE6, inclusive.
As a result of all our actions, we get something like this:
Thus, Ext allows you to quite freely decorate your interface and organically fit it into the design of your site and its color scheme.
This example can be viewed on a page in github .
When preparing the article, an English-language manual was used from the official website of Ext.
You can read more about SASS by reference, I’ll just say that this CSS extension allows you to create a style using variables, functions and the inclusion of one file into another.
Beginning of work
So, for decorating, I will take one of the standard examples ext - themes.js, which generates almost all interface elements so that you can see the result. This is how the page looks before decorating:
For decoration, we need the following components:
1. Ruby
2. Compass / SASS gem. To install, run the command line with ruby (Start Command Prompt with Ruby) and enter:
> gem install compassThe current version of Ext JS (4.0.7 and earlier) is incompatible with the latest versions of SASS, so downgrade needs to be done:
> gem uninstall sass
> gem install sass -v 3.1.1
Checking the installed version is performed by commands
> compass -v
> sass –v
Folder structure
Suppose our application is in the root of the site, and the ext components are in the
resources/ext/ folderFor styling that does not affect the standard Ext components, you need to copy resources from the Ext folder to other places:
Content
resources/extjs/resources/themes/templates/resources/ to copy the resources/ folder.All folders from
resourses/extjs/resources/themes/images/default in copy to /resources/images .Finally, you need to create a
resourses/css/ folder for the compiled css file.After that, we check that the correct relative path to ext is specified in the resources / sass / config.rb file:
$ext_path = "../ext"And because of the bug in the ExtJS code (version 4.0.7), you will have to correct the
/extjs/resources/themes/lib/utils.rb file, replacing it in line 62:images_path = File.join($ext_path, 'resources' , 'themes' , 'images' , theme)to another:
images_path = relative_path
This is done so that the pictures are actually used from the
resources/images folder, not resources/extjs/resources/imagesBuild Your CSS
So, when the preparations are finished, you can compile your own style. Open the Ruby command line, go to the resources / sass folder and enter:
> compass compileIf everything has been done correctly before, then in the
resources/ss folder resources/ss will be a .ccs file with the same name as the .scss file. Do not forget to register the use of this style:< link rel ="stylesheet" type ="text/css" href ="resourses/css/my-ext-theme.css" />We update the page, and see that nothing has changed. This is normal, because we have not changed a single variable. Let's change a few. Open the
resources/sass/my-ext-theme.scss and edit it. To begin with, let's set a new base color by uncommenting the line$ base-color: #FFF;The result is amazing, but for complete beauty you need to fix some elements that are not in the subject. The full list of variables available for change lies in the files in the
resources/ext/resources/themes/stylesheets/ext4/default/variables folderIn order to override them, you just need to copy the desired variable from there to our theme file, assign a new color and rebuild the theme. For example, to override the color of the panel header, we write:
$ panel-header-color: #d12c31;All variables are reasonable names, so their purpose is easy to guess:
$panel-border-radius - the radius of the rounding of the panel headings$toolbar-background-color - toolbar background color')
Icons
Sprites are used as icons in Ext, so in this case, changing variables is indispensable, however, since we copied the images into a separate folder, you can replace the sprite with icons there. Unfortunately, GIF is used there, so to use PNG you will have to dig a little.
The easiest way is to create an additional CSS file
ext-override.css and override the path to the icon file. This is also useful because during decoration some elements appear that do not change with the help of variables and they also have to be defined here so that they remain constant each time the main my-ext-theme.css file is my-ext-theme.cssSo, let's replace the toolbar icons in the panel:
.x-tool img {
background-image: url( '../resources/images/tools/tool-sprites.png' ) !important;
/*
due to use .png instead of .gif
*/
}
Compatibility
For compatibility with legacy CSS3-free browsers, Ext generates a special markup code based on images. Of course, when styling a picture, it should be replaced, and for this, the developers have provided a special component in the Sencha SDK Tools - Theme Slicer . To create images from the style you just need to enter one command:
> sencha slice theme -d resources/ext -c resources/css/my-ext-theme.css -o resources/images -vParameters used:
- --css [=] value, -c [=] value Path to the used css file. If not specified, standard is used.
- --ext-dir [=] value, -d [=] value Path to the unpacked Ext JS libraries, required
- --manifest [=] value, -m [=] value The path to the .manifest file used by the utility, the default is taken as standard
- --output-dir [=] value, -o [=] value The path to write finished images. If not specified, they are written to the current folder.
- --verbose, -v Display a message for each generated image
After these actions, the developers promise correct display in browsers older than IE6, inclusive.
Result
As a result of all our actions, we get something like this:
Thus, Ext allows you to quite freely decorate your interface and organically fit it into the design of your site and its color scheme.
This example can be viewed on a page in github .
When preparing the article, an English-language manual was used from the official website of Ext.
Source: https://habr.com/ru/post/133801/
All Articles