We make screenshots of Android 2.3.3 and below without root in the virtual machine
The ability to take screenshots without additional tools and manipulations appeared in Android only from version 2.3.4. For Android 2.3.3 and below, there is no native screenshots feature. All applications from the market for this purpose require root. The only way (known to me) to take a screen shot of a device with an “outdated” version of Android without root (if you do not consider photographing the phone with another device) is to do it using DDMS (Debug Monitor) from the Android SDK.
The article will discuss how to configure the Android SDK installed on a virtual machine with Ubuntu 11.10 in VirtualBox with a host on Windows 7, to work with a real device connected to USB, using the example of HTC Wildfire (Android 2.2).
Click here to download the SDK for Linux. For example, android-sdk_r15-linux.tgz. The file name may differ depending on the version (r15). Now you need to extract the SDK from the archive to a place convenient for you, for example, to the / opt folder. To do this, click on the archive file with the right mouse button and select “Extract here” in the context menu (for the English version of Ubuntu). After that, in the terminal (Ctrl + Alt + T) execute the command
Android SDK requires JDK (Java Development Kit). Install it with the command
')
Perhaps with JDK 7 everything will also be in order, but we will follow the official requirements .
Now run the Android SDK Manager
and install the Android SDK Platform-tools package, which contains ADB (Android Debug Bridge), which is necessary for working with connected devices.
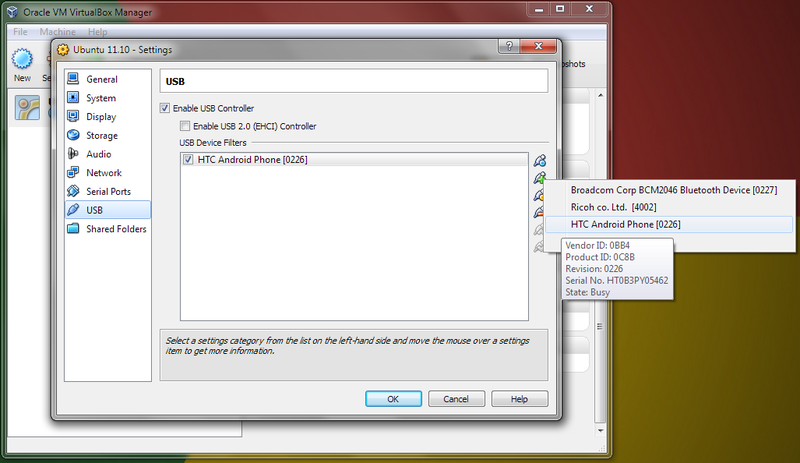
Now turn off the virtual machine and in its settings in VirtualBox configure the USB filter (the phone must be connected in the “Charge only” mode). In the machine settings in the USB section, click on the icon with a green cross on the right and select a phone from the list. Here you can find Vendor ID, which we need in the future.
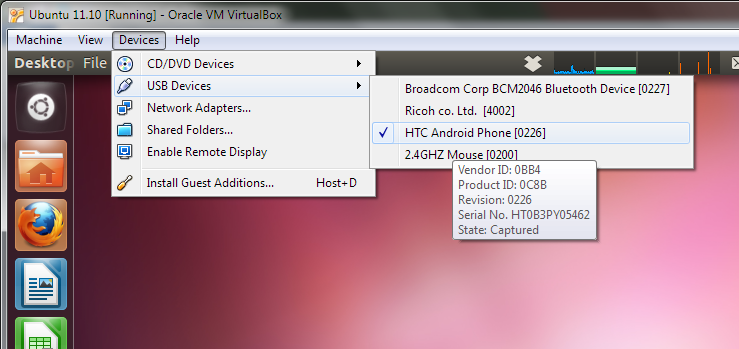
Run Ubuntu. After loading in the VirtualBox Devices-> USB Devices menu, select our device (virtually connect it).
Perhaps on the host (Windows 7) the installation of the necessary USB driver for VirtualBox will start.
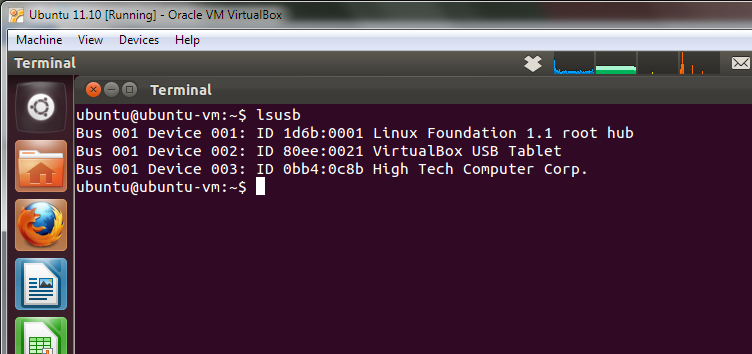
After that in Ubuntu using the command
we can view a list of connected USB devices. Last in list ID 0bb4: 0c8b High Tech Computer Corp. - HTC device. Vendor ID can be found in this line (the first four characters in 0bb4: 0c8b)
It remains to configure the access rights to the USB device. To do this, create a file with the rules.
Add rules
where 0bb4 is the same Vendor ID mentioned above. Let's save.
Now we will restart the virtual machine and reconnect the device in the VirtualBox Devices-> USB Devices menu.
You need to enable USB Debugging mode in your phone (Settings-> Applications-> Development). After that, run DDMS
If in the DDMS window instead of the device name you see something like "???????????????", then something is wrong with the device access rights. Check the rules in the file 51-android.rules. By default, devices work in access mode 0664, which does not allow ADB (Android Debug Bridge) to work correctly with connected devices.
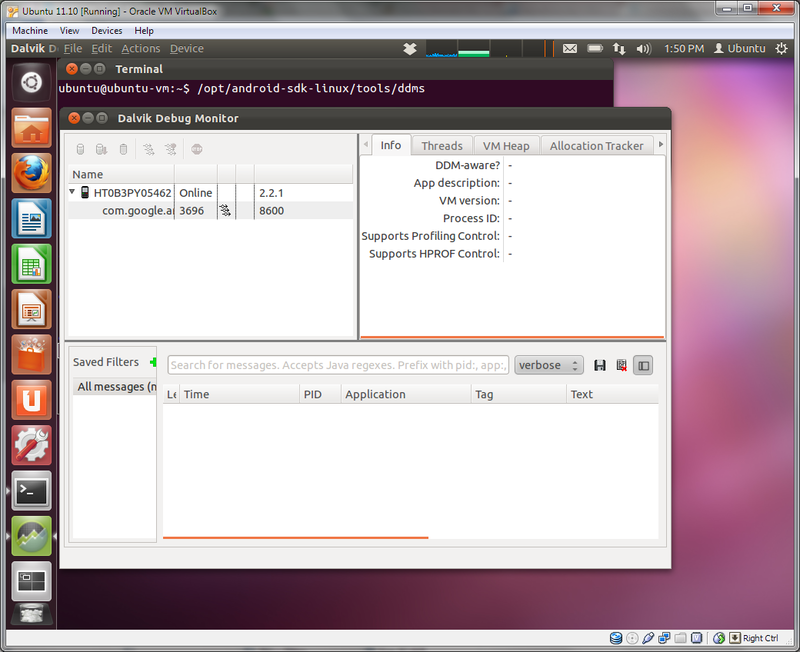
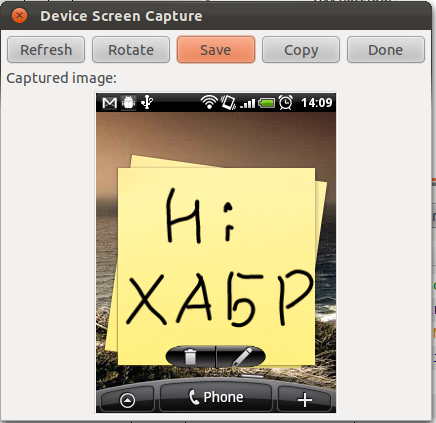
If everything looks like in the screenshot above, then everything is in order. Now you can take screenshots of your phone, which is deprived of OS updates. To do this, select a device by clicking on it in the list, and in the Device menu it selects the Screen Capture item.
The article will discuss how to configure the Android SDK installed on a virtual machine with Ubuntu 11.10 in VirtualBox with a host on Windows 7, to work with a real device connected to USB, using the example of HTC Wildfire (Android 2.2).
1. Install Android SDK
Click here to download the SDK for Linux. For example, android-sdk_r15-linux.tgz. The file name may differ depending on the version (r15). Now you need to extract the SDK from the archive to a place convenient for you, for example, to the / opt folder. To do this, click on the archive file with the right mouse button and select “Extract here” in the context menu (for the English version of Ubuntu). After that, in the terminal (Ctrl + Alt + T) execute the command
~$ sudo mv Downloads/android-sdk-linux /opt Android SDK requires JDK (Java Development Kit). Install it with the command
')
~$ sudo apt-get install openjdk-6-jdk Perhaps with JDK 7 everything will also be in order, but we will follow the official requirements .
Now run the Android SDK Manager
~$ /opt/android-sdk-linux/tools/android and install the Android SDK Platform-tools package, which contains ADB (Android Debug Bridge), which is necessary for working with connected devices.
2. USB Setup
Now turn off the virtual machine and in its settings in VirtualBox configure the USB filter (the phone must be connected in the “Charge only” mode). In the machine settings in the USB section, click on the icon with a green cross on the right and select a phone from the list. Here you can find Vendor ID, which we need in the future.
Run Ubuntu. After loading in the VirtualBox Devices-> USB Devices menu, select our device (virtually connect it).
Perhaps on the host (Windows 7) the installation of the necessary USB driver for VirtualBox will start.
After that in Ubuntu using the command
~$ lsusb we can view a list of connected USB devices. Last in list ID 0bb4: 0c8b High Tech Computer Corp. - HTC device. Vendor ID can be found in this line (the first four characters in 0bb4: 0c8b)
It remains to configure the access rights to the USB device. To do this, create a file with the rules.
~$ sudo touch /etc/udev/rules.d/51-android.rules ~$ sudo gedit /etc/udev/rules.d/51-android.rules Add rules
SUBSYSTEM=="usb", ATTR{idVendor}=="0bb4", MODE="0666" where 0bb4 is the same Vendor ID mentioned above. Let's save.
Now we will restart the virtual machine and reconnect the device in the VirtualBox Devices-> USB Devices menu.
3. Make a screenshot
You need to enable USB Debugging mode in your phone (Settings-> Applications-> Development). After that, run DDMS
~$ /opt/android-sdk-linux/tools/ddms If in the DDMS window instead of the device name you see something like "???????????????", then something is wrong with the device access rights. Check the rules in the file 51-android.rules. By default, devices work in access mode 0664, which does not allow ADB (Android Debug Bridge) to work correctly with connected devices.
If everything looks like in the screenshot above, then everything is in order. Now you can take screenshots of your phone, which is deprived of OS updates. To do this, select a device by clicking on it in the list, and in the Device menu it selects the Screen Capture item.
Source: https://habr.com/ru/post/133797/
All Articles