Octree visualization and algorithms for working on its structure. Part 1
Octree trees are used to solve a variety of tasks related to optimization, visualization in computer graphics, and not only. For example, the famous and beloved idSoftware, the flagship technology in the field of computer graphics and everything else that relates to computer games, its new and, of course, high-tech engine id Tech 6 implements with innovative technology "Sparse Voxel Octree" , based on octree lies. Octree trees allow you to create completely destructible geometry of models, as the main programmer of the DukeNukem 3D engine once did, writing this creation. If we are concerned with optimization, then this structure is used in the physics simulation engines, which greatly facilitates the work of the stone. Well, and without ray tracing will not do, octree is also used here.
There is a lot of traffic under the cut!
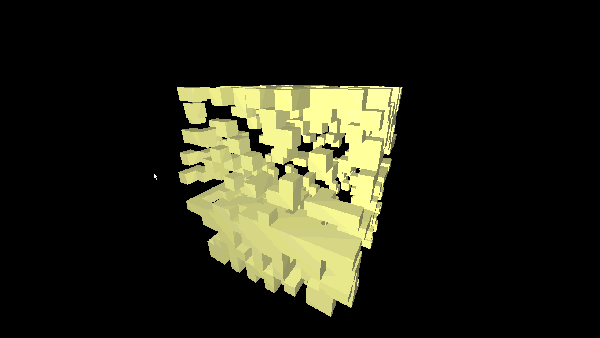
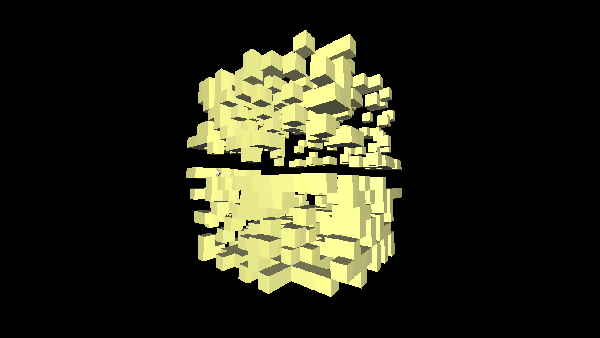
Oktotree - a tree-like, recursive data structure, each node of which contains eight descendants. It can be represented as a three-dimensional cube ( voxel ), divided by three planes parallel to the frontal, horizontal and profile planes and passing through the geometric center of the cube. As a result, we get eight cubes that are descendants of a single octree node, i.e. our big cube.
Below are presented simple algorithms for searching, traversing and deleting elements of an octree.
1 Algorithms for searching and creating a tree
')
Create a tree. In the node we will enter the geometric parameters of the voxel, its color for highlighting. The structure will be
struct octTree { mid midle; // float lenght; // char novusial; // : / RGB_color color;// octTree* up; // octTree* t1; // octTree* t2; octTree* t3; octTree* t4; octTree* t5; octTree* t6; octTree* t7; octTree* t8; }; struct mid // { float x; float y; float z; }; struct RGB_color // { float R; float G; float B; }; Next, create the entire structure from scratch. Dscr - resolution of the cube (octree), the number of subboxing of the entire tree. Descr must be a multiple of 8. mid midle is the coordinates of its center, float len is the length of the cube's side, octTree * up is the parent node, in the first run of the function we insert the root address * root, octTree ** el - the pointer where we will save the created node first run, insert the address of the root address ** root.
// . dscr - el . void OctObject::makeTr(octTree** el,int dscr,mid midle,float len,octTree* up) { mid setmidle; // / if(*el==NULL) { (*el)=new octTree; (*el)->lenght=len; (*el)->midle=midle; (*el)->novusial=0; (*el)->color.B=(*el)->color.G=(*el)->color.R=1; // . null(*el); (*el)->up=up; if(!(dscr%8)) { (*el)->novusial=1;// . // // , setmidle.x=(*el)->midle.x-(*el)->lenght/4; /// 1 - setmidle.y=(*el)->midle.y+(*el)->lenght/4; setmidle.z=(*el)->midle.z+(*el)->lenght/4; this->makeTr(&((*el)->t1),dscr/8,setmidle,(*el)->lenght/2,(*el)); setmidle.x=(*el)->midle.x+(*el)->lenght/4;/// 2 - setmidle.y=(*el)->midle.y+(*el)->lenght/4; setmidle.z=(*el)->midle.z+(*el)->lenght/4; this->makeTr(&((*el)->t2),dscr/8,setmidle,(*el)->lenght/2,(*el)); setmidle.x=(*el)->midle.x-(*el)->lenght/4;/// 3 - setmidle.y=(*el)->midle.y-(*el)->lenght/4; setmidle.z=(*el)->midle.z+(*el)->lenght/4; this->makeTr(&((*el)->t3),dscr/8,setmidle,(*el)->lenght/2,(*el)); setmidle.x=(*el)->midle.x+(*el)->lenght/4;/// 4 - setmidle.y=(*el)->midle.y-(*el)->lenght/4; setmidle.z=(*el)->midle.z+(*el)->lenght/4; this->makeTr(&((*el)->t4),dscr/8,setmidle,(*el)->lenght/2,(*el)); setmidle.x=(*el)->midle.x-(*el)->lenght/4;/// 5 - setmidle.y=(*el)->midle.y+(*el)->lenght/4; setmidle.z=(*el)->midle.z-(*el)->lenght/4; this->makeTr(&((*el)->t5),dscr/8,setmidle,(*el)->lenght/2,(*el)); setmidle.x=(*el)->midle.x+(*el)->lenght/4;/// 6 - setmidle.y=(*el)->midle.y+(*el)->lenght/4; setmidle.z=(*el)->midle.z-(*el)->lenght/4; this->makeTr(&((*el)->t6),dscr/8,setmidle,(*el)->lenght/2,(*el)); setmidle.x=(*el)->midle.x-(*el)->lenght/4;/// 7 - setmidle.y=(*el)->midle.y-(*el)->lenght/4; setmidle.z=(*el)->midle.z-(*el)->lenght/4; this->makeTr(&((*el)->t7),dscr/8,setmidle,(*el)->lenght/2,(*el)); setmidle.x=(*el)->midle.x+(*el)->lenght/4;/// 8 - setmidle.y=(*el)->midle.y-(*el)->lenght/4; setmidle.z=(*el)->midle.z-(*el)->lenght/4; this->makeTr(&((*el)->t8),dscr/8,setmidle,(*el)->lenght/2,(*el)); } } else if(*el==root) // { setmidle.x=root->midle.x-root->lenght/4; /// 1 - setmidle.y=root->midle.y+root->lenght/4; setmidle.z=root->midle.z+root->lenght/4; this->makeTr(&((*el)->t1),dscr/8,setmidle,root->lenght/2,root); setmidle.x=root->midle.x+root->lenght/4;/// 2 - setmidle.y=root->midle.y+root->lenght/4; setmidle.z=root->midle.z+root->lenght/4; this->makeTr(&((*el)->t2),dscr/8,setmidle,root->lenght/2,root); setmidle.x=root->midle.x-root->lenght/4;/// 3 - setmidle.y=root->midle.y-root->lenght/4; setmidle.z=root->midle.z+root->lenght/4; this->makeTr(&((*el)->t3),dscr/8,setmidle,root->lenght/2,root); setmidle.x=root->midle.x+root->lenght/4;/// 4 - setmidle.y=root->midle.y-root->lenght/4; setmidle.z=root->midle.z+root->lenght/4; this->makeTr(&((*el)->t4),dscr/8,setmidle,root->lenght/2,root); setmidle.x=root->midle.x-root->lenght/4;/// 5 - setmidle.y=root->midle.y+root->lenght/4; setmidle.z=root->midle.z-root->lenght/4; this->makeTr(&((*el)->t5),dscr/8,setmidle,root->lenght/2,root); setmidle.x=root->midle.x+root->lenght/4;/// 6 - setmidle.y=root->midle.y+root->lenght/4; setmidle.z=root->midle.z-root->lenght/4; this->makeTr(&((*el)->t6),dscr/8,setmidle,root->lenght/2,root); setmidle.x=root->midle.x-root->lenght/4;/// 7 - setmidle.y=root->midle.y-root->lenght/4; setmidle.z=root->midle.z-root->lenght/4; this->makeTr(&((*el)->t7),dscr/8,setmidle,root->lenght/2,root); setmidle.x=root->midle.x+root->lenght/4;/// 8 - setmidle.y=root->midle.y-root->lenght/4; setmidle.z=root->midle.z-root->lenght/4; this->makeTr(&((*el)->t8),dscr/8,setmidle,root->lenght/2,root); } return; } As you can see the function is recursive.
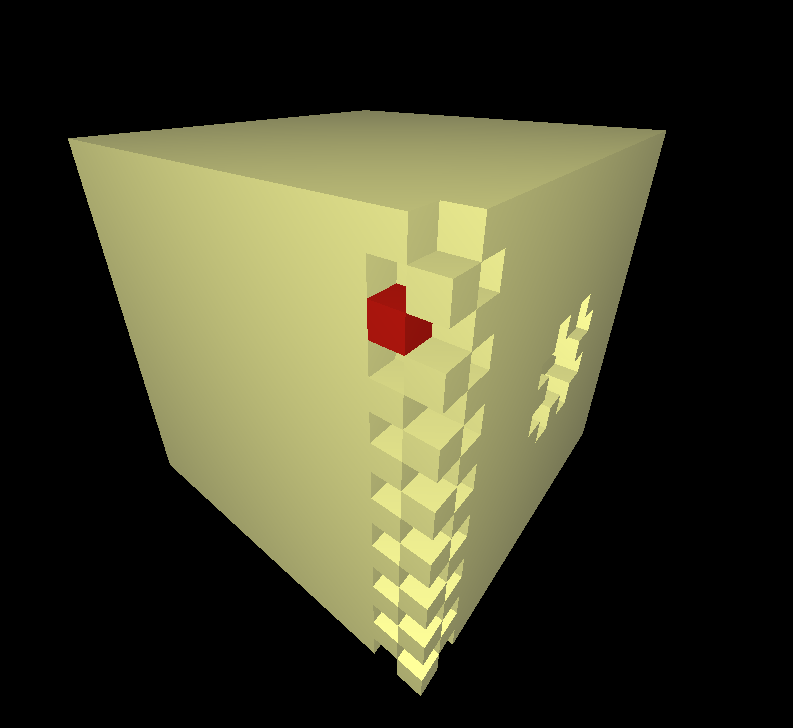
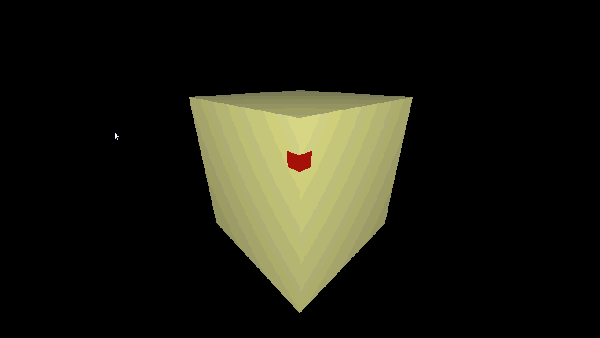
To visually highlight the subboxing when the camera is rotated, create an algorithm for searching for an element in the octree tree.
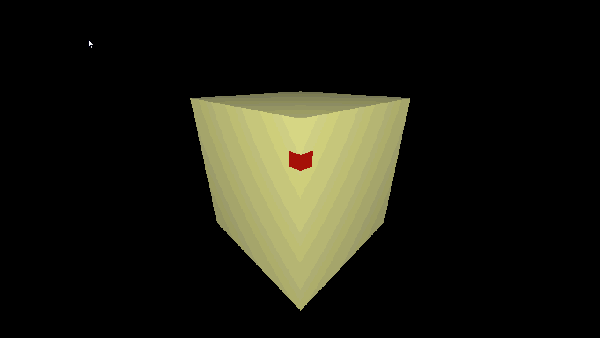
In order to highlight a voxel, you need to find it; for this, we apply the ray tracing method directly from the center of the screen into the three-dimensional scene, and use the found point of intersection of the ray with the voxel to obtain the voxel itself.
X, y, z - coordinates of the ray vector at the current time. octTree * el - the node in which we are looking for the intersection.
// , . octTree* OctObject::seach(float x, float y, float z,octTree *el) { if(el->t1==NULL) if(el->novusial!=1) // , . return el; else return NULL; else { if(((el->midle.z+el->lenght/2)>=z)&&(el->midle.z<=z))//1 - oz - { if(((el->midle.y+el->lenght/2)>=y)&&(el->midle.y<=y))// 1- oy- { if((el->midle.x-el->lenght/2<=x)&&(el->midle.x>=x))//1 - ox- { return seach(x,y,z,el->t1); } else if((el->midle.x+el->lenght/2>=x)&&(el->midle.x<=x))//2- ox- { return seach(x,y,z,el->t2); } else return NULL; // } else { if(((el->midle.y-el->lenght/2)<=y)&&(el->midle.y>=y))// 2- oy - { if((el->midle.x-el->lenght/2<=x)&&(el->midle.x>=x))//1 - ox- { return seach(x,y,z,el->t3); } else if((el->midle.x+el->lenght/2>=x)&&(el->midle.x<=x))//2- ox- { return seach(x,y,z,el->t4); } else return NULL; // } else return NULL; // } } else { if(((el->midle.z-el->lenght/2)<=z)&&(el->midle.z>=z))//2 - oz - { if(((el->midle.y+el->lenght/2)>=y)&&(el->midle.y<=y))// 1- oy- { if((el->midle.x-el->lenght/2<=x)&&(el->midle.x>=x))//1 - ox- { return seach(x,y,z,el->t5); } else if((el->midle.x+el->lenght/2>=x)&&(el->midle.x<=x))//2- ox- { return seach(x,y,z,el->t6); } else return NULL; // } else { if(((el->midle.y-el->lenght/2)<=y)&&(el->midle.y>=y))// 2- oy - { if((el->midle.x-el->lenght/2<=x)&&(el->midle.x>=x))//1 - ox- { return seach(x,y,z,el->t7); } else if((el->midle.x+el->lenght/2>=x)&&(el->midle.x<=x))//2- ox- { return seach(x,y,z,el->t8); } else return NULL; // } else return NULL; // } } else return NULL; // } } } This function will be called from the keyboard and mouse handler by pressing the spacebar or scrolling to remove the voxel. Here we will trace our ray.
// , . octTree* OctObject::FindVoxeloutside(float a, float b,float c) { float x,y,z; octTree *ret; z=(fabs(x=(fabs(a)>=fabs(b) ? a : b))>=fabs(c) ? x : c);// , ,, . if(z==a) { x=a; // do{ if(fabs(a)>=fabs(x)) { y=x/a*b; z=x/a*c;// . . if((ret=seach(x,y,z,root))!=NULL) { return ret; } x+=eps*(a>0 ? -1 : 1); }else return NULL; }while(true); } else if(z==b) { y=b; // do{ if(fabs(b)>=fabs(y)) { x=y/b*a; z=y/b*c;// . . if((ret=seach(x,y,z,root))!=NULL) { return ret; } y+=eps*(b>0 ? -1 : 1); }else return NULL; }while(true); } else if(z==c) { z=c; // do{ if(fabs(c)>=fabs(z)) { x=z/c*a; y=z/c*b;// . . if((ret=seach(x,y,z,root))!=NULL) { return ret; } z+=eps*(c>0 ? -1 : 1); }else return NULL; }while(true); } return NULL; } 2 Removing a node
In my case, the complete removal of a node from the structure is not desirable, and it is expensive. The deleted element will be marked with a delete flag, in order not to send its vertices to the OpenGL pipeline and not to display its faces. Here it would be possible to make a deferred reconstructor, which, upon the accomplishment of a specific event or at a specific time interval, would rebuild the entire tree, excluding and removing the marked nodes and sub nodes from memory.
// ( 6 6 "" ). void OctObject::del(octTree *el) { if(el==NULL) { return; } else { el->novusial=1;// (). if(el->up==NULL)// . return; if(el->up->novusial)// / el, return; // novusial==1, , novusial==1, .. . del(el->up); } return;} 
Further, I hope, in “part 2” I will tell and show you how to stir up all this on OpenGL.
View the rest of the code spinning this project in OpenGL, pick up the binaries and the whole project here .
Source: https://habr.com/ru/post/133769/
All Articles