Qt Components for Desktop
This post participates in the competition " Smart phones for smart posts ".
As you know, QML is based on graphic primitives and even banal buttons have to draw from them (rectangle, gradient, text, mouse area, for example). To facilitate the creation of UIs, Qt Components have been created. They allow you to create buttons, text boxes, dropboxes and other controls for entering or displaying data. In the official release now components for
mobile platforms: Symbian and MeeGo. But Qt Labs also has a version for desktop platforms, which (after some time) will be included in Qt5, as the main means of creating a user interface (as we remember, in Qt5 QML comes first, and QtGui comes second). In this case, the components themselves adapt to the native view of the operating system.
In order to show the capabilities of the desktop components, and at the same time identify the main problems and the benefits of using them, I created a minimal graphical application on the classic QtGui and on the components. No, not Hello World. Calculator. Without the implementation of calculations, just a graphical interface.
')
Launched under the cat launches under 3 operating systems and some arguments on the subject.
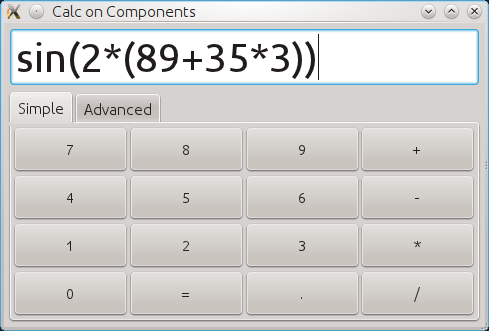
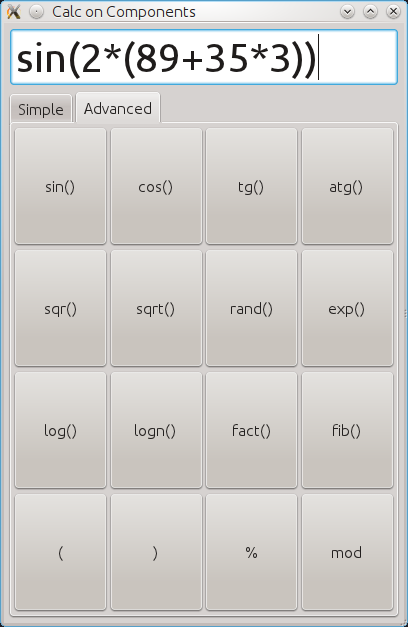
So, the calculator includes a display and two tabs with different buttons: a simple set (in the screenshot above) and an advanced one.
We will understand first with the code.
The first and most interesting thing to know when working with components is that they do not use QmlApplicationViewer or QDeclarativeView explicitly. Qml file is launched via QDeclarativeEngine . But the components themselves create a QDeclarativeView when it is needed (that is, when a new window is created). To facilitate the work, in the repository with components lies the QmlDesktopViewer class, which is easy to connect to your project by connecting it to the general source tree and using it in main.cpp.
Now we turn to QML. Create a file main.qml, which will be launched when the application starts
I have slightly reduced the source code, but the total lines in this file are 125.
So, the main element here is the Window . It just creates a QDeclarativeView , which displays all its elements. For Window, you can set the title, height, width, maximum and minimum height and width, visibility. In general, the standard set for the window. The first element in the window is our display, implemented on TextField . If someone developed on mobile Qt Components, then this element should be familiar. It has about the same API as in mobile components.
The next element is the TabFrame , which is eventually converted to a QTabWidget . We will add two Tab elements to this element (I have shortened one, it is exactly the same). All the contents of the Tab will be displayed on this tab (that is, it is analogous to adding widgets to the tab widget or to its Layout in QtGui).
CalcButtonRow in this case is our component, which contains 4 buttons (with names passed through the names property) and stretches them in width and height so that the buttons take up all the space of the tab (the display shows the analog QGridLayout on the tab widget in QtGui). The solution to the forehead and subject to many problems in the production, but for the test come down.
I reduced the source code again (43 lines in the original). Side buttons are positioned to the sides, central - to the center of the parent element. All 4 with a quarter-width width of the parent element.
Here we see the Button element, which should also be familiar to the mobile components. In the button handler, we emit a signal from our element with the text written on the button.
Let's go back to main.qml
When a button is pressed , the buttonPressed function is called , which adds the button text to the line at the current cursor position and shifts it by the required number of characters (for functions, this number is less by one, since the cursor must be inside the brackets, not after them).
This is ALL code. Total got about 160 lines of qml.
Similar code written in QtGui (without a designer, with the generation of all objects in the constructor in cycles, with QSignalMapper and other ways to reduce the code for such forms) took about 130 lines of c ++ code (excluding main.cpp).
That is, the amount of code is approximately equal. Look at the results in various operating systems.

Everything is about the same, but. In the QML version, the buttons (different gradients) look a little different, a small cant with tabs are drawn, the blue focus frame is always lit (on the QtGui version it disappears if the window is inactive), there are no animations when adding text to the text field and switching tabs. Not bad.

In the QML version there is again a small joint with the display of tabs, again the focus frame is always visible and plus there are traces of the mouse hover on the buttons (which in the QtGui version, as they should, disappear). Again, not bad.

Traditionally, the focus frame is burning in the qml version, an ever-burning tab on the inactive window has been added to it. BUT. For Mac OS X, I had to slightly modify the application on QtGui, because when I launched it for the first time, the window looked like this.

It was necessary for QLineEdit to explicitly specify minimumHeight. QML version has not been reworked.
You ask why we need these components if there is QtGui. The answer is simple. To create a more pleasant and rich interface. I will not talk about the well-known features such as kinetic scrolling, beautiful animations when changing objects and all that.
What can I add to the calculator UI? The first thing that comes to mind is the dependence of the font size on the display on the entered text. The larger the text, the smaller the font. Let's change for this our TextField with a display on
As usual, the magic of QML is in action. We added one function, two property change handlers, and a Behavior element. And that's all, now we have dynamically changed the font, and even with the animation. How long will this code on QtGui take (exactly with the animation)? A little more than 15 lines. We'll have to connect the Animation Framework.


You can think of many more examples when QML makes it easier to create UI applications for the desktop.
Now this project is somewhere in the alpha area and it is still too early to talk about its ubiquitous commercial use, but already now it works quite tolerably and allows integrating QtGui widgets into the QML interface. Yes, of course, you can always insert them through proxying into QGraphicsObject, but it is much more complicated, it cuts down some of the possibilities for interacting with widgets and it takes more code. The screenshot shows 4 launches of exampla from components. They show the current status. That is, much can already be done. The screenshot is not visible, but the right button on the toolbar opens a new window.

Pros:
Minuses:
As you know, QML is based on graphic primitives and even banal buttons have to draw from them (rectangle, gradient, text, mouse area, for example). To facilitate the creation of UIs, Qt Components have been created. They allow you to create buttons, text boxes, dropboxes and other controls for entering or displaying data. In the official release now components for
mobile platforms: Symbian and MeeGo. But Qt Labs also has a version for desktop platforms, which (after some time) will be included in Qt5, as the main means of creating a user interface (as we remember, in Qt5 QML comes first, and QtGui comes second). In this case, the components themselves adapt to the native view of the operating system.
In order to show the capabilities of the desktop components, and at the same time identify the main problems and the benefits of using them, I created a minimal graphical application on the classic QtGui and on the components. No, not Hello World. Calculator. Without the implementation of calculations, just a graphical interface.
')
Launched under the cat launches under 3 operating systems and some arguments on the subject.
So, the calculator includes a display and two tabs with different buttons: a simple set (in the screenshot above) and an advanced one.
We will understand first with the code.
Qt Components Calculator
The first and most interesting thing to know when working with components is that they do not use QmlApplicationViewer or QDeclarativeView explicitly. Qml file is launched via QDeclarativeEngine . But the components themselves create a QDeclarativeView when it is needed (that is, when a new window is created). To facilitate the work, in the repository with components lies the QmlDesktopViewer class, which is easy to connect to your project by connecting it to the general source tree and using it in main.cpp.
#include <QtGui/QApplication> #include "qmldesktopviewer.h" int main(int argc, char *argv[]) { QApplication app(argc, argv); QmlDesktopViewer *viewer = new QmlDesktopViewer(); viewer->open("qrc:/main.qml"); QObject::connect(&app, SIGNAL(lastWindowClosed()), viewer, SLOT(quit())); return app.exec(); } Now we turn to QML. Create a file main.qml, which will be launched when the application starts
import QtQuick 1.1 import QtDesktop 0.1 Window { function buttonPressed(name, offset) { var text = display.text var pos = display.cursorPosition display.text = text.substr(0,pos) + name + text.substr(pos) display.cursorPosition = pos+name.length-offset } title: "Calc on Components" width: 400 height: 600 maximumHeight: 900 minimumHeight: 250 maximumWidth: 1000 minimumWidth: 300 visible: true id: mainWindow TextField { id: display anchors.top: parent.top anchors.left: parent.left anchors.right: parent.right anchors.margins: 4 height: 60; font.pixelSize: 40 } TabFrame { id: frame position: "North" anchors.top: display.bottom anchors.left: parent.left anchors.right: parent.right anchors.bottom: parent.bottom anchors.margins: 4 Tab { id: simpleTab title: "Simple" anchors.margins: 4 CalcButtonRow { anchors.left: parent.left anchors.right: parent.right height: parent.height/4 anchors.top: parent.top names: ["7","8","9","+"] onButtonPressed: mainWindow.buttonPressed(name, 0) } // 3 } // } Component.onCompleted: display.focus = true } I have slightly reduced the source code, but the total lines in this file are 125.
So, the main element here is the Window . It just creates a QDeclarativeView , which displays all its elements. For Window, you can set the title, height, width, maximum and minimum height and width, visibility. In general, the standard set for the window. The first element in the window is our display, implemented on TextField . If someone developed on mobile Qt Components, then this element should be familiar. It has about the same API as in mobile components.
The next element is the TabFrame , which is eventually converted to a QTabWidget . We will add two Tab elements to this element (I have shortened one, it is exactly the same). All the contents of the Tab will be displayed on this tab (that is, it is analogous to adding widgets to the tab widget or to its Layout in QtGui).
CalcButtonRow in this case is our component, which contains 4 buttons (with names passed through the names property) and stretches them in width and height so that the buttons take up all the space of the tab (the display shows the analog QGridLayout on the tab widget in QtGui). The solution to the forehead and subject to many problems in the production, but for the test come down.
import QtQuick 1.0 import QtDesktop 0.1 Item { signal buttonPressed(string name) property variant names: ["","","",""] Button { anchors.left: parent.left anchors.top: parent.top anchors.bottom: parent.bottom width: parent.width/4 text: names[0] onClicked: buttonPressed(text) } // 3 } I reduced the source code again (43 lines in the original). Side buttons are positioned to the sides, central - to the center of the parent element. All 4 with a quarter-width width of the parent element.
Here we see the Button element, which should also be familiar to the mobile components. In the button handler, we emit a signal from our element with the text written on the button.
Let's go back to main.qml
// function buttonPressed(name, offset) { var text = display.text var pos = display.cursorPosition display.text = text.substr(0,pos) + name + text.substr(pos) display.cursorPosition = pos+name.length-offset } // onButtonPressed: mainWindow.buttonPressed(name, 0) // (sin(), cos() ..) onButtonPressed: mainWindow.buttonPressed(name, 1) When a button is pressed , the buttonPressed function is called , which adds the button text to the line at the current cursor position and shifts it by the required number of characters (for functions, this number is less by one, since the cursor must be inside the brackets, not after them).
This is ALL code. Total got about 160 lines of qml.
Similar code written in QtGui (without a designer, with the generation of all objects in the constructor in cycles, with QSignalMapper and other ways to reduce the code for such forms) took about 130 lines of c ++ code (excluding main.cpp).
That is, the amount of code is approximately equal. Look at the results in various operating systems.
Linux KDE4
Everything is about the same, but. In the QML version, the buttons (different gradients) look a little different, a small cant with tabs are drawn, the blue focus frame is always lit (on the QtGui version it disappears if the window is inactive), there are no animations when adding text to the text field and switching tabs. Not bad.
Windows 7
In the QML version there is again a small joint with the display of tabs, again the focus frame is always visible and plus there are traces of the mouse hover on the buttons (which in the QtGui version, as they should, disappear). Again, not bad.
Mac OS X 10.6
Traditionally, the focus frame is burning in the qml version, an ever-burning tab on the inactive window has been added to it. BUT. For Mac OS X, I had to slightly modify the application on QtGui, because when I launched it for the first time, the window looked like this.
It was necessary for QLineEdit to explicitly specify minimumHeight. QML version has not been reworked.
Buns from using QML instead of QtGui
You ask why we need these components if there is QtGui. The answer is simple. To create a more pleasant and rich interface. I will not talk about the well-known features such as kinetic scrolling, beautiful animations when changing objects and all that.
What can I add to the calculator UI? The first thing that comes to mind is the dependence of the font size on the display on the entered text. The larger the text, the smaller the font. Let's change for this our TextField with a display on
TextField { function adaptFontSize() { var width = display.width var length = display.text.length var newFontSize = 40 if (width/26 < length) { newFontSize = 1.5*(display.width/display.text.length) if (newFontSize < 20) newFontSize = 20 } display.font.pixelSize = newFontSize } id: display anchors.top: parent.top anchors.left: parent.left anchors.right: parent.right anchors.margins: 4 height: 60; font.pixelSize: 40 onWidthChanged: adaptFontSize() onTextChanged: adaptFontSize() Behavior on font.pixelSize { NumberAnimation{easing: Easing.OutElastic; duration: 200}} } As usual, the magic of QML is in action. We added one function, two property change handlers, and a Behavior element. And that's all, now we have dynamically changed the font, and even with the animation. How long will this code on QtGui take (exactly with the animation)? A little more than 15 lines. We'll have to connect the Animation Framework.
You can think of many more examples when QML makes it easier to create UI applications for the desktop.
The current state of Qt Components for the desktop
Now this project is somewhere in the alpha area and it is still too early to talk about its ubiquitous commercial use, but already now it works quite tolerably and allows integrating QtGui widgets into the QML interface. Yes, of course, you can always insert them through proxying into QGraphicsObject, but it is much more complicated, it cuts down some of the possibilities for interacting with widgets and it takes more code. The screenshot shows 4 launches of exampla from components. They show the current status. That is, much can already be done. The screenshot is not visible, but the right button on the toolbar opens a new window.
Pros and cons of using components instead of QtGui
Pros:
- Rich interface creation features
- Simplify implementation of complex interfaces
- Ability to use standard QML elements without the need to create extra QDeclarativeView
- Simplified transfer of the application to mobile devices (the common API for all components is very similar)
- No platform dependency (QtGui is sometimes dependent. An example is seen on launch in Mac OS X)
Minuses:
- This is still a deep alpha, a lot of minor and not very display bugs
- Complicated interaction with the data layer (properties of the declarative context, plugins and other methods)
- Unusual for those who have not dealt with QML
- Maybe not everything (and I doubt that even in the release they will support all the functionality of QtGui)
Links
- Source Code Repository
- Test projects (qml and qtgui)
- Desktop components in Qt Labs: 1 , 2 , 3 , 4
Source: https://habr.com/ru/post/133754/
All Articles