ListView in Android: Customizing Lists
Continuing the article on ListView in Android, in which we look at more complex examples of its use, such as icons on the elements of the list and adding checkboxes to these elements. We will also consider the possibilities for code optimization.
Let me remind you that the article is a translation of this article with the permission of its author.
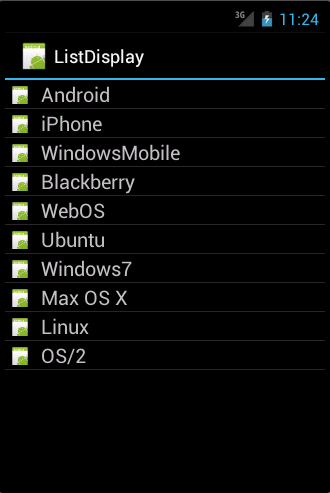
You can create your own template for list items and apply it to your Adapter. The template will be the same for each element of the list, but then we will analyze how to make it more flexible. In our example, we will add an icon to each item in the list.
Create a template file “rowlayout.xml” in the res / layout folder of your project “de.vogella.android.listactivity”.
Change your Activity to the following. The code is almost the same as in the previous example, the only difference is that we use our own template in the ArrayAdapter and tell the adapter which UI element will contain the text. We did not do this in the previous article because we used the standard template.
')
Both previous examples use the same template for all lines at once. If you want to change the appearance of certain strings, you need to define your adapter and replace the getView () method.
This method is responsible for creating individual elements of your ListView. getView () returns a view. This View is actually a Template (ViewGroup) and contains other Views, for example, ImageView or TextView. With getView (), you can also change the settings for individual views.
To read a template from XML in getView (), you can use the system service LayoutInflator.
In this example, we expand the ArrayAdapter, but we can also directly implement a BaseAdapter.
It is very simple to create your own Adapter, not paying attention to its optimization. Just get the data you want to display in your Activity and save it to the list item. In your getView (), set your predefined template for the elements and get the elements you need with findViewById (). After that you can determine their properties.
Our example uses two images: “no.png” and “ok.png”. I put them in the res / drawable-mdpi folder. Use your pictures. If you have not found any, just copy “icon.png” and, using a graphical editor, modify them a bit.
Create a class “MySimpleArrayAdapter” that will serve as our Adapter.
To use this Adapter, change the class MyList to the following.
When you launch this application, you will see a list with items, with different icons on some of them.
Creating Java objects for each element is an increase in memory consumption and time costs. As already mentioned, Android deletes items (views) of your list that are no longer displayed and delegates control of them to the getView () method via the convertView parameter.
Your Adapter can use this view and avoid “blowing up” the Template for this item. This saves memory and reduces CPU usage.
In your implementation, you must check convertView for content and reassign it by sending new data to an existing Template if convertView is not empty.
Our implementation also uses the ViewHolder model. The findViewById () method is quite resource-intensive, so you should avoid it if there is no direct need for it.
ViewHolder keeps links to the necessary in the list item templates. This ViewHolder is attached to an element with the setTag () method. Each species may contain an applied link. If the item is cleared, we can get the ViewHolder via the getTag () method. It looks loaded, but actually works faster than repeated findViewById () calls.
Both techniques (reassigning existing views and the ViewHolder model) increase performance by about 15%, especially on large amounts of data.
Continuing to use the de.vogella.android.listactivity project, create the class “MyArrayAdapter.java”.
You can also add a LongItemClickListener to the view. To do this, get a ListView through the getListView () method and determine the processing of a long press through the setOnItemLongClickListener () method.
Your list item template can also contain Views that interact with the data model. For example, you can use Checkbox in the list item and, if the checkbox is enabled, you can change the data displayed in the item.
We are still using the same project. Create a list item template "rowbuttonlayout.xml".
Create a Model class for this example that contains the name of the element and its contents, if it is checked.
Create the next Adapter. This Adapter will add Checkbox change processing. If the checkbox is turned on, the data in the models also change. The Checkbox required gets its model via the setTag () method.
Finally, change your ListView to the next.
When you launch your application, you will be able to mark items that will be reflected on your model.
You can also make a single and multiple choice. See the following snippets for an example. To get selected items, use listView.getCheckedItemPosition () or listView.getCheckedItemPositions (). You can also use listView.getCheckedItemIds () to get the ID of selected items.
You can put arbitrary items around your list. For example, you can create a template with a list between two TextViews. If you do this, then you must specify the id "@android: id / list" to the ListView, since ListActivity searches for a View with this ID. In this case, one TextView will always be visible above the ListView (Header), and the other will be visible below. If you want to use Footer and Header only at the end / beginning of the list so that they are not fixed, then you need to use view.setHeaderView () or view.setFooterView (), for example:
If you work with a database or with content directly, you can use a SimpleCursorAdapter to transfer data to your ListView.
Create a new project “de.vogella.android.listactivity.cursor” with the activity “MyListActivity”. Create such an activity.
Make sure you give the app access to your contacts. (Use "android.permission.READ_CONTACTS" in AndroidManifest.xml).
Thanks for attention. Comments and amendments to the translation are welcome, because even in the source there are errors and typos.
I apologize for the repost, not originally noted as a translation, as recently here. Thank you very much for the jeston tip, noted and learned from mistakes.
Let me remind you that the article is a translation of this article with the permission of its author.
Example: ListActivity with its own template.
You can create your own template for list items and apply it to your Adapter. The template will be the same for each element of the list, but then we will analyze how to make it more flexible. In our example, we will add an icon to each item in the list.
Create a template file “rowlayout.xml” in the res / layout folder of your project “de.vogella.android.listactivity”.
<?xml version="1.0" encoding="utf-8"?> <LinearLayout xmlns:android="http://schemas.android.com/apk/res/android" android:layout_width="wrap_content" android:layout_height="wrap_content" > <ImageView android:id="@+id/icon" android:layout_width="22px" android:layout_height="22px" android:layout_marginLeft="4px" android:layout_marginRight="10px" android:layout_marginTop="4px" android:src="@drawable/ic_launcher" > </ImageView> <TextView android:id="@+id/label" android:layout_width="wrap_content" android:layout_height="wrap_content" android:text="@+id/label" android:textSize="20px" > </TextView> </LinearLayout> Change your Activity to the following. The code is almost the same as in the previous example, the only difference is that we use our own template in the ArrayAdapter and tell the adapter which UI element will contain the text. We did not do this in the previous article because we used the standard template.
package de.vogella.android.listactivity; import android.app.ListActivity; import android.os.Bundle; import android.view.View; import android.widget.ArrayAdapter; import android.widget.ListView; import android.widget.Toast; public class MyListActivity extends ListActivity { public void onCreate(Bundle icicle) { super.onCreate(icicle); String[] values = new String[] { "Android", "iPhone", "WindowsMobile", "Blackberry", "WebOS", "Ubuntu", "Windows7", "Max OS X", "Linux", "OS/2" }; // ArrayAdapter<String> adapter = new ArrayAdapter<String>(this, R.layout.rowlayout, R.id.label, values); setListAdapter(adapter); } @Override protected void onListItemClick(ListView l, View v, int position, long id) { String item = (String) getListAdapter().getItem(position); Toast.makeText(this, item + " selected", Toast.LENGTH_LONG).show(); } } ')
Example: ListActivity with a flexible template
Both previous examples use the same template for all lines at once. If you want to change the appearance of certain strings, you need to define your adapter and replace the getView () method.
This method is responsible for creating individual elements of your ListView. getView () returns a view. This View is actually a Template (ViewGroup) and contains other Views, for example, ImageView or TextView. With getView (), you can also change the settings for individual views.
To read a template from XML in getView (), you can use the system service LayoutInflator.
In this example, we expand the ArrayAdapter, but we can also directly implement a BaseAdapter.
Definition of a simple adapter
It is very simple to create your own Adapter, not paying attention to its optimization. Just get the data you want to display in your Activity and save it to the list item. In your getView (), set your predefined template for the elements and get the elements you need with findViewById (). After that you can determine their properties.
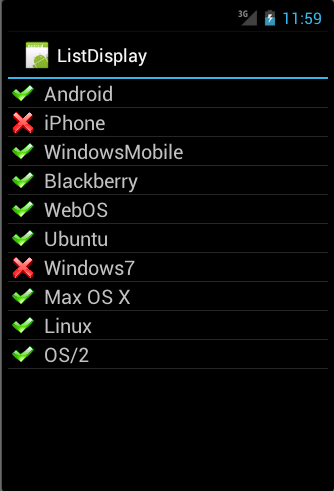
Our example uses two images: “no.png” and “ok.png”. I put them in the res / drawable-mdpi folder. Use your pictures. If you have not found any, just copy “icon.png” and, using a graphical editor, modify them a bit.
Create a class “MySimpleArrayAdapter” that will serve as our Adapter.
package de.vogella.android.listactivity; import android.content.Context; import android.view.LayoutInflater; import android.view.View; import android.view.ViewGroup; import android.widget.ArrayAdapter; import android.widget.ImageView; import android.widget.TextView; public class MySimpleArrayAdapter extends ArrayAdapter<String> { private final Context context; private final String[] values; public MySimpleArrayAdapter(Context context, String[] values) { super(context, R.layout.rowlayout, values); this.context = context; this.values = values; } @Override public View getView(int position, View convertView, ViewGroup parent) { LayoutInflater inflater = (LayoutInflater) context .getSystemService(Context.LAYOUT_INFLATER_SERVICE); View rowView = inflater.inflate(R.layout.rowlayout, parent, false); TextView textView = (TextView) rowView.findViewById(R.id.label); ImageView imageView = (ImageView) rowView.findViewById(R.id.icon); textView.setText(values[position]); // Windows iPhone String s = values[position]; if (s.startsWith("Windows7") || s.startsWith("iPhone") || s.startsWith("Solaris")) { imageView.setImageResource(R.drawable.no); } else { imageView.setImageResource(R.drawable.ok); } return rowView; } } To use this Adapter, change the class MyList to the following.
package de.vogella.android.listactivity; import android.app.ListActivity; import android.os.Bundle; public class MyListActivity extends ListActivity { public void onCreate(Bundle icicle) { super.onCreate(icicle); String[] values = new String[] { "Android", "iPhone", "WindowsMobile", "Blackberry", "WebOS", "Ubuntu", "Windows7", "Max OS X", "Linux", "OS/2" }; MySimpleArrayAdapter adapter = new MySimpleArrayAdapter(this, values); setListAdapter(adapter); } } When you launch this application, you will see a list with items, with different icons on some of them.
Optimize the performance of your own adapter
Creating Java objects for each element is an increase in memory consumption and time costs. As already mentioned, Android deletes items (views) of your list that are no longer displayed and delegates control of them to the getView () method via the convertView parameter.
Your Adapter can use this view and avoid “blowing up” the Template for this item. This saves memory and reduces CPU usage.
In your implementation, you must check convertView for content and reassign it by sending new data to an existing Template if convertView is not empty.
Our implementation also uses the ViewHolder model. The findViewById () method is quite resource-intensive, so you should avoid it if there is no direct need for it.
ViewHolder keeps links to the necessary in the list item templates. This ViewHolder is attached to an element with the setTag () method. Each species may contain an applied link. If the item is cleared, we can get the ViewHolder via the getTag () method. It looks loaded, but actually works faster than repeated findViewById () calls.
Both techniques (reassigning existing views and the ViewHolder model) increase performance by about 15%, especially on large amounts of data.
Continuing to use the de.vogella.android.listactivity project, create the class “MyArrayAdapter.java”.
package de.vogella.android.listactivity; import android.app.Activity; import android.view.LayoutInflater; import android.view.View; import android.view.ViewGroup; import android.widget.ArrayAdapter; import android.widget.ImageView; import android.widget.TextView; public class MyArrayAdapter extends ArrayAdapter<String> { private final Activity context; private final String[] names; public MyArrayAdapter(Activity context, String[] names) { super(context, R.layout.rowlayout, names); this.context = context; this.names = names; } // // static class ViewHolder { public ImageView imageView; public TextView textView; } @Override public View getView(int position, View convertView, ViewGroup parent) { // ViewHolder ViewHolder holder; // , // View rowView = convertView; if (rowView == null) { LayoutInflater inflater = context.getLayoutInflater(); rowView = inflater.inflate(R.layout.rowlayout, null, true); holder = new ViewHolder(); holder.textView = (TextView) rowView.findViewById(R.id.label); holder.imageView = (ImageView) rowView.findViewById(R.id.icon); rowView.setTag(holder); } else { holder = (ViewHolder) rowView.getTag(); } holder.textView.setText(names[position]); // Windows iPhone String s = names[position]; if (s.startsWith("Windows7") || s.startsWith("iPhone") || s.startsWith("Solaris")) { holder.imageView.setImageResource(R.drawable.no); } else { holder.imageView.setImageResource(R.drawable.ok); } return rowView; } } package de.vogella.android.listactivity; import android.app.ListActivity; import android.os.Bundle; public class MyListActivity extends ListActivity { public void onCreate(Bundle icicle) { super.onCreate(icicle); String[] values = new String[] { "Android", "iPhone", "WindowsMobile", "Blackberry", "WebOS", "Ubuntu", "Windows7", "Max OS X", "Linux", "OS/2" }; setListAdapter(new MyArrayAdapter(this, values)); } } Advanced ListActivity
Handling a long press on an item
You can also add a LongItemClickListener to the view. To do this, get a ListView through the getListView () method and determine the processing of a long press through the setOnItemLongClickListener () method.
package de.vogella.android.listactivity; import android.app.ListActivity; import android.os.Bundle; import android.view.View; import android.widget.AdapterView; import android.widget.AdapterView.OnItemLongClickListener; import android.widget.ArrayAdapter; import android.widget.ListView; import android.widget.Toast; public class MyList extends ListActivity { /** , . */ public void onCreate(Bundle icicle) { super.onCreate(icicle); // ListActivity String[] names = new String[] { "Linux", "Windows7", "Eclipse", "Suse", "Ubuntu", "Solaris", "Android", "iPhone", "Linux", "Windows7", "Eclipse", "Suse", "Ubuntu", "Solaris", "Android", "iPhone" }; ArrayAdapter<String> adapter = new TwoLayoutsArrayAdapter(this, names); setListAdapter(adapter); ListView list = getListView(); list.setOnItemLongClickListener(new OnItemLongClickListener() { @Override public boolean onItemLongClick(AdapterView<?> parent, View view, int position, long id) { Toast.makeText(MyList.this, "Item in position " + position + " clicked", Toast.LENGTH_LONG).show(); // "", , // onListItemClick return true; } }); } @Override protected void onListItemClick(ListView l, View v, int position, long id) { super.onListItemClick(l, v, position, id); // , Object o = this.getListAdapter().getItem(position); String keyword = o.toString(); Toast.makeText(this, "You selected: " + keyword, Toast.LENGTH_SHORT) .show(); } } Elements interacting with the data model
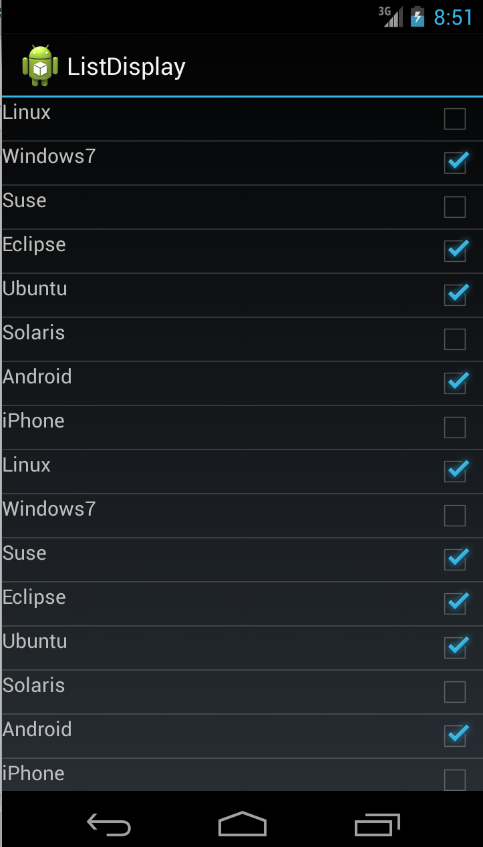
Your list item template can also contain Views that interact with the data model. For example, you can use Checkbox in the list item and, if the checkbox is enabled, you can change the data displayed in the item.
We are still using the same project. Create a list item template "rowbuttonlayout.xml".
<?xml version="1.0" encoding="utf-8"?> <RelativeLayout xmlns:android="http://schemas.android.com/apk/res/android" android:layout_width="match_parent" android:layout_height="wrap_content"> <TextView android:text="@+id/label" android:layout_width="wrap_content" android:layout_height="wrap_content" android:id="@+id/label" android:textSize="30px"></TextView> <CheckBox android:id="@+id/check" android:layout_width="wrap_content" android:layout_height="wrap_content" android:layout_marginLeft="4px" android:layout_marginRight="10px" android:layout_alignParentRight="true" ></CheckBox> </RelativeLayout> Create a Model class for this example that contains the name of the element and its contents, if it is checked.
package de.vogella.android.listactivity; public class Model { private String name; private boolean selected; public Model(String name) { this.name = name; selected = false; } public String getName() { return name; } public void setName(String name) { this.name = name; } public boolean isSelected() { return selected; } public void setSelected(boolean selected) { this.selected = selected; } } Create the next Adapter. This Adapter will add Checkbox change processing. If the checkbox is turned on, the data in the models also change. The Checkbox required gets its model via the setTag () method.
package de.vogella.android.listactivity; import java.util.List; import android.app.Activity; import android.view.LayoutInflater; import android.view.View; import android.view.ViewGroup; import android.widget.ArrayAdapter; import android.widget.CheckBox; import android.widget.CompoundButton; import android.widget.TextView; public class InteractiveArrayAdapter extends ArrayAdapter<Model> { private final List<Model> list; private final Activity context; public InteractiveArrayAdapter(Activity context, List<Model> list) { super(context, R.layout.rowbuttonlayout, list); this.context = context; this.list = list; } static class ViewHolder { protected TextView text; protected CheckBox checkbox; } @Override public View getView(int position, View convertView, ViewGroup parent) { View view = null; if (convertView == null) { LayoutInflater inflator = context.getLayoutInflater(); view = inflator.inflate(R.layout.rowbuttonlayout, null); final ViewHolder viewHolder = new ViewHolder(); viewHolder.text = (TextView) view.findViewById(R.id.label); viewHolder.checkbox = (CheckBox) view.findViewById(R.id.check); viewHolder.checkbox .setOnCheckedChangeListener(new CompoundButton.OnCheckedChangeListener() { @Override public void onCheckedChanged(CompoundButton buttonView, boolean isChecked) { Model element = (Model) viewHolder.checkbox .getTag(); element.setSelected(buttonView.isChecked()); } }); view.setTag(viewHolder); viewHolder.checkbox.setTag(list.get(position)); } else { view = convertView; ((ViewHolder) view.getTag()).checkbox.setTag(list.get(position)); } ViewHolder holder = (ViewHolder) view.getTag(); holder.text.setText(list.get(position).getName()); holder.checkbox.setChecked(list.get(position).isSelected()); return view; } } Finally, change your ListView to the next.
package de.vogella.android.listactivity; import java.util.ArrayList; import java.util.List; import android.app.ListActivity; import android.os.Bundle; import android.widget.ArrayAdapter; public class MyList extends ListActivity { /** , . */ public void onCreate(Bundle icicle) { super.onCreate(icicle); // , ListActivity ArrayAdapter<Model> adapter = new InteractiveArrayAdapter(this, getModel()); setListAdapter(adapter); } private List<Model> getModel() { List<Model> list = new ArrayList<Model>(); list.add(get("Linux")); list.add(get("Windows7")); list.add(get("Suse")); list.add(get("Eclipse")); list.add(get("Ubuntu")); list.add(get("Solaris")); list.add(get("Android")); list.add(get("iPhone")); // list.get(1).setSelected(true); return list; } private Model get(String s) { return new Model(s); } } When you launch your application, you will be able to mark items that will be reflected on your model.
Multiple choice
You can also make a single and multiple choice. See the following snippets for an example. To get selected items, use listView.getCheckedItemPosition () or listView.getCheckedItemPositions (). You can also use listView.getCheckedItemIds () to get the ID of selected items.
package de.vogella.android.listactivity; import android.app.ListActivity; import android.os.Bundle; import android.widget.ArrayAdapter; import android.widget.ListView; public class MyList extends ListActivity { /** , . */ public void onCreate(Bundle icicle) { super.onCreate(icicle); // , ListActivity String[] names = new String[] { "Linux", "Windows7", "Eclipse", "Suse", "Ubuntu", "Solaris", "Android", "iPhone", "Linux", "Windows7", "Eclipse", "Suse", "Ubuntu", "Solaris", "Android", "iPhone" }; setListAdapter(new ArrayAdapter<String>(this, android.R.layout.simple_list_item_multiple_choice, android.R.id.text1, names)); ListView listView = getListView(); listView.setChoiceMode(ListView.CHOICE_MODE_MULTIPLE); } } package de.vogella.android.listactivity; import android.app.ListActivity; import android.os.Bundle; import android.widget.ArrayAdapter; import android.widget.ListView; public class MyList extends ListActivity { /** . */ public void onCreate(Bundle icicle) { super.onCreate(icicle); // , ListActivity String[] names = new String[] { "Linux", "Windows7", "Eclipse", "Suse", "Ubuntu", "Solaris", "Android", "iPhone", "Linux", "Windows7", "Eclipse", "Suse", "Ubuntu", "Solaris", "Android", "iPhone" }; setListAdapter(new ArrayAdapter<String>(this, android.R.layout.simple_list_item_single_choice, android.R.id.text1, names)); ListView listView = getListView(); listView.setChoiceMode(ListView.CHOICE_MODE_SINGLE); } } package de.vogella.android.listactivity; import android.app.ListActivity; import android.os.Bundle; import android.widget.ArrayAdapter; import android.widget.ListView; public class MyList extends ListActivity { /** . */ public void onCreate(Bundle icicle) { super.onCreate(icicle); // , ListActivity String[] names = new String[] { "Linux", "Windows7", "Eclipse", "Suse", "Ubuntu", "Solaris", "Android", "iPhone", "Linux", "Windows7", "Eclipse", "Suse", "Ubuntu", "Solaris", "Android", "iPhone" }; setListAdapter(new ArrayAdapter<String>(this, android.R.layout.simple_list_item_single_choice, android.R.id.text1, names)); ListView listView = getListView(); listView.setChoiceMode(ListView.CHOICE_MODE_SINGLE); } } Heder and Footer
You can put arbitrary items around your list. For example, you can create a template with a list between two TextViews. If you do this, then you must specify the id "@android: id / list" to the ListView, since ListActivity searches for a View with this ID. In this case, one TextView will always be visible above the ListView (Header), and the other will be visible below. If you want to use Footer and Header only at the end / beginning of the list so that they are not fixed, then you need to use view.setHeaderView () or view.setFooterView (), for example:
package de.vogella.android.listactivity; import android.app.ListActivity; import android.os.Bundle; import android.view.View; import android.widget.ArrayAdapter; import android.widget.ListView; public class MyList extends ListActivity { /** . */ public void onCreate(Bundle icicle) { super.onCreate(icicle); // , ListActivity String[] names = new String[] { "Linux", "Windows7", "Eclipse", "Suse", "Ubuntu", "Solaris", "Android", "iPhone", "Linux", "Windows7", "Eclipse", "Suse", "Ubuntu", "Solaris", "Android", "iPhone" }; View header = getLayoutInflater().inflate(R.layout.header, null); View footer = getLayoutInflater().inflate(R.layout.footer, null); ListView listView = getListView(); listView.addHeaderView(header); listView.addFooterView(footer); setListAdapter(new ArrayAdapter<String>(this, android.R.layout.simple_list_item_single_choice, android.R.id.text1, names)); } } SimpleCursorAdapter
If you work with a database or with content directly, you can use a SimpleCursorAdapter to transfer data to your ListView.
Create a new project “de.vogella.android.listactivity.cursor” with the activity “MyListActivity”. Create such an activity.
package de.vogella.android.listactivity.cursor; import android.app.ListActivity; import android.database.Cursor; import android.net.Uri; import android.os.Bundle; import android.provider.ContactsContract; import android.widget.ListAdapter; import android.widget.SimpleCursorAdapter; public class MyListActivity extends ListActivity { /** */ @Override public void onCreate(Bundle savedInstanceState) { super.onCreate(savedInstanceState); Cursor mCursor = getContacts(); startManagingCursor(mCursor); // , // SimpleListAdapter . ListAdapter adapter = new SimpleCursorAdapter(this, // . android.R.layout.two_line_list_item, // mCursor, // , . // , . new String[] { ContactsContract.Contacts._ID, ContactsContract.Contacts.DISPLAY_NAME }, // , new int[] { android.R.id.text1, android.R.id.text2 }); // . setListAdapter(adapter); } private Cursor getContacts() { // Uri uri = ContactsContract.Contacts.CONTENT_URI; String[] projection = new String[] { ContactsContract.Contacts._ID, ContactsContract.Contacts.DISPLAY_NAME }; String selection = ContactsContract.Contacts.IN_VISIBLE_GROUP + " = '" + ("1") + "'"; String[] selectionArgs = null; String sortOrder = ContactsContract.Contacts.DISPLAY_NAME + " COLLATE LOCALIZED ASC"; return managedQuery(uri, projection, selection, selectionArgs, sortOrder); } } Make sure you give the app access to your contacts. (Use "android.permission.READ_CONTACTS" in AndroidManifest.xml).
Thanks for attention. Comments and amendments to the translation are welcome, because even in the source there are errors and typos.
I apologize for the repost, not originally noted as a translation, as recently here. Thank you very much for the jeston tip, noted and learned from mistakes.
Source: https://habr.com/ru/post/133575/
All Articles