Development of cartographic and geolocation mobile applications
This post participates in the competition " Smart phones for smart posts "
The article highlights the main points when developing cartographic and geolocation mobile applications using QtQuick / QML . The example considered in the article will help to get into the essence and basics of using the Location module API from QtMobility .
At the end of the article, the reader will understand how little code is needed to implement the basic functionality of a map application, such as displaying a map, moving and changing the map scale, the so-called “tweak”. For this gesture, use the PinchArea element that was introduced in Qt Quick 1.1. You can also use the volume up / down keys to zoom.
Plus, I’ll tell you what to do to use maps not only from Nokia, but also from Google and OpenStreetMap. To access additional maps, you need to build a project with plugins for Qt. To display the maps, you need to connect to the Internet , but the tiles are downloaded once and then requests are cached in a temporary folder . The location and size of the cache are customizable.
The description of the project build and plug-ins is based on the statement that the reader has the latest version of QtSDK installed and all system paths to libraries are specified (and the ability to use all of this, of course).
')
Additional plugins
To use maps from Google and OpenStreetMap, you need to download the project with plugins, either as an archive , or to clone the repository with gitorius .
I used QtCreator for the build, so I will describe the build based on my experience.
When you open a project in QtCreator, he will offer to customize the build configuration, select Qt Emulator and press Ctrl + B.
When the build is complete, create a separate folder and name it / geoservices , and put the resulting libraries into it. In order for Qt to search for our plugins in this folder, you must either put this folder next to the executable file of the application, or add the search path by calling QApplication :: addLibraryPath () in the main function. That's it, extensions are ready to use, you can go to our application.
Cartographic application
So, let's start, finally, to creation. To create an application, you can use the standard Qt Quick template provided in QtCreator. All changes will occur in main.qml, open this file, delete everything that has been added and proceed to writing a map application.
First, of course, you need to connect the necessary modules:
import QtQuick 1.1 // import QtMobility.location 1.2 To display maps in the Location module, there is such an excellent element as the Map , it needs to install a plugin with the name of the displayed map and set the focus:
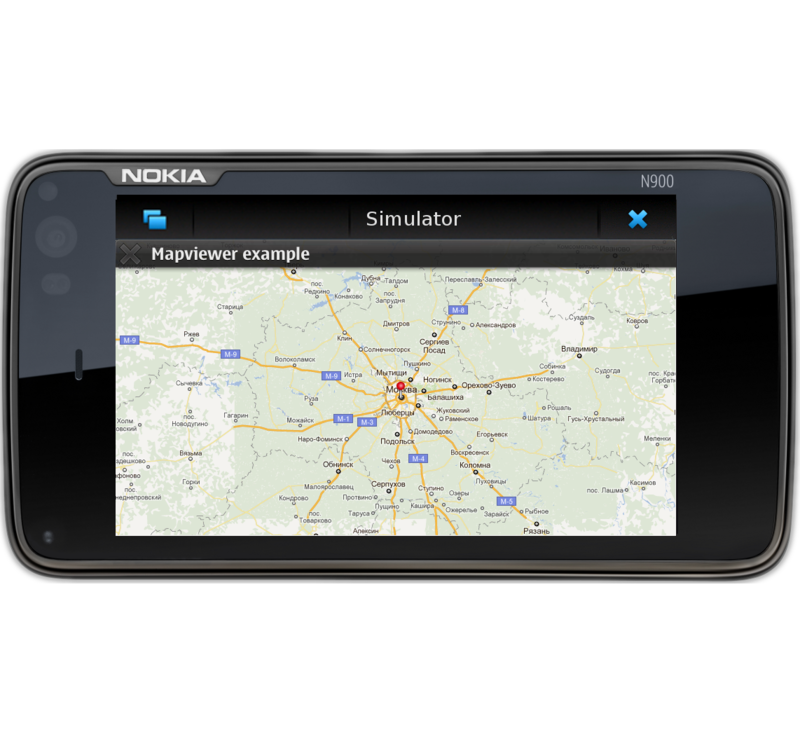
Map { id: map z : 1 // focus : true // "nokia", // ( ;-) ) // : "nokia" "google" "openstreetmap" //- "nokia", plugin : Plugin { name : "nokia" } //... } In principle, you can already test the application, it really does not know how to react to events, but nothing more is needed to display the map. Of course, we will not stop and continue to expand the functionality. So, let the map show us our beloved capital of all of us and for this we will set the map center and scale.
//... zoomLevel: 7 center: Coordinate { latitude: 55.7545 longitude: 37.6268 } //... Now you can add functionality to respond to user actions.
Let's start with the implementation of the pinch.
//... PinchArea { id: pincharea property double oldZoom anchors.fill: parent function calcZoomDelta(zoom, percent) { return zoom + Math.log(percent)/Math.log(2) } onPinchStarted: { oldZoom = map.zoomLevel } onPinchUpdated: { map.zoomLevel = calcZoomDelta(oldZoom, pinch.scale) } onPinchFinished: { map.zoomLevel = calcZoomDelta(oldZoom, pinch.scale) } } //... The whole implementation of this functionality took 22 lines of code, not bad, is not it?
So, it remains to realize the movement of the map and add a zoom with the keys.
//... Keys.onPressed: { switch (event.key) { case Qt.Key_VolumeUp: case Qt.Key_Plus: map.zoomLevel += 1; break; case Qt.Key_VolumeDown: case Qt.Key_Minus: map.zoomLevel -= 1; break; } } MapMouseArea { property int lastX : -1 property int lastY : -1 onPressed : { lastX = mouse.x lastY = mouse.y } onReleased : { lastX = -1 lastY = -1 } onPositionChanged: { if (mouse.button == Qt.LeftButton) { if ((lastX != -1) && (lastY != -1)) { var dx = mouse.x - lastX var dy = mouse.y - lastY map.pan(-dx, -dy) } lastX = mouse.x lastY = mouse.y } } onDoubleClicked: { map.center = mouse.coordinate map.zoomLevel += 1 lastX = -1 lastY = -1 } } //... And in order for the map not to be quite boring, we’ll add a pin in the style of Google.
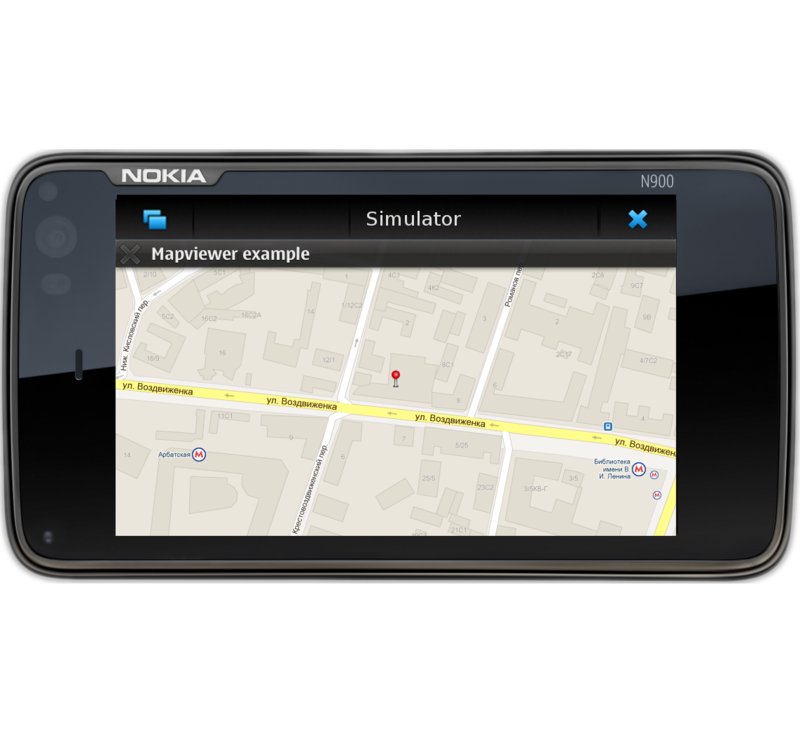
//... MapImage { id: baloon // MapImage source: "http://habrastorage.org/storage1/b80bea34/0e0bc0f1/2cc13b01/8b462d5a.png" offset.x: -12 offset.y: -24 // Nokia coordinate : Coordinate { latitude: 55.752949 longitude: 37.606292 } // // // MapMouseArea { anchors.fill: parent // // onClicked: { map.center = baloon.coordinate map.zoomLevel = map.maximumZoomLevel } } } } The result of the resulting application can be seen in the screenshots:
Conclusion
So, with minimal effort, we got a working mapping application, the amount of code is also minimal. As a result, we received an element that can be embedded in any application, where you need to show, for example, some information about the office or store address, you can display the path from the metro to the office, or simply display the map. Examples of use, of course, weight. Plus, using the example of source codes for additional plug-ins, you can implement work with any map services that support working with tiles ( Bing as an example). For placement on the map of various elements, there are such as:
All elements and mouse events work in map coordinates, which saves the programmer from converting and makes working with elements easier. For example, MapCircle has such a property as radius , it stores the value in meters and when the map scale changes, the circle either increases or decreases.
Links
- The app itself on gitorius
- Repository with add. plugins
- Plugins documentation
Source: https://habr.com/ru/post/133506/
All Articles