We build a tracked Bluetooth robot with a camera. Part 1
Due to numerous requests, I decided to describe the process of creating such a robot with a camera on a tracked chassis and control via bluetooth using a joystick.
I always dreamed of creating a robot that can be controlled using a computer and watching it move from the first person.
I conditionally divided the whole process into three parts:
1. Build a robot
2. Programming boron microcontroller
3. PC control programming
I believe that the most interesting this topic will be those who would like to build such a robot, but do not have enough knowledge in some moments. (For those who are well versed in robotics, electronics and programming, I will not reveal anything new). Therefore, I will tell you the most detailed and simple.
Generally speaking, the robot can be bought and finished, but
- firstly it is not so interesting - the process of creating a robot with your own hands is a great pleasure
- secondly, when buying a ready-made robot, it is often quite difficult, if not impossible, to remake it for your own interests.
-and finally, with the right approach, it may be cheaper to make a robot yourself.
We will use the cheapest, but ready-made units, because the assembly from scratch is not interesting for everyone, is more complex and risks getting tired of the process that lasts for months :).
If you want to not just get a robot to play, but to make yourself, then let's go!
The robot does not make decisions on its own, that is, it is a PC-controlled chassis that executes commands and transmits the video signal. However, it is not difficult to modify it to an independent robot - you just need to add sensors and add logic to the on-board computer. The platform is designed for this.
We will need:
For tracked chassis
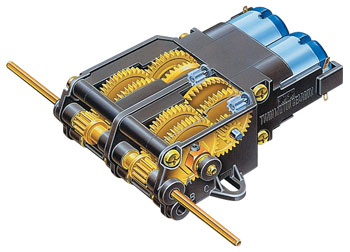
1. Twin engine gearbox - Tamiya Twin Motor Gearbox (TAM70097)
2. Tracks and rollers with axles - Tamiya Track and Wheel Set (TAM70100)

3. Platforms and fasteners - Tamiya Universal Plate Set (2) (TAM70157)

of this, deficiency in Russia is only point 2.
You can buy the rest in Terraelectronics (70097 - 520r, 70157 - 385r)
Or in the official Tamiya store . If you buy in it, then take a tracked chassis (630r) and a box (390r). You will reserve a box with one motor.
The fact is that we need a box with two motors, so that the robot can not only go straight, but also turn it, driving the tracks separately.
Since in Moscow it was not possible to buy everything in one place, but I didn’t want to run and look, I ordered it all on ebay from a single seller who delivers to Russia at a normal price. Cost kit approximately $ 37.5 with delivery.
You can also find these parts at pololu.com. There is more expensive and not always available.
Instead of a platform with holes it is quite possible to use a piece of plywood, and for fasteners a metal constructor, which is sold in the children's world for about 200-400 rubles (there are several sets).
In general, the most important thing is the tracks and gearmotors.
Onboard electronics
1. Arduino Duemillanove / Freeduino 2009 - the brain of our robot -
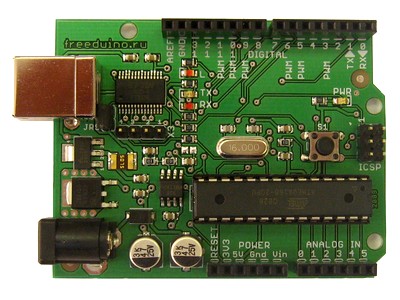
on ebay from $ 17.60.
I took on freeduino.ru, for a long time and for 950r.
For a robot, it is quite sufficient on the basis of Atmega168 (cheaper than Atmega328P), if you are not going to write a very sophisticated logic of the robot or use the Arduino like me for other experiments that might not suffice 16kB of flash memory.
2. Motor Shield V2 or V3 power module for motor control
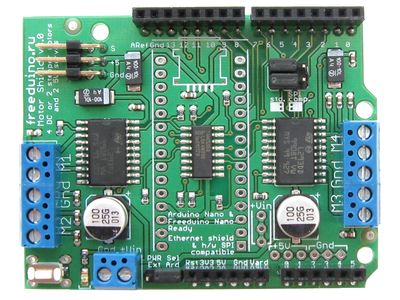
On ebay from $ 10.5, the old version and no combs for installing the next floor shields.
on Freeduino.ru from 600r in the form of a designer to 900 r in assembled form. I advise v3 - it is more flexible.
3. Sensor shield V4 - a convenient module for connecting sensors and servo drives. If you are not afraid of a bundle of wires, then he nafig not needed. I bought it for experiments, so I stuck it for convenience.

about $ 8 on ebay
4. SmartBluetooth module. It will be needed to communicate with a PC or laptop.

on ebay from $ 9.9. I took a long time and he cost me as much as $ 23
5. Bluetooth dongle - if you control from a PC and Bluetooth interface is not in it, you need to buy.
 price - $ 2.7
Total $ 40.7 if you do without the Sensor shield, but with a bluetooth dongle for the PC.
')
We will also need power for the Arduino and the motors. You can use ordinary AA batteries in such a compartment by buying it on the market or in Chipidip, if it is very urgent.

RPMS & AA
or 9V battery type "Krona".
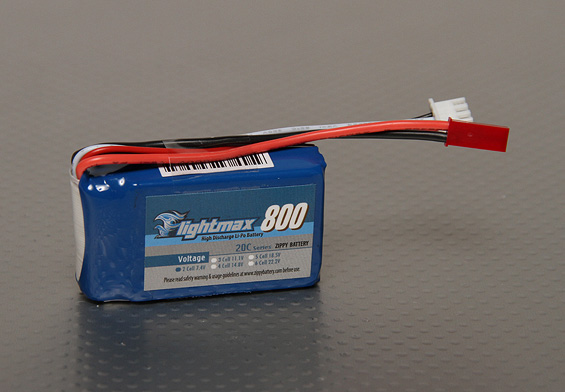
I prefer compact and more convenient LiPoly batteries :
or 2 LiIon element 18650 connected in series.
This kit is enough to make a robot with basic functionality, so I would suggest to pause at this place, choose where and what you will order, make orders or go shopping, and while the order will be delivered, take video subsystem.
When ordering mainly from China, all the components you will receive in about 2-3 weeks and will cost $ 80-100, depending on the chosen vendor or your desire to bargain and save, it may be cheaper. If you buy several products from one seller, ask to combine shipping, you can save on this. The so-called “free shipping” is simply included in the price and is good if you buy one item.
We assemble the chassis
The Tamiya 70100 Kit comes with detailed instructions. Carefully cut out the rubber caterpillars and rollers with cutting pliers or with a stationery knife, separating them from the sprues, assemble and fasten with cogs M3x10 to the plywood floor, or if you bought the Tamiya universal plate set, then complete wedges, they are reusable, so it's okay if something happens first you will not thrust there.
Then we assemble a box of motors with TAM70097 gearboxes. She has 2 options for gear ratios. 58: 1 drives very, very quickly, but the motors at low speeds do not pull and moan plaintively, and after loading the platform, they can barely turn over. I recommend to collect in the version 201: 1, so our "tank" will not run away from sight and will move more smoothly. True noise from the furiously rotating gear will be more. The driving gears of the chassis are mounted on the hexagonal axes of the box.
To check the performance, it is enough to apply power from 2 batteries to the motors simply by referring to the wiring of the motor contacts. Now you need to solder a pair of wires to the motors. Centimeters 10-15 will be enough.
Then, using parts from the designer, I secured the second platform for mounting the electronics. In principle, it is possible to do one floor, it’s just that there’s not enough space and it’s not very convenient to work, but it’s quite possible.
On the second floor, fasten the Arduino / Freeduino with cogs M3x10 (it does not quite coincide along the holes and becomes slightly diagonal). The second floor insert MotorShield. Through the holes in the site, we pass the wires from the motors and fasten the wires to the port M3 and M4 - extreme screws, the middle one remains unused (it is for stepper motors). The polarity of the motor connection does not matter yet, then it can be changed or set programmatically, so do not be afraid to confuse.
Bluetooth module for now just think about where to plug in or attach to the top floor with an office eraser. I didn’t even unpack it - the foamed packaging will serve as a mechanical protection for it, and at the same time it will not allow to close the contacts by accident.
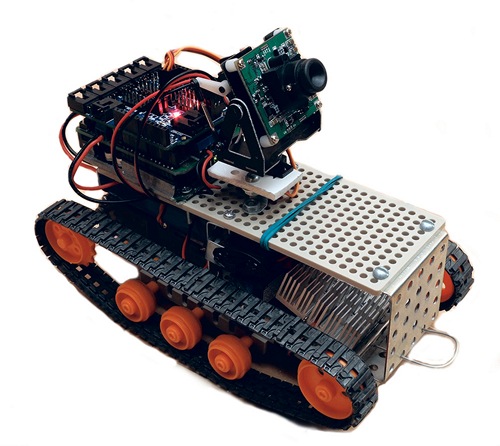
You’ll get something like this sandwich:

" RC Tank chassis "
Open the full-size image to see better what is connected and how, if there are difficulties with the assembly and connection. Arduino fasten USB port to the edge of the platform, so that it is more convenient to then connect the cable and program without removing from the robot.
Work just a couple of hours, if done slowly.
Video subsystem
To ride with the image of the first person we need a miniature video camera, radio transmitter (transmitter) and receiver (receiver).
There are a lot of options. Including reach the market and buy in the store spy things or CCTV equipment Chinese radio camera. Will cost most likely 2-4 sput together with the receiver.
But much cheaper to order from China.
I recommend taking it at 1.2 GHz, not 2.4 GHz, to avoid interfering with the bluetooth module and WiFi running at 2.4 GHz
For example, here is such a kit :

will cost a little more than $ 30. There are cheaper, depending on the camera in the kit.
On ebay, you can buy exactly the same or with a camera in a metal case as in the picture from the box.
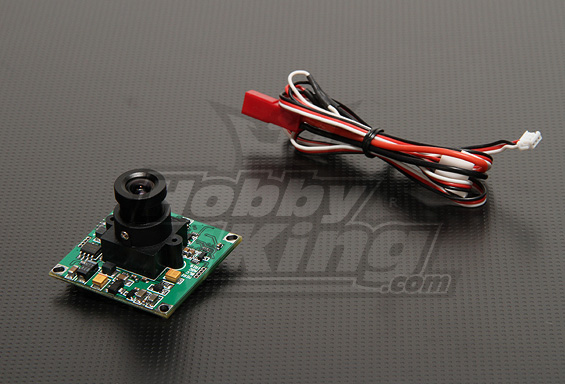
The image quality of all these CMOS cameras is quite so-so (380TVL and those are quite soapy and with a low dynamic range and high noise in low light). Therefore, I ordered a camera on Sony's CCD matrix with a resolution of 420TVL and better sensitivity on hobbyking.com, which allows you to see what is going on under the table without additional lighting.
And also fastening for it with turn and an inclination:
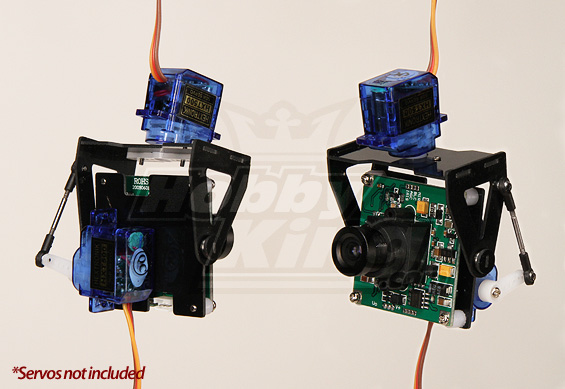
As the inscription on the picture reads, servo drives are not included in the kit, so we are ordering inexpensive 9gram servos. We will need 2 pieces, the 3rd will remain in reserve if we break it.
My 9V camera doesn't work, so I have to power it from a separate 11.1V battery .
The receiver and transmitter used from the inexpensive kit shown above. (The transmitter tried a more powerful one - at 800mW, but it decently warms up, cumbersome with a radiator and power such that it causes pickups on the camera's servos).
You can connect the receiver to a TV, but control it from a computer, and watching TV is not very convenient (except to buy a portable one). Therefore, we need a video capture device.
Fortunately it is inexpensive , very compact, powered by a USB port, all cables and software included:
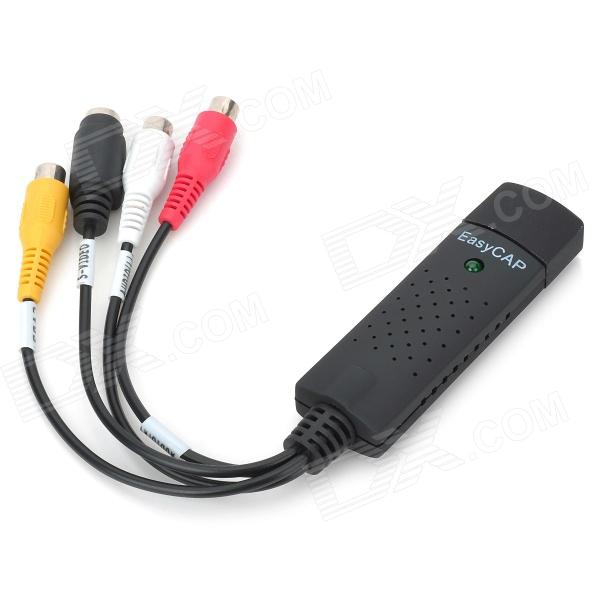
It is useful to have a switch from trifles, so as not to suffer from switching off, pulling out the power connector and a set of connectors male and female
That's all we need.
Where to buy options and how to save enough, there are others, but the article will endless if you try to list everything.
Collecting all this is quite fascinating and not at all as difficult as it may seem at first glance.
But we will deal with the final assembly and tuning in the next part, but for now you need to buy everything you need and assemble the chassis. :)
Enjoy the shopping!
UPD I was contacted more than once about the cost.
To avoid misunderstandings, I will put together:
1. Chassis - I bought on ebay for $ 37.5 with delivery. In Moscow, all components are in Terraelectronica:
70097 (motor-gearbox) - 514r
70157 (2 platforms + fasteners) - 381r
70100 (tracks and wheels) - 571r
Total chassis in Moscow 1466 p (~ $ 46- $ 50)
2. Electronics - $ 40.7 if you do without the Sensor shield, but with a bluetooth dongle for the PC. All from China.
3. Video subsystem - from $ 27 on Dealextreme.
Total full set from $ 105 (all from China) to $ 118 (chassis in Moscow).
Batteries are separate, there are too many power options to describe here.
UPD 2 To charge lithium-ion and lithium-polymer batteries, appropriate charging is needed - a regular power supply will not work.
On hobbiking there is a whole section of chargers: www.hobbyking.com/hobbyking/store/__216__408__Battery_Chargers_Acc_-Battery_Chargers.html
I myself use this: HobbyKing ECO6 50W 5A Balancer / Charger w / accessories. He needs a power supply for 12V approx 5 A, at HK there is one , you can buy from us on the radio market.
All links are given in the article.
Part 2
Part 3
I always dreamed of creating a robot that can be controlled using a computer and watching it move from the first person.
I conditionally divided the whole process into three parts:
1. Build a robot
2. Programming boron microcontroller
3. PC control programming
I believe that the most interesting this topic will be those who would like to build such a robot, but do not have enough knowledge in some moments. (For those who are well versed in robotics, electronics and programming, I will not reveal anything new). Therefore, I will tell you the most detailed and simple.
Generally speaking, the robot can be bought and finished, but
- firstly it is not so interesting - the process of creating a robot with your own hands is a great pleasure
- secondly, when buying a ready-made robot, it is often quite difficult, if not impossible, to remake it for your own interests.
-and finally, with the right approach, it may be cheaper to make a robot yourself.
We will use the cheapest, but ready-made units, because the assembly from scratch is not interesting for everyone, is more complex and risks getting tired of the process that lasts for months :).
If you want to not just get a robot to play, but to make yourself, then let's go!
The robot does not make decisions on its own, that is, it is a PC-controlled chassis that executes commands and transmits the video signal. However, it is not difficult to modify it to an independent robot - you just need to add sensors and add logic to the on-board computer. The platform is designed for this.
We will need:
For tracked chassis
1. Twin engine gearbox - Tamiya Twin Motor Gearbox (TAM70097)
2. Tracks and rollers with axles - Tamiya Track and Wheel Set (TAM70100)
3. Platforms and fasteners - Tamiya Universal Plate Set (2) (TAM70157)
of this, deficiency in Russia is only point 2.
You can buy the rest in Terraelectronics (70097 - 520r, 70157 - 385r)
Or in the official Tamiya store . If you buy in it, then take a tracked chassis (630r) and a box (390r). You will reserve a box with one motor.
The fact is that we need a box with two motors, so that the robot can not only go straight, but also turn it, driving the tracks separately.
Since in Moscow it was not possible to buy everything in one place, but I didn’t want to run and look, I ordered it all on ebay from a single seller who delivers to Russia at a normal price. Cost kit approximately $ 37.5 with delivery.
You can also find these parts at pololu.com. There is more expensive and not always available.
Instead of a platform with holes it is quite possible to use a piece of plywood, and for fasteners a metal constructor, which is sold in the children's world for about 200-400 rubles (there are several sets).
In general, the most important thing is the tracks and gearmotors.
Onboard electronics
1. Arduino Duemillanove / Freeduino 2009 - the brain of our robot -
on ebay from $ 17.60.
I took on freeduino.ru, for a long time and for 950r.
For a robot, it is quite sufficient on the basis of Atmega168 (cheaper than Atmega328P), if you are not going to write a very sophisticated logic of the robot or use the Arduino like me for other experiments that might not suffice 16kB of flash memory.
2. Motor Shield V2 or V3 power module for motor control
On ebay from $ 10.5, the old version and no combs for installing the next floor shields.
on Freeduino.ru from 600r in the form of a designer to 900 r in assembled form. I advise v3 - it is more flexible.
3. Sensor shield V4 - a convenient module for connecting sensors and servo drives. If you are not afraid of a bundle of wires, then he nafig not needed. I bought it for experiments, so I stuck it for convenience.
about $ 8 on ebay
4. SmartBluetooth module. It will be needed to communicate with a PC or laptop.
on ebay from $ 9.9. I took a long time and he cost me as much as $ 23
5. Bluetooth dongle - if you control from a PC and Bluetooth interface is not in it, you need to buy.
price - $ 2.7Total $ 40.7 if you do without the Sensor shield, but with a bluetooth dongle for the PC.
')
We will also need power for the Arduino and the motors. You can use ordinary AA batteries in such a compartment by buying it on the market or in Chipidip, if it is very urgent.
RPMS & AA
or 9V battery type "Krona".
I prefer compact and more convenient LiPoly batteries :
or 2 LiIon element 18650 connected in series.
This kit is enough to make a robot with basic functionality, so I would suggest to pause at this place, choose where and what you will order, make orders or go shopping, and while the order will be delivered, take video subsystem.
When ordering mainly from China, all the components you will receive in about 2-3 weeks and will cost $ 80-100, depending on the chosen vendor or your desire to bargain and save, it may be cheaper. If you buy several products from one seller, ask to combine shipping, you can save on this. The so-called “free shipping” is simply included in the price and is good if you buy one item.
We assemble the chassis
The Tamiya 70100 Kit comes with detailed instructions. Carefully cut out the rubber caterpillars and rollers with cutting pliers or with a stationery knife, separating them from the sprues, assemble and fasten with cogs M3x10 to the plywood floor, or if you bought the Tamiya universal plate set, then complete wedges, they are reusable, so it's okay if something happens first you will not thrust there.
Then we assemble a box of motors with TAM70097 gearboxes. She has 2 options for gear ratios. 58: 1 drives very, very quickly, but the motors at low speeds do not pull and moan plaintively, and after loading the platform, they can barely turn over. I recommend to collect in the version 201: 1, so our "tank" will not run away from sight and will move more smoothly. True noise from the furiously rotating gear will be more. The driving gears of the chassis are mounted on the hexagonal axes of the box.
To check the performance, it is enough to apply power from 2 batteries to the motors simply by referring to the wiring of the motor contacts. Now you need to solder a pair of wires to the motors. Centimeters 10-15 will be enough.
Then, using parts from the designer, I secured the second platform for mounting the electronics. In principle, it is possible to do one floor, it’s just that there’s not enough space and it’s not very convenient to work, but it’s quite possible.
On the second floor, fasten the Arduino / Freeduino with cogs M3x10 (it does not quite coincide along the holes and becomes slightly diagonal). The second floor insert MotorShield. Through the holes in the site, we pass the wires from the motors and fasten the wires to the port M3 and M4 - extreme screws, the middle one remains unused (it is for stepper motors). The polarity of the motor connection does not matter yet, then it can be changed or set programmatically, so do not be afraid to confuse.
Bluetooth module for now just think about where to plug in or attach to the top floor with an office eraser. I didn’t even unpack it - the foamed packaging will serve as a mechanical protection for it, and at the same time it will not allow to close the contacts by accident.
You’ll get something like this sandwich:
" RC Tank chassis "
Open the full-size image to see better what is connected and how, if there are difficulties with the assembly and connection. Arduino fasten USB port to the edge of the platform, so that it is more convenient to then connect the cable and program without removing from the robot.
Work just a couple of hours, if done slowly.
Video subsystem
To ride with the image of the first person we need a miniature video camera, radio transmitter (transmitter) and receiver (receiver).
There are a lot of options. Including reach the market and buy in the store spy things or CCTV equipment Chinese radio camera. Will cost most likely 2-4 sput together with the receiver.
But much cheaper to order from China.
I recommend taking it at 1.2 GHz, not 2.4 GHz, to avoid interfering with the bluetooth module and WiFi running at 2.4 GHz
For example, here is such a kit :
will cost a little more than $ 30. There are cheaper, depending on the camera in the kit.
On ebay, you can buy exactly the same or with a camera in a metal case as in the picture from the box.
The image quality of all these CMOS cameras is quite so-so (380TVL and those are quite soapy and with a low dynamic range and high noise in low light). Therefore, I ordered a camera on Sony's CCD matrix with a resolution of 420TVL and better sensitivity on hobbyking.com, which allows you to see what is going on under the table without additional lighting.
And also fastening for it with turn and an inclination:
As the inscription on the picture reads, servo drives are not included in the kit, so we are ordering inexpensive 9gram servos. We will need 2 pieces, the 3rd will remain in reserve if we break it.
My 9V camera doesn't work, so I have to power it from a separate 11.1V battery .
The receiver and transmitter used from the inexpensive kit shown above. (The transmitter tried a more powerful one - at 800mW, but it decently warms up, cumbersome with a radiator and power such that it causes pickups on the camera's servos).
You can connect the receiver to a TV, but control it from a computer, and watching TV is not very convenient (except to buy a portable one). Therefore, we need a video capture device.
Fortunately it is inexpensive , very compact, powered by a USB port, all cables and software included:
It is useful to have a switch from trifles, so as not to suffer from switching off, pulling out the power connector and a set of connectors male and female
That's all we need.
Where to buy options and how to save enough, there are others, but the article will endless if you try to list everything.
Collecting all this is quite fascinating and not at all as difficult as it may seem at first glance.
But we will deal with the final assembly and tuning in the next part, but for now you need to buy everything you need and assemble the chassis. :)
Enjoy the shopping!
UPD I was contacted more than once about the cost.
To avoid misunderstandings, I will put together:
1. Chassis - I bought on ebay for $ 37.5 with delivery. In Moscow, all components are in Terraelectronica:
70097 (motor-gearbox) - 514r
70157 (2 platforms + fasteners) - 381r
70100 (tracks and wheels) - 571r
Total chassis in Moscow 1466 p (~ $ 46- $ 50)
2. Electronics - $ 40.7 if you do without the Sensor shield, but with a bluetooth dongle for the PC. All from China.
3. Video subsystem - from $ 27 on Dealextreme.
Total full set from $ 105 (all from China) to $ 118 (chassis in Moscow).
Batteries are separate, there are too many power options to describe here.
UPD 2 To charge lithium-ion and lithium-polymer batteries, appropriate charging is needed - a regular power supply will not work.
On hobbiking there is a whole section of chargers: www.hobbyking.com/hobbyking/store/__216__408__Battery_Chargers_Acc_-Battery_Chargers.html
I myself use this: HobbyKing ECO6 50W 5A Balancer / Charger w / accessories. He needs a power supply for 12V approx 5 A, at HK there is one , you can buy from us on the radio market.
All links are given in the article.
Part 2
Part 3
Source: https://habr.com/ru/post/133414/
All Articles