Introduction to Tkinter
Good day to all!
Tkinter is a cross-platform library for developing a graphical user interface in Python ( since Python 3.0 has been renamed tkinter ). Tkinter stands for Tk interface, and is an interface to Tcl / Tk .
Tkinter is part of the standard Python distribution.
All code in this article is written for Python 2.x.
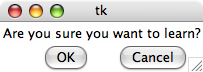
To make sure that Tkinter is installed and working, we use the standard Tkinter _test () function:
')
import Tkinter Tkinter._test() After executing this code, the following window should appear:
Great, now you can start writing a few simple programs to demonstrate the basic principles of Tkinter.
Hello world
Of course, where without him. First we need to create the main window by writing
from Tkinter import * root = Tk() Yes, just one line, this is not WinAPI (=. Now we will create a button, when clicked, the text will be displayed in the console:
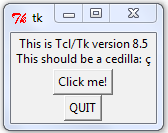
def Hello(event): print "Yet another hello world" btn = Button(root, # text="Click me", # width=30,height=5, # bg="white",fg="black") # btn.bind("<Button-1>", Hello) # Hello btn.pack() # root.mainloop() It's simple, isn't it? Create an instance of the Button class, specify the parent and optionally a list of parameters. There are many more parameters, such as font, frame thickness, etc.
Then we bind an event to a button press (you can bind several different events depending, for example, on which mouse button our btn was pressed.
mainloop () starts the event loop; Until we call this function, our window will not respond to external stimuli.
Packers
The pack () function is the so-called packer, or location manager. He is responsible for how the widgets will be located on the main window. For each widget, call the packer method, otherwise it will not be displayed. There are three packers in total:
pack () . Automatically places widgets in the parent window. It has side, fill, expand options . Example:
from Tkinter import * root = Tk() Button(root, text = '1').pack(side = 'left') Button(root, text = '2').pack(side = 'top') Button(root, text = '3').pack(side = 'right') Button(root, text = '4').pack(side = 'bottom') Button(root, text = '5').pack(fill = 'both') root.mainloop() 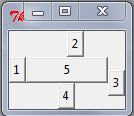
grid () . Places widgets on the grid. The main parameters: row / column - row / column in the grid, rowspan / columnspan - how many rows / columns the widget takes. Example:
from Tkinter import * root = Tk() Button(root, text = '1').grid(row = 1, column = 1) Button(root, text = '2').grid(row = 1, column = 2) Button(root, text = '__3__').grid(row = 2, column = 1, columnspan = 2) root.mainloop() 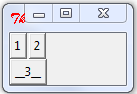
place () . Allows you to place widgets in the specified coordinates with the specified dimensions.
Basic parameters: x, y, width, height . Example:
from Tkinter import * root = Tk() Button(root, text = '1').place(x = 10, y = 10, width = 30) Button(root, text = '2').place(x = 45, y = 20, height = 15) Button(root, text = '__3__').place(x = 20, y = 40) root.mainloop() 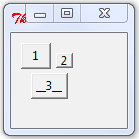
Now, to demonstrate other features of Tkinter, let's write the simplest
Text editor
Without further ado, here is the code:
from Tkinter import * import tkFileDialog def Quit(ev): global root root.destroy() def LoadFile(ev): fn = tkFileDialog.Open(root, filetypes = [('*.txt files', '.txt')]).show() if fn == '': return textbox.delete('1.0', 'end') textbox.insert('1.0', open(fn, 'rt').read()) def SaveFile(ev): fn = tkFileDialog.SaveAs(root, filetypes = [('*.txt files', '.txt')]).show() if fn == '': return if not fn.endswith(".txt"): fn+=".txt" open(fn, 'wt').write(textbox.get('1.0', 'end')) root = Tk() panelFrame = Frame(root, height = 60, bg = 'gray') textFrame = Frame(root, height = 340, width = 600) panelFrame.pack(side = 'top', fill = 'x') textFrame.pack(side = 'bottom', fill = 'both', expand = 1) textbox = Text(textFrame, font='Arial 14', wrap='word') scrollbar = Scrollbar(textFrame) scrollbar['command'] = textbox.yview textbox['yscrollcommand'] = scrollbar.set textbox.pack(side = 'left', fill = 'both', expand = 1) scrollbar.pack(side = 'right', fill = 'y') loadBtn = Button(panelFrame, text = 'Load') saveBtn = Button(panelFrame, text = 'Save') quitBtn = Button(panelFrame, text = 'Quit') loadBtn.bind("<Button-1>", LoadFile) saveBtn.bind("<Button-1>", SaveFile) quitBtn.bind("<Button-1>", Quit) loadBtn.place(x = 10, y = 10, width = 40, height = 40) saveBtn.place(x = 60, y = 10, width = 40, height = 40) quitBtn.place(x = 110, y = 10, width = 40, height = 40) root.mainloop() Here are some new highlights.
First, we connected the tkFileDialog module for the file open / close dialogs. Using them is simple: you need to create an object of the Open or SaveAs type , optionally specifying the filetypes parameter, and call its show () method. The method will return a string with the file name or an empty string if the user simply closed the dialog.
Secondly, we created two frames. The frame is intended for grouping other widgets. One contains control buttons, and the other contains a text box and a scroll bar.
This is done so that the textbox does not fit the buttons and is always the maximum size.
Third, the Text widget has appeared. We created it with the wrap = 'word' parameter to wrap the text by word. The main Text methods are: get, insert, delete . Get and delete accept initial and final indexes. The index is a string of the form 'x.y', where x is the number of the character in the line, and y is the line number, with the characters numbered starting from 1, and the lines starting from 0. That is, the very beginning of the text is indicated by the index '1.0'. To mark the end of the text is the index 'end'. Also constructions of the form '1.end' are admissible.
B Fourthly, we created a scrollbar. After creating it, you need to associate it with the desired widget, in this case, with the textbox. Bilateral binding:
scrollbar['command'] = textbox.yview textbox['yscrollcommand'] = scrollbar.set That's all. Tkinter is definitely a powerful and convenient library. We covered not all of its capabilities, the rest - the topic of further articles.
Useful links:
http://ru.wikiversity.org
http://www.pythonware.com/
Source: https://habr.com/ru/post/133337/
All Articles