Database Migrations - Library Overview and Usage
 As you could already read , a new version of CodeIgniter was recently released, one of the innovations of which is the Migration library. Phil Sturgeon , one of its main developers, was so inspired by the convenience of database version management for Rails that he decided to create an analogue of such a method for CodeIgniter, and finally you can see this library in the official distribution.
From this article you will get a general idea of migrations, as well as learn how to create them. In the second part , we will see how easily they can be integrated into your application.
This article will be useful for novice users of CodeIgniter, but I hope that more advanced colleagues will learn about this wonderful library and learn something new for themselves.
Among other things, this library is not difficult at all, and it will not be difficult to implement it if you wish for any other platform!
Library Overview
The Migration library allows us to store all changes to the database in the application, and roll them in or out if necessary. It can be convenient for developing in a team - it is not necessary to explain to your colleague what needs to be changed in the database in order for your code to work, and when uploading new versions of the site to the combat server. Well, or at worst, you can always quickly roll back to the old version, if you screwed up somewhere.
')
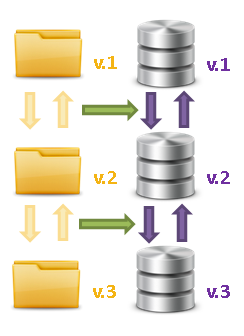
To understand in general how the library works, consider the following primitive scenario:
0. Suppose we have a version 0 of the application with a starting base (also version 0) .
1. In the course of development, we understand that in order to implement a new functional (for example, a newsletter subscription system), we will need to make changes not only in the application code, but also in the database structure.
2. To do this, we will specify in the config that the database version for this version of the code will be 1 and together with the new code we will create the migration 001 , specifying actions for it to upgrade and for the database downgrade (in case you need to roll back the version of the application ).
3. Then we implement some kind of update roll-in mechanism - it could be a page in the admin panel, a solution using the CLI, or even a fully automatic update when unloading from the version control system.
4. Upload the new project code to the site, start the migration to the required version, and voila!
Now imagine that you need to update the application through 3 versions in advance, or on the test server to see how the version made a couple of months ago was implemented? Easily, just by changing the code, migrate to the desired version of the database (migration will happen gradually, say from the 4th to the 1st, first the 3rd and 2nd will roll, and then the 1st version)!
Are you inspired by this opportunity like me and want to try? Nothing is easier!
Practical use
As a matter of fact, the library is completely easy to use, and to introduce it into a project you need to add / correct quite a few lines of code.
The whole process of creating migrations will not take ten minutes of time, but will save you and your colleagues working on the same project decently.
Create class MY_Migration
So, for a start, we will need to
What for? Everything is very simple, by default this class cannot report which versions of the database and code are current, and it is not entirely correct to implement these checks on the entire code, it is better to do it in one place.
To do this, we will use the standard class extension technique used in CodeIgniter - we will create the % site_path% / application / libraries / MY_Migration.php file with a couple dozen lines of code inside.
This class will add 2 more public methods to the implementation of the ancestor:
/** * Wrapper function for the protected _get_version. * Get's the database current version * * @access public * @return integer Current DB Migration version */ public function get_db_version() { return parent::_get_version(); } /** * Retrieves current file system version * * @access public * @return integer Current file system Migration version */ public function get_fs_version() { return $this->_migration_version; } Note: hereinafter abbreviated code listings can be given, a link to all the files used in the tutorial at the end of the article.
As you can see, the functions are only wrappers for the protected method to get the database version and, again, the protected properties of $ _migration_version , and quite clearly demonstrate the use of encapsulation .
I also advise you to pay attention to an important point: in the original Migration class there is a restriction, due to which its constructor is executed only when the parent class is initialized.
Therefore, in order for the application to work correctly, automatically initializing MY_Migration instead of the original, you need to duplicate the parent class constructor by changing the condition on it to 41 lines:
public function __construct($config = array()) { # Only run this constructor on main library load if (get_parent_class($this) !== FALSE) { return; } ### Other code here... } on
public function __construct($config = array()) { # Only run this constructor on main library load if (get_parent_class($this) !== FALSE && get_class($this)!='MY_Migration') { return; } ### Other code here... } Create a migration
Expanding the base class, the case remains small. In order for the library to roll or roll back changes to the database, you need to create a migration file that contains the descendant class Migration (in our case MY_Migration ).
Since this is our first migration, we will create the following file: % site_path% / application / migrations / 001_add_messages.php , containing up and down functions:
<?php defined('BASEPATH') OR exit('No direct script access allowed'); class Migration_Add_messages extends MY_Migration { public function up() { $this->db->query(" CREATE TABLE IF NOT EXISTS `email_list` ( `list_id` INT(10) UNSIGNED NOT NULL AUTO_INCREMENT, `email` VARCHAR(255) CHARACTER SET utf8 COLLATE utf8_general_ci NULL DEFAULT NULL ) ENGINE=MyISAM;"); } public function down() { $this->db->query("DROP TABLE IF EXISTS `email_list`"); } } Please note that the files with migrations contain at the beginning of the 3-digit numeric sequence number of the version to which they transfer the database, and the class contained in them is called as the file name, where instead of the version number is Migration_ .
Rule config
Finally, to work with migrations, you need to tweak the config in the % site_path% / application / config / migration.php file and enable them, see if the path and version of the database required for our code to work correctly (standard comments are cut out of listing):
$config['migration_enabled'] = TRUE; $config['migration_version'] = 1; $config['migration_path'] = APPPATH . 'migrations/'; Please note that I indicated the 1st version, which implies that we have already done the mailing list functionality.
Total
Thus, we have slightly increased the usability of the library, expanding its functionality, bypassed the pitfall associated with checking in the constructor for the inheritance of the original class, and also learned how to create migrations.
As you can see, there is nothing difficult in creating migrations, and, again, they can save you a significant amount of time. Moreover, their implementation in the current project should not cause any difficulties. By the way, just my introduction will be devoted to my second article, which will appear in the very near future.
Download full source archive
The second part: Database migration - integration with your application
PS:
UPD: Kind anonymous poured a little karma, transferred to the blog CodeIgniter
Source: https://habr.com/ru/post/133312/
All Articles