How to: VM in files on local Citrix XenServer
By default, Citrix XenServer uses LVM virtual machine storage systems in local storage. This storage option has many advantages over VHD files, but sometimes for ease of transfer or to create shared storage, you need to use file storage mode by analogy with VMware ESX .
In this guide, I will step by step describe how to create a shared file repository on a local Citrix XenServer server.
Due to the impossibility for me to post to the blog "virtualization", I will post it here.

')
First you need to install Citrix XenServer. I will not describe this process; it is rather trivial. We assume that at the moment you have a server with an installed OS on the system disk. Now we are ready to connect additional drives and organize shared storage of virtual machines in VHD format on them.
Connect new hard drives to the server and boot the system.
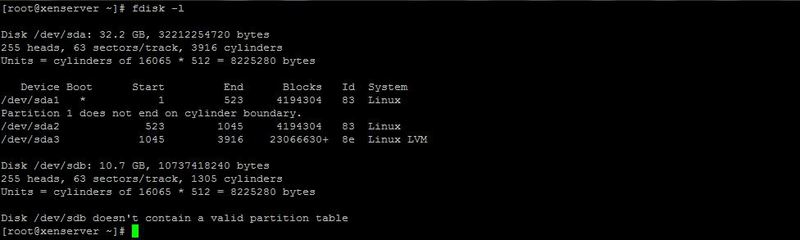
Use the fdisk command to find the newly mounted disks. In my case, this is / dev / sdb
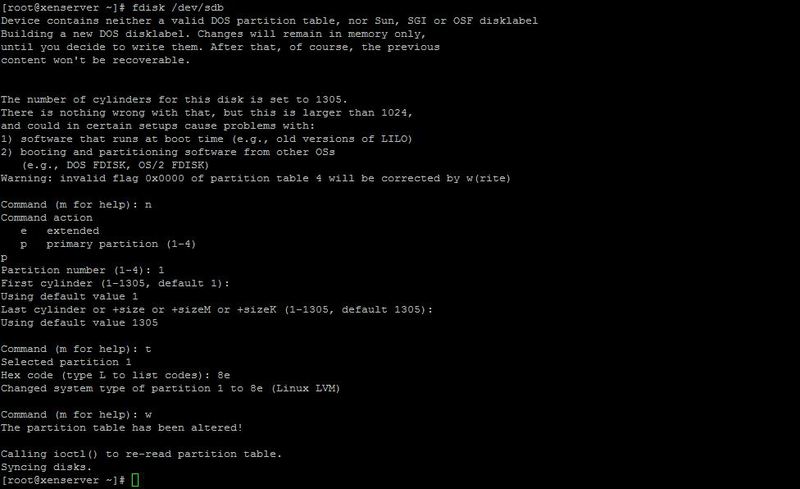
For flexibility, we will use the LVM section. This will allow in the future to flexibly interact with hard drives. Use the fdisk command to partition the disk and create a partition of type 8E (Linux LVM).
In order for the operating system to see the changes, it is necessary to re-read the partitioning of the disks. To do this, you can use the partprobe command from the parted package. Or simply by rebooting the system. (it is possible to manually signal the action to the kernel, but I will not describe it)

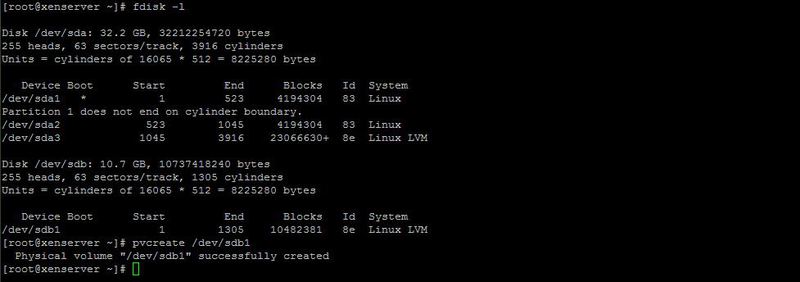
Use the fdisk command again. We define the operated section: in my case it is
/ dev / sdb1 . Using the pvcreate command to create a physical volume.
Make sure everything is created correctly with the pvscan command. Next, using the vgcreate command, create a group with a logical volume called loc_str based on the physical ones created.

The next step is to create the directly used logical volume. Create it with the lvcreate command. Where -L value is the size of the volume, and -n value is the name of the volume.

Next, you need to create a file system on the created disk. Use the mkfs.ext3 command.

Now we need a mount point. For this, I created in the root folder / VM . For automatic mounting, you need to make an entry in the / etc / fstab file .

Mount the created logical volume with the mount command and make sure that everything is fine with the df command.

Now we have a VM directory where the logical volume is mounted. This is where we will store the virtual machines.
The next step is to configure the NFS server. To begin with, we will add the necessary services to autoload with the command chkconfig .

Now edit the / etc / exports configuration file. Add the created directory to it and allow access to it from the local machine without replacing the superuser with nobody.

Now run the NFS server. To do this, run the nfs and portmap daemons.

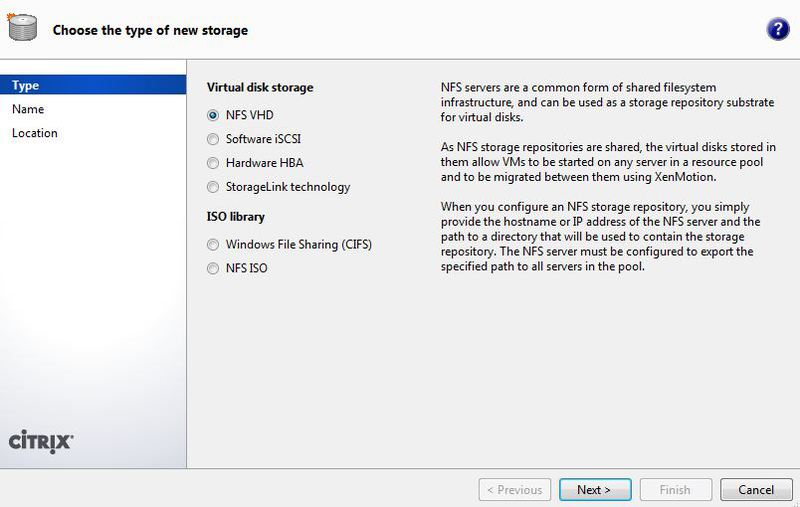
All perfectly. Most of the way is already covered. Now we need to add storage to the XenServer configuration. For this we use the XenCenter utility. Select New SR ... from the server's drop-down menu. You need NFS VHD type.
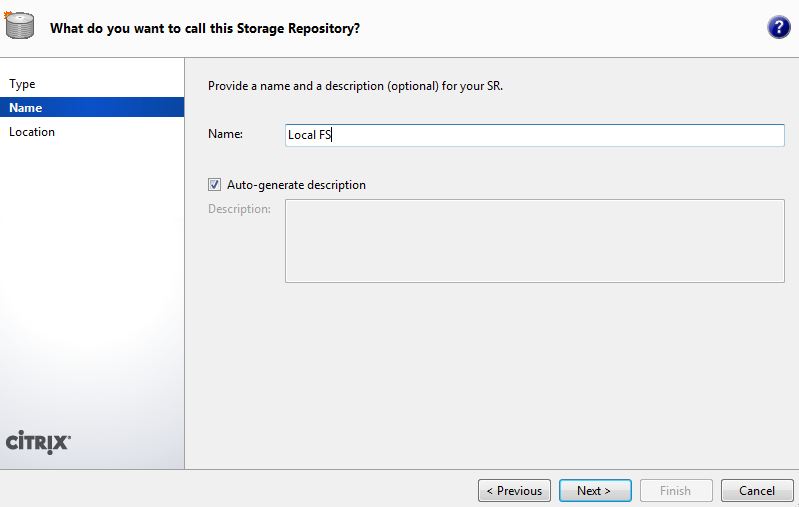
Next, enter a name for the vault. For example, Local FS .
Now you need to specify the path to the location that we specified in the / etc / exports file.

At the creation of the storage is complete. Opening his property you can make sure that everything went right.
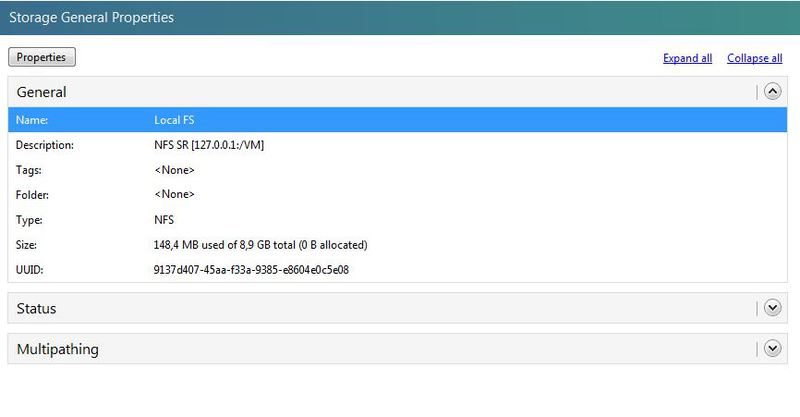
From the file system point of view, the virtual machines will now be located as VHD files in the VM directory.

After rebooting (you can immediately add to rc.local ), you need to re-activate the logical volume group: vgchange -ay loc_str
Thank you for reading.
I hope the article was helpful.
In this guide, I will step by step describe how to create a shared file repository on a local Citrix XenServer server.
Due to the impossibility for me to post to the blog "virtualization", I will post it here.
')
First you need to install Citrix XenServer. I will not describe this process; it is rather trivial. We assume that at the moment you have a server with an installed OS on the system disk. Now we are ready to connect additional drives and organize shared storage of virtual machines in VHD format on them.
Connect new hard drives to the server and boot the system.
Use the fdisk command to find the newly mounted disks. In my case, this is / dev / sdb
For flexibility, we will use the LVM section. This will allow in the future to flexibly interact with hard drives. Use the fdisk command to partition the disk and create a partition of type 8E (Linux LVM).
In order for the operating system to see the changes, it is necessary to re-read the partitioning of the disks. To do this, you can use the partprobe command from the parted package. Or simply by rebooting the system. (it is possible to manually signal the action to the kernel, but I will not describe it)
Use the fdisk command again. We define the operated section: in my case it is
/ dev / sdb1 . Using the pvcreate command to create a physical volume.
Make sure everything is created correctly with the pvscan command. Next, using the vgcreate command, create a group with a logical volume called loc_str based on the physical ones created.
The next step is to create the directly used logical volume. Create it with the lvcreate command. Where -L value is the size of the volume, and -n value is the name of the volume.
Next, you need to create a file system on the created disk. Use the mkfs.ext3 command.
Now we need a mount point. For this, I created in the root folder / VM . For automatic mounting, you need to make an entry in the / etc / fstab file .
Mount the created logical volume with the mount command and make sure that everything is fine with the df command.
Now we have a VM directory where the logical volume is mounted. This is where we will store the virtual machines.
The next step is to configure the NFS server. To begin with, we will add the necessary services to autoload with the command chkconfig .
Now edit the / etc / exports configuration file. Add the created directory to it and allow access to it from the local machine without replacing the superuser with nobody.
Now run the NFS server. To do this, run the nfs and portmap daemons.
All perfectly. Most of the way is already covered. Now we need to add storage to the XenServer configuration. For this we use the XenCenter utility. Select New SR ... from the server's drop-down menu. You need NFS VHD type.
Next, enter a name for the vault. For example, Local FS .
Now you need to specify the path to the location that we specified in the / etc / exports file.
At the creation of the storage is complete. Opening his property you can make sure that everything went right.
From the file system point of view, the virtual machines will now be located as VHD files in the VM directory.
After rebooting (you can immediately add to rc.local ), you need to re-activate the logical volume group: vgchange -ay loc_str
Thank you for reading.
I hope the article was helpful.
Source: https://habr.com/ru/post/133219/
All Articles