Manage dependencies in Android projects using Ivy
If your Android project is compiled and built using Maven or SBT (or maybe something else other than Ant), then you already use the dependency management mechanism, which is provided out of the box. However, if you use Ant, or simply build an application in Eclipse using an ADT plug-in, then you don’t have this functionality, and the lib directory in the project root is filled manually, and there is no desire or opportunity to switch to Maven. Then, is it possible not to store jar files manually, not to keep them binary, in VCS, not to add them to the “Build Path” in the project settings? Of course there are, what questions!
I think that in the world of “big Java” many have heard or even worked with such a tool called Ivy - “The agile dependency manager”. By the way, if you use SBT, then you automatically use Ivy, just don’t know about it. What can Ivy? Roughly speaking, it is intended for exactly one thing - managing your project’s dependencies on third-party libraries. Ivy is not a build system, it can only complement it.
If the project uses one or two libraries, then perhaps using an instrument such as Ivy will seem an unnecessary “overhead” to you, however, it can make life much easier if your project grows and “grows” with functionality provided by a third party.
')
Our goal will be an application that can be built from both Eclipse and console. To work with Ivy from the console, we will use Ant, which needs to be informed about this - I just put ivy.jar in ~ / .ant / lib / . We may also need the JSch library (ssh2 implementation) - jsch.jar , which can also be put in ~ / .ant / lib / . Do not use outdated versions, there were problems with them. There is no need to do anything more at this stage, we proceed to setting up the project.
The next step we need to configure Ivy to work with the used package repositories. For this there is a so-called. resolvers - descriptions of repositories that specify their URL, structure, and other characteristics. For our example, I chose 3 used libraries - ZXing, ACRA and RoboGuice. The latter can be found in mvnrepository.com , the other two use their own Maven-compatible repositories. The file with the Ivy settings is called ivysettings.xml and is located in the directory with build.xml - in our case it is the project root. Here are its contents for this example:
The ibiblio resolver is standard from the Ivy package and includes storage located on maven.org and others. Next, configurable storage with ZXing and ACRA. Notice the pattern attribute, which defines the storage structure. Also, resolvers are combined in a chained chain, defining the order of enumerating storages when searching for the required package.
So, the storages are configured, then we will describe the dependencies themselves. To do this, create a file ivy.xml (in the same directory with ivysettings.xml ). Its contents are:
The info section is necessary, and its purpose, I think, is clear from the example. It is followed by a description of the dependencies themselves. More worthwhile stops at guice and roboguice . The first library is a dependency for the second, and two of them are enough (according to the documentation of RoboGuice itself), but the guice will “pull” its dependencies, because both packages are written with the attribute transitive = “false” , which prevents further dependencies from resolving them. With this configuration, additional packages -javadoc and -sources , if any , will also be provided. In case you do not need them, then you need to add the configurations section in ivy.xml and create an empty configuration:
and in the description of dependencies add the attribute conf = "default" .
The final step will be the modification of the build.xml project (how to generate it - described in the official documentation). However, if you do not plan to use Ant, you can skip this step. First, you need to add a namespace (namespace) Ivy in the project description:
And add a new target (target):
As a final touch, you can add our goal to the application build process (if you build a project using Ant):
Now, if in the root of the project run the command
then you should see the package download process, and the result should be the lib directory containing the jar files of the libraries.
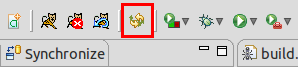
First you need to install the IveDE plugin for Eclipse. The plugin is available in the Eclipse Marketplace. After installation, the “Resolve All Dependencies” button should appear in the toolbar:
Now, let's add dependencies to the project: open the project properties -> Java Build Path -> go to the Libraries tab -> Add Library -> in the list that appears, select IvyDE Managed Dependencies -> click Next. Next, we will be asked about the location of the ivy.xml file and other settings. In this case, you can leave everything as it is and go to the Settings tab, in which you can specify the path to our ivysettings.xml file in the Ivy settings path property . After that you can click Finish. Now, all libraries that have been registered in ivy.xml as dependencies should be connected to the project, and visible in the Package Explorer:

When you make changes to ivy.xml, Eclipse will run the Ivy Resolve task. You can also run it using Ant View by adding the build.xml project to it.
It often happens that the required libraries are not in public repositories, or maybe you will use a library written by another team of your project and you need to connect it as a dependency, or something else. Although creating your own Ivy-storage is somewhat beyond the scope of this note, but I decided to include a description of a very basic (but quite working) configuration.
I took the Droid @ Screen library as an experimental instance, and the storage will be located in / var / ivy . Now, you should choose the structure of the location of the artifacts - and in this case it will be / organization / name / version / artifact . For our test library, com.ribomation is used as the organization in the package names, then the storage structure will look like this:
Pay attention to the ivy.xml file - it contains a description of the artifact, its dependencies, configurations and other things. Its minimum content is:
Next, you need to connect our local repository to ivysettings.xml (dots already marked tags, your KO are marked):
Pay attention to the m2compatible attribute - its use will lead to the fact that Ivy will replace the points with system separators in the organization name, respectively, and the search for artifacts will be conducted not in the com.ribomation directory, but in their hierarchy - com / ribomation . Now, add the dependency to ivy.xml :
Actually, this is all - you can run the problem resolve .
If you are interested in having a remote repository accessed via SSH, then you need to use ssh for the resolver, not the filesystem , but:
Otherwise, they are identical.
During the work with Ivy and Eclipse, the following error was noticed - if your project is divided into several (main, tests, etc.), then when opening them, the Ivy plug-in for some reason confuses dependencies between projects. The solution is very simple - just click the “Resolve All Dependencies” button on the toolbar.
So, the purpose of this note was to show how you can, without changing the existing structure (and infrastructure) of the project, add to it a mechanism for resolving dependencies and get rid of the manual labor of maintaining and adding them to the project. The source code of the project is here . I hope that the information will be useful to you.
I think that in the world of “big Java” many have heard or even worked with such a tool called Ivy - “The agile dependency manager”. By the way, if you use SBT, then you automatically use Ivy, just don’t know about it. What can Ivy? Roughly speaking, it is intended for exactly one thing - managing your project’s dependencies on third-party libraries. Ivy is not a build system, it can only complement it.
If the project uses one or two libraries, then perhaps using an instrument such as Ivy will seem an unnecessary “overhead” to you, however, it can make life much easier if your project grows and “grows” with functionality provided by a third party.
')
Training
Our goal will be an application that can be built from both Eclipse and console. To work with Ivy from the console, we will use Ant, which needs to be informed about this - I just put ivy.jar in ~ / .ant / lib / . We may also need the JSch library (ssh2 implementation) - jsch.jar , which can also be put in ~ / .ant / lib / . Do not use outdated versions, there were problems with them. There is no need to do anything more at this stage, we proceed to setting up the project.
Customization
The next step we need to configure Ivy to work with the used package repositories. For this there is a so-called. resolvers - descriptions of repositories that specify their URL, structure, and other characteristics. For our example, I chose 3 used libraries - ZXing, ACRA and RoboGuice. The latter can be found in mvnrepository.com , the other two use their own Maven-compatible repositories. The file with the Ivy settings is called ivysettings.xml and is located in the directory with build.xml - in our case it is the project root. Here are its contents for this example:
<ivysettings> <resolvers> <ibiblio name="maven2" m2compatible="true" /> <url name="acra" m2compatible="true"> <artifact pattern="http://acra.googlecode.com/svn/repository/releases/[organization]/[module]/[revision]/[module]-[revision].jar" /> </url> <url name="zxing" m2compatible="true"> <artifact pattern="http://mvn-adamgent.googlecode.com/svn/maven/release/[organization]/[revision]/[module]-[revision].jar" /> </url> <chain name="chained" returnFirst="true"> <resolver ref="maven2" /> <resolver ref="acra" /> <resolver ref="zxing" /> </chain> </resolvers> <settings defaultResolver="chained" /> </ivysettings> The ibiblio resolver is standard from the Ivy package and includes storage located on maven.org and others. Next, configurable storage with ZXing and ACRA. Notice the pattern attribute, which defines the storage structure. Also, resolvers are combined in a chained chain, defining the order of enumerating storages when searching for the required package.
So, the storages are configured, then we will describe the dependencies themselves. To do this, create a file ivy.xml (in the same directory with ivysettings.xml ). Its contents are:
<ivy-module version="2.0"> <info organisation="com.example" module="ivy-android-example" revision="0.1" /> <dependencies> <dependency org="org.acra" name="acra" rev="4.2.3" /> <dependency org="com.google.inject" name="guice" transitive="false" rev="2.0-no_aop" /> <dependency org="org.roboguice" name="roboguice" rev="1.1.2" transitive="false" /> <dependency org="com.google.zxing.core" name="core" rev="1.6" /> </dependencies> </ivy-module> The info section is necessary, and its purpose, I think, is clear from the example. It is followed by a description of the dependencies themselves. More worthwhile stops at guice and roboguice . The first library is a dependency for the second, and two of them are enough (according to the documentation of RoboGuice itself), but the guice will “pull” its dependencies, because both packages are written with the attribute transitive = “false” , which prevents further dependencies from resolving them. With this configuration, additional packages -javadoc and -sources , if any , will also be provided. In case you do not need them, then you need to add the configurations section in ivy.xml and create an empty configuration:
<configurations> <conf name="default" visibility="public" /> </configurations> and in the description of dependencies add the attribute conf = "default" .
The final step will be the modification of the build.xml project (how to generate it - described in the official documentation). However, if you do not plan to use Ant, you can skip this step. First, you need to add a namespace (namespace) Ivy in the project description:
<project xmlns:ivy="antlib:org.apache.ivy.ant" name="IvyAndroidExample" default="help"> And add a new target (target):
<target name="resolve" description="--> retrieve dependencies with ivy"> <ivy:retrieve /> </target> As a final touch, you can add our goal to the application build process (if you build a project using Ant):
<target name="-pre-build" depends="resolve" /> Now, if in the root of the project run the command
$ ant resolve
then you should see the package download process, and the result should be the lib directory containing the jar files of the libraries.
Integration with Eclipse
First you need to install the IveDE plugin for Eclipse. The plugin is available in the Eclipse Marketplace. After installation, the “Resolve All Dependencies” button should appear in the toolbar:
Now, let's add dependencies to the project: open the project properties -> Java Build Path -> go to the Libraries tab -> Add Library -> in the list that appears, select IvyDE Managed Dependencies -> click Next. Next, we will be asked about the location of the ivy.xml file and other settings. In this case, you can leave everything as it is and go to the Settings tab, in which you can specify the path to our ivysettings.xml file in the Ivy settings path property . After that you can click Finish. Now, all libraries that have been registered in ivy.xml as dependencies should be connected to the project, and visible in the Package Explorer:
When you make changes to ivy.xml, Eclipse will run the Ivy Resolve task. You can also run it using Ant View by adding the build.xml project to it.
Local storage
It often happens that the required libraries are not in public repositories, or maybe you will use a library written by another team of your project and you need to connect it as a dependency, or something else. Although creating your own Ivy-storage is somewhat beyond the scope of this note, but I decided to include a description of a very basic (but quite working) configuration.
I took the Droid @ Screen library as an experimental instance, and the storage will be located in / var / ivy . Now, you should choose the structure of the location of the artifacts - and in this case it will be / organization / name / version / artifact . For our test library, com.ribomation is used as the organization in the package names, then the storage structure will look like this:
	 / var / ivy
	 Com── com
	     Ri── ribomation
	         D── droidAtScreen
	             0.5── 0.5.1
	                 D── droidAtScreen.jar
	                 I── ivy.xml
Pay attention to the ivy.xml file - it contains a description of the artifact, its dependencies, configurations and other things. Its minimum content is:
<ivy-module version="2.0"> <info organisation="com.ribomation" module="droidAtScreen" revision="0.5.1" /> <publications> <artifact /> </publications> </ivy-module> Next, you need to connect our local repository to ivysettings.xml (dots already marked tags, your KO are marked):
<ivysettings> <property name="repo.dir" value="/var/ivy"/> <resolvers> <...> <filesystem name="local" m2compatible="true"> <ivy pattern="${repo.dir}/[organization]/[module]/[revision]/[artifact].[ext]" /> <artifact pattern="${repo.dir}/[organization]/[module]/[revision]/[module].jar" /> </filesystem> <chain name="chained" returnFirst="true"> <...> <resolver ref="local" /> </chain> </resolvers> <...> </ivysettings> Pay attention to the m2compatible attribute - its use will lead to the fact that Ivy will replace the points with system separators in the organization name, respectively, and the search for artifacts will be conducted not in the com.ribomation directory, but in their hierarchy - com / ribomation . Now, add the dependency to ivy.xml :
<dependency org="com.ribomation" name="droidAtScreen" rev="0.5.1" /> Actually, this is all - you can run the problem resolve .
If you are interested in having a remote repository accessed via SSH, then you need to use ssh for the resolver, not the filesystem , but:
<ssh name="shared" host="example.com" user="${user.name}" keyFile="${user.home}/.ssh/key"> <...> </ssh> Otherwise, they are identical.
Remarks
During the work with Ivy and Eclipse, the following error was noticed - if your project is divided into several (main, tests, etc.), then when opening them, the Ivy plug-in for some reason confuses dependencies between projects. The solution is very simple - just click the “Resolve All Dependencies” button on the toolbar.
Instead of conclusion
So, the purpose of this note was to show how you can, without changing the existing structure (and infrastructure) of the project, add to it a mechanism for resolving dependencies and get rid of the manual labor of maintaining and adding them to the project. The source code of the project is here . I hope that the information will be useful to you.
Source: https://habr.com/ru/post/132870/
All Articles