Deploying Kaviza VDI-in-a-Box
 When customers of DEPO Computers are asked to build a solution for desktop virtualization, we often face an understandable, in general, problem: flagship products such as Citrix XenDesktop and VMware View are quite expensive for small developing companies with limited IT budgets.
But not so long ago, Citrix Systems acquired the company Kaviza, which developed a desktop virtualization solution for small and medium-sized businesses - Kaviza VDI-in-a-Box. As the name implies, this is a boxed solution, which includes all the necessary tools (a detailed description and comparison with other Citrix products can be found in a recent announcement ).
DEPO Computers has been cooperating with Citrix Systems for a long time and uses its products in its virtualization solutions. Naturally, we decided to deploy Kaviza on our test site and see how easy it is to work with it in order to offer our clients.
To deploy Kaviza (a trial applains can be downloaded from kaviza.com), you need a XenServer hypervisor or ESXi (already available beta 5 version also supports Hyper-V).
')
We import the Kaviza_VDI_kMGR_XenServer_v4_1_5.xva applains into the hypervisor.
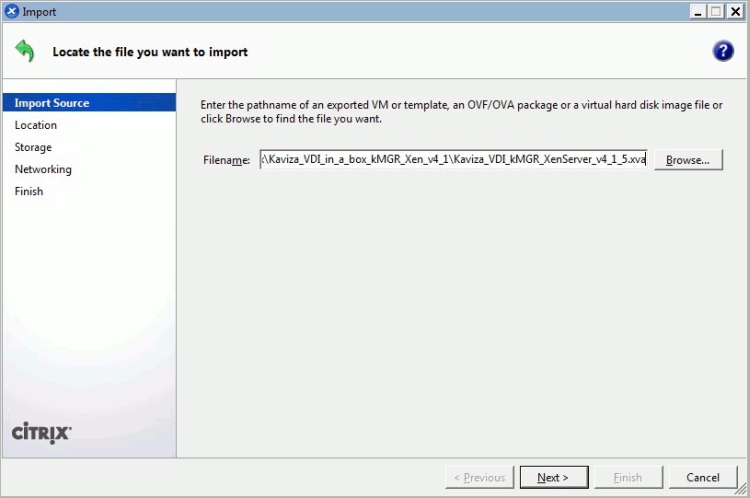
After import, we will have a virtual machine Kaviza_VDI_kMGR_XenServer_v4_1_5. Make sure that she was automatically assigned an IP address. If the DHCP server is not configured, register the address manually in the console (login: kvm, password: kaviza123):
sudo vi / etc / network / interfaces
auto eth0 iface
eth0 inet static
address 10.0.100.33
netmask 255.0.0.0
gateway 10.0.0.1
To specify DNS, you need to correct the resolv.conf file:
$ sudo vi /etc/resolv.conf
All Kaviza server configuration operations are performed via a browser: http: // [kMGR address] / admin, where ([kMGR address] IP address of the Kaviza server). Deploying infrastructure on Kaviza consists of several steps.
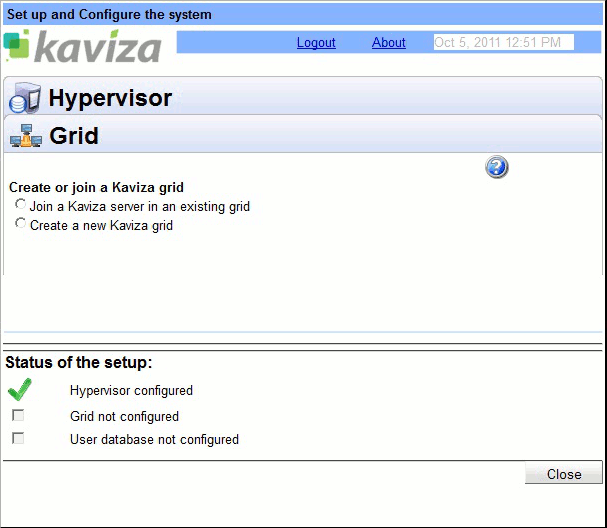
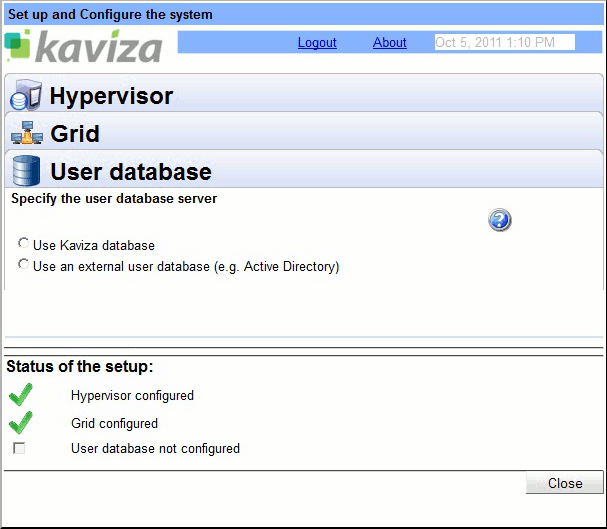
Step 1. Setting up a Kaviza server
To log in to the administration page, use the login (kavizaadmin) and password (kaviza) by default. The first configuration window opens in which you need to enter the IP address / DNS name of the hypervisor, username and password with root privileges. Select the storage and network connection and click Save to save the settings.
Please note that Kaviza cannot be deployed on a server that is part of the XenServer server pool — this restriction is related to the implementation of the technology of pooling Kaviza servers and ensuring HighAvailability. There is no such limitation on ESXi.

Now set up the grid. Selecting 'Create a new Kaviza grid', set the name and save. To join an already existing grid, select the 'Join a Kaviza server in an existing grid' option, set the IP address / DNS name of the Kaviza server from which you want to replicate the configuration and templates; set the username and password to the server from which replication will be performed, and save the parameters. The rest will happen automatically.
The last step in setting up a server is to select a user base. You can create an internal user database or use the Active Directory database. We save.
After the server configuration is completed, a welcome window will appear asking you to create a template for desktop deployment.
Step 2. Creating a "golden" image
So, for the further deployment of desktops, we need a "golden" image.
Create a virtual machine, install Windows 7, update, XenTools and enter it into the domain. We include the built-in administrator account and RemoteDesktop. We add there groups of users from ActiveDirectory which can be connected on RDP. If firewall is enabled, add RemoteDesktop to exceptions. It is recommended to perform all actions under a local administrator account.
Houston, we have a problem
And here there is a nuance that is not described in the official documentation of Kaviza, and we have not met in other sources. With virtual machines with the English version of Windows, there were no problems creating an image for future desktops. When working with the Russian version, Kaviza refused to accept the local administrator account in Russian. The problem is solved simply by renaming the account.
If, after creating the template, try to add an administrator as a desktop user, Kaviza will report that he cannot find it, apparently his account is used for certain secret purposes.
Installing Windows XP differs only in that you have to enter the activation key directly during installation.
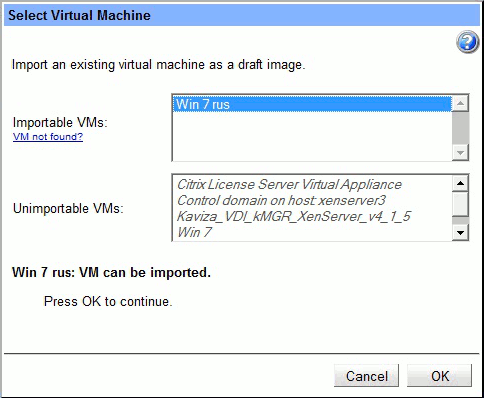
Select the configured virtual machine in the appropriate list for importing into the “golden” image and click OK. In the window that appears, set the image name and description.
The unavailable import section contains virtual machines that are not ready for some reason: for example, XenTools is not installed, RemoteDesktop is not enabled, the virtual machine is turned off, and so on.
The creation of the image will begin, which can be traced by the progress bar. When the image is ready, you need to connect to it via RDP and install an agent that matches the bitness of the OS. After installing the agent, the virtual machine will restart, the Next button will become active.

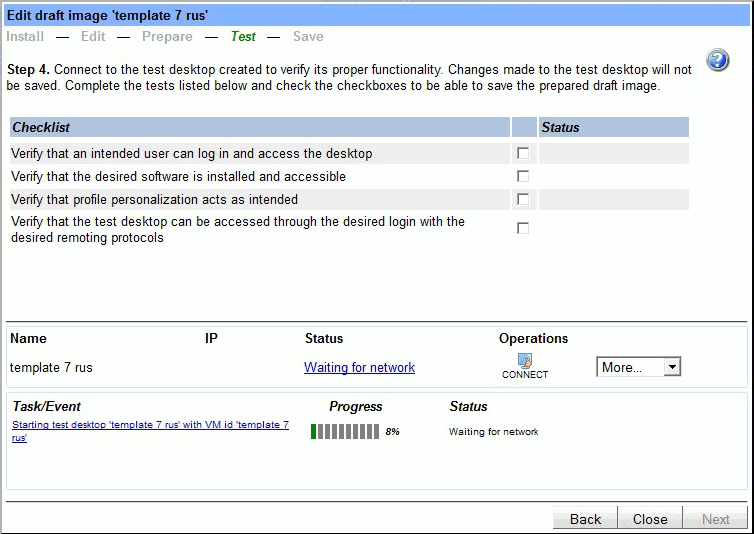
In the next image preparation window, we check connection via RDP and HDX protocol. Also at this step you can install the necessary software or updates.
In the security group 'Direct RDP Access Administrators' we add groups of domain users who will connect to desktops. We make sure that all requirements are satisfied, and check the check boxes. We go further.

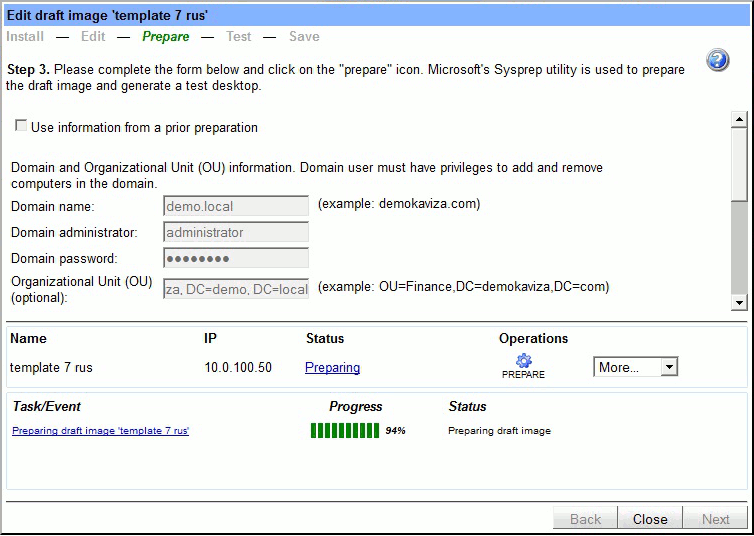
The next step is to run the sysprep utility. We fill in the form data, select the time zone, the prefix of the computer name, the activation method, the reinstallation of the drivers (recommended by default). Click Prepare and wait for sysprep to finish.
Next, we test the image for the availability of the connection and the health of the installed software, again tick the list, click Next and save the "golden" image.
The created image goes into the category of published. Naturally, if necessary, the “golden image” can be edited: add software, install updates, etc. - the procedure is the same.
Step 3. Creating Desktop Templates
To create desktop templates, go to the Templates tab and click the green plus button. In the window that appears, fill in the template name, description fields, choose the image from which the template will be created, set the RAM size (for Windows XP at least 512 MB is recommended, for Windows 7 - from 1536 MB), color depth, maximum number of desktops and number running desktops, select the desktop update mode and click the Save button.

Now go to the Admin tab, click Administer Users and add users or corresponding IDs to ActiveDirectory (for user groups, Administer Groups). The Assign Desktop Templates link is used to assign available templates to users.
Virtual machines are accessed via a browser (http: // [kMGR address] /), a Java client (http: // [kMGR address] /dt/kavizaclient.jnlp) or a Citrix plugin. When using a Java client, the default connection is made via the HDX protocol, if it is not available, then via RDP. In addition, you can connect from mobile devices.
Very short conclusion
Here, in general, and all. As we have seen, Kaviza is really a very simple and easy-to-use product that allows you to customize the delivery of desktops to users in a couple of hours. With the exception of a couple of the nuances described above, I didn’t have any problems in working with Kaviza, which I wish you.
bubarashka
Systems Engineer DEPO Computers
Source: https://habr.com/ru/post/132822/
All Articles