RadioPoint - or my bike in the field of Internet radio
Already a long time ago, when I first encountered the idea of Internet radio, I was upset by the meager availability of the stream creation tools that was available on the market. Either the choice was reduced to the SAM Broadcaster combine, or to a handful of utilities in the format “assemble the config itself”. I also wanted something more convenient than a set of command-line utilities (that is, with a convenient graphical interface), but also easier than SAM. And now, after years, I started writing my bicycle ...

Initially, I had a program that has two main interfaces - it is a “circuit” interface and a “console” interface. The scheme should be something like a block diagram, where each block is a kind of “filter” involved in processing, monitoring or input / output of sound. The console was supposed to be a kind of desktop DJ, where he could manage the filters installed on the scheme (playlist, mixers, etc.).
 It is worth saying that the project is at the very early stage of its existence. At this stage, it is present at the very minimum, but already sufficient to create its small radio station with a playlist and broadcast from the microphone. Below, I just want to consider creating such a scheme using the current version 0.11 from scratch.
When you start the program, the first thing you will see is a concise empty desktop of the scheme. Using the context menu, add the following filters to the schema:

All filters can be dragged freely using the drag-n-drop method, so it’s easy for us to arrange them beautifully. The second item will be the integration of filters in the scheme. Our sound should come from the sources (Input), go to the mixer (Mixer) and go to the output (Output). By clicking the left mouse button on the extreme areas (tinted green) of the filter and dragging the line to the desired extreme area of another filter, we connect them. Almost all input filters can receive only one signal (after connecting the input to such a filter, its input will be tinted red), with the exception of mixers (Mixer) and switching (Switcher).
')

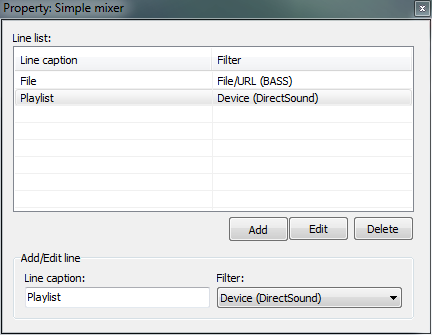
At this stage of the formation of the scheme we are finished. It remains to configure the filters. So, for example, in the mixer filter we need to specify that we are going to process two incoming channels, set the order and names for them (for better understanding) ... with the right button on the filter and “property”. This later (on the remote) will make it easier for us to understand what exactly we are adjusting with a mixer.
In the “Input: Device (DirectSound)” filter, we likewise need to select the sound source in our system, and in the “Output: Device (DirectSound)” filter - where we will output the sound. Next, the “Output: Streaming server” filter needs to be configured. In its settings, we will need to specify the text info about the station, select the encoder (currently only the mp3 encoder works, aac encodes, but does not allow to change the quality of the stream) and the broadcast server (at the moment it is only IceCast v2). In the settings of this filter, you will not find anything new for yourself, with what you would not have seen in programs of a similar sense. The last thing to set up is a filter control. The meaning of this filter is that it controls the rest. So, our playlist filter, tells the file input filter which file to open and when. Go to the “Control: Playlist” settings and specify the “Input: File / URL (BASS)” filter in the “Input 1” form (the “Input 2” and “Switcher” parameters are currently not working).
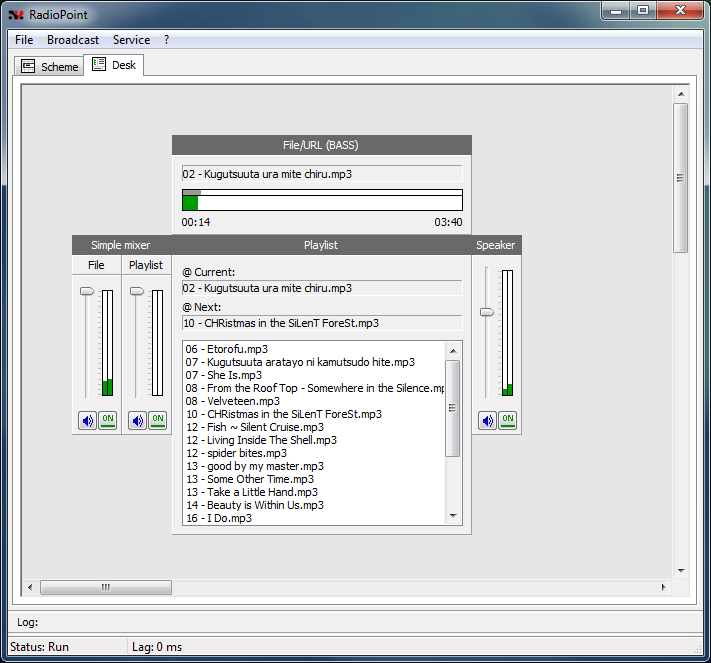
Now it was the turn at the DJ's desk, or as I call it, the “console”. The console, as well as the scheme, is formed in a similar way. By calling the context menu in the “Add” submenu, we see a list of filters already installed on the scheme and some of them have a submenu with the name of the block that can be placed on the console. So we need blocks from the filters “Input: File / URL (BASS)”, “Mixer: Simple Mixer”, “Control: Playlist” and “Filter: Volume”. The installed blocks, like the filters in the diagram, are easily transferred to a convenient place. Those. the appearance of the control panel you form yourself.

And now, in fact, the preparation is over. It remains only to run the necessary accompanying software (Eiskast, and winamp to listen to the eiskast) and click on “Broadcast” -> “Run” (or just F9). After the start of the broadcast, you will not be able to change the location and parameters of the filters, nor will you be able to change the location of the blocks on the remote, but in general, you don’t need to do this during the broadcast))). With the same favorite drag-n-drop method, we throw music into the playlist (or you can do this through the context menu of the playlist) and enjoy the music.
That's actually we finished creating our first station with RadioPoint 0.11.
In the future ... in the future we are waiting for the addition of new filters and the improvement of current ones. For example, a playlist filter will acquire control of two input filters and a switch filter, which will allow creating a “cross-fade” effect when switching tracks. Add filters to switch on the schedule (for example, to display jingles or recorded programs at the exact estimated time), effect filters, etc. So there are far-reaching plans, on dividing the program into the work place of the DJ and the processing server itself, and the processing server is planned to be made available for several platforms (Win / Linux). But this is all the future ... to which you still need to live)))
The latest version of RadioPoint can be downloaded from the project site: radiopoint.org
Or directly at the link: RadioPoint v0.11.0.4102 (zip, 1.7 Mb) (Windows x32)
PS If you have a desire to help morally, with ideas or code, then I ask you to contact the PM, the contacts listed in the profile or the contacts listed on the site.
Initially, I had a program that has two main interfaces - it is a “circuit” interface and a “console” interface. The scheme should be something like a block diagram, where each block is a kind of “filter” involved in processing, monitoring or input / output of sound.
When you start the program, the first thing you will see is a concise empty desktop of the scheme. Using the context menu, add the following filters to the schema:
- Input: File / URL (BASS) / for decoding files from hard disk
- Input: Device (DirectSound) / for voice recording from a microphone
- Mixer: Simple mixer / for mixing what was fed to the input
- Control: Playlist / to control the decoder to read the files we need
- Output: Device (DirectSound) / in order to be able to hear yourself
- Filter: Volume / to control the volume of sound supplied to our speakers (well, not all the same time, we will listen to the broadcast directly)
- Output: Streaming server / output to broadcast server
All filters can be dragged freely using the drag-n-drop method, so it’s easy for us to arrange them beautifully. The second item will be the integration of filters in the scheme. Our sound should come from the sources (Input), go to the mixer (Mixer) and go to the output (Output). By clicking the left mouse button on the extreme areas (tinted green) of the filter and dragging the line to the desired extreme area of another filter, we connect them. Almost all input filters can receive only one signal (after connecting the input to such a filter, its input will be tinted red), with the exception of mixers (Mixer) and switching (Switcher).
')
At this stage of the formation of the scheme we are finished. It remains to configure the filters. So, for example, in the mixer filter we need to specify that we are going to process two incoming channels, set the order and names for them (for better understanding) ... with the right button on the filter and “property”. This later (on the remote) will make it easier for us to understand what exactly we are adjusting with a mixer.
In the “Input: Device (DirectSound)” filter, we likewise need to select the sound source in our system, and in the “Output: Device (DirectSound)” filter - where we will output the sound. Next, the “Output: Streaming server” filter needs to be configured. In its settings, we will need to specify the text info about the station, select the encoder (currently only the mp3 encoder works, aac encodes, but does not allow to change the quality of the stream) and the broadcast server (at the moment it is only IceCast v2). In the settings of this filter, you will not find anything new for yourself, with what you would not have seen in programs of a similar sense. The last thing to set up is a filter control. The meaning of this filter is that it controls the rest. So, our playlist filter, tells the file input filter which file to open and when. Go to the “Control: Playlist” settings and specify the “Input: File / URL (BASS)” filter in the “Input 1” form (the “Input 2” and “Switcher” parameters are currently not working).
Now it was the turn at the DJ's desk, or as I call it, the “console”. The console, as well as the scheme, is formed in a similar way. By calling the context menu in the “Add” submenu, we see a list of filters already installed on the scheme and some of them have a submenu with the name of the block that can be placed on the console. So we need blocks from the filters “Input: File / URL (BASS)”, “Mixer: Simple Mixer”, “Control: Playlist” and “Filter: Volume”. The installed blocks, like the filters in the diagram, are easily transferred to a convenient place. Those. the appearance of the control panel you form yourself.
And now, in fact, the preparation is over. It remains only to run the necessary accompanying software (Eiskast, and winamp to listen to the eiskast) and click on “Broadcast” -> “Run” (or just F9). After the start of the broadcast, you will not be able to change the location and parameters of the filters, nor will you be able to change the location of the blocks on the remote, but in general, you don’t need to do this during the broadcast))). With the same favorite drag-n-drop method, we throw music into the playlist (or you can do this through the context menu of the playlist) and enjoy the music.
That's actually we finished creating our first station with RadioPoint 0.11.
In the future ... in the future we are waiting for the addition of new filters and the improvement of current ones. For example, a playlist filter will acquire control of two input filters and a switch filter, which will allow creating a “cross-fade” effect when switching tracks. Add filters to switch on the schedule (for example, to display jingles or recorded programs at the exact estimated time), effect filters, etc. So there are far-reaching plans, on dividing the program into the work place of the DJ and the processing server itself, and the processing server is planned to be made available for several platforms (Win / Linux). But this is all the future ... to which you still need to live)))
The latest version of RadioPoint can be downloaded from the project site: radiopoint.org
Or directly at the link: RadioPoint v0.11.0.4102 (zip, 1.7 Mb) (Windows x32)
PS If you have a desire to help morally, with ideas or code, then I ask you to contact the PM, the contacts listed in the profile or the contacts listed on the site.
Source: https://habr.com/ru/post/132435/
All Articles