PHP Automated Testing
The work on TDD has obvious advantages: the developer always has a goal clearly described in the form of a test, and he will immediately know when it will be reached.
However, there are some costs: you need to constantly run the same test when there are changes in it or in the appropriate class in order not to miss the very moment of truth. It seems to be not such a big problem, but constant switching to the console to check the changes made to work, and generally remember the need for these manipulations - too much dispersion of attention.
Next on how to automate the whole thing.
A colleague engaged in the development of PHP TDD, looking for an opportunity to automate the launch of tests for the newly modified class, but could not find a complete system that meets his needs, and suggested that I myself create something similar, especially since for other languages this is There are even several options. “Why not?” - I thought, and now I present you the result of my work.
')
You make changes to the file of the class or test being developed and save it. After a few moments, a pop-up message appears with information about the results of the corresponding test.

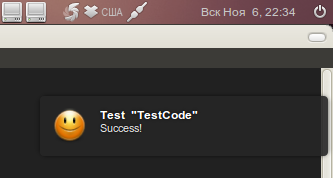
The complete information was deliberately removed with the purpose of reporting only the success or failure of the test, so as not to distract the developer with “unnecessary letters,” especially since he most often anticipates the result of the test.
The system consists of two autotestd and cautotest applications .
autotestd performs the following functions:
cautotest (console autotest) - the console client for autotestd - allows you to send project management commands:
The first step is to download autotestd from this link .
Since this is the very first version of the program and there was still no point in compiling the deb-package, I decided to limit myself to the self-written installation script - install (it is in the archive with the program):
As you can see, all the dependencies are first installed, then directories are created, files are copied and, finally, a link is created to launch the application.
Run the script only from sudo: sudo ./install
After installation, you can run the application itself (preferably in the background): autotestd &
(In the next version I plan to make autotestd a real demon)
Now download the cautotest client
Installation is performed by a similar command: sudo ./install
It's all the same.
The cautotest -h command will display the parameter help.
This is all that is required to get started. Now go to the project directory and execute the following command:
cautotest -a project_name ./application/modules ./tests
IMPORTANT! Comparison of application classes and tests is performed by the class name:
Such naming has been adopted at our work. If it is different for you, you can easily fix this by changing the regular expressions used for matching in the /etc/autotestd/config.ini file.
At this all the preparation ends.
The cautotest -l (“l”) command will output something like this:
Additional information can be obtained with the cautotest -i testp command :
Now try to change any class of your project. When saving, the corresponding test will be run and a message will be displayed.
Both applications are written in Python2.6.
Inotify is used to track file changes and, accordingly, a python bundle: python-pyinotify.
For communication with the client, DBus is used, which makes it possible in the future to quickly and painlessly add other interfaces for project management and feedback.
The system calls phpunit with a specific test file. You can correct the command and add the necessary arguments in the program config.
To store information about projects, sqlite3 is used, sqlalchemy is used to communicate with sqlite.
You have read the first version of AutoTest for PHP. I hope someone will find it useful and brighten up the gray days. :)
Those who want to see some additional functionality, or complain about bugs, please write to the issues sections on githab: autotestd-issues and cautotest-issues .
And the last. Add watchers to projects: this way you will be able to receive notification of changes, and I will see if it is worth developing them (projects) further.
Thanks for attention.
However, there are some costs: you need to constantly run the same test when there are changes in it or in the appropriate class in order not to miss the very moment of truth. It seems to be not such a big problem, but constant switching to the console to check the changes made to work, and generally remember the need for these manipulations - too much dispersion of attention.
Next on how to automate the whole thing.
Why PHP?
A colleague engaged in the development of PHP TDD, looking for an opportunity to automate the launch of tests for the newly modified class, but could not find a complete system that meets his needs, and suggested that I myself create something similar, especially since for other languages this is There are even several options. “Why not?” - I thought, and now I present you the result of my work.
')
What does this look like?
You make changes to the file of the class or test being developed and save it. After a few moments, a pop-up message appears with information about the results of the corresponding test.
The complete information was deliberately removed with the purpose of reporting only the success or failure of the test, so as not to distract the developer with “unnecessary letters,” especially since he most often anticipates the result of the test.
What is needed for this?
The system consists of two autotestd and cautotest applications .
autotestd performs the following functions:
- matches class names with implementation files and test files
- keeps track of file changes
- runs tests and displays messages with the result
- accepts project management teams
cautotest (console autotest) - the console client for autotestd - allows you to send project management commands:
- getting information about active projects
- adding a new project
- project change
- project deletion
autotestd
The first step is to download autotestd from this link .
Since this is the very first version of the program and there was still no point in compiling the deb-package, I decided to limit myself to the self-written installation script - install (it is in the archive with the program):
#!/bin/bash apt-get install python2.6 python-sqlalchemy sqlite3 inotify-tools python-pyinotify python-dbus libnotify-bin python-notify mkdir /etc/autotestd cp config.ini /etc/autotestd/ chmod a+w /etc/autotestd mkdir /usr/share/autotestd cp ./*.py /usr/share/autotestd/ ln -s /usr/share/autotestd/autotestd.py /usr/local/bin/autotestd As you can see, all the dependencies are first installed, then directories are created, files are copied and, finally, a link is created to launch the application.
Run the script only from sudo: sudo ./install
After installation, you can run the application itself (preferably in the background): autotestd &
(In the next version I plan to make autotestd a real demon)
cautotest
Now download the cautotest client
Installation is performed by a similar command: sudo ./install
#!/bin/bash apt-get install python2.6 python-dbus mkdir /usr/share/cautotest cp ./*.py /usr/share/cautotest/ ln -s /usr/share/cautotest/main.py /usr/local/bin/cautotest It's all the same.
The cautotest -h command will display the parameter help.
This is all that is required to get started. Now go to the project directory and execute the following command:
cautotest -a project_name ./application/modules ./tests
- -a is a parameter indicating that we are adding a project.
- project_name - the name of the project under which it will be registered in autotestd
- ./application/modules - path to the directory containing the classes of your application (classes are searched recursively, starting from this directory)
- ./tests - path to the directory containing the tests
IMPORTANT! Comparison of application classes and tests is performed by the class name:
//MyClass.php class MyClass extends XXX { }; //MyClassTest.php class MyClassTest extends UnitTest { }; Such naming has been adopted at our work. If it is different for you, you can easily fix this by changing the regular expressions used for matching in the /etc/autotestd/config.ini file.
At this all the preparation ends.
The cautotest -l (“l”) command will output something like this:
hdg700@laptop:~$ cautotest -l
Active projects:
- testp
Use '-i project_name' for more information
Additional information can be obtained with the cautotest -i testp command :
hdg700@laptop:~$ cautotest -i testp
Project: testp
Code dir: /home/hdg700/work/testproj/code/
Test dir: /home/hdg700/work/testproj/test/
Classes: 1
Tests: 1
Now try to change any class of your project. When saving, the corresponding test will be run and a message will be displayed.
How it works?
Both applications are written in Python2.6.
Inotify is used to track file changes and, accordingly, a python bundle: python-pyinotify.
For communication with the client, DBus is used, which makes it possible in the future to quickly and painlessly add other interfaces for project management and feedback.
The system calls phpunit with a specific test file. You can correct the command and add the necessary arguments in the program config.
To store information about projects, sqlite3 is used, sqlalchemy is used to communicate with sqlite.
What is interesting turned out while working?
- Launching external programs: if you do not intercept the stdin, stdout and stderr of the program being run, then when your application is running in the background (autotest &), its execution stops at the start of the external program until you do fg. This feature pretty much patted my nerves, but in the end everything turned out to be logical: you just need to intercept stdin, stdout and stderr.
- The DBus Session bus runs in the environment of a single user, therefore applications using it must be launched from a single user (tautology to increase attention :). When translating autotestd to daemon mode, you will need to use the system bus.
PS
You have read the first version of AutoTest for PHP. I hope someone will find it useful and brighten up the gray days. :)
Those who want to see some additional functionality, or complain about bugs, please write to the issues sections on githab: autotestd-issues and cautotest-issues .
And the last. Add watchers to projects: this way you will be able to receive notification of changes, and I will see if it is worth developing them (projects) further.
Thanks for attention.
Source: https://habr.com/ru/post/132102/
All Articles