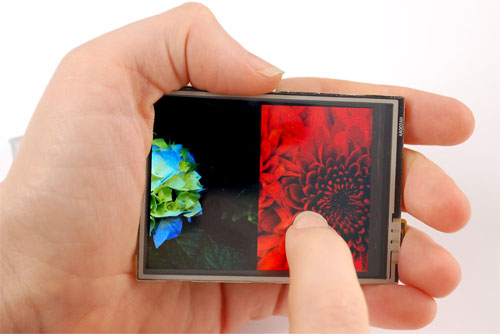
Microtouch
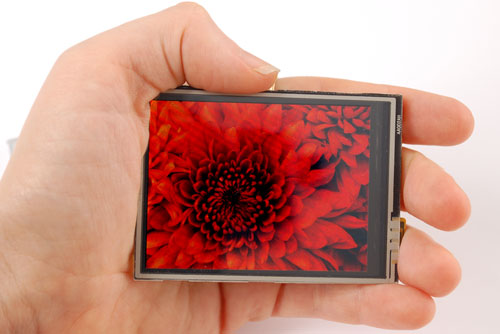
Yes, iTouch is awesome. But who needs such a "closed" device? Maybe it's better to make your touchscreen gadget, write your own programs - all using free hardware and software? Well, yes, let this gadget not be able to play MP3, but it has a color touch (resistive) TFT screen of 320x240 pixels, an 8-bit Atmega32u4 microcontroller, a charger for lithium-polymer batteries, a backlight control, a microSD connector and a three-axis accelerometer. A curious little thing, especially for those who like to do something with their own hands, what do you think?
Of course, one scheme and good luck is not enough. Therefore, the creator of microtouch (which we know by the code name " Rossum ") wrote an operating system and several demo applications , for example:
The project is the result of a collaboration between Rossum and Ladyada, developed in California and New York.
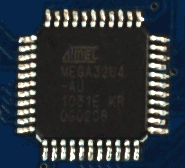
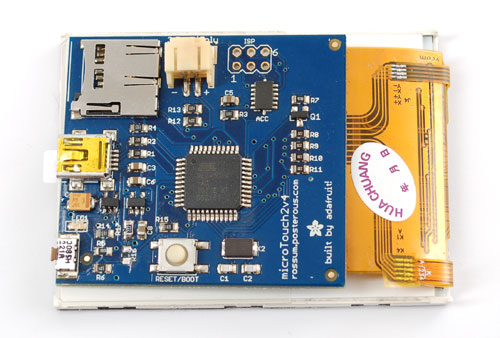
The brain of the Microtouch is the Atmega32u4 in the TQFP package. The chip has built-in USB support and a lot of contacts.
')

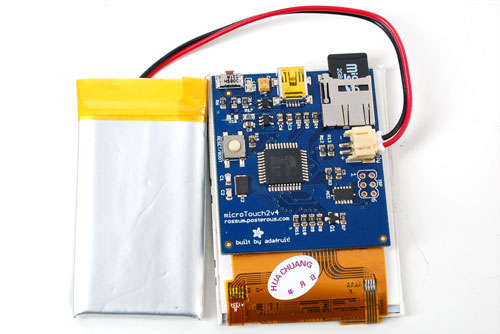
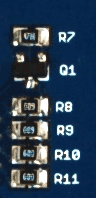
The board has a 3.7 volt lithium polymer battery charger (MCP73812). The battery must be connected to a 2-pin JST-PH, not forgetting to check the polarity before connecting. The charger chip is very simple, but it charges the battery normally. The charging current is about 250 mA, so do not turn it on to the hub without additional power. Normally it will be charged from any computer. Unfortunately, there is no (for example, LED) notification that the battery has been charged, but you can determine the status of the battery through the microcontroller's ADC. You can change the charge current by changing the resistance R17. Read the datasheet for MCP73812 to find a resistor for the desired charge current.
Battery pins (or USB) connect to LP2985 3.3v LDO. This regulator is of very good quality, yields about 1% error and a current up to 150 milliamperes. In the microtouch circuit, 4 LEDs of the backlight are consumed most of all (up to 80 mA total). In addition, a microcontroller eats 10–20 mA, about 20 mA takes a TFT, and another 2 mA eats a red LED. Accelerometer practically does not consume energy.

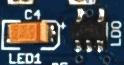
This LED is connected to PC7 pin and is used to indicate bootloader activity. You can use it as you like.
The frequency of the crystal oscillator is 16 MHz. This is a small Atmel overclocking (at 3.3V it is better to use the frequency of 12 MHz); We check the chips for performance before shipping. The reason for overclocking is to enable a quick GUI. Next to quartz, two stabilizing capacitors are installed.
Microtouch uses a trick that allows it to power off when powered by battery. An LDO has an “Enable” output, which is shorted to common (that is, LDO is disabled by default). When the rectangular power button is pressed, the LDO turns on, which turns on the AVR. The first thing that the AVR does is to give the “Enable” pin (it is connected to PF0) a high logic level. When the power button is released, this output will keep the LDO running. This means that if you are writing your code for Microtouch, first of all make sure that PF0 is in output mode and feed a high logic level to it.
Accordingly, to turn itself off, the controller can lower the PF0 to a low level. The user will have to press the power button again to turn on the microtouch again. You should not do this when the device is powered by USB, because the bootloader may hang. Clicking on “reset” will take the device out of the hung state.
A reset button is connected to the AVR's reset pin. It can be used to start the bootloader. If you overwrite the bootloader, it will simply restart the device.
AVR can be reflash with any standard AVR programmer, avrdude or something similar. During the firmware, do not forget to keep the power button pressed, or connect the device to miniUSB, or power up (3.3 volts) from the programmer. Make sure the power supply is actually 3.3 volts. USBtinyISP, for example, gives 5 volts, and such a voltage can damage the screen.
The screen is backlit using 4 white LEDs connected in parallel. We use 22-68 Ohm resistors (68 in the image, the value may vary depending on the screen model) at each cathode. The cathodes are connected to PC6 pin. You can change the backlight by changing the voltage at the output. When the backlight is off, nothing is visible on the screen.
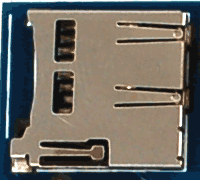
MicroSD and microSDHC flash cards are supported.

To obtain data on the movement on the microtouch board there is an accelerometer MMA7455. Accelerometer can detect movement and shaking. It can be configured from + -2g (for high accuracy) to + -8g. No need to throw Microtouch to test accelerometer! It is better to use the Accelerate application for this.
You can use the USB connector to download the new firmware in the microtouch. The loader takes 4 KB of memory. The bootloader itself can be overwritten using the AVR ISP programmer.
Another USB port can be used to charge the battery. You can run Microtouch from USB, but since the charger is connected directly to the LDO, the USB port will not be able to provide the necessary 100-150 mA. As a result, the core will detect that the voltage is too low and reduce the backlight brightness. That is why the screen is not as bright as when powered by battery.
To use microtouch, you do not need an AVR programmer, because the microtouch already has a boot loader flashed! The bootloader is activated by pressing the “Reset / Boot” button when USB is connected. You can determine the activity of the loader by the flickering of the green “Boot” LED. After that, the board will be defined as a COM port, and avrdude can be used for firmware. The name of the programmer is avr109, that is, for example, to check the bootloader, run avrdude -p m32u4 -P COM3 -c avr109

Soon the loader will issue a timeout (after about 5 seconds). Since we do not use the USB / Serial converter, the firmware is very fast. You can flash the entire controller in less than 2 seconds!
The bootloader occupies the top 4 KB of FLASH memory, so keep in mind that you only have 28 KB instead of 32. We believe that this is not very scary, and 28 KB is not so little. If you need more free space, you can always use an ISP connector and an AVR programmer (which will erase the bootloader).
If you are using Windows, then you will need an inf-file. The Apple and Linux users do not need to worry about anything, because the device will be defined as / dev / ttyUSB * or / dev / cu * (you can check it with the help of dmesg ).
To exit the program, you need to click on the dark part of the screen, below the image on the screen.
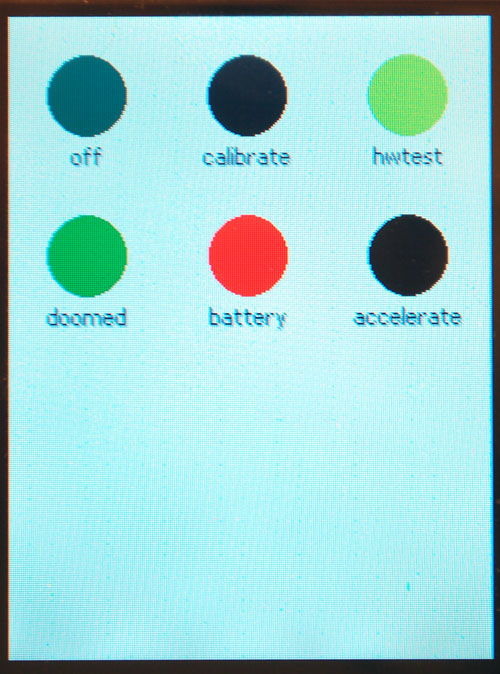
On the main screen shows the program, stitched in microtouch. Programs are selected by touching your finger to the desired circle.
Microtouch can be used to view images by converting images to im2 format (which is more convenient to draw on the screen). The converter can be found in the github repository. Place the images in the root folder of the microSD card and insert the card into the microtouch. After turning on the device, you will see icons for images. Click on the circle to view any. You can "drag" the image with your finger.
<
Icons for files on a flash drive are sometimes not shown after downloading, if the volume of the card is 2GB or more. If the image icons do not appear, launch the HWTest application and make sure that everything is in order with the USB flash drive. After exiting HWTest icons should appear.
The application Off (you will never guess) turns off your device. The device will not turn off if connected to USB.
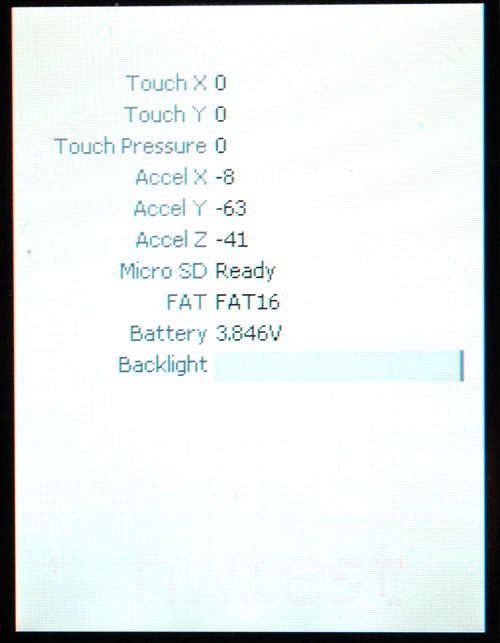
With this application you can check the battery voltage, backlight, touchscreen, accelerometer and SD card. You can also change the brightness of the backlight.

Doomed is a simple 3D engine. You can move around the map by touching the part of the screen in the direction you want to move.

This app is used to calibrate the touch screen. Calibration is stored permanently in EEPROM. Touch the centers with the dials.
This application is used to calibrate the touchscreen: you need to touch the centers of the circles with your finger or stylus. Calibration can only be performed once per device lifetime: calibration data is stored directly in the EEPROM.
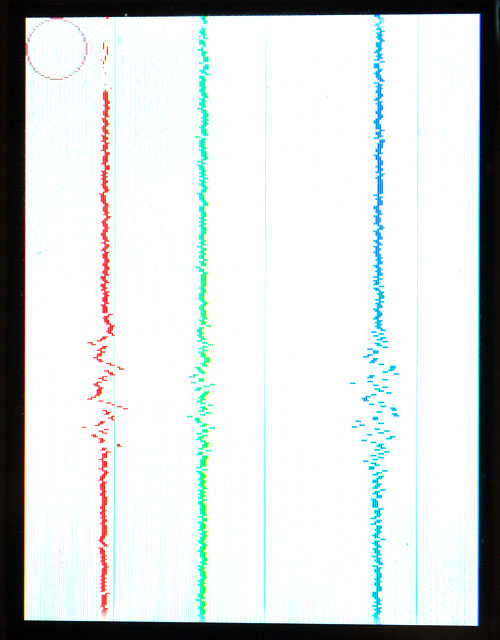
This application uses a three-axis accelerometer to move the ball around the screen, and also displays a "cardiogram" of read data. The ball moves when you shake the device.
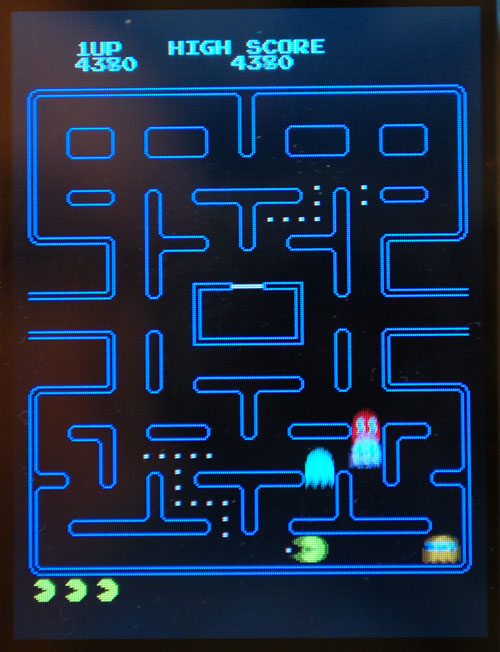
A small cute program that demonstrates Packman's sprite animation (for now, you can't play Peckman).
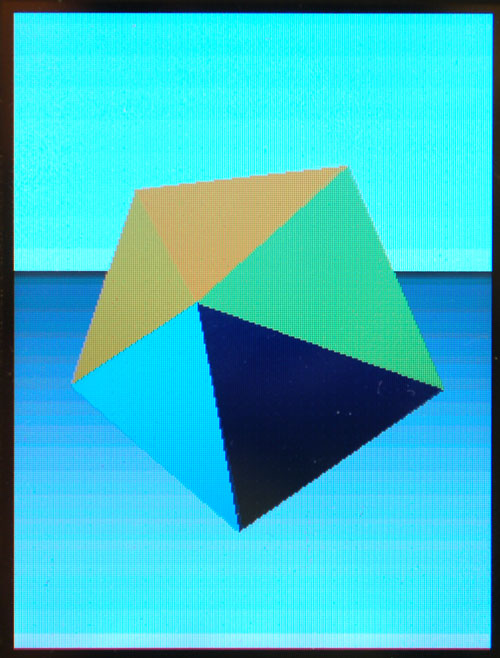
This program draws a three-dimensional icosahedron on the screen. The figure responds to the accelerometer, it can be rotated by shaking the device.
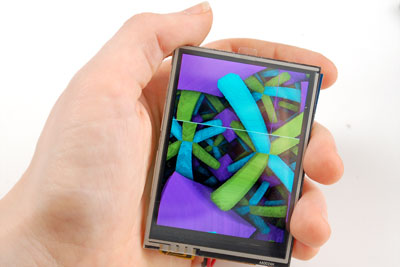
Another 3D application.
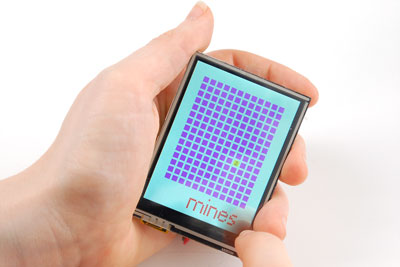
Click on the squares, beware of the min! One-to-one as Minesweeper, but do not need to install Windows.
You can draw on the screen with your finger.
Single player game similar to Go. The game ends when all the tiles are painted in the same color.
If you want to develop programs for microtouch, then you need AVR-gcc.
Translator's note: today there is an official website of the project at sourceforge and an application for reading electronic books in the epub format. The gadget can be collected by yourself or purchased in online stores.
Of course, one scheme and good luck is not enough. Therefore, the creator of microtouch (which we know by the code name " Rossum ") wrote an operating system and several demo applications , for example:
- Image viewer - you can insert microSD with images, slide shows or animations, and they will be shown as "mini-programs"
- Calibrate - touch screen calibration
- Doomed - a three-dimensional maze
- Accelerate - you need to keep the ball in the center of the screen using the accelerometer
- Paint - drawing with your fingers without the possibility of cleaning the screen
- Flip - Reversi game
- Minesweeper - Minesweeper for which windows do not need to be installed
- 3D Icosohedron - a three-dimensional icosahedron controlled by an accelerometer
- Pacman - demonstration of sprite animation
- Lattice - demonstration of the three-dimensional grid
The project is the result of a collaboration between Rossum and Ladyada, developed in California and New York.
Hardware design
Microcontroller
The brain of the Microtouch is the Atmega32u4 in the TQFP package. The chip has built-in USB support and a lot of contacts.
')
Lithium polymer battery and charger
The board has a 3.7 volt lithium polymer battery charger (MCP73812). The battery must be connected to a 2-pin JST-PH, not forgetting to check the polarity before connecting. The charger chip is very simple, but it charges the battery normally. The charging current is about 250 mA, so do not turn it on to the hub without additional power. Normally it will be charged from any computer. Unfortunately, there is no (for example, LED) notification that the battery has been charged, but you can determine the status of the battery through the microcontroller's ADC. You can change the charge current by changing the resistance R17. Read the datasheet for MCP73812 to find a resistor for the desired charge current.
Power supply (3.3 volts)
Battery pins (or USB) connect to LP2985 3.3v LDO. This regulator is of very good quality, yields about 1% error and a current up to 150 milliamperes. In the microtouch circuit, 4 LEDs of the backlight are consumed most of all (up to 80 mA total). In addition, a microcontroller eats 10–20 mA, about 20 mA takes a TFT, and another 2 mA eats a red LED. Accelerometer practically does not consume energy.
Led indicator
This LED is connected to PC7 pin and is used to indicate bootloader activity. You can use it as you like.
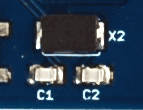
Quartz
The frequency of the crystal oscillator is 16 MHz. This is a small Atmel overclocking (at 3.3V it is better to use the frequency of 12 MHz); We check the chips for performance before shipping. The reason for overclocking is to enable a quick GUI. Next to quartz, two stabilizing capacitors are installed.
Power button (or How does this gizmo turn on?)
Microtouch uses a trick that allows it to power off when powered by battery. An LDO has an “Enable” output, which is shorted to common (that is, LDO is disabled by default). When the rectangular power button is pressed, the LDO turns on, which turns on the AVR. The first thing that the AVR does is to give the “Enable” pin (it is connected to PF0) a high logic level. When the power button is released, this output will keep the LDO running. This means that if you are writing your code for Microtouch, first of all make sure that PF0 is in output mode and feed a high logic level to it.
Accordingly, to turn itself off, the controller can lower the PF0 to a low level. The user will have to press the power button again to turn on the microtouch again. You should not do this when the device is powered by USB, because the bootloader may hang. Clicking on “reset” will take the device out of the hung state.
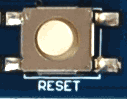
Reset button
A reset button is connected to the AVR's reset pin. It can be used to start the bootloader. If you overwrite the bootloader, it will simply restart the device.
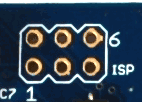
ISP connector
AVR can be reflash with any standard AVR programmer, avrdude or something similar. During the firmware, do not forget to keep the power button pressed, or connect the device to miniUSB, or power up (3.3 volts) from the programmer. Make sure the power supply is actually 3.3 volts. USBtinyISP, for example, gives 5 volts, and such a voltage can damage the screen.
Screen backlight
The screen is backlit using 4 white LEDs connected in parallel. We use 22-68 Ohm resistors (68 in the image, the value may vary depending on the screen model) at each cathode. The cathodes are connected to PC6 pin. You can change the backlight by changing the voltage at the output. When the backlight is off, nothing is visible on the screen.
microSD / transflash
MicroSD and microSDHC flash cards are supported.
Three Axis Accelerometer
To obtain data on the movement on the microtouch board there is an accelerometer MMA7455. Accelerometer can detect movement and shaking. It can be configured from + -2g (for high accuracy) to + -8g. No need to throw Microtouch to test accelerometer! It is better to use the Accelerate application for this.
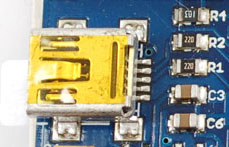
USB
You can use the USB connector to download the new firmware in the microtouch. The loader takes 4 KB of memory. The bootloader itself can be overwritten using the AVR ISP programmer.
Another USB port can be used to charge the battery. You can run Microtouch from USB, but since the charger is connected directly to the LDO, the USB port will not be able to provide the necessary 100-150 mA. As a result, the core will detect that the voltage is too low and reduce the backlight brightness. That is why the screen is not as bright as when powered by battery.
Loader
To use microtouch, you do not need an AVR programmer, because the microtouch already has a boot loader flashed! The bootloader is activated by pressing the “Reset / Boot” button when USB is connected. You can determine the activity of the loader by the flickering of the green “Boot” LED. After that, the board will be defined as a COM port, and avrdude can be used for firmware. The name of the programmer is avr109, that is, for example, to check the bootloader, run avrdude -p m32u4 -P COM3 -c avr109
Soon the loader will issue a timeout (after about 5 seconds). Since we do not use the USB / Serial converter, the firmware is very fast. You can flash the entire controller in less than 2 seconds!
The bootloader occupies the top 4 KB of FLASH memory, so keep in mind that you only have 28 KB instead of 32. We believe that this is not very scary, and 28 KB is not so little. If you need more free space, you can always use an ISP connector and an AVR programmer (which will erase the bootloader).
If you are using Windows, then you will need an inf-file. The Apple and Linux users do not need to worry about anything, because the device will be defined as / dev / ttyUSB * or / dev / cu * (you can check it with the help of dmesg ).
Programs!
To exit the program, you need to click on the dark part of the screen, below the image on the screen.
Main menu
On the main screen shows the program, stitched in microtouch. Programs are selected by touching your finger to the desired circle.
Image viewer (built-in image viewer)
Microtouch can be used to view images by converting images to im2 format (which is more convenient to draw on the screen). The converter can be found in the github repository. Place the images in the root folder of the microSD card and insert the card into the microtouch. After turning on the device, you will see icons for images. Click on the circle to view any. You can "drag" the image with your finger.
<Icons for files on a flash drive are sometimes not shown after downloading, if the volume of the card is 2GB or more. If the image icons do not appear, launch the HWTest application and make sure that everything is in order with the USB flash drive. After exiting HWTest icons should appear.
Off
The application Off (you will never guess) turns off your device. The device will not turn off if connected to USB.
HW Test
With this application you can check the battery voltage, backlight, touchscreen, accelerometer and SD card. You can also change the brightness of the backlight.
Doomed
Doomed is a simple 3D engine. You can move around the map by touching the part of the screen in the direction you want to move.
Calibrate app
This app is used to calibrate the touch screen. Calibration is stored permanently in EEPROM. Touch the centers with the dials.
This application is used to calibrate the touchscreen: you need to touch the centers of the circles with your finger or stylus. Calibration can only be performed once per device lifetime: calibration data is stored directly in the EEPROM.
Accelerate app
This application uses a three-axis accelerometer to move the ball around the screen, and also displays a "cardiogram" of read data. The ball moves when you shake the device.
PacMan App
A small cute program that demonstrates Packman's sprite animation (for now, you can't play Peckman).
Icosohedron app
This program draws a three-dimensional icosahedron on the screen. The figure responds to the accelerometer, it can be rotated by shaking the device.
Lattice App
Another 3D application.
Mines app
Click on the squares, beware of the min! One-to-one as Minesweeper, but do not need to install Windows.
Paint app
You can draw on the screen with your finger.
Flip app
Single player game similar to Go. The game ends when all the tiles are painted in the same color.
Download
- PCBs in EagleCAD format are located in the gafub repository of the developer Adafruit (distributed under terms similar to Creative Commons Attrib / Share)
- The firmware code and image converter are in the Rossum developer github repository (MIT licensing)
- INF file to support the bootloader in Windows
If you want to develop programs for microtouch, then you need AVR-gcc.
Translator's note: today there is an official website of the project at sourceforge and an application for reading electronic books in the epub format. The gadget can be collected by yourself or purchased in online stores.
Source: https://habr.com/ru/post/131430/
All Articles