Installer Miranda for corporate Jabber'a on NSIS
Good day! Probably many had to collect small installers of various software for their needs or the needs of the employer company. In my work, I have to deal with the most diverse tasks of writing any small admin software. Starting from the firewall configuration scripts and the VNC service installer to the corporate messenger installer based on Miranda. At the last we will stop today. By implementing login and password input directly to the installer, by calling “Page custom” and working with NSD functionality

So. Our task is to create an installer with a login and password during installation. For the formation of the interface we will use NSISDialogDesigner. I highly recommend this software to simplify the creation of your pages in the installer. The program is completely free and has a large set of functionality. On the left is a set of controls, on the right are the properties of the elements and the window itself, below is the ready code for insertion into NSIS, it is formed in real time.
')
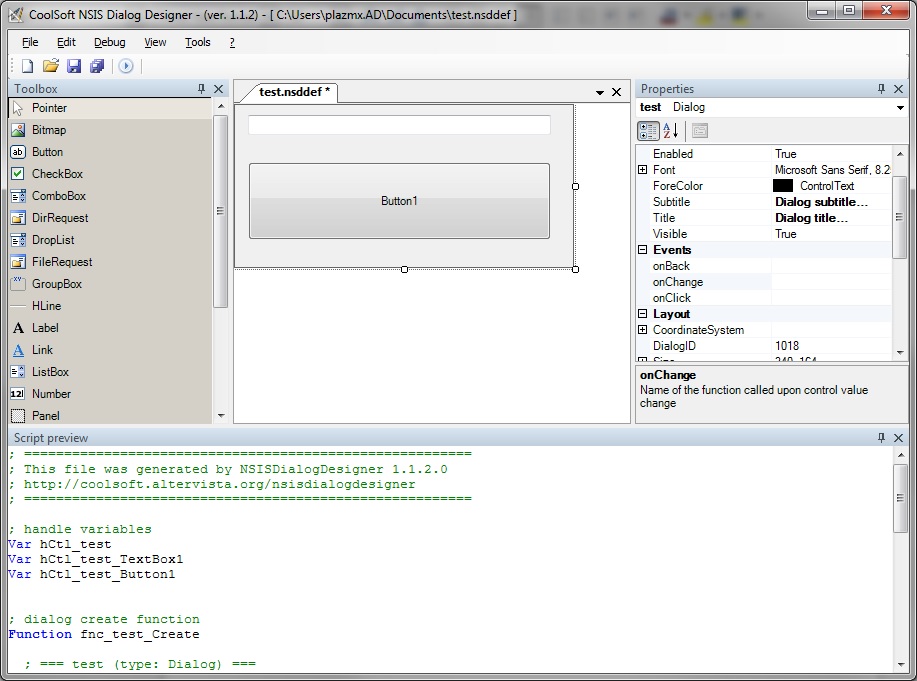
You will make life easier specifying the performance of the necessary functions directly in NSISDialogDesigner. This will be useful for creating more complex interfaces in multiple pages. Because To dig into this code already in NSIS is quite tedious.
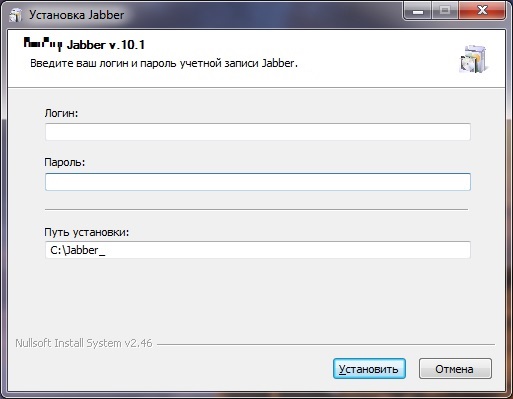
I will not list all the creation steps. At the exit, we should get this interface. The input field is specially made by my usual test field. But of course you can use the password entry field to hide characters.
Next, insert the generated code into the NSIS project. And enter your page in the list. My description of MUI elements in this case looks like this. You will find the complete nsi file at the end of the post.
! define MUI_ICON "D: \ Jabber_2013 \ ico.ico"
! insertmacro MUI_LANGUAGE "Russian"
Page custom fnc_Jabber_2013_Show
! insertmacro MUI_PAGE_INSTFILES
Next we have to organize work with interface variables. I tell you right away that it’s just that you don’t get
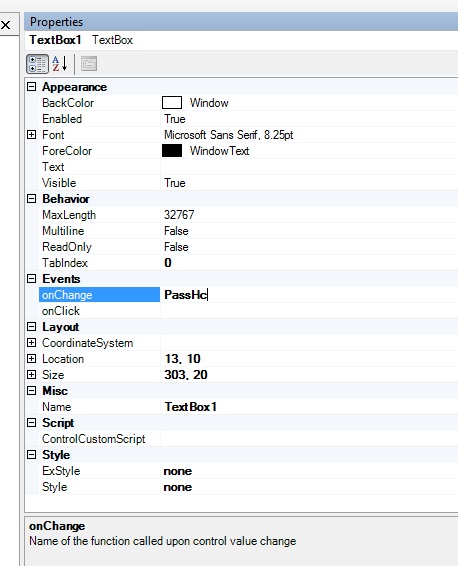
Next, we write the change processing functions inside our TextBox. I look like this.
Function PatchCh1
$ {NSD_GetText} $ hCtl_Jabber_2013_TextBox1 $ 4
$ {NSD_SetText} $ hCtl_Jabber_2013_TextBox3 C: \ Jabber_ $ 4
$ {NSD_GetText} $ hCtl_Jabber_2013_TextBox2 $ 5
$ {NSD_GetText} $ hCtl_Jabber_2013_TextBox3 $ 3
FunctionEnd
Function PatchCh2
$ {NSD_GetText} $ hCtl_Jabber_2013_TextBox2 $ 5
FunctionEnd
Function PatchCh3
$ {NSD_GetText} $ hCtl_Jabber_2013_TextBox3 $ 3
FunctionEnd
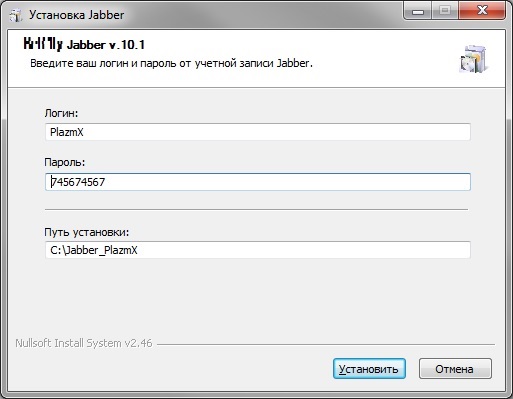
As you can see, proceeding from the login, the installation path will automatically change. PatchCh2 and PatchCh3 are needed to get the password variables and the installation path itself.
Next we have the installation section.
Section "Jabber"
SetOutPath "$ 3"
File / r "D: \ Jabber_2013 \ Jabber \ *"
CreateShortCut "$ DESKTOP \ $ 4.lnk" "$ 3 \ miranda32.exe"
$ {WriteToFile} `$ 3 \ pass.x`` $ 5`
$ {WriteToFile} `$ 3 \ logg.x`` $ 4`
nsExec :: Exec "$ 3 \ start.bat"
SectionEnd
To generate autoexec.ini and write the password and login to it, I use the script under sed. I attach it with the source. If someone can offer a more elegant way, I will be very grateful. Because Now it looks like this:
start.bat contains
Set / p logg = <logg.x
sed -rf too.sed pass.x> pass_clear.x
echo [JABBER]> autoexec.ini
echo LoginName = s% logg% >> autoexec.ini
echo jid = s% logg% server.com >> autoexec.ini
sed -f dop.sed pass_clear.x >> autoexec.ini
too.sed contains amagic spell :
y / `0123456789 - = \\ qwertyuiop [] asdfghjkl; 'zxcvbnm,. \ / ~! @ # $% ^ & * () _ + | QWERTYUIOP {} ASDFGHJKL:" ZXCVBNM <>? / e56789:; <=> 2Bav | jwy ~ zntu`bfxiklmopq @,} h {gsr134% ѓ & E () * c + \ / -. D0ЃV \\ JWY ^ ZNTUFXIKLMOPQ? '_] H [GSRACD /
Explain autoexec.ini is the Miranda auto configuration file. In it, you can specify a login (in open form), a password (in encrypted form), a jid for the connection and some other settings.
As a result, we get something like this:
Project files
I hope someone this record is useful. Thank!
So. Our task is to create an installer with a login and password during installation. For the formation of the interface we will use NSISDialogDesigner. I highly recommend this software to simplify the creation of your pages in the installer. The program is completely free and has a large set of functionality. On the left is a set of controls, on the right are the properties of the elements and the window itself, below is the ready code for insertion into NSIS, it is formed in real time.
')
You will make life easier specifying the performance of the necessary functions directly in NSISDialogDesigner. This will be useful for creating more complex interfaces in multiple pages. Because To dig into this code already in NSIS is quite tedious.
I will not list all the creation steps. At the exit, we should get this interface. The input field is specially made by my usual test field. But of course you can use the password entry field to hide characters.
Next, insert the generated code into the NSIS project. And enter your page in the list. My description of MUI elements in this case looks like this. You will find the complete nsi file at the end of the post.
! define MUI_ICON "D: \ Jabber_2013 \ ico.ico"
! insertmacro MUI_LANGUAGE "Russian"
Page custom fnc_Jabber_2013_Show
! insertmacro MUI_PAGE_INSTFILES
Next we have to organize work with interface variables. I tell you right away that it’s just that you don’t get
hCtl_Jabber_2013_TextBox1 to get the text typed inside. For this we need to use ${NSD_GetText} $hCtl_Jabber_2013_TextBox1 $0 command ${NSD_SetText} $hCtl_Jabber_2013_TextBox1 $0 we can send our variable inside TextBox1. With NSD, you can use other element parameters, such as visibility or style / color.Next, we write the change processing functions inside our TextBox. I look like this.
Function PatchCh1
$ {NSD_GetText} $ hCtl_Jabber_2013_TextBox1 $ 4
$ {NSD_SetText} $ hCtl_Jabber_2013_TextBox3 C: \ Jabber_ $ 4
$ {NSD_GetText} $ hCtl_Jabber_2013_TextBox2 $ 5
$ {NSD_GetText} $ hCtl_Jabber_2013_TextBox3 $ 3
FunctionEnd
Function PatchCh2
$ {NSD_GetText} $ hCtl_Jabber_2013_TextBox2 $ 5
FunctionEnd
Function PatchCh3
$ {NSD_GetText} $ hCtl_Jabber_2013_TextBox3 $ 3
FunctionEnd
As you can see, proceeding from the login, the installation path will automatically change. PatchCh2 and PatchCh3 are needed to get the password variables and the installation path itself.
Next we have the installation section.
Section "Jabber"
SetOutPath "$ 3"
File / r "D: \ Jabber_2013 \ Jabber \ *"
CreateShortCut "$ DESKTOP \ $ 4.lnk" "$ 3 \ miranda32.exe"
$ {WriteToFile} `$ 3 \ pass.x`` $ 5`
$ {WriteToFile} `$ 3 \ logg.x`` $ 4`
nsExec :: Exec "$ 3 \ start.bat"
SectionEnd
To generate autoexec.ini and write the password and login to it, I use the script under sed. I attach it with the source. If someone can offer a more elegant way, I will be very grateful. Because Now it looks like this:
start.bat contains
Set / p logg = <logg.x
sed -rf too.sed pass.x> pass_clear.x
echo [JABBER]> autoexec.ini
echo LoginName = s% logg% >> autoexec.ini
echo jid = s% logg% server.com >> autoexec.ini
sed -f dop.sed pass_clear.x >> autoexec.ini
too.sed contains a
y / `0123456789 - = \\ qwertyuiop [] asdfghjkl; 'zxcvbnm,. \ / ~! @ # $% ^ & * () _ + | QWERTYUIOP {} ASDFGHJKL:" ZXCVBNM <>? / e56789:; <=> 2Bav | jwy ~ zntu`bfxiklmopq @,} h {gsr134% ѓ & E () * c + \ / -. D0ЃV \\ JWY ^ ZNTUFXIKLMOPQ? '_] H [GSRACD /
Explain autoexec.ini is the Miranda auto configuration file. In it, you can specify a login (in open form), a password (in encrypted form), a jid for the connection and some other settings.
As a result, we get something like this:
Project files
I hope someone this record is useful. Thank!
Source: https://habr.com/ru/post/131231/
All Articles