Use Storyboard
Introduction
In the recently released iOS 5, a convenient mechanism for developing the program's interface appeared - Storyboard . This mechanism allows you to significantly reduce the amount of code associated with transitions between screens, Popover shows, and even with the setting of cells in the table.
Task: By clicking on the button show the next screen by placing it in the current NavigationController.
Solution without Storyboard:
DDetailViewController* nextController = [DDetailViewController new]; [self.navigationController pushViewController:nextController animated:YES]; [nextController release]; Storyboard Solution:
')
That's all! No code!
How it works
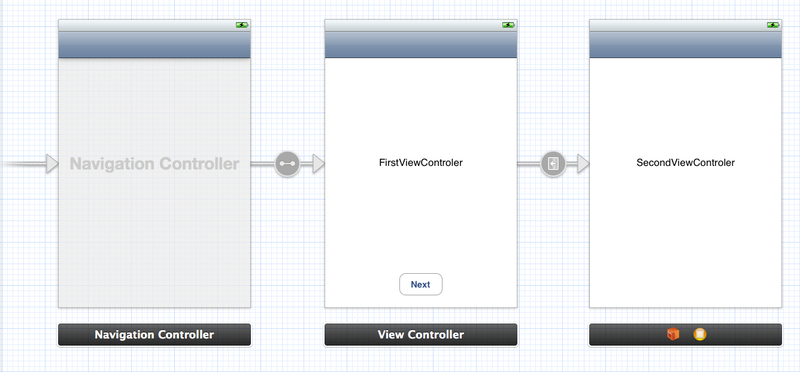
The project creates a .storyboard file and loads the entire interface from it. This scene is described inside this file.

Such an arrow points to the very first screen that will be visible when the program is turned on. It is added automatically, after adding the very first controller to the Storyboard, in the future you can drag it onto any other controller, thereby making it the first one.
This arrow describes the relationships between the controllers, in this case the rootViewController NavigationController corresponds to FirstViewController. This connection can be set in the same way as the connections of outlets and actions are set (for example, you can draw a line from one controller to another with Ctrl pressed).
Such an arrow indicates a switch to another controller. Such a transition can be easily set in the same way as in the previous cases, the beginning of a connection can go immediately from the desired interface element - buttons, table cells, and so on. She has the settings - ID and type of transition.
At first glance, everything seems to be very trivial, but the question immediately arises: what to do if you need to transfer data when switching from one controller to another?
Screen capture
Each transition between controllers is described by the UIStoryboardSegue class, in its interface there are only three properties: identifier , sourceViewController , destinationViewController . It is this class that will be passed to our method.
- (void)prepareForSegue:(UIStoryboardSegue*)segue sender:(id)sender This method will be called on the controller from which the transition was started, in our case it will be FirstViewController. We define it as follows:
- (void)prepareForSegue:(UIStoryboardSegue*)segue sender:(id)sender { if ([[segue identifier] isEqualToString:@"showDetail"]) { [[segue destinationViewController] setText:@"SecondViewController"]; } else { [super prepareForSegue:segue sender:sender]; } } The identifier value was specified in the transition settings.
IPad Storyboard
In the iPhone, only one scene can be performed at a time, then there are exceptions on the iPad in the form of popovers. To show the popover, the UIStoryboardPopoverSegue class is used , which is a descendant of the UIStoryboardSegue . In this class, one property has been added - popoverController , which always returns a popover in which the current scene is shown.
Code mix
Not all situations transitions can be described in the Storyboard. In this case, you can mix Storyboard with the old, familiar methods of display and transition between controllers. There are some minor simplifications too:
- The UIViewController class has new methods and properties for working with Storyboard, one of them is the storyboard , which returns the current Storyboard of the scene.
- If a transition is already in Storyboard and an identifier is given to it, then the transition can be called using the following method belonging to the UIViewController:
- (void)performSegueWithIdentifier:(NSString*)identifier sender:(id)sender - If the transition is not described in the Storyboard, but the controller is described, then you can call it using the method belonging to the UIStoryboard:
- (id)instantiateViewControllerWithIdentifier:(NSString*)identifier - In other cases, you can use the old methods.
Nice little thing
As promised at the very beginning of the article, it is now possible to customize UITableViewCell directly in the storyboard! You can either choose from ready-made cell types or make your own!
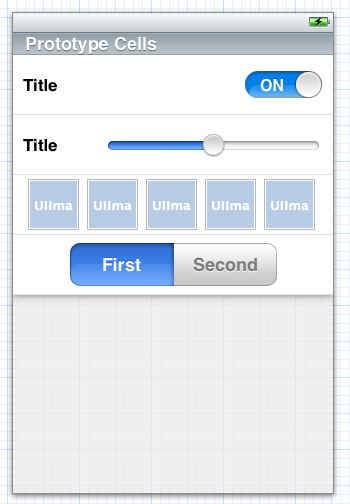
I doubt the usability of such an interface, but earlier it would have taken me much more time on it. If you do not define the UITableViewDataSource methods in the controller, then the label will look exactly the same in the code. If we need to fill the table dynamically, then we use the old code, except that the table method
- (id)dequeueReusableCellWithIdentifier:(NSString *)identifier now always returns the cell. If there is no such cell in the queue, then it will be created.How to add Storyboard to the project
- If you create a new project, then everything is simple - put a tick Use Storyboard .
- If you need to add a new part of the interface to an existing project and wanted to try the Storyboard, then do the following: add a new file to the project, in the wizard, select the type of the Storyboard file in the iOS-> User Interface section. Next we use the UIStoryboard class to create a scene.
- If we want to transfer the entire interface in an existing project to the Storyboard, then we do it as above, transfer the entire interface there and select the target of interest in the project settings and on the Summary tab remove everything in the Main Interface field and enter the scene name in the Main Storyboard:

Conclusion
Of course, it is still too early to start integrating the Storyboard into your projects, as support for earlier versions is needed, but the technology looks tempting. In addition, if you do not have enough standard types of transitions, you can just write your successor UIStoryboardSegue .
Source: https://habr.com/ru/post/131128/
All Articles