How I put together the first analog client for twitter
One day, my friends and I had an idea, why not make it so that you could type some message on the old dial-up phone and send it. And really, I thought, the more I have long wanted to do something based on the Arduino, because the platform is accessible and easy to learn. Yes, and the idea of inhaling new life in a vintage telephone seemed attractive. The result is a Tweephone .
A small video demonstration, and below will tell about the process of creation.
In order to be able to type characters, I chose the principle of typing on mobiles with a 12-button keypad. For example, to type the letter "a" you need to turn the two one time, and for the letter "f" - three three times.
')
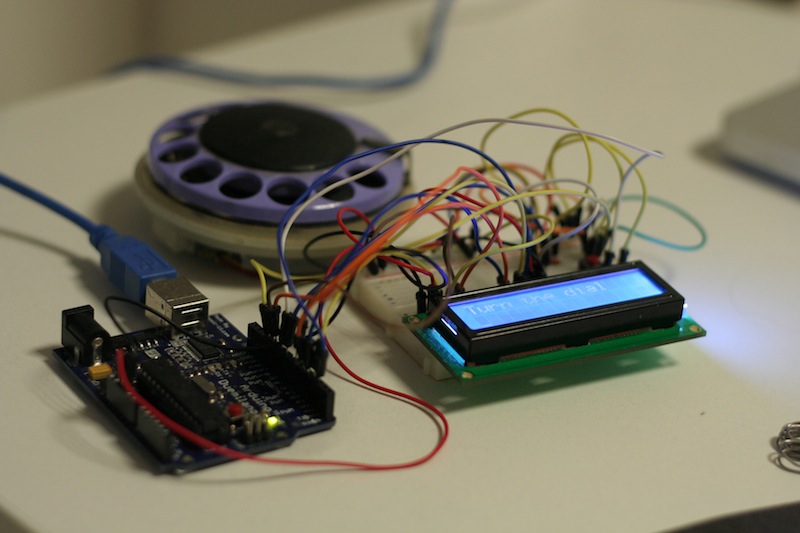
Without thinking twice, I organized among my friends a search for the actual device itself (which was found at my friend's grandmother), pulled out an Arduino and LCD screen of 16 * 2 lines, soldering accessories, free time, and a keen desire to do something with my hands.
Having acquired Arduino, I immediately connected an LCD to it, twisted test examples for LEDs, buttons, and an LCD screen. You can find them on the Arduino website .
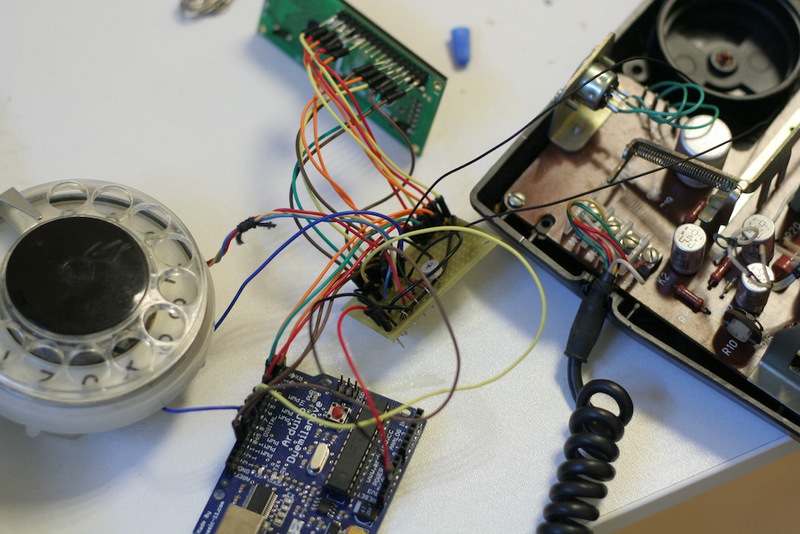
After removing the cover of the phone and examining the insides, I found that the work of the dialer itself is very simple: it has 3 contacts, one of which closes with the other two. With the first, in the case when the disk scrolls, and with the second, it is closed by default, but in the process of how the disk returns to its original state, it opens a certain number of times, depending on the number, relative to which the disk began to move. It was all visible to the naked eye, but in addition to verify the correctness of the work can be using a multimeter, which beeps when a short circuit contacts. It also became clear that the “handset on the device” / “handset off-hook” state can also be used programmatically, because this action simply closes and opens the contacts of the button on the telephone board.
Given this knowledge, it became clear that, roughly speaking, I am dealing with 3 buttons, the data from which need to be read programmatically, and everything else is a matter of algorithm. Therefore, I connected each of them according to the scheme from the site to the Arduino digital ports, and gathered the whole thing on a breadboard.
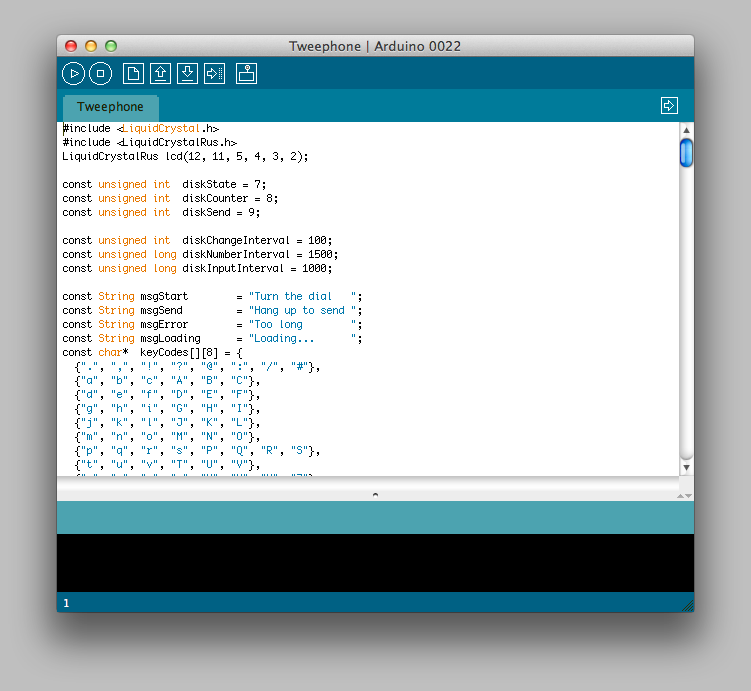
It remains to open the development environment and write code that would read pulses from digital ports, convert them to symbols and send them to Twitter. Since the communication boards for the Arduino were not at hand, it was decided to connect the phone via USB to a computer running a script that reads the lines from the Arduino Serial port and posts them.
Since the algorithm of the whole process is rather trivial, I will not give all the code here, I’ll tell you only about how the data collected from the disk is read.
First, in order to work with a digital port, you need to specify the mode of this port during initialization:
As you can see from the listing, I used ports 7 and 8 to connect the dialer directly.
Further, inside the infinite loop in which the script is executed, you need to check the status of the first port, and if there is a logical “yes” on it, then this means that the user has started to turn the disk. Until the disk comes back, you need to increase the counter every time the second port is open.
The same check is carried out for the status of the handset, and in case there is text and the phone is put, the line is written to the Serial port.
A small Ruby script is running on the computer that reads the string and sends it to Twitter.
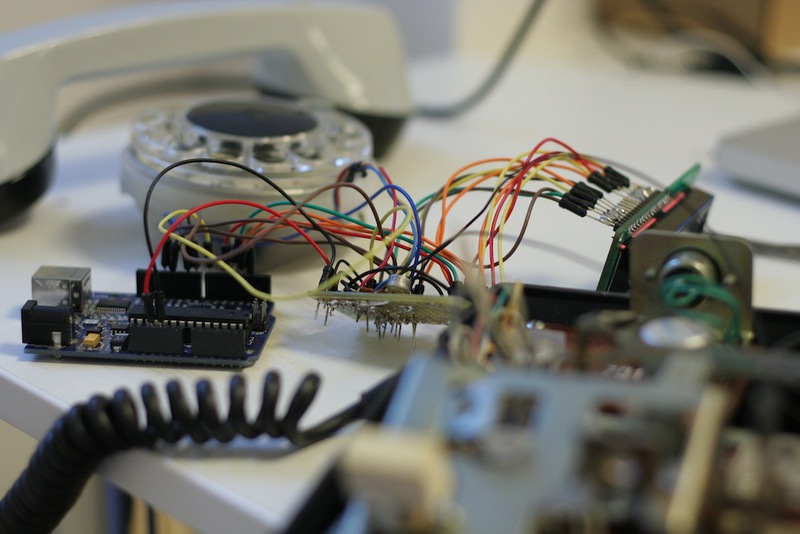
After making sure that everything works fine, I transferred the whole circuit from the breadboard board to the mounting board, and put everything inside the case, after having drunk a hole for the display.

All the project code is available on GitHub , so everyone can sort out the details and implement something like that.
Tweet for HabraHabra
Twitter project
Project page
Write if you have questions.
A small video demonstration, and below will tell about the process of creation.
In order to be able to type characters, I chose the principle of typing on mobiles with a 12-button keypad. For example, to type the letter "a" you need to turn the two one time, and for the letter "f" - three three times.
')
Without thinking twice, I organized among my friends a search for the actual device itself (which was found at my friend's grandmother), pulled out an Arduino and LCD screen of 16 * 2 lines, soldering accessories, free time, and a keen desire to do something with my hands.
Having acquired Arduino, I immediately connected an LCD to it, twisted test examples for LEDs, buttons, and an LCD screen. You can find them on the Arduino website .
After removing the cover of the phone and examining the insides, I found that the work of the dialer itself is very simple: it has 3 contacts, one of which closes with the other two. With the first, in the case when the disk scrolls, and with the second, it is closed by default, but in the process of how the disk returns to its original state, it opens a certain number of times, depending on the number, relative to which the disk began to move. It was all visible to the naked eye, but in addition to verify the correctness of the work can be using a multimeter, which beeps when a short circuit contacts. It also became clear that the “handset on the device” / “handset off-hook” state can also be used programmatically, because this action simply closes and opens the contacts of the button on the telephone board.
Given this knowledge, it became clear that, roughly speaking, I am dealing with 3 buttons, the data from which need to be read programmatically, and everything else is a matter of algorithm. Therefore, I connected each of them according to the scheme from the site to the Arduino digital ports, and gathered the whole thing on a breadboard.
It remains to open the development environment and write code that would read pulses from digital ports, convert them to symbols and send them to Twitter. Since the communication boards for the Arduino were not at hand, it was decided to connect the phone via USB to a computer running a script that reads the lines from the Arduino Serial port and posts them.
Since the algorithm of the whole process is rather trivial, I will not give all the code here, I’ll tell you only about how the data collected from the disk is read.
First, in order to work with a digital port, you need to specify the mode of this port during initialization:
const unsigned int diskState = 7;
const unsigned int diskCounter = 8;

void setup() {
pinMode(diskState, INPUT);
pinMode(diskCounter, INPUT);
}
As you can see from the listing, I used ports 7 and 8 to connect the dialer directly.
Further, inside the infinite loop in which the script is executed, you need to check the status of the first port, and if there is a logical “yes” on it, then this means that the user has started to turn the disk. Until the disk comes back, you need to increase the counter every time the second port is open.
unsigned int prevDiskCountState = HIGH;

void loop() {
unsigned int currDiskState = digitalRead(diskState);
unsigned int currDiskCountState = digitalRead(diskCounter);

if (currDiskState == HIGH) {
if (prevDiskCountState == HIGH && currDiskCountState == LOW) {
currDiskCount++;
delay(100);
}

prevDiskCountState = currDiskCountState;
} else {
if (currDiskCount > 0) {
//
}
}
}
The same check is carried out for the status of the handset, and in case there is text and the phone is put, the line is written to the Serial port.
Serial.println(msg);A small Ruby script is running on the computer that reads the string and sends it to Twitter.
<br/> require "serialport" <br/> require "twitter" <br/> <br/> # params for serial port <br/>port_str = "/dev/tty.usbserial-A900cdNp" <br/>baud_rate = 9600 <br/>data_bits = 8 <br/>stop_bits = 1 <br/>parity = SerialPort::NONE<br/> <br/>sp = SerialPort. new (port_str, baud_rate, data_bits, stop_bits, parity)<br/> <br/> # twitter auth <br/> require './Config.rb' <br/>Twitter.configure do |config|<br/> config.consumer_key = YOUR_CONSUMER_KEY<br/> config.consumer_secret = YOUR_CONSUMER_SECRET<br/> config.oauth_token = YOUR_OAUTH_TOKEN<br/> config.oauth_token_secret = YOUR_OAUTH_TOKEN_SECRET<br/> end <br/> <br/>client = Twitter::Client.new<br/> <br/> while true do <br/> line = sp. gets <br/> if line<br/> puts line<br/> client. update (line)<br/> end <br/> end <br/> <br/>sp.close <br/>After making sure that everything works fine, I transferred the whole circuit from the breadboard board to the mounting board, and put everything inside the case, after having drunk a hole for the display.
All the project code is available on GitHub , so everyone can sort out the details and implement something like that.
Tweet for HabraHabra
Twitter project
Project page
Write if you have questions.
Source: https://habr.com/ru/post/131065/
All Articles