Advanced Wordpress Templates
Suppose you have the task to provide your client with a pre-laid out layout or a form where he can safely add textual material, be it a description of a product or service, divided into columns. Yes, this task can be solved in many ways, but I would like that it would be easier for a person to use the editor, and there were less questions for you. In the end, WYSIWYG was created so that even the spherical secretary in a vacuum would understand what exactly will be displayed on the site as a result of her work in the editor. But go find such a “secretary”.
As a Web Designer for WordPress-based sites in development, I often encounter the fact that clients who have little or no HTML skills are ultimately involved in supporting and updating sites. Although TinyMCE is quite a functional editor, providing a manager of any skill level with all the necessary tools for formatting and publishing articles, creating something beyond a single-column text with several pictures with shutdown requires at least basic HTML skills.
')
This article shows an easy-to-implement trick that gives even the least tech-savvy customers the ability to manage multiple columns of content in a cozy WYSIWIG editor. And for you, advanced users, this is still a great way to standardize and optimize the contents of records.
A couple of margin notes:
The filter
Now we need to add styles. Type the following into your
The
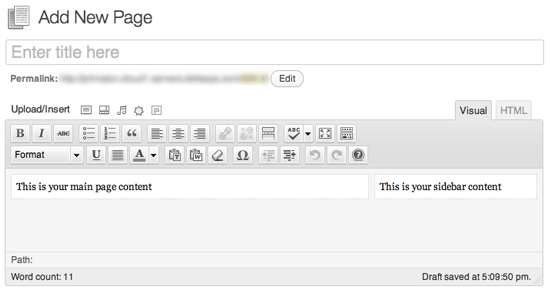
Now, creating a record on the site, you will see two columns for editing and inserting text into them:
This multicolored pattern will appear every time.
when creating a new post or page.
And here it is - the coveted template for your editor. You can go back and edit the
Use this technique to create your own templates, based on
your tasks.
This technique is applicable not only to the design of the record. Using javascript
You can also drive in the carousel or add other dynamic
effects on the fly.
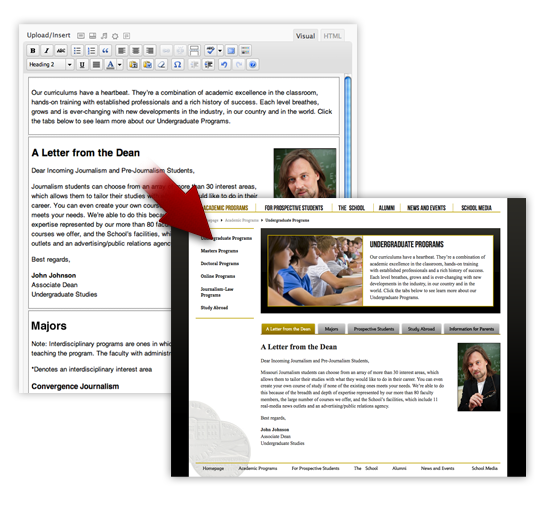
In the example above, with unprecedented ease we transform a series of blocks into an elegant set of tabs for site visitors, while retaining the ease of editing their content on one page. And these are just some options for using the technology that is now available to you and your WordPress site.
You can also set an individual default design style in the
Add this code to the
Alternatively, you can use the following code to automatically search for a suitable type of
(In the above code,
If the client decides that he does not want to work with the predefined template for some records, he can easily clear the record with the Backspace key until all the content disappears, then click Backspace again and the TinyMCE editor will remove the div containers, leaving an empty field the editor.
I hope that you will find this technique useful, anxiously observing how many more new uses you find, changing and improving it to create more and more dynamic patterns.
PS The post for a long time lying in the drafts, but not lost relevance. I will be glad to hear about errors in a personal manner (via internal mail). Thank.

As a Web Designer for WordPress-based sites in development, I often encounter the fact that clients who have little or no HTML skills are ultimately involved in supporting and updating sites. Although TinyMCE is quite a functional editor, providing a manager of any skill level with all the necessary tools for formatting and publishing articles, creating something beyond a single-column text with several pictures with shutdown requires at least basic HTML skills.
')
This article shows an easy-to-implement trick that gives even the least tech-savvy customers the ability to manage multiple columns of content in a cozy WYSIWIG editor. And for you, advanced users, this is still a great way to standardize and optimize the contents of records.
Creating a custom template
All we're going to do is enter a few HTML elements in the edit box and give them a style. The WordPress filter, calleddefault_content , allows you to insert predefined content into any record you create, so that customers do not have to learn the details of block layout. This filter is also great for adding “fish” to a new entry.Back end
Adding the following line to functions.php, each new entry created by the user will be pre-supplied with two div blocks withcontent-col-main and content-col-side styles, respectively. I should note, at present this code has been tested only in WordPress version 3.0 and higher: <?php add_filter( 'default_content', 'custom_editor_content' ); function custom_editor_content( $content ) { $content = ' <div class="content-col-main"> This is your main page content </div> <div class="content-col-side"> This is your sidebar content </div> '; return $content; } ?> A couple of margin notes:
The filter
default_content launched only when creating a new entry; any entry or page created before will not be changed. Line breaks and optional tags are not necessary, but I found them useful, as sometimes TinyMCE is odd.Now we need to add styles. Type the following into your
functions.php : <?php add_editor_style( 'editor-style.css' ); ?> The
add_editor_style() function add_editor_style() specified style used for styling to the contents of the TinyMCE editor window. If you do not specify the parameters of the function, it will itself attach the editor-style.css used by default, but for the purposes of this article I wrote my own style. Create a style file editor-style.css and place it in the theme folder. The contents of the file will be as follows: body { background: #f5f5f5; } .content-col-main { float:left; width:66%; padding:1%; border: 1px dotted #ccc; background: #fff; } .content-col-side { float:right; width:29%; padding:1%; border: 1px dotted #ccc; background: #fff; } img { /* , */ max-width: 100%; width: auto; height: auto; } Now, creating a record on the site, you will see two columns for editing and inserting text into them:

This multicolored pattern will appear every time.
when creating a new post or page.
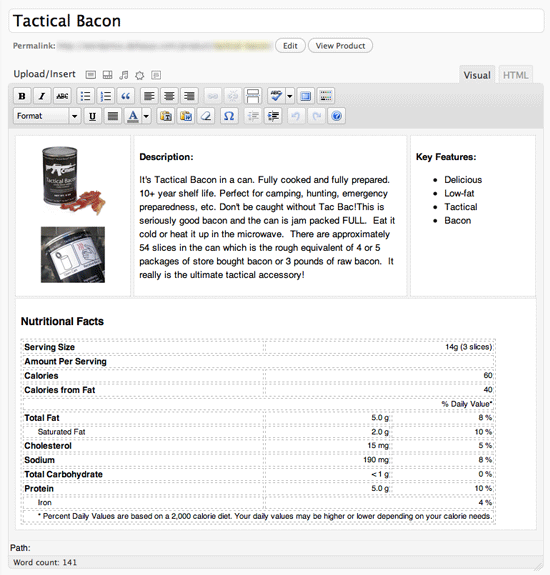
And here it is - the coveted template for your editor. You can go back and edit the
default_content code and editor-styles.css style editor-styles.css your goals:
Use this technique to create your own templates, based on
your tasks.
Front end
Now, when your entry will be displayed on the site, its contents are still displayed in one column as before? Do not forget to add in the style.css the styles we used earlier in thecustom_editor_content() function. Open style.css (or any other style sheet used in your skin) and create divs as you like.
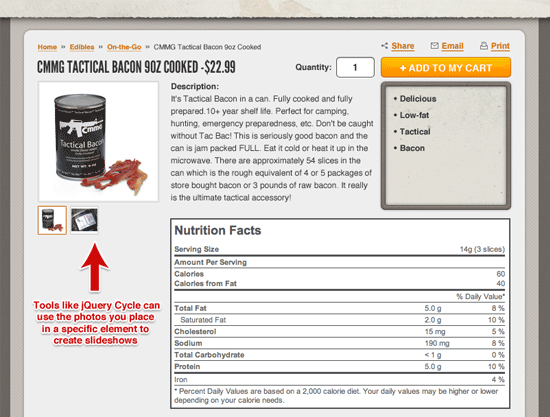
This technique is applicable not only to the design of the record. Using javascript
You can also drive in the carousel or add other dynamic
effects on the fly.
Squeeze some more out of your template.
In addition to new design features, this method can also be used to create objects that your JavaScript code will later access.
In the example above, with unprecedented ease we transform a series of blocks into an elegant set of tabs for site visitors, while retaining the ease of editing their content on one page. And these are just some options for using the technology that is now available to you and your WordPress site.
Templates for templates
The code above will allow you to apply the same style to all posts, pages, and custom post types using the TinyMCE editor. Most likely this is not the best solution. You can change this by setting the condition to use one or anothercustom_editor_content() , defining different templates for each type of record: <?php add_filter( 'default_content', 'custom_editor_content' ); function custom_editor_content( $content ) { global $current_screen; if ( $current_screen->post_type == 'page') { $content = ' // (PAGES) '; } elseif ( $current_screen->post_type == 'POSTTYPE') { $content = ' // (CUSTOM POST TYPE) '; } else { $content = ' // (EVERYTHING ELSE) '; } return $content; } ?> You can also set an individual default design style in the
editor-style.css , but if you need to apply your own styles for each type of record, you can do it using the following snippet from WPStorm : <?php function custom_editor_style() { global $current_screen; switch ($current_screen->post_type) { case 'post': add_editor_style('editor-style-post.css'); break; case 'page': add_editor_style('editor-style-page.css'); break; case '[POSTTYPE]': add_editor_style('editor-style-[POSTTYPE].css'); break; } } add_action( 'admin_head', 'custom_editor_style' ); ?> Add this code to the
functions.php your theme, and then create the editor-style-[POSTTYPE].css file / s to use the styles specifically created for each occasion. Simply replace [POSTTYPE] with a custom post type name. Expand the code above by adding other types to it for each additional record type.Alternatively, you can use the following code to automatically search for a suitable type of
editor-style- based on the type of record being edited. Attention, make sure that the added suffix of the new style file matches the name of the record type. <?php function custom_editor_style() { global $current_screen; add_editor_style( array( 'editor-style.css', 'editor-style-'.$current_screen->post_type.'.css' ) ); } add_action( 'admin_head', 'custom_editor_style' ); ?> (In the above code,
editor-style.css will also be included in all types of editable materials, in addition to the additional styles defined for this type of editor-style-[POSTTYPE].css / page and named editor-style-[POSTTYPE].css .)Afterword
Although this technique has its drawbacks (you need to know in advance the type of design patterns), and the client will not be able to redefine the structure (this was not enough), it allows you to create even more interesting sandboxes for your clients, where they can frolic while maintaining a standardized content format.If the client decides that he does not want to work with the predefined template for some records, he can easily clear the record with the Backspace key until all the content disappears, then click Backspace again and the TinyMCE editor will remove the div containers, leaving an empty field the editor.
I hope that you will find this technique useful, anxiously observing how many more new uses you find, changing and improving it to create more and more dynamic patterns.
PS The post for a long time lying in the drafts, but not lost relevance. I will be glad to hear about errors in a personal manner (via internal mail). Thank.
Source: https://habr.com/ru/post/131001/
All Articles