Deploying OS Images with FOG

In this article I will try to introduce you to the free FOG product, which serves to create and deploy OS images. To my surprise, I did not see articles on Russian-language resources devoted, of course, to this interesting product.
I note that I do not set myself the task to describe absolutely all the nuances and paint everything. Nothing will replace your personal experience. I just want to open the curtain and help many system administrators move in the right direction, the rest is in your hands.
FOG is an alternative to paid Acronis products. I have nothing against the products of this company, but it is not about it today. I am also aware of RIS / Deployment Services for Windows Server, please, do not write about it in the comments.
If simplified, then everything works through a PXE / TFTP bundle.
')
In addition to managing images, FOG has bundled a nice tool for equipment diagnostics (memtest), as well as primitive inventory tools.
We will also consider the creation of prepared images for Windows XP, Windows 7 operating systems (FOG supports other operating systems, but we will not touch other operating systems).
Will put on CentOS 5. Let's divide our story into several parts.
1) Install and configure
2) Creating an image for Windows 7
3) Creating an image for Windows XP
4) How does the unfolding / creation of the image.
5) Links
1. Installation and configuration
Download the latest version from the site (in my case - fog_0.32.tar.gz)
Unpack. Before installation, read the installation.txt file, as well as video instruction (see links).
For the work will need the following :
PHP 5.2.1+, MySql 5+, Apache 2+. Total it turns out classic LAMP.
If there is no problem with the second and third in CentOS 5, then the first in the official. There are no repositories, you can easily find it on pkgs.org (although packages are not official, use them at your own peril and risk). As I understand it, FOG itself does not install packages, it only looks at their presence in the system.
More specifically, the list of packages that are needed can be found in the ./lib/redhat/config.sh file. By the way, there is an error - in CentOS 5 there is no php-gettext package, there is php-php-gettext package. I also did not need a virus check, so I removed clamav-update from the list - without this, the installation does not go. By the way, here you can edit the installation path for the admin panel and other settings.
Installation is very simple - you need to run the file ./bin/ installfog.sh. In the same file there are MySQL database settings (snmysqluser, snmysqlpass, snmysqlhost). I draw your attention to the fact that access to the FOG database should be open to other computers (on which you will deploy images).
Therefore, we need to do something like
create database fog;
grant all privileges on fog.* to 'foguser'@'localhost' identified by '';
grant all privileges on fog.* to 'foguser'@'%' identified by '';
However, you can create a database after installation. The database access settings, the path to the admin panel, and others. By default, FOG takes it from the /opt/fog/service/etc/config.php file.
You can install in the normal mode and in the storage-node mode. I think for the first time the first option will do (it is covered in the video instructions). My DHCP and TFTP servers are on different hosts and it’s very convenient that the installer considers this possibility.
After FOG finds out what it wants, it will be installed. Attention! If you have already configured a TFTP server, backup your settings (/tftpboot/pxelinux.cfg/default) - FOG will unceremoniously erase them and install its own. By default, the menu uses passwords, respectively, if you don’t need them, you can remove them from there.
Three services will be created:
FOGImageReplicator, FOGMulticastManager, FOGScheduler. Accordingly, do not forget to make chkconfig <IMAGING SERVICE> on.
In my case, the admin files are listed in / var / www / html / fog. The services themselves and their settings will be written by default to the / opt / fog directory.
Once everything is set, you need to start the tftp-server (via xinetd), check that the FOG services are running.
Then go to the link:
http: // YOUR AI-PI / fog / management
Default User:
Username: fog
Password: password
2. Creating an image for Windows 7
Creating an image implies hardware independence. For this we need the sysprep package, which is already in Windows 7.
When creating the image, I first of all used the manual that I found in the comments for the current release. It is simple and clear, in addition, there is nothing complicated.
The basic meaning is:
Step One - Installing Windows
Step Two - Using Sysprep
Step Tree - Cleaning PC for Deployment
Step Four - Upload Settings
From myself I will add a few important notes:
- I do not advise you to install an antivirus, after deploying an image there is a greater risk that the OS will not start on it (this happened even with the relatively harmless ESET NOD32 - the same story is possible with other products)
- categorically do not put Daemon Tools, Alcohol 120% in the original image - they contain a problem driver for sysprep.
- you can do without WAIK (I did so in view of its huge size - it was just too lazy to download), there will just be a little less automation when donating the unfolding image. In addition, you can cheat and download someone else's unattend.xml (for example, from the manual). Then already slip it sysprep.
- I added extra. drivers for the image. They can be taken from the site driverpacks.net. To add them to the reference image, after installing Windows 7, you need to unzip the downloaded driver files. Then, using FAR, I found all .inf files, I placed the search results in a temporary panel, copied the full paths to the files to the clipboard. Next file is a .bat file:
pnputil -i -a <let before the .inf file> and run. I really didn’t figure out how to automate it completely (a message like “Driver not signed was issued many times. It is recommended to install only signed drivers”). If anyone knows - write in the comments how it can be overcome.
3. Creating an image for Windows XP.
I based on four articles:
1) forum.sysadmins.su/index.php?showtopic=6924
2) www.answersthatwork.com/Download_Area/ATW_Library/WinXP_Professional/WinXP__3-Setup-How_to_SYSPREP_a_Windows_XP_PC_setup.pdf
3) remyservices.wordpress.com/2007/09/28/sysprep-in-depth-part-5-customizing-sysprepinf
4) remyservices.wordpress.com/2008/01/24/sysprep-in-depth-part-5-addition-1-customizing-sysprepinf
The first describes a general algorithm, the second describes a step-by-step instruction in pictures (and also highlights the main problem when deploying images to a computer with a different type of IDE / SATA controller).
The third and fourth is the description of the response file for sysprep.
You can download sysprep for Windows XP SP3 here.
The image creation scheme in this case was somewhat different for me from Windows 7.
The driverpacks.net website has a special program for embedding drivers in the OS image. It was her that I took advantage of. Read the note on its use here .
The nuance is in the sequence of using this program along with nLite and the like.
I allow myself to make a copy-paste on the first link.
 1. Install the system on a computer.  (drivers for video cards and exotic hardware such as a scanner, etc. that will not be better placed on other computers).  Make all the necessary settings, changes and additions.  Install (MUI) Russian and service packs.
 2. Put all the necessary software package.  I advise you to use a distribution kit that does not require activation.  I used Windows XP Corporate Edition with integrated SP2, but SP1 is also possible.
 3. Clearing the system.  Here you decide what to leave and what to demolish.
 3.1.  We clean the DLL cache.  To do this, run the following commands:
 "sfc / cachesize = 5" and "sfc / purgecache"
 3.2.  Clearing the basket
 3.3.  Disable System Restore and delete the System Volume Information folder from the root of the partition.
 3.4.  remove msn messenger.
 3.5.  we edit windowsinfsysoc.inf to remove the word hide and then through "install-uninstall programs-> windows components we remove MSN Explorer and I don’t like everything.
 4. Now we will make a configuration file for cloning.
 4.1.  On the Windows XP CD, look for [cd]: / SUPPORT / TOOLS / DEPLOY.CAB.  Or download it on the Internet (for the current SP).  Extract all the files from there.
 4.2.  Create a SYSPREP directory on C: and drop all the files from DEPLOY.CAB there.
 4.3.  Run SETUPMGR.EXE.  Runs the Wizard.
 4.3.1.  Select Create a new answer file, then Sysprep Install.
 4.3.2.  Carefully choose the version of Windows.
 4.3.3.  In the next window, tick Yes, full automate the installation.
 4.3.4.  Before us opens a window where we are invited to fill in all sorts of information.  The field Providing the Product Key is very important to us.  The following field is important for system administrators.  If you write the name of the computer, then all your clones will be with the same name, which is not very good in the grid.  If you put Automatically generate computer name, the system will randomly give a name to the computer.  In my case, I missed this field (if I poke it, I cannot switch to the next menu without introducing any name!), Thus the system asks what name I want to give the computer.  There are also a bunch of interesting parameters that can be initially registered through this program.  I advise you to carefully go through all the options.
 4.3.5.  Upon completion, all of this should be stored in the sysprep.inf file and the file should be located in the C: SYSPREP directory.
 5. Everything that we will do next, starting from this point and until the image is recorded on a CD or on another partition, must be done without rebooting the system!
 5.1.  The biggest problem when transferring Windows to another computer is the disk controller driver.  As a rule, almost all boards support the standard IDE controller.  Therefore, we need to install the standard IDE driver.  In the device manager in the IDE controllers branch, we change our controller (update driver) to the Standart ide controller ... when prompted to reboot to cancel.
 5.2.  Now we will erase the HKEY_LOCAL_MACHINE / SYSTEM / MountedDevices / key from the register, and thus we will avoid problems with matching the partition signatures.
 6. As many of you know, Windows XP divides all computers into several types: "Standart PC", into "ACPI PC" and into "ACPI Uniprocessor PC", etc.  In order to boot at the time of the first and second download, do the following:
 6.1.  We copy everything that is in the Hal folder to the c: / windows / system32 folder, if there are such files there, it is recommended to leave later versions.
 6.2.  You also need to adjust the boot.ini a little.  After the change, it should look like this:
 [boot loader]
 timeout = 10
 default = multi (0) disk (0) rdisk (0) partition (1) WINDOWS
 [operating systems]
 multi (0) disk (0) rdisk (0) partition (1) WINDOWS = "Microsoft Windows XP Professional" / fastdetect
 multi (0) disk (0) rdisk (0) partition (1) WINDOWS = "Standart PC" / fastdetect /hal=hal.dll
 multi (0) disk (0) rdisk (0) partition (1) WINDOWS = "ACPI PC" / fastdetect /hal=halacpi.dll
 multi (0) disk (0) rdisk (0) partition (1) WINDOWS = "ACPI Multiprocessor PC" / fastdetect / hal = Halmacpi.dll
 multi (0) disk (0) rdisk (0) partition (1) WINDOWS = "ACPI Uniprocessor PC" / fastdetect / hal = Halaacpi.dll

 This menu will help with the first and second boot on your computer when it detects a device.  if at the moment of selecting the menu the computer fell into a gray screen or hung up - you incorrectly selected your PC type.  To continue, restart the machine and repeat the selection operation.

 7. Go to the final stage.  Run the command (START-RUN): c: / sysprep / sysprep –pnp -mini.  In the window that appears, change the "shutdown mode" to "quit" and click "Reseal".  The main thing is to prevent the reboot.  And now check Boot.ini, there you need to correct the timeout, put 10.
 8. At this we can say finished.  It remains the smallest thing to make the image of the disk.
 9. As soon as you open this image on the new computer (or on a new disk), Mini-Setup is started.  There is a search for a new iron.
 10. After installation, we recommend replacing our Standart ide controller with a native one (update the driver, and give it the one that comes on the CD with the motherboard)
 11. Configure our network settings (if there is a network, of course)
 12. After several reboots (on the moym after the 3rd), you can choose when booting Microsoft Windows XP Professional, if everything goes as it should and the device boots up, by default, install Microsoft Windows XP Professional "/ fastdetect
The answer file for Windows XP is much simpler than in Windows 7 (xml is used there), so here I decided to get bogged down.
As a result, I got the following sysprep.inf file:
 ; SetupMgrTag
 [Unattended]
     OemSkipEula = Yes
     InstallFilesPath = C: \ sysprep \ i386
     TargetPath = \ WINDOWS
     KeepPageFile = 0

 [GuiUnattended]
     AdminPassword = * // SETTING THE PASSWORD OF THE ADMINISTRATOR DON'T TURN
     EncryptedAdminPassword = No
     AutoLogon = No
     AutoLogonCount = 0
     OEMSkipRegional = 1
     OEMDuplicatorstring = Duplicate_XP_SP3 // ADD INFORMATION ABOUT WHAT IS A CLONED COPY
     TimeZone = 180 // FOR EKATERINBURG
     OemSkipWelcome = 1

 [UserData]
     ProductKey = YOUR, THEN IT CAN BE CHANGED!
     FullName = "WS"
     OrgName = "HOME"
     ComputerName = *

 [RegionalSettings]
     LanguageGroup = 5

 [Identification]
     JoinWorkgroup = WORKGROUP

 [Networking]
     InstallDefaultComponents = Yes

 [WindowsFirewall]
     Profiles = WindowsFirewall.TurnOffFirewall

 [WindowsFirewall.TurnOffFirewall]
     Mode = 0

 [Sysprep]
     BuildMassStorageSection = Yes
You can change this file if you download it through the executable file setupmgr.exe, which comes in the package deploy.cab.
The meaning of these options is clear from the title, the remaining comments are on the third link.
I will add my comments:
- AdminPassword = * I put it this way, because when I tried to set my password, I got the error “I can't change the password” during the deployment process. Accordingly, without knowing the password, it makes no sense to include AutoLogon, although on the first launch it would be convenient.
- If you have a domain, then you can immediately include the computer in the domain (see the 4th link and the JoinDomain option), although you should keep in mind that the computer name must be unique, which means it must be (ComputerName = *). We have a domain, in fact, the only reason I did not use this option was to put the unique meaningful computer name myself before being included in the domain (oh, if the computer name in Windows could be changed without removing it from the domain!)
That's all.
- the sysprep folder after the mini-setup is deleted, i.e. in the cloned system it will not be, therefore, in theory, you can not be afraid to write passwords in clear form in the sysprep.inf file.
4. How is the deployment / creation of the image.

If there is no image as such, then you need to go to the Image management section and create a prototype of a new image.

The first thing to do is register a host on FOG. For this there is a special. menu item when booting over the network.
After you do this, go to the Hosts management section, find your host there (by MAC address and by the time the registration is created).
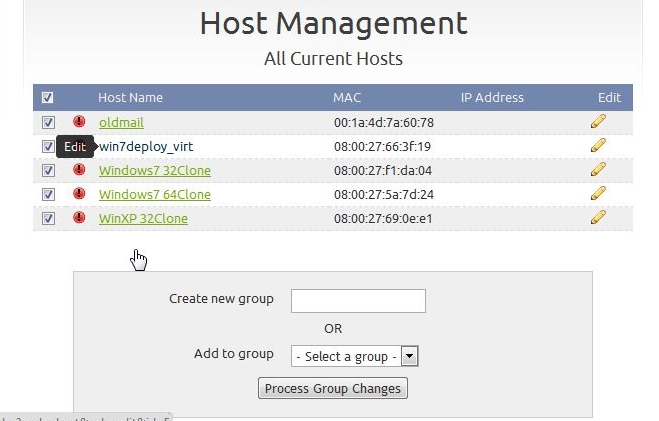
Put the desired OS and select the prototype of the image.
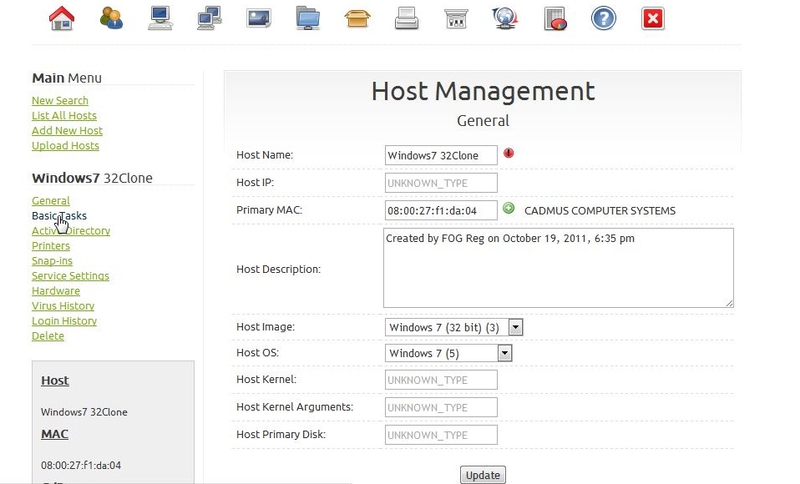
Then you can choose - either use this host as the basis of the image or roll an already existing image into this host.
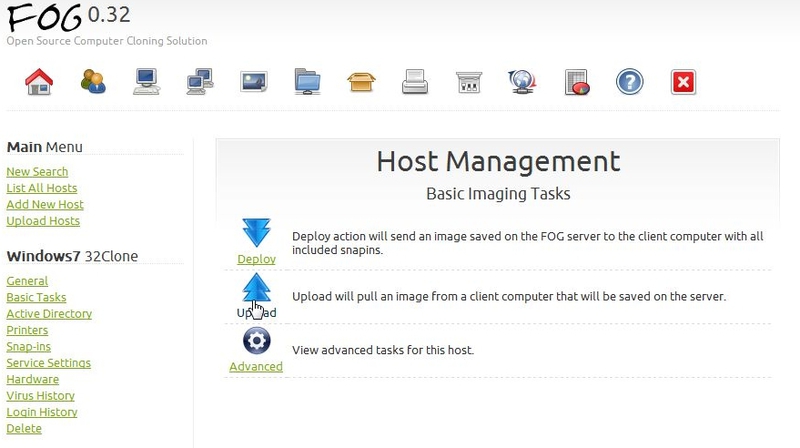
To do this, go to the mode of editing the host in the basic tasks.
Next will be the main choice (there are other tasks) - roll out (deploy) or use the image as a reference (upload).
We confirm.
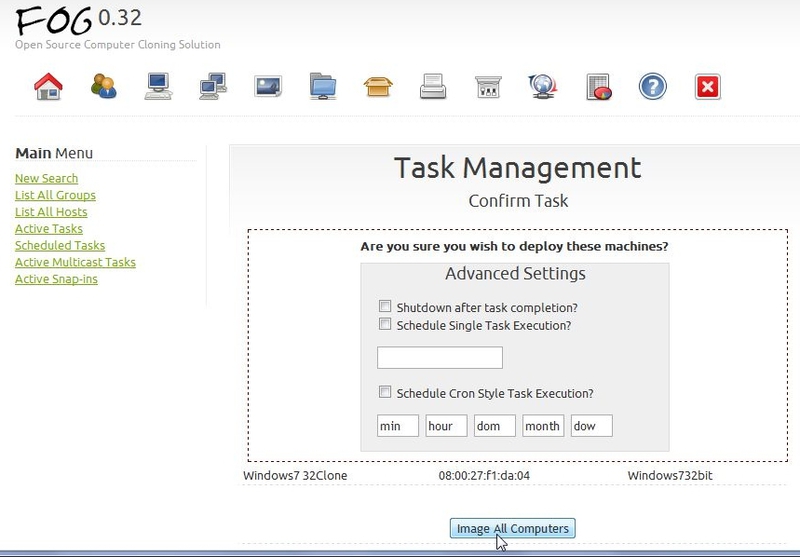
By the way, if the computer has WakeUpOnLAN enabled, you can use the FOG scheduler without physical access to the computer.
Very important! When you expand the image, FOG deletes all partitions and creates its own partition. Perhaps you can somehow manage this behavior - write in the comments if someone knows.
You can see the scheduled tasks in Task Management.

If a task is assigned to a host, then when it is loaded over the network, it will be executed without displaying the menu. In addition, the developers have organized feedback - i.e. through the admin panel you can watch the progress indicator for the current task.
Finally, I will say that it is possible to install a client on Windows, through which you can control the behavior of the host (perform tasks). See the last link.
5. References
FOG Official Documentation
www.fogproject.org/wiki/index.php?title=FOGUserGuide
Developer videos
www.fogproject.org/?q=node/5
The expanded instruction of the FOG setup in English
www.petri.co.il/windows-image-deployment-with-fog.htm
Video on installing FOG service on Windows clients
freeghost.sourceforge.net/videotutorials/FogServiceInstall.swf.html
Source: https://habr.com/ru/post/130987/
All Articles