Deploy billing for a small network from scratch
Background :
Some good people decided to start a provider business. Stretched and unwound the optics in a small area, put the boxes, put there minimal switches with which you can organize VLAN-Per-User, bought a small, for a start, channel from the nearest highway. They have a question about what users should consider traffic / money and cut speeds.
The general network layout should look like this:

To whom it is interesting, further under the cut there are a lot of letters and pictures.
')
Conventions :
- Gateway uplink will be 1.2.3.3
- NAS network adapters looking at the uplink will be on the network 1.2.3.3/24
- The network provided to users will be 172.16.0.0/18, or, if you like, 255.255.192.0
- we reserve IP addresses 172.16.0.0-172.16.0.10 for access servers and other own needs
- The user statistics server will be available at stat.isp and, taking into account the budget of the solution, will be located on the same host as the billing server, although it is good practice not only to separate the billing and subscriber traffic, but also to distribute the database, the billing core and the web to separate hosts. -interface.
Initial requirements were clearly stated:
- Design network capacity - up to 10,000 subscribers
- Distribution of IP to subscribers using DHCP
- Authorization or on a bunch of IP + MAC
- Several fully unlimited fares
- Traffic is still necessary to control
- It is very desirable to see the activity of each individual user.
- The division of the rights of cashiers / accountants / managers / administrators
- Ability to scale decisions regarding the growth in the number of subscribers
“Since there is no speaker yet, and there are three and a half ip cards issued by an aplink, the first users are supposed to be NAT.
- Naturally, all this is the most budget :)
A cursory examination of the range of opensource billing systems showed that Stargazer might be optimal in this situation for the following reasons:
- The project is open, actively developing, new versions are released with enviable consistency.
- It does not suffer from congenital monostroid and allows you to finish the functional without becoming attached to the internal mechanics
- The kernel is written in C / C ++ and absolutely fast
- A large selection of methods for counting traffic
- Optional storage support in Files / MySQL / Firebird / PostgreSQL
- The magic mechanism for executing commands on remote servers
The installation will run on the bare FreeBSD 8.2-RELEASE installed in the kern-developer + ports option. All user traffic will be driven through a remote NAS to all
the same FreeBSD 8.2, producing NAT / Shape / NetFlow and drawing schedules for the subscriber channel using bandwidthd. As a webinterface for stargazer 2.407-p1, we will be the last one at the time of writing the topic Ubilling 0.1.7, although Stargazer has a wide choice of frontends - from the Win-configurator to several console and XML-RPC API.
Further direct copy-paste from the console with periodic focus on conceptual points.
So let's start setting up the billing server .
1. Moral prepare
2. Installing dependencies
For simplicity, isc-dhcp is compiled without DHCP_PARANOIA
php5 should be compiled with at least CLI support and the Apache module (the latter should be fine with dependency)
We collect vital PHP extensions, namely: put a tick on MYSQL, MBSTRING and ICONV
3. We assemble the stargazer itself and its console configurators in two lines :)
4. Expand the current version of Ubilling
5. Make special symlink magic
6. Start Apache and MySQL
7. Set a new root user password for mysql (newpassword - for example)
#mysqladmin -u root password newpassword
8. We give /etc/stargazer/stargazer.conf to the following form
9. We edit the config / etc / stargazer / rules leaving only one direction we need, namely the Internet.
10. Add our first NAS to /etc/stargazer/remote_nas.conf
10. start / stop stargazer
11. Make sure that the default database is deployed
12. Edit / usr / local / etc / sudoers, adding a user there, under which the Web interface will work
13. Deploy dump Ubilling
14. Make sure everything is fine.
15. Edit the file config / billing.ini, bringing it up to standard:
16. Expand billet launch scripts
17. And we do nailing IP + MAC in the script / etc / stargazer / OnConnect
18. We edit the config / etc / stargazer / config, writing in it the current MySQL parameters
19. Similarly, we edit the config config / mysql.ini
20. Start the stargazer and change the default administrator password.
21. bring our /etc/rc.conf to the form
22. Add the ".isp" service zone to /etc/namedb/named.conf
and in / etc / namedb / master / isp
23. Create a stargazer startup script in /etc/rc.d/billing
and assign him the necessary rights
24. We register the necessary virtualkhosty in /usr/local/etc/apache/httpd.conf
25. We rule the global template by which dhcp configs will be generated, it is located here: /usr/local/www/data/billing/config/dhcp/global.template
26. Set the required logging level for dhcpd in /etc/syslog.conf
27. We can make a preventive reboot to see how everything rises, or perezaprazvatit all that we have already built manually.
28. And now the most interesting thing for which everything was started :)
We go to our servername.isp / billing and log in with the default username and password admin / demo (do not forget to change immediately) and see the following picture:

Add the traffic class we need:

We add network and service (I remind you that we reserve the first 10 IP for our needs)
Adding network handler DHCP
and apply to it your subnet pattern
hinting in such a way that the default gateway should be towards our NAS server.
Check if the dhcpd.conf config is successfully created in the “Networks” directory
Add your first fare, let it be called Unlim-1 and be unlimited with a subscription fee of 50 money per month
We hang on it symmetrical speed of 1 megabit / s

Add our access server which we will configure a little later.
In reference books of Cities, Streets and houses we add our settlement, streets and houses where subscribers will live
Well, like everything, we register our first subscriber
We assign him MAC, tariff, enter the full name. and all that is needed in “editing”, and, in general, it should work.
Configure NAS server.
Again, we have FreeBSD 8.2 Naked, from which we want it to act as the default gateway for our users.
The necessary module can be simply loaded, but this is a matter of habit, so we will assemble the core with our hands and throw away everything we don’t need.
We replace in the config of our new kernel ident GENERIC on NAS1
And collect / put it in one line:
We make sure that our /etc/rc.conf looks like this somewhere:
Install thttpd with which we will show graphs.
Excellent NetFlow sensor
Expat needed
And moderately vruchy, but ideally easy to set up bandwidthd for drawing per-user plots
PHP build with CLI support
And the MYSQL module to it
We bring our /etc/firewall.conf to the form:
We expose the correct rights to our firewall initialization script
We collect rscriptd and ensure its launch upon reboot
edit /etc/rc.d/rscriptd, making it look like
and assign him the right rights
Expand Ubilling script blanks
We edit the config / etc / rscriptd / config, writing to it the current MySQL parameters so that the GetSpeed, GetUpSpeed, GetMAC scripts can receive user information normally.
Also, do not forget to fix / etc / rscriptd / OnConnect, specifying in it the input interface for shaping, which in our case
We configure bandwidthd so that he draws beautiful graphics, which we then have to contemplate in Ubilling:
In the file /usr/local/bandwidthd/etc/bandwidthd.conf we enter the network of our users
add periodic SIGHUP for bandwidthd to crontab -e
And again terrible simlinkovaya magic, so that our thttpd could normally show graphs
We provide start up when loading
And as a final touch, we add more or less universal things that help to somehow improve the speed in future in /etc/sysctl.conf
After a reboot, we get a working NAS, remotely receiving commands from the billing system, sending it traffic information and everything else that was required of it.
I would also like to write about setting up a user account, undocumented "features" with the transition to the next month and other things that you can stumble at first. But the article was already too monstrous and boring. I promise, if karma allows, to describe all these things in a separate legend in a week.
Offsite Stargazer
Offsite Ubilling
Some good people decided to start a provider business. Stretched and unwound the optics in a small area, put the boxes, put there minimal switches with which you can organize VLAN-Per-User, bought a small, for a start, channel from the nearest highway. They have a question about what users should consider traffic / money and cut speeds.
The general network layout should look like this:
To whom it is interesting, further under the cut there are a lot of letters and pictures.
')
Conventions :
- Gateway uplink will be 1.2.3.3
- NAS network adapters looking at the uplink will be on the network 1.2.3.3/24
- The network provided to users will be 172.16.0.0/18, or, if you like, 255.255.192.0
- we reserve IP addresses 172.16.0.0-172.16.0.10 for access servers and other own needs
- The user statistics server will be available at stat.isp and, taking into account the budget of the solution, will be located on the same host as the billing server, although it is good practice not only to separate the billing and subscriber traffic, but also to distribute the database, the billing core and the web to separate hosts. -interface.
Initial requirements were clearly stated:
- Design network capacity - up to 10,000 subscribers
- Distribution of IP to subscribers using DHCP
- Authorization or on a bunch of IP + MAC
- Several fully unlimited fares
- Traffic is still necessary to control
- It is very desirable to see the activity of each individual user.
- The division of the rights of cashiers / accountants / managers / administrators
- Ability to scale decisions regarding the growth in the number of subscribers
“Since there is no speaker yet, and there are three and a half ip cards issued by an aplink, the first users are supposed to be NAT.
- Naturally, all this is the most budget :)
A cursory examination of the range of opensource billing systems showed that Stargazer might be optimal in this situation for the following reasons:
- The project is open, actively developing, new versions are released with enviable consistency.
- It does not suffer from congenital monostroid and allows you to finish the functional without becoming attached to the internal mechanics
- The kernel is written in C / C ++ and absolutely fast
- A large selection of methods for counting traffic
- Optional storage support in Files / MySQL / Firebird / PostgreSQL
- The magic mechanism for executing commands on remote servers
The installation will run on the bare FreeBSD 8.2-RELEASE installed in the kern-developer + ports option. All user traffic will be driven through a remote NAS to all
the same FreeBSD 8.2, producing NAT / Shape / NetFlow and drawing schedules for the subscriber channel using bandwidthd. As a webinterface for stargazer 2.407-p1, we will be the last one at the time of writing the topic Ubilling 0.1.7, although Stargazer has a wide choice of frontends - from the Win-configurator to several console and XML-RPC API.
Further direct copy-paste from the console with periodic focus on conceptual points.
So let's start setting up the billing server .
1. Moral prepare
2. Installing dependencies
   # cd / usr / ports / databases / mysql51-server / && make install
   # cd / usr / ports / textproc / expat2 && make install
   # cd / usr / ports / devel / libtool && make all && make install
   # cd / usr / ports / security / sudo && make install
For simplicity, isc-dhcp is compiled without DHCP_PARANOIA
# cd / usr / ports / net / isc-dhcp31-server / && make install
php5 should be compiled with at least CLI support and the Apache module (the latter should be fine with dependency)
# cd / usr / ports / lang / php5 && make install
We collect vital PHP extensions, namely: put a tick on MYSQL, MBSTRING and ICONV
# cd / usr / ports / lang / php5-extensions / && make config && make install
3. We assemble the stargazer itself and its console configurators in two lines :)
   # fetch http://stg.dp.ua/download/server/2.407-p1/stg-2.407-p1.tar.gz && tar zxvf stg-2.407-p1.tar.gz && cd stg-2.407-p1 / projects / stargazer / && ./build && gmake install
   # cd ../sgconf && ./build && gmake && gmake install && cd ../sgconf_xml/ && ./build && gmake && gmake install
4. Expand the current version of Ubilling
   # cd / usr / local / www / data /
   # mkdir billing
   # cd billing
   # fetch http://ubilling.net.ua/ub.tgz
   # tar zxvf ub.tgz
   # chmod -R 777 content / config / multinet / exports / remote_nas.conf vservices.php
5. Make special symlink magic
   # mkdir / etc / stargazer / dn
   # chmod -R 777 / etc / stargazer / dn
   # ln -fs / usr / local / www / data / billing / multinet / usr / local / etc / multinet
   # ln -fs /usr/local/www/data/billing/remote_nas.conf /etc/stargazer/remote_nas.conf
   # ln -fs / etc / stargazer / dn / usr / local / www / data / billing / content / dn
6. Start Apache and MySQL
   # /usr/local/etc/rc.d/mysql-server start
   # /usr/local/etc/rc.d/apache onestart
7. Set a new root user password for mysql (newpassword - for example)
#mysqladmin -u root password newpassword
8. We give /etc/stargazer/stargazer.conf to the following form
 LogFile = /var/log/stargazer.log
 PIDFile = /var/run/stargazer.pid
 Rules = / etc / stargazer / rules
 DetailStatWritePeriod = 1/4
 StatWritePeriod = 10
 DayFee = 1
 DayFeeIsLastDay = no
 DayResetTraff = 1
 SpreadFee = no
 FreeMbAllowInet = no
 WriteFreeMbTraffCost = yes
 FullFee = yes
 <DirNames>
   DirName0 = Internet
   DirName1 =
   DirName2 =
   DirName3 =
   DirName4 =
   DirName5 =
   DirName6 =
   DirName7 =
   DirName8 =
   DirName9 =
 </ DirNames>
 ExecutersNum = 1
 ModulesPath = / usr / lib / stg
 <StoreModule store_mysql>
   dbhost = localhost
   dbname = stg
   dbuser = root
   rootdbpass = newpassword
 </ StoreModule>
 <Modules>
 <Module auth_ao>
 </ Module>
 <Module auth_ia>
   Port = 5555
   UserDelay = 60
   UserTimeout = 65
   FreeMb = cash
 </ Module>
 <Module conf_sg>
   Port = 5555
 </ Module>
 <Module cap_nf>
         TCPPort = 42111
         UDP port = 42111
 </ Module>

 <Module remote_script>
 SendPeriod = 10
 SubnetFile = / etc / stargazer / remote_nas.conf
 Password = password_for_rscriptd
 UserParams = Cash Tariff
 Port = 9999
 </ Module>
 </ Modules>
9. We edit the config / etc / stargazer / rules leaving only one direction we need, namely the Internet.
# echo "ALL 0.0.0.0/0 DIR0"> / etc / stargazer / rules
10. Add our first NAS to /etc/stargazer/remote_nas.conf
# echo "172.16.0.0/18 172.16.0.2"> /etc/stargazer/remote_nas.conf
10. start / stop stargazer
   # stargazer
   # killall stargazer
11. Make sure that the default database is deployed
  # mysql -u root -p stg -e "S Enter password:
 + --------------- +
 |  Tables_in_stg |
 + --------------- +
 |  admins |
 |  messages |
 |  stat |
 |  tariffs |
 |  users |
 + --------------- +
12. Edit / usr / local / etc / sudoers, adding a user there, under which the Web interface will work
User_Alias BILLING = www BILLING ALL = NOPASSWD: ALL
13. Deploy dump Ubilling
   # cd / usr / local / www / data / billing /
   # cat docs / test_dump.sql |  mysql -u root -p stg
14. Make sure everything is fine.
#mysql -u root -p stg -e "SHOW TABLES" Enter password: + ----------------- + | Tables_in_stg | + ----------------- + | address | | admins | | ahenassign | | apt | | build | | cardbank | | cardbrute | | cashtype | | cfitems | | cftypes | | city | | contracts | | contrahens | | cpe | | cpetypes | | dhcp | | directions | | dshape_time | | emails | | employee | | jobs | | jobtypes | | messages | | modem_templates | | modems | | nas | | nethosts | | networks | | notes | | payments | | phones | | realname | | services | | servtariff | | speeds | | stat | | street | | switches | | switchmodels | | tags | | tagtypes | | tariffs | | taskman | | userreg | | users | | userspeeds | | vcash | | vcashlog | | vservices | | weblogs | + ----------------- +
15. Edit the file config / billing.ini, bringing it up to standard:
 baseconf = sgconfxml
 SGCONF = / usr / sbin / sgconf
 SGCONFXML = / usr / sbin / sgconf_xml
 STG_HOST = localhost
 STG_PORT = 5555
 XMLRPC_PORT = 8081
 STG_LOGIN = admin
 STG_PASSWD = new_password_starmin_azer
 Sudo = / usr / local / bin / sudo
 TOP = / usr / bin / top -b
 CAT = / bin / cat
 Grep = / usr / bin / grep
 RC_DHCPD = / usr / local / etc / rc.d / isc-dhcpd
 UPTIME = / usr / bin / uptime
 Ping = / sbin / ping
 KILL = / bin / kill
 STGPID = / var / run / stargazer.pid
 STGNASHUP = 1
 PHPSYSINFO = phpsysinfo /
 LANG = ua
 TASKBAR_ICON_SIZE = 128
 REGRANDOM_MAC = 1
 REGALWONLINE = 1
 REGDISABLEDSTAT = 1
16. Expand billet launch scripts
   # cp -f docs / presets / FreeBSD / etc / stargazer / config / etc / stargazer /
   # cp -f docs / presets / FreeBSD / etc / stargazer / GetMac / etc / stargazer /
   # chmod a + x / etc / stargazer / *
17. And we do nailing IP + MAC in the script / etc / stargazer / OnConnect
 #! / bin / sh
 LOGIN = $ 1
 IP = $ 2
 CASH = $ 3
 ID = $ 4
 MAC = `php / etc / stargazer / GetMac $ LOGIN`
 / usr / sbin / arp -S $ IP $ MAC
18. We edit the config / etc / stargazer / config, writing in it the current MySQL parameters
 host = localhost
 username = root
 password = newpassword
 database = stg
19. Similarly, we edit the config config / mysql.ini
 ; database host
 server = "localhost"
 ; database port
 port = "3306"
 ; user login
 username = "root"
 ; user password
 password = "newpassword"
 ; database name to use
 db = "stg"
 character = "UTF8"
 prefix = "billing"
20. Start the stargazer and change the default administrator password.
   # stargazer
   # sgconf_xml -s localhost -p 5555 -a admin -w 123456 -r "<ChgAdmin Login = \" admin \ "Password = \" new_password_admin_stargazer \ "/>"
21. bring our /etc/rc.conf to the form
 gateway_enable = "YES"
 hostname = "billing.isp"
 ifconfig_em0 = "inet 172.16.0.1 netmask 255.255.192.0"
 inetd_enable = "YES"
 keymap = "ru.koi8-r"
 sshd_enable = "YES"
 named_enable = "YES"
 sendmail_enable = "NO"
 mysql_enable = "YES"
 apache_enable = "YES"
 dhcpd_enable = "YES"
 dhcpd_flags = "- q"
 dhcpd_conf = "/ usr / local / etc / multinet / dhcpd.conf"
 dhcpd_ifaces = "em0"
22. Add the ".isp" service zone to /etc/namedb/named.conf
 acl internals {172.16.0.0/18;  };
 acl local {127.0.0.1;  };

 zone "isp" {
     type master;
     file "/ etc / namedb / master / isp";
     allow-query {internals;  local;  };
 };
and in / etc / namedb / master / isp
 $ TTL 86400
 @ IN SOA isp.  admin.isp.  (
                         2011101001;  Serial
                                 8H;  Refresh
                                 1D;  Retry
                                 2W;  Expire
                                 1D);  Negative Cache TTL

         IN NS dns.isp.
 @ IN A 172.16.0.1


 billing IN A 172.16.0.1
 stat IN A 172.16.0.1
 nas1 IN A 172.16.0.2
23. Create a stargazer startup script in /etc/rc.d/billing
 #! / bin / sh
 / usr / sbin / stargazer
and assign him the necessary rights
# chmod a + x /etc/rc.d/billing
24. We register the necessary virtualkhosty in /usr/local/etc/apache/httpd.conf
 NameVirtualHost *: 80

 <VirtualHost *: 80>
 ServerName billing.isp
 DocumentRoot "/ usr / local / www / data / billing /"
 AddDefaultCharset utf-8
 </ Virtualhost>


 <VirtualHost *: 80>
 ServerName stat.isp
 DocumentRoot "/ usr / local / www / data / billing / userstats /"
 AddDefaultCharset utf-8
 </ Virtualhost>
25. We rule the global template by which dhcp configs will be generated, it is located here: /usr/local/www/data/billing/config/dhcp/global.template
 option domain-name "isp";
 option domain-name-servers 172.16.0.1;
 default-lease-time 3600;
 max-lease-time 43200;
 authoritative;
 ddns-update-style none;
 log facility local7;
 one-lease-per-client true;
 deny duplicates;

 shared-network ourisp {
 {SUBNETS}
 }
26. Set the required logging level for dhcpd in /etc/syslog.conf
27. We can make a preventive reboot to see how everything rises, or perezaprazvatit all that we have already built manually.
28. And now the most interesting thing for which everything was started :)
We go to our servername.isp / billing and log in with the default username and password admin / demo (do not forget to change immediately) and see the following picture:
Add the traffic class we need:
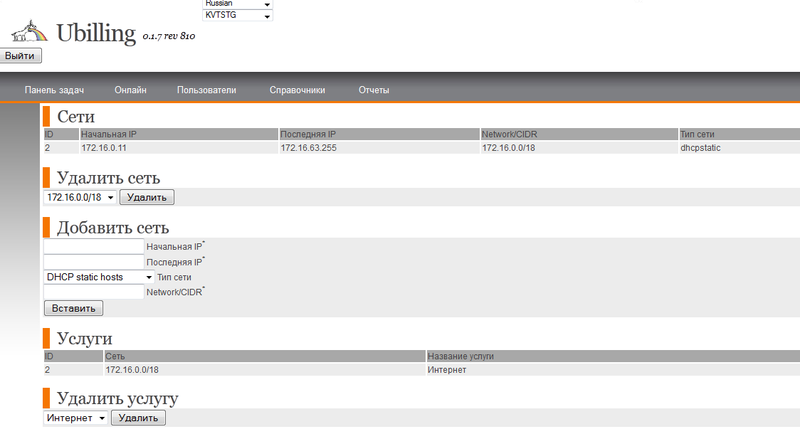
We add network and service (I remind you that we reserve the first 10 IP for our needs)
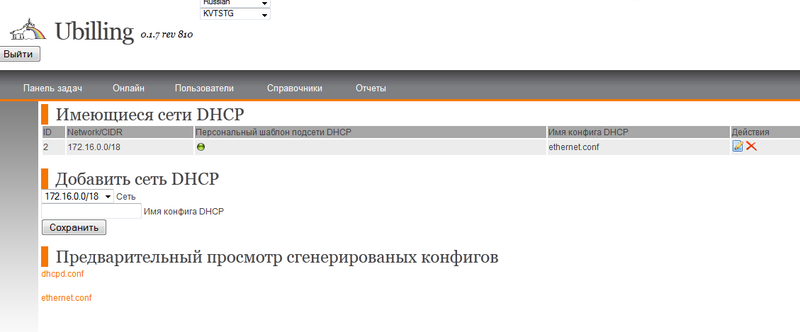
Adding network handler DHCP
and apply to it your subnet pattern
 subnet {NETWORK} netmask {MASK} {
 default-lease-time 3600;
 option domain-name "ourisp";
 option subnet-mask {MASK};
 option routers 172.16.0.2;
 include "/ usr / local / etc / multinet / {HOSTS}";
 }
hinting in such a way that the default gateway should be towards our NAS server.
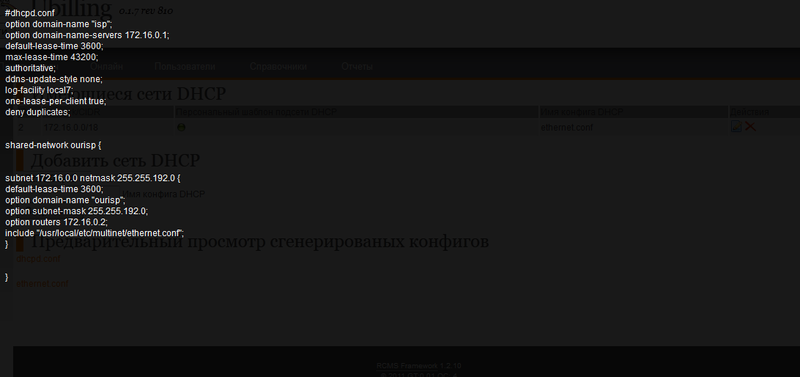
Check if the dhcpd.conf config is successfully created in the “Networks” directory
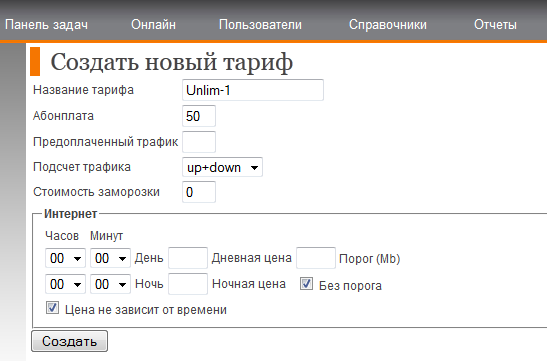
Add your first fare, let it be called Unlim-1 and be unlimited with a subscription fee of 50 money per month
We hang on it symmetrical speed of 1 megabit / s
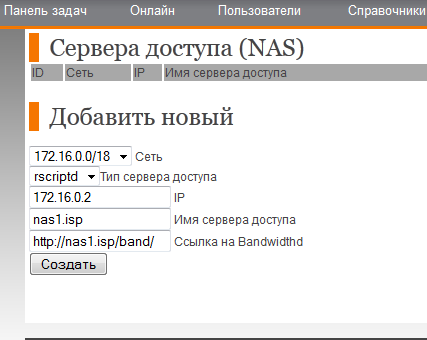
Add our access server which we will configure a little later.
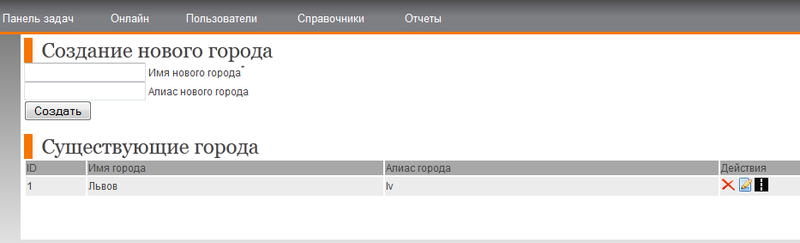
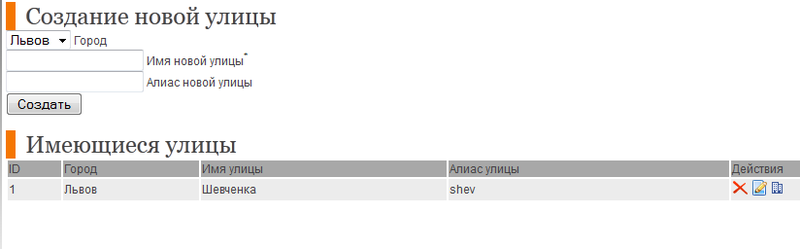
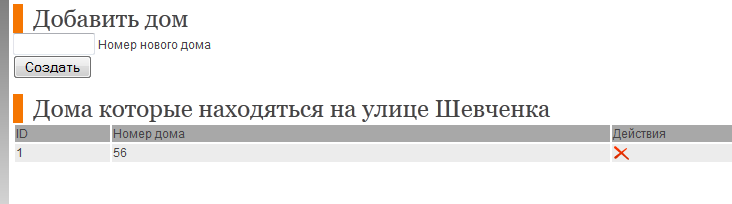
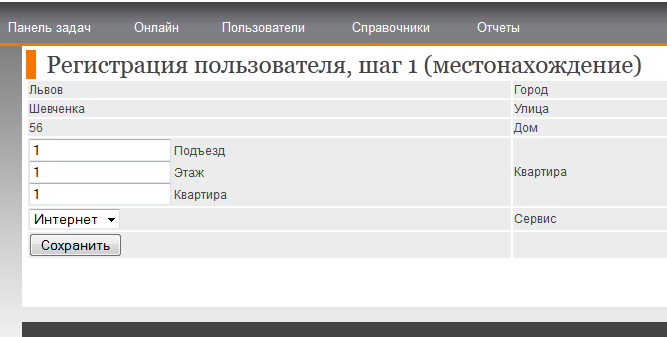
In reference books of Cities, Streets and houses we add our settlement, streets and houses where subscribers will live
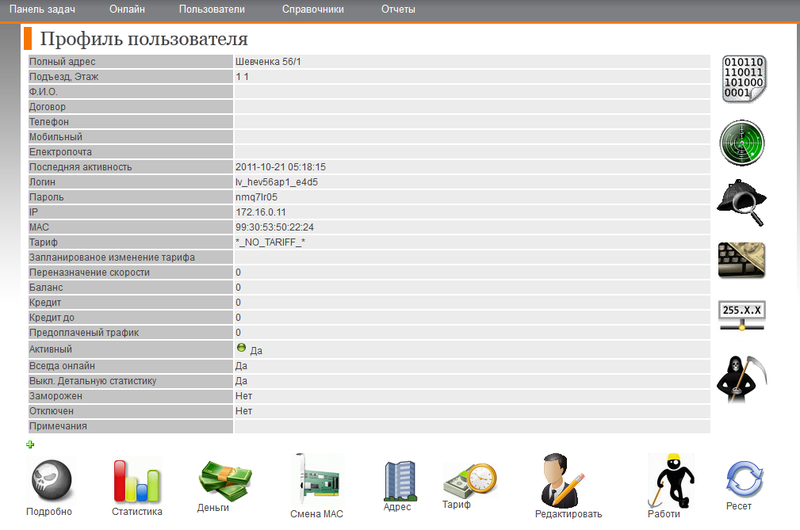
Well, like everything, we register our first subscriber
We assign him MAC, tariff, enter the full name. and all that is needed in “editing”, and, in general, it should work.
Configure NAS server.
Again, we have FreeBSD 8.2 Naked, from which we want it to act as the default gateway for our users.
The necessary module can be simply loaded, but this is a matter of habit, so we will assemble the core with our hands and throw away everything we don’t need.
 # cd / usr / src / sys / i386 / conf /
 # cp GENERIC NAS1
We replace in the config of our new kernel ident GENERIC on NAS1
 options IPFIREWALL
 options IPFIREWALL_DEFAULT_TO_ACCEPT
 options IPFIREWALL_FORWARD
 options IPFIREWALL_VERBOSE
 options IPFIREWALL_VERBOSE_LIMIT = 50
 options IPFIREWALL_NAT
 options LIBALIAS
 options ROUTETABLES = 2
 options DUMMYNET
And collect / put it in one line:
# config NAS1 && cd ../compile/NAS1 && make cleandepend && make depend && make && make install
We make sure that our /etc/rc.conf looks like this somewhere:
 defaultrouter = "1.2.3.3"
 gateway_enable = "YES"
 hostname = "nas1"
 ifconfig_em1 = "inet 1.2.3.4 netmask 255.255.255.0 -rxcsum -txcsum -tso"
 ifconfig_em0 = "inet 172.16.0.2 netmask 255.255.192.0 -rxcsum -txcsum -tso"
 inetd_enable = "YES"
 sshd_enable = "YES"
 firewall_enable = "YES"
 firewall_nat_enable = "YES"
 dummynet_enable = "YES"
 firewall_script = "/ etc / firewall.conf"
 thttpd_enable = "YES"
 thttpd_enable = "YES"
Install thttpd with which we will show graphs.
# cd / usr / ports / www / thttpd / && make install
Excellent NetFlow sensor
# cd / usr / ports / net-mgmt / softflowd / && make install
Expat needed
#cd / usr / ports / textproc / expat2 && make install
And moderately vruchy, but ideally easy to set up bandwidthd for drawing per-user plots
# cd / usr / ports / net-mgmt / bandwidthd / && make install
PHP build with CLI support
# cd / usr / ports / lang / php5 && make install
And the MYSQL module to it
# cd / usr / ports / lang / php5-extensions / && make config && make install
We bring our /etc/firewall.conf to the form:
 #! / bin / sh
 # send netflow to billing server
 / usr / local / sbin / softflowd -i em0 -n 172.16.0.1:42111
 FwCMD = "/ sbin / ipfw -q"
 $ {FwCMD} -f flush
 # user network
 $ {FwCMD} table 2 add 172.16.0.0/18
 # networks which will not be NAT-it
 $ {FwCMD} table 9 add 1.2.3.4/24
 #NAT
 $ {FwCMD} nat 1 config log if em1 reset same_ports
 $ {FwCMD} add 600 nat 1 ip from table \ (2 \) to not table \ (9 \) via em1
 $ {FwCMD} add 601 nat 1 ip from any to 1.2.3.4 via em1
 # default blocking policy
 $ {FwCMD} add 65533 deny all from table \ (2 \) to any via em0
 $ {FwCMD} add 65534 deny all from any to any table \ (2 \) via em0
 $ {FwCMD} add 65535 allow
We expose the correct rights to our firewall initialization script
# chmod a + x /etc/firewall.conf
We collect rscriptd and ensure its launch upon reboot
# fetch http://stg.dp.ua/download/server/2.407-p1/stg-2.407-p1.tar.gz && tar zxvf stg-2.407-p1.tar.gz && cd stg-2.407-p1 / projects / rscriptd / && ./build && gmake install
edit /etc/rc.d/rscriptd, making it look like
 #! / bin / sh
 / usr / sbin / rscriptd
and assign him the right rights
#chmod a + x /etc/rc.d/rscriptd
Expand Ubilling script blanks
 # mkdir ubilling && fetch http://ubilling.net.ua/ub.tgz && tar zxvf ub.tgz && cd ubilling
 # mkdir / etc / stargazer / dn && chmod a + w / etc / stargazer / dn
 # cp -f docs / presets / FreeBSD / etc / stargazer / * / etc / rscripd /
 # chmod a + x / etc / rscriptd / *
We edit the config / etc / rscriptd / config, writing to it the current MySQL parameters so that the GetSpeed, GetUpSpeed, GetMAC scripts can receive user information normally.
Also, do not forget to fix / etc / rscriptd / OnConnect, specifying in it the input interface for shaping, which in our case
IFACE = "em0"
We configure bandwidthd so that he draws beautiful graphics, which we then have to contemplate in Ubilling:
In the file /usr/local/bandwidthd/etc/bandwidthd.conf we enter the network of our users
 subnet 172.16.0.0/18
 dev "em0"
 output_cdf true
 recover_cdf true
add periodic SIGHUP for bandwidthd to crontab -e
3 3 * * * / bin / kill -HUP `cat / var / run / bandwidthd.pid`
And again terrible simlinkovaya magic, so that our thttpd could normally show graphs
 # mv / usr / local / bandwidthd / htdocs / usr / local / www / data / band
 # ln -fs / usr / local / www / data / band / / usr / local / bandwidthd / htdocs
 # cp /usr/local/etc/thttpd.conf.sample /usr/local/etc/thttpd.conf
We provide start up when loading
   # / usr / local / bandwidthd / bandwidthd
   # /usr/local/etc/rc.d/thttpd start
And as a final touch, we add more or less universal things that help to somehow improve the speed in future in /etc/sysctl.conf
 net.inet.ip.fw.one_pass = 1
 net.inet.ip.fastforwarding = 1
 net.inet.tcp.nolocaltimewait = 1
After a reboot, we get a working NAS, remotely receiving commands from the billing system, sending it traffic information and everything else that was required of it.
I would also like to write about setting up a user account, undocumented "features" with the transition to the next month and other things that you can stumble at first. But the article was already too monstrous and boring. I promise, if karma allows, to describe all these things in a separate legend in a week.
Offsite Stargazer
Offsite Ubilling
Source: https://habr.com/ru/post/130937/
All Articles