Framework for web applications built on CodeIgniter

Surely, many web programmers have studied and, perhaps, even used such a wonderful framework as CodeIgniter . I chose him because he has the lowest threshold of entry, he is the most simple to learn, good documentation, fast, etc. etc. For simple projects, the most “it” is to try your hand exactly as a developer. Of course, for more serious projects it is better to use more functional and feature-rich frameworks.
Further I will describe how I “upgrade” CodeIgnite r to use this framework for different projects, since its basic functionality and examples from the documentation, to put it mildly, are very simple, but in life everything is much more complicated. So let's start with.
Before reading it is highly recommended to familiarize yourself with the official CodeIgniter documentation, since The article assumes that at least you have read the main topics and the theme “ Template Parser Class ” and have completed these examples.
The first thing that is very inconvenient in the basic configuration is the separation of controllers, models and mappings into different folders without the possibility of combining any module into one folder. Those. if you want to write, for example, the “ News ” module, which displays news, your module will crawl into three different folders controllers, models, views . And soon it will be unclear which controller belongs to which model and which “views”. It is good if you have one such module. And if there are more than 10, then it becomes very difficult to control.
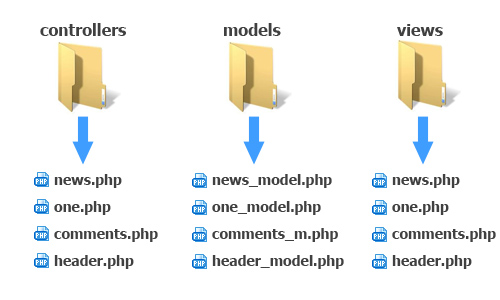
Yes, you can create subfolders inside folders (controllers, models, views) (for example, news, menu, comments ) and throw our controllers, models and views there, as the documentation says, but it seems to me that this is still inconvenient.
It would be much more convenient if we had the modules folder, and in it we created our News module, i.e. folder, and inside it already 3 folders (counter-s, models, views). This functionality provides us with a HMVC extension for CodeIgniter . Download and read the installation instructions at this link .
This extension will allow us to locate our models, controllers, views related only to this module inside each module. It is also possible to create subfolders inside the model, counter-ops or view folders inside these modules, which is very convenient for large modules that have many files.
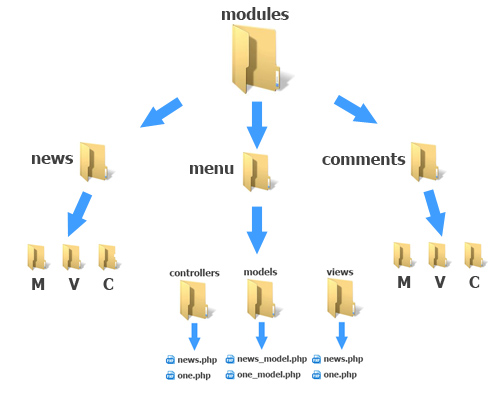
Moreover, it allows us to load several controllers or models from different modules and build a structure that is convenient for us (or run a controller from another model, etc. from one model).
In this, of course, I did not discover anything new. Therefore, we go further.
The basic CI URL is resolved as follows:
example.com/ class / function / ID
')
Those. the first segment is the controller being called (class), the second is the function in it, the third is the parameter passed to the function (maybe the fourth and fifth). Honestly, even for an average project this is very inconvenient, so I decided to build my own URL processing logic, which gives me complete freedom of action. To do this, edit the routes.php file in the application / config folder and write to it:
$route['default_controller'] = "main"; $route[':any'] = "main"; This shows that in any case the main controller will be loaded and the function index () will be launched. Next, create a file in the application / controllers folder and call it “ main.php ”. Do not forget that we have installed the HMVC extension, so our controllers will now be inherited not from CI_Controller , but from MX_Controller . This controller will be the main one, and everything will pass through it. At the same time, it will be very simple and will simply transfer control to other modules. This is what the function index () looks like for me:
function index() { session_start(); // , CI $this->check_lang(); // $this->check_module(); // $this->tp->load_tpl($this->tp->tpl); // $this->tp->print_page(); // } We will not touch the last two lines from the class “tp”. Basic CI does not use PHP sessions, and instead saves data in Cookies (plunging newbies into misleading by calling its Session library, although it works with Cookies). I nevertheless decided to use native PHP sessions, although I did not completely abandon the functionality offered by CI to work with cookies (I use this and that).
So, the first thing I do is check for the language (my projects are often multilingual).
function check_lang() { if ($s=$this->uri->segment(1)) { switch ($s) { case 'ru': define('LANG','ru'); break; case 'en': define('LANG','en'); $this->config->set_item('language', 'english'); break; default: show_404('page'); } } else { define('LANG','ru'); } } It can be seen that the first segment in the URL will be responsible for the language. In the file application / config / config.php, specify:
$config['language'] = 'russian'; To change the configuration language from the controller, use this
$this->config->set_item('language', 'english'); If you are not using multilanguage, just skip this.
The check_module () function should check the second segment of the URL (or the first if you do not use multilanguage) on whether it is a valid module, i.e. I prescribe the allowed modules in the constructor, for example, like this:
function __construct() { $this->modules=array('auth','cabinet','ads','root'); // } Then in the function I check:
function check_module() { if ($m=$this->uri->segment(2)) { if (in_array($m,$this->modules)) { $this->common->load_module($m); $this->tp->tpl=$this->$m->tpl; } else { show_404('page'); } } else { $this->load_main_page(); // , } } Thus, if the second segment is empty, then the main page is loaded. If the URL contains a valid module, then it loads, if not, then it throws it to 404. Next, I create 2 models of tp.php and common.php in the application / models folder, which will be available everywhere for me (I write them in the application / config autoloader /autoload.php ):
$autoload['model'] = array('tp','common'); In tp , the functions for the operation of my simple template that will expand the capabilities of a very weak native will be described. In " common " I write all the other functions that will be used frequently.
Thus, $ this-> common-> load_module ($ m) will load the $ m module (the second segment from the URL) and the index () function in it. Everything is simple here:
function load_module($module) { if (is_dir('application/modules/'.$module)) // , { $this->load->module($module); $this->$module->index(); } } Each module loaded from a URL must use some template of the whole page, for example, such
<!DOCTYPE HTML PUBLIC "-//W3C//DTD HTML 4.0//EN" "http://www.w3.org/TR/html4/strict.dtd"> <html> <head> <meta http-equiv="Content-Type" content="text/html; charset=utf-8" /> <title>{page_title}</title> <link rel="stylesheet" type="text/css" href="{SITEURL}/css/main.css"> </head> <body> <div class="page"> {HEADER} <div class="content"> <div class="page_title"> {title_of_page} </div> <div class="needwidth"> <div class="rightside"> {LOOKED_ADS} </div> <div class="sam_kontent"> {MSG} {CONTENT} </div> <div class="clear"></div> </div> </div> {FOOTER} </div> </body> </html> The main templates for the entire page are created in the application / views / templates folder (the templates folder is created manually). Different modules can use the same templates.
The module controller frame itself looks like this:
class News extends MX_Controller { private $mname; public $tpl; function __construct() { $this->tpl='p_default.tpl'; // $this->mname=strtolower(get_class());// } public function index() { // , .. $this->tp->parse('CONTENT', $this->mname.'/'.$this->mname.'.tpl'); } } In our News module we create 3 folders - controllers, models, views . In the controllers folder, create the news.php file and write the code described above into it. In the function index () we build our logic. For example, I ship the model news_model.php there, located in the models folder of the news module. Already in the model I describe functions for working with the database or other complex functions associated with this module.
In the end, the entire result obtained from the news module is written to the CONTENT label, which is replaced in the template with this result. To understand how this happens, you need to tell how I built the logic of my "template engine".
I just expanded the capabilities of the base “Parser” and brought it into the “human species”. If you don’t know how the base works, first understand it better.
So, consider the “ tp ” model.
There are 2 public variables - $ D , $ tpl . $ D is our global array, which in the end will replace in the template all labels of the form {LABEL} with the contents of $ this-> D ['LABEL'] , worked in modules. $ tpl is the main master template of the entire page, which is written in each module from the URL and is then transmitted to the main controller, where $ this-> tp-> load_tpl ($ this-> tp-> tpl) is called.
We have already seen the parse () function above. Two parameters must be passed to this function, the first is the label to which the result will be saved (html chunk), the second is this html chunk located in the views folder. But parse () will check this html for the presence of tags in it and work them out, if necessary:
function parse($label, $tpl) { $TPL=$this->load->view($tpl, FALSE, TRUE); $pattern = '/{[A-Za-z0-9_]+}/'; // preg_match_all($pattern, $TPL, $MODULES); // foreach ($MODULES[0] as $MODULE) { $module=substr($MODULE,1,-1); if (!isset($this->D[$module])) $this->D[$module]=$this->lang->line($module); // , langs } if (isset($this->D[$label])) { $this->D[$label].=$this->parser->parse($tpl, $this->D, TRUE); } else { $this->D[$label]=$this->parser->parse($tpl, $this->D, TRUE); } } From all this it should be clear that if you create a news.tpl file inside the news module in the views folder and write the simplest html there, for example
<h1> !</h1> Then run example.com/ru/news , then the main controller main.php will start , which will transfer control to the news module, the template p_default.tpl will be loaded there (from the code above).
Then the news module controller replaces {CONTENT} with the contents of the application / modules / news / views / news.tpl file and displays the contents of the p_default.tpl template.
But ... this is still theoretically, because we have not described the functions $ this-> tp-> load_tpl ($ this-> tp-> tpl) and $ this-> tp-> print_page () .
The load_tpl () function accepts a template as a parameter, which is the main one, i.e. template for the entire page (in the views / templates folder). Then this template is checked for other labels, which can be either modules or just variables (such as title or copyright).
Labels in uppercase and with numbers are modules, in lowercase are simple variables. If a replacement tag is not found, they are simply overwritten (deleted). Here is the code itself:
function load_tpl($tpl_name) { $TPL=$this->load->view('templates/'.$tpl_name, FALSE, TRUE); $pattern = '/{[A-Z0-9_]+}/'; $pattern2 = '/{[a-z_]+}/'; preg_match_all($pattern, $TPL, $MODULES); // preg_match_all($pattern2, $TPL, $VALUES); // foreach ($MODULES[0] as $MODULE) { $module=substr($MODULE,1,-1); if (!isset($this->D[$module])) { $this->D[$module]=''; $this->common->load_module(strtolower($module)); } } foreach ($VALUES[0] as $VALUE) { $value=substr($VALUE,1,-1); if (!isset($this->D[$value])) { $this->D[$value]=''; } } $this->D['TPL']=$tpl_name; } At the end of our main controller, the main function is the print_page () function, which should display the worked template on the screen:
function print_page() { $this->parser->parse('templates/'.$this->D['TPL'], $this->D); } All of the above, I tried to simplify as much as possible. In fact, everything is much more complicated and wider for me, but you can do this yourself (because and this, perhaps, not everyone read to the end). In the tp model I still have a bunch of all functions for the template engine, for example:
function clear($label) { $this->D[$label]=''; } function kill($label) { unset($this->D[$label]); } function assign($label, $value='') { if (is_array($label)) { foreach ($label as $l=>$v) { $this->D[$l]=$v; } } else $this->D[$label]=$value; } Understanding their logic is easy. Using $ this-> tp-> assign ('page_title', 'Home Page') , for example, you can simply replace {page_title} with a “Home Page” in the template.
Inside the templates there can also be modules that can display something, for example, the latest news or menu. In the template, they are inserted inside curly brackets, for example, {MENU} or {HEADER}. The parse () function, having encountered such a label, will check whether this label is a module, and if so, replace it with what the module will issue. Such modules are also located inside the modules folder and have their own MVC.
The main controller of the header module, for example, looks like this:
class Header extends MX_Controller { public $mname, $tag; function __construct() { $this->mname=strtolower(get_class());// $this->tag=strtoupper($this->mname); // «» } public function index() { $this->load->model($this->mname.'/'.$this->mname.'_model'); $model=$this->mname.'_model'; $this->$model->index($this->mname); $this->tp->parse($this->tag, $this->mname.'/'.$this->mname.'.tpl'); } } The last function $ this-> tp-> parse ($ this-> tag, $ this-> mname. '/'. $ This-> mname. '. Tpl') will replace {HEADER} with the contents of the modules / header / views file /header.tpl
It should be noted that the module that runs from the URL and is the main one is always the first to work, then the template is loaded and parse () works through all the modules inside it.
For clarity, everything described above is depicted in the picture.
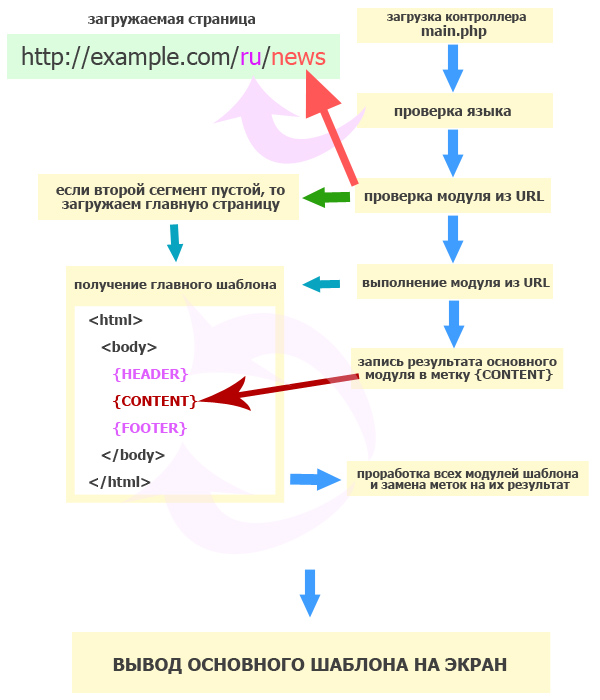
I beg your pardon for the primitive graphics, I'm still a programmer, not a designer.
If you are too lazy to write all this manually, you can download CodeIgniter with my minor modifications and dig out there (link below). I deliberately cut out almost all of my functions, modules, models and everything else, limiting myself only to those described in the article, so that you could try to expand the functionality yourself and not be distracted by everything else.
Of course, it was possible to add a lot more, but the article was so long.
I will be glad to hear the criticism of professionals.
My revised CodeIgniter can be downloaded from here .
UPDATE 10/15/2011
Registered on github.com and added to the repository. I hope I did everything right. Here is the link https://github.com/IbrahimKZ/codeigniter
Source: https://habr.com/ru/post/130387/
All Articles