Centralized deployment of Microsoft Word settings through Group Policy
In many companies, for most users, the main (and sometimes the only) product that most employees use is the Microsoft Word test editor, which is included as a key component of the Microsoft Office software product. In principle, initially after installation, this product is optimally configured, and most people use it without making any changes to the settings. If you look at this software deeper and at least open the Word Options dialog box, you can see that Microsoft Word includes about two hundred different settings that allow you to customize this product directly to fit your needs.
If you are faced with the task of setting up some of the parameters of this product for several computers in your home environment or in a workgroup, I think it will not be difficult for you to go through all the settings and manually change one or another parameter. But if you need to change certain settings for a dozen or hundreds of users located in several departments on different floors, then this occupation will take you a long time, roughly speaking, wasted time.
As many of you know, for the centralized distribution of system-wide settings and settings of some software products, it is advisable to use the functionality of group policy. This article will discuss the distribution of Microsoft Word 2010 settings through Group Policy to computers running Windows 7 operating systems in an Active Directory domain running in Windows Server 2008 R2 domain mode in the fictitious company Biopharmaceutic.
Most likely, at the initial stage of the centralized deployment of settings for a product such as Microsoft Word, this question will arise in your first place. Of course, you will not find such an administrative template either in the Local Group Policy Editor snap-in on the client computer, or in the Group Policy Management Editor snap-in, called from the Group Policy Management snap-in on the domain controller. Since such administrative templates are not initially provided when you install a Microsoft Office software product, you should either write such a template with your own hand, which can take you quite a long time, or try to download such a set of templates from somewhere and then import them into your infrastructure.
Naturally, the second option is of higher priority, since by importing an existing administrative template, you will save yourself from writing thousands of lines and this will save a lot of your time. Naturally, Microsoft gives you this opportunity. In order to download a set of administrative templates for Microsoft Office products, you need to click on the following link and download a set of administrative templates depending on the bitness of the Microsoft Office product installed in your environment.
After the file with the administrative templates is loaded, you need to unpack it before importing the required template. To do this, localize the downloaded file and run it. In the “The Microsoft Office 2010 Administrative Templates” window that appears , accept the terms of the license agreement and click on the “Continue” button. In the "Browse Folder" dialog box that appears , select the folder into which ADMX and ADML files should be initially copied. In just a few seconds the files will be copied to the folder you specified:

Fig. 1. The process of saving administrative template files to a computer
In the next step, you will need to copy the administrative template files to a specific folder so that when you open the Group Policy Management Editor snap -in, you can immediately find the required administrative templates. If you manage the Microsoft Word settings using Group Policy on a computer that is a member of a workgroup, you will need to copy the language-independent ADMX file and the ADML language resources file to the % SystemRoot% \ PolicyDefinitions folder .
If you configure Microsoft Word on computers that belong to an Active Directory domain, you first need to create a central repository, in other words, a separate folder located in % SYSVOL% , which will contain all the required ADMX and ADML files. The procedure for creating a central repository was described in detail in one of my previous articles on working with group policies. The following example will consider the deployment of Microsoft Word settings for computers that are included in the domain.
In order for the Group Policy Management Editor snap-in to not immediately appear a lot of unnecessary administrative templates, I recommend at this stage to copy into the central repository only the file “word14.admx” and “word14.adml” from the language resource folder that has the same language as installed Microsoft Office product on client computers. After you complete all the steps mentioned earlier, you can proceed directly to the process of deploying MS Word settings using Group Policy.
After you have completed all the prerequisites, you can proceed to the process of deploying settings using Group Policy. The following material assumes that Windows 7 and Microsoft Office 2010 are installed on computers for which the group policy object specified in the article is installed. The following example will look at changes to eight program settings located in the categories Spelling , Preservation , "Ribbon" and "Advanced . " So, to make changes to the settings that are present in the above categories, follow these steps:
It's time to check if the previously mentioned Microsoft Word options have been applied to your users' software. Log in under a user account on a computer with installed Microsoft Office 2010 software. Open Microsoft Word, where you will immediately notice on the ribbon that the Developer tab has appeared, the parameter of which was configured in step 9 earlier. Now for the Word options dialog box. As you can see in the following illustration, in the Advanced group, the option “Number of documents in the list of recent files” is set to 30, and centimeters are indicated as the unit of measurement. That is, we can immediately say that at least three of the eight parameters were successfully applied. If you want to check whether the settings for the remaining five parameters have been applied, go to the appropriate groups in the program parameters dialog box and recheck yourself.

Fig. 10. Microsoft Word Options Dialog
In this article, you learned how to centrally customize the Microsoft Word text editor, which is included with the Microsoft Office 2010 software product. The process of creating a group policy object and examples of setting up eight parameters in the Microsoft Word configuration GUI are described in detail. in different groups in the Word Options dialog box.
Naturally, the group policy functionality allows you to configure significantly fewer program parameters than with the graphical interface. Therefore, if you fail to find one or another parameter in the loaded administrative template, you will need to either modify the existing template or use the registry preference item located in Computer Configuration \ Settings \ Windows Configuration \ Registry .
If you are faced with the task of setting up some of the parameters of this product for several computers in your home environment or in a workgroup, I think it will not be difficult for you to go through all the settings and manually change one or another parameter. But if you need to change certain settings for a dozen or hundreds of users located in several departments on different floors, then this occupation will take you a long time, roughly speaking, wasted time.
As many of you know, for the centralized distribution of system-wide settings and settings of some software products, it is advisable to use the functionality of group policy. This article will discuss the distribution of Microsoft Word 2010 settings through Group Policy to computers running Windows 7 operating systems in an Active Directory domain running in Windows Server 2008 R2 domain mode in the fictitious company Biopharmaceutic.
Where can I find administrative templates for Microsoft Word?
Most likely, at the initial stage of the centralized deployment of settings for a product such as Microsoft Word, this question will arise in your first place. Of course, you will not find such an administrative template either in the Local Group Policy Editor snap-in on the client computer, or in the Group Policy Management Editor snap-in, called from the Group Policy Management snap-in on the domain controller. Since such administrative templates are not initially provided when you install a Microsoft Office software product, you should either write such a template with your own hand, which can take you quite a long time, or try to download such a set of templates from somewhere and then import them into your infrastructure.
Naturally, the second option is of higher priority, since by importing an existing administrative template, you will save yourself from writing thousands of lines and this will save a lot of your time. Naturally, Microsoft gives you this opportunity. In order to download a set of administrative templates for Microsoft Office products, you need to click on the following link and download a set of administrative templates depending on the bitness of the Microsoft Office product installed in your environment.
After the file with the administrative templates is loaded, you need to unpack it before importing the required template. To do this, localize the downloaded file and run it. In the “The Microsoft Office 2010 Administrative Templates” window that appears , accept the terms of the license agreement and click on the “Continue” button. In the "Browse Folder" dialog box that appears , select the folder into which ADMX and ADML files should be initially copied. In just a few seconds the files will be copied to the folder you specified:
Fig. 1. The process of saving administrative template files to a computer
In the next step, you will need to copy the administrative template files to a specific folder so that when you open the Group Policy Management Editor snap -in, you can immediately find the required administrative templates. If you manage the Microsoft Word settings using Group Policy on a computer that is a member of a workgroup, you will need to copy the language-independent ADMX file and the ADML language resources file to the % SystemRoot% \ PolicyDefinitions folder .
If you configure Microsoft Word on computers that belong to an Active Directory domain, you first need to create a central repository, in other words, a separate folder located in % SYSVOL% , which will contain all the required ADMX and ADML files. The procedure for creating a central repository was described in detail in one of my previous articles on working with group policies. The following example will consider the deployment of Microsoft Word settings for computers that are included in the domain.
In order for the Group Policy Management Editor snap-in to not immediately appear a lot of unnecessary administrative templates, I recommend at this stage to copy into the central repository only the file “word14.admx” and “word14.adml” from the language resource folder that has the same language as installed Microsoft Office product on client computers. After you complete all the steps mentioned earlier, you can proceed directly to the process of deploying MS Word settings using Group Policy.
Deploying Microsoft Word Settings to Client Computers
After you have completed all the prerequisites, you can proceed to the process of deploying settings using Group Policy. The following material assumes that Windows 7 and Microsoft Office 2010 are installed on computers for which the group policy object specified in the article is installed. The following example will look at changes to eight program settings located in the categories Spelling , Preservation , "Ribbon" and "Advanced . " So, to make changes to the settings that are present in the above categories, follow these steps:
- Open the Group Policy Management snap- in . In the displayed snap-in, in the console tree, expand the node Forest:% forest name% , the Domains node, then the node with the name of your domain. After that, go to the “Group Policy Objects” node and in the selected node create a Group Policy object, for example, “Customize Microsoft Word 2010” . Select the created GPO object, click on it with the right mouse button and select the Edit command from the context menu to open the Group Policy Management Editor snap-in;
- In the Group Policy Management Editor snap -in, expand User Configuration \ Policies \ Administrative Templates . Notice that in addition to the standard child nodes, in the snap-in tree you can find the “Microsoft Word 2010” node with eight child nodes and many policy settings. The following illustration shows the Group Policy Management Editor snap-in with the Microsoft Word 2010 node expanded:
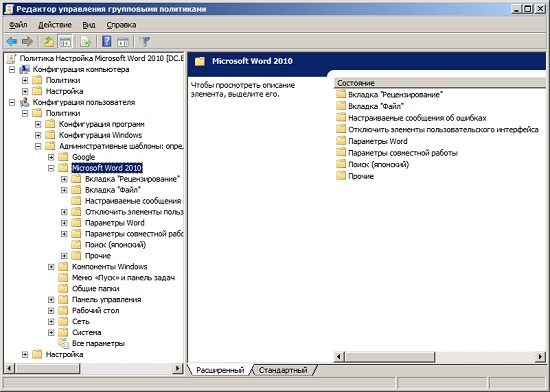
Fig. 2. The “Microsoft Word 2010” node of the Group Policy Management Editor
') - In the new menu, Microsoft Word 2010, a new menu, Backstage, where you can view the latest open documents. By default, it displays the 25 most recently opened Microsoft Word documents. Using Group Policy settings, you can change the default value. To do this, go to the "Advanced" node and select the "Number of documents in the list of recent documents" policy option. In the dialog box that appears, select the check box for the options to enable and in the corresponding field, specify the number of documents that you think will be optimal for your users. For example, as can be seen below, I have specified the maximum number of 30 documents:
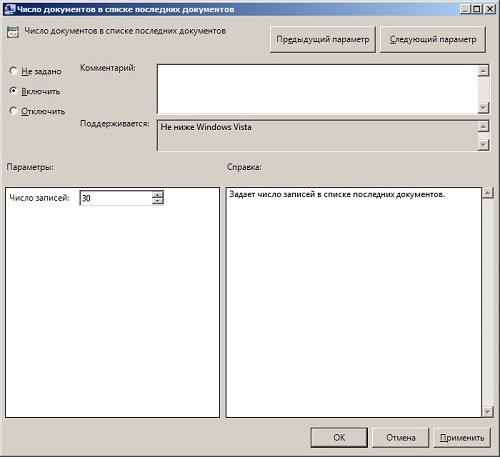
Fig. 3. Policy settings "Number of documents in the list of recent documents" - The next setting, which will be changed, is a parameter that indicates automatic spelling. I believe that every person who has worked at least once in any version of Microsoft Office may have noticed that when you enter the wrong words, they will be underlined by a wavy red or green line. These underscores indicate that the program has an automatic spelling and grammar checker, during which the text editor compares the words you entered with words from the main dictionary. To prevent users from accidentally turning off this feature and not showing their true literacy to their colleagues, you need to prevent users from unchecking this box. In the settings of Microsoft Word, this setting is located in the "Spelling" group of the " Word Options " dialog box. To do this, in the “Microsoft Word 2010” node of the Group Policy Management Editor, expand the “Word Options” node and select the “Spelling” node. Open the "Automatically check grammar" properties dialog box, select the "Enable" option. In addition, to enable automatic checking of grammatical errors, select the appropriate checkbox and select from the drop-down list the color used to mark grammatical errors. The default color is red. The configured policy setting is shown in the following illustration:
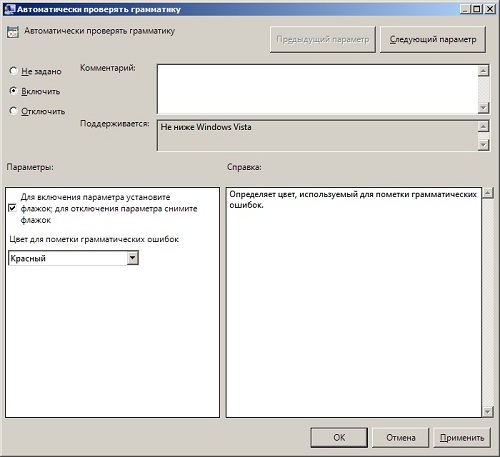
Fig. 4. Automatically check grammar policy settings - If there can be grammatical errors, then you should not exclude the option that users can also make spelling errors. Therefore, it would be nice if, in addition to the previous policy setting, you also configure a policy setting that performs actions similar to the actions of the Check Spelling check box from the program settings dialog box. To do this, in the “Spelling” node , open the “Also check spelling” policy settings dialog box. In the dialog box that appears, select the option “Enable” ;
- You can often come across situations when users forget that they have the Caps Lock key turned on and, without looking at the screen, they enter text for a few minutes and then raise their heads and nervously begin to erase entire paragraphs with shouts and re-enter the whole text. This can be avoided by checking the appropriate box in the AutoCorrect options dialog box. In order to centrally specify this setting to all your users, go to the “AutoCorrect” node and open the “Eliminate the consequences of accidental pressing of cAPS LOCK” policy settings window. In the dialog box that appears, as you can see in the following illustration, set the switch to the “Enable” option:
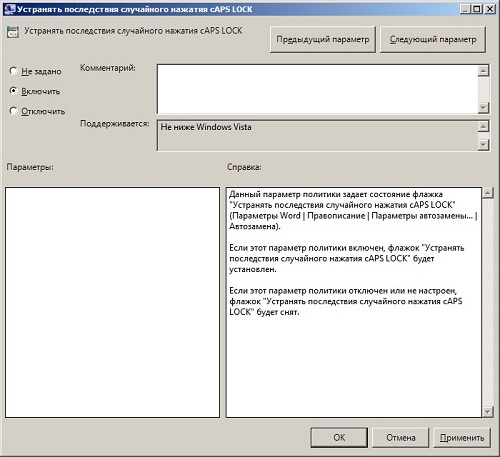
Fig. 5. Policy settings "Eliminate the effects of accidental pressing cAPS LOCK" - Microsoft Word functionality also supports excellent auto-formatting for typed text. For example, you can set a parameter that allows you to automatically replace fractions of type 1/2 with the corresponding signs. To do this, in the “AutoFormat on Input / Replace on Input” node , open the properties of the parameter “Fractions (1/2) with appropriate characters” and set the switch to the “Enable” option. As you can see below, using the graphical interface, you can specify the same parameter on the AutoFormat tab of the AutoCorrect dialog box for the spelling options of Microsoft Word:
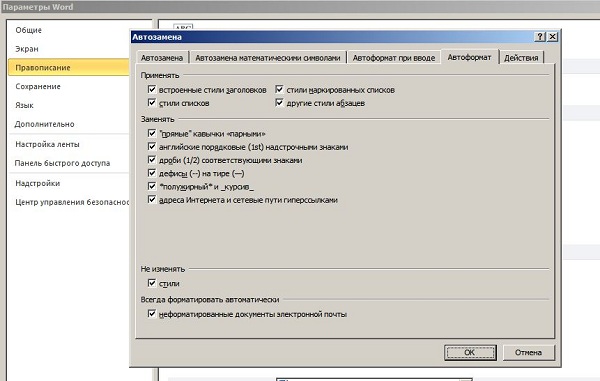
Fig. 6. AutoFormat settings - Did your users ever have such situations when, after they typed a huge part of their document, the text editor closed with an error or the computer “reluctantly” restarted, or did the lights turn off in the building? For certain, such situations happened. In order for users to save their documents as often as possible, you can configure the settings for automatic saving. To do this, go to the “Save” node and open the “Autosave” parameter properties dialog box. In the dialog box that appears, set the switch to the “Enable” option, and then, using the appropriate control, set the required time in minutes, for example, to 3 minutes. Now your users can worry less about losing their data:

Fig. 7. Autosave policy settings - In addition to users who only enter text, you may also have employees who periodically write a variety of macros, and as many of you know, there is a hidden “Developer” tab for writing macros in the Microsoft Office 2010 ribbon. Experienced users who really need such a tab turn it on automatically. I think it would be much more convenient for such users if this tab was displayed automatically. To do this, in the “Configure ribbon” node in the Group Policy Management Editor, select the “Show Developer tab” option in the ribbon . In the properties dialog of the current parameter, select the “Enable” option;
- The last parameter, which will be discussed in this article, is intended to determine the units of measurement used for the horizontal ruler, as well as the markup in the dialog boxes of the program by default. Both in the graphical interface of the program and in Group Policy, you can specify such units of measure as "Inches" , "Centimeters" , "Millimeters" , "Points" or "Peaks" . To specify units of measure using Group Policy, for example, centimeters, in the Advanced node , open the "Units of Measurement" parameter properties dialog box. In the dialog box that appears, select the “Enable” checkbox and select the required unit of measurement from the drop-down list, for example, as shown below:
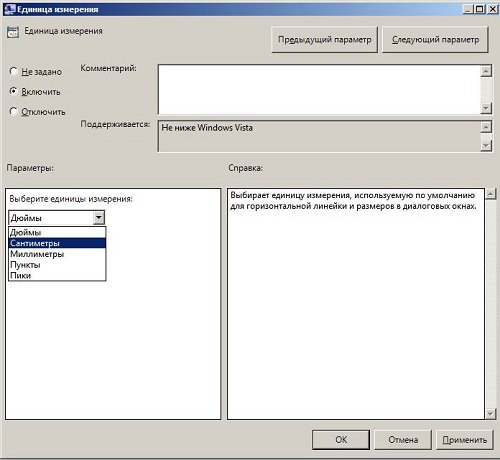
Fig. 8. Units of Measure policy settings - Of course, the above eight Microsoft Word settings are only a small part of the number of parameters that you can customize for your employees to work optimally with this program. After all the settings you specified are entered, you should link the GPO object you created to the unit containing the accounts of your users. In this example, such a unit is the “Users” unit, which is the parent unit in the hierarchy of divisions with user accounts. Close the Group Policy Management Editor snap-in and associate the newly created group policy object. To do this, in the console tree of the Group Policy Management snap- in, select the organizational unit, right-click on it, and select the Link existing GPO from the context menu. In the "Select a Group Policy Object" dialog box that appears , select this GPO and click on the "OK" button . Expand the Users container and select the associated GPO. Click the Table tab , and since the current GPO has configured only those parameters that are located in the User Configuration node , select the Computer Configuration Settings Disabled option from the GPO Status drop-down list. In the warning dialog box, click on the "OK" button .

Fig. 9. Disable Computer Configuration Settings for the Associated GPO
It's time to check if the previously mentioned Microsoft Word options have been applied to your users' software. Log in under a user account on a computer with installed Microsoft Office 2010 software. Open Microsoft Word, where you will immediately notice on the ribbon that the Developer tab has appeared, the parameter of which was configured in step 9 earlier. Now for the Word options dialog box. As you can see in the following illustration, in the Advanced group, the option “Number of documents in the list of recent files” is set to 30, and centimeters are indicated as the unit of measurement. That is, we can immediately say that at least three of the eight parameters were successfully applied. If you want to check whether the settings for the remaining five parameters have been applied, go to the appropriate groups in the program parameters dialog box and recheck yourself.
Fig. 10. Microsoft Word Options Dialog
Conclusion
In this article, you learned how to centrally customize the Microsoft Word text editor, which is included with the Microsoft Office 2010 software product. The process of creating a group policy object and examples of setting up eight parameters in the Microsoft Word configuration GUI are described in detail. in different groups in the Word Options dialog box.
Naturally, the group policy functionality allows you to configure significantly fewer program parameters than with the graphical interface. Therefore, if you fail to find one or another parameter in the loaded administrative template, you will need to either modify the existing template or use the registry preference item located in Computer Configuration \ Settings \ Windows Configuration \ Registry .
Source: https://habr.com/ru/post/130327/
All Articles