Experience using TFS 2010: (Control System. Rights and Policies)
Last time, I wrote about creating branches, Experience in using TFS 2010: (System of control . Branches. Creation ) and one of the variants of their hierarchy. In this part I will try to reveal the work with the control system and in more detail and focus on the means of controlling access to the code in the branches and CheckIn policy.
Setting permissions on actions in branches
And so, the next step will be setting permissions to branches and prohibiting certain actions, so that the code is always of high quality. There is a small digression, there is no such possibility in ClearCase UCM, there are only some rights settings, for example, such a setting, how not to do Deliver (Merge to the site branch or integration branch) if the file is in check-out, or to forbid doing Merge from the branch developer to a branch of another developer. But all these settings apply to all users. Of course, the system administrator can create several groups with different rights, but this configuration is available only on the server side, and as I said, no non-system administrator can do this.
In TFS2010, however, it is possible to customize the access rights to branches individually, for example, you can allow the integrator to do Merge into the integration branch and the site branch, but to forbid the developer.
And this can be done by the project administrator (for example, the project leader, or the project manager). I will not describe all possible options for setting permissions. I will only show one of the possibilities, for example, to prohibit developers from making changes in the site branch and in another branch, and work only in their own.
So that all changes merge into the site branch through a single access point - Integrator, which is responsible for the quality of the code head. To do this, I created the Integrators user group and allowed them to do some things above the integration branch and the site branch; I forbade all others to do these things, see Figure 1 and Figure 2.
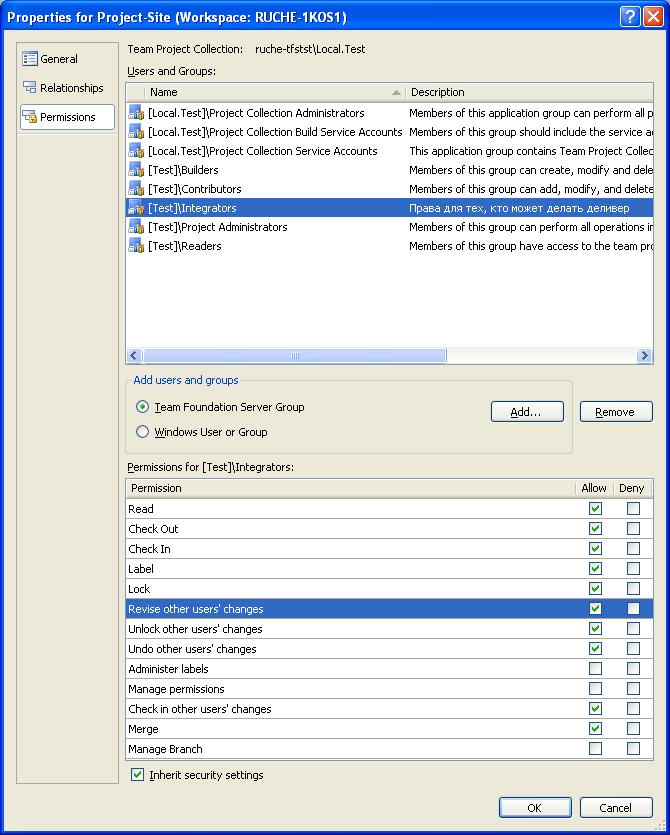
Figure 1 - The rights of the integrator over the site and the integration branch
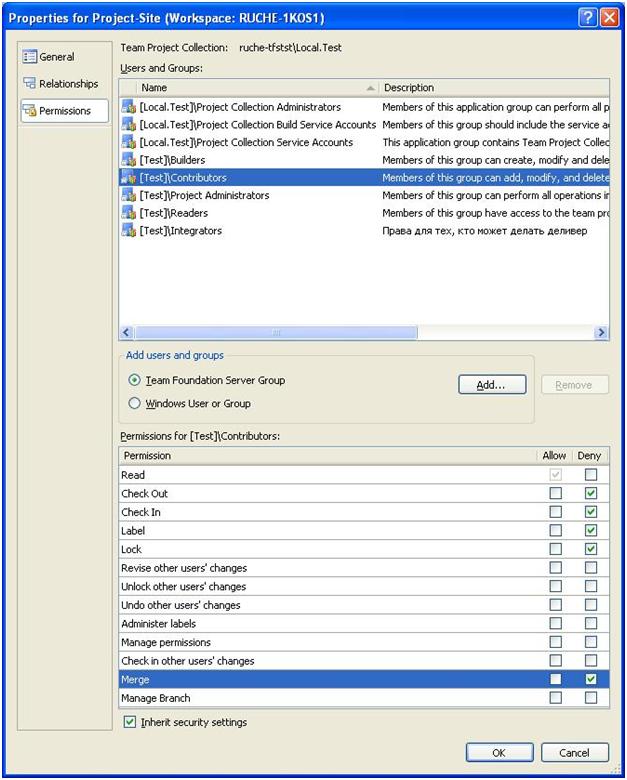
Figure 2 - Developer rights over the site and integration branch
')
It is also necessary to prohibit developers and integrator from climbing other people's branches and making changes to them, for example, I forbade Integrator to make changes to the Trollik developer branch, see Figure 3 and left him the right to only watch the code.

Figure 3 - The rights of the integrator in the developer branch
Naturally, the developers of lamerok and Trollik need to put full access rights to their branch. I have achieved what I wanted, now we have a system that obeys the rules:
- You can not change the code in other branches
- Only an integrator has the right to change the code in the site and integration branch.
- All available code for reading from any branch
Check-in policy
And so, I forbade the developers themselves to merge their changes into the site branch, and also to change the code not in their own branches. Now you need to prevent them from doing check-in poor-quality code.
This option is not available in ClearCase, since this operation is already related to the workflow management section and does not have to be associated with the monitoring system itself, however TFS is an integrated system, here it can and should be done.
I always have to be sure that even in their branches, the developers of the code meet the quality standard. But before doing the settings, I will add an empty project, so that there is something to work on.
After that, you can configure the check-in policy. To do this, in Team Explorer, click on the project, right-click, select Team Project Settings and Source Control, see Figure 4.

Figure 4 - Selecting the CheckIn policy settings
We have the opportunity to choose from 4 options:
- Builds policy - prohibits doing check-in code if there are errors during the build (compilation)
- Code Analysis policy - prohibits doing check-in code if there are Code Analysis errors (it will also be revealed at the stage of compilation by means of Code Analysis)
- Testing Policy - forbids doing check-in code if at least one of the tests from the list has ended unsuccessfully. In most cases, unit tests are meant here, but nothing prevents you from adding system tests such as user interface tests to this list.
- WorkItem - prohibits doing check-in code if the developer has not associated the changes with the task or bug, or any other type of work item that is assigned to it.
Of course, I want to choose everything, because I am very worried about the quality of the code, see Figure 5
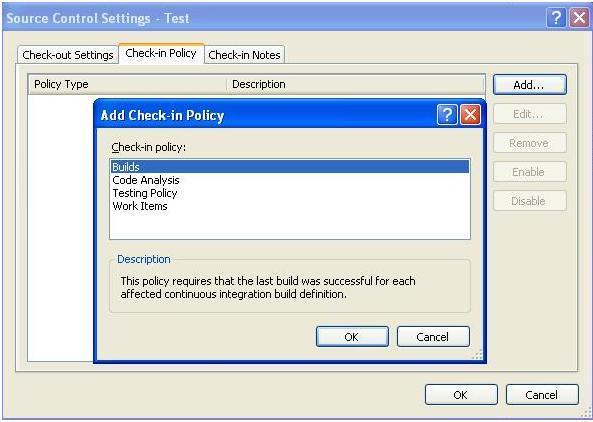
Figure 5 - CheckIn Policy
Consistently add the Build policy and CodeAnalysis. For Code Analysis, I’ll select the minimum recommended by Microsoft, I’m not a beast, and developers should have at least some space for creativity, see Figure 6.

Figure 6 - CheckIn Code Analysis Policy
The next step - I need to add a policy Testing Policy, the situation here is a bit more complicated. We currently do not have a list of tests. We need to create it. To begin, add to the file MyClass.cs. which we have in the project, a simple method that returns true if the number is greater than 0 and false otherwise, see Figure 7.

Figure 7 - Method class MyClass
After that we can create a test for the MyMethod method and add this test to the list of tests. To do this, we need to add a test project to the solution, this is easy to do, by standing on the solution and using the right mouse button select the menu Add-> New Project-> Test Project. After this operation, the test file appeared, and the settings for the tests in the Solution Items list, but the file does not contain any test or test list, because we have not yet created tests, and now that the test project has been created, we can easily do this using the right mouse, getting up on the method, see Figure 8.
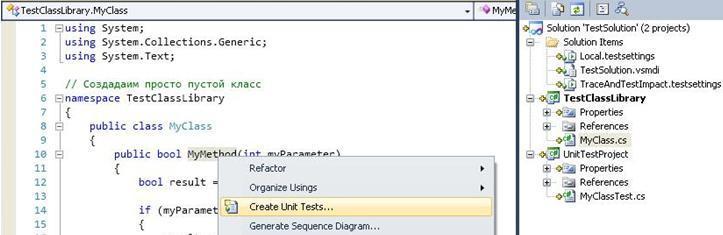
Figure 8 - Creating a unit test
The unit test became automatic, and by default, it does not pass. In addition, now this unit test is in the TestSolution.vsmdi-> All Loaded Tests test file. However, we need to create a list of tests that will be run before each checkin operation. Create such a list by clicking on the file TestSolution.vsmdi, in a solution. Let's call it TestForCheckInPolitics and then move our unit test to this list, see Figure 9.
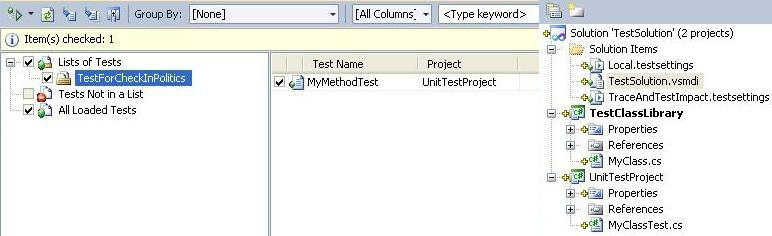
Figure 9 - Creating a list of tests for the CheckIn policy
Now that we have a list of tests, we need to add it under control. To do this, check in the test file (TestSolution.vsmdi). After that we can add it to the policy. To do this, select the Testing Policy in the window shown in Figure 5, specify the test file and the list of tests for the CheckIn policy, see Figure 10
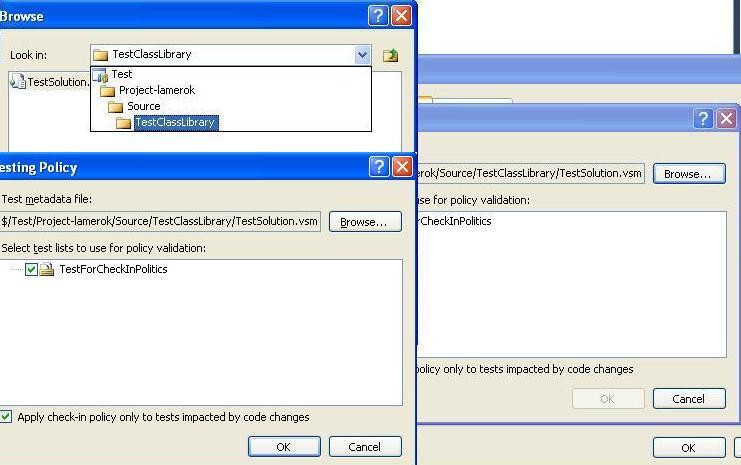
Figure 10 - Selecting a list of tests for the CheckIn policy
In addition, in order to be sure that the developer changes the code only on the instructions, we will install the latest policy - to link CheckIn with the work item.
After the CheckIn policy is configured, we will try to check in our code. As can be seen from Figure 11, we have suffered a complete fiasco.

Figure 11 - The CheckIn policy worked
All politicians worked at once, we will try to consistently correct the situation.
To begin, we will enable CodeAnalysis for the projects of the solution and set the rules for them, the same as we set for the CheckIn policy (minimum recommended by Microsoft), then we will build the build, run the unit tests and try to check the files again, as shown in Figure 12, we are still We cannot do this because our test fails and we have not indicated a link to the work item.
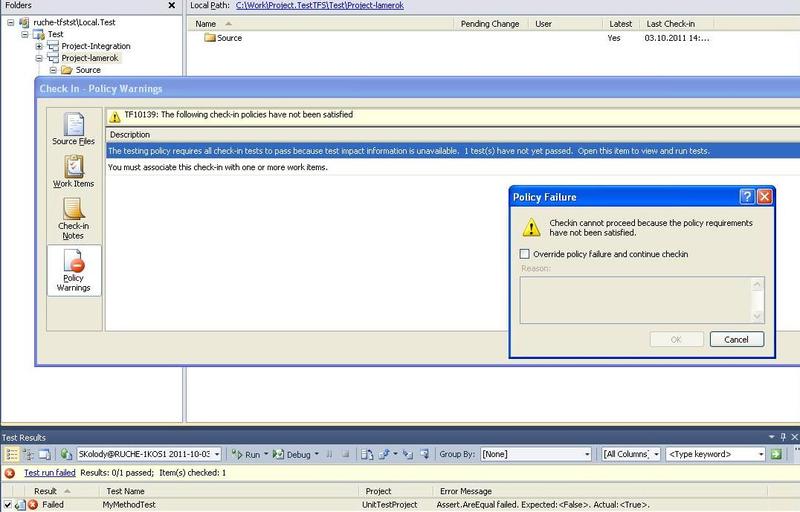
Figure 12 - CheckIn Policy Violation
Let's change the unit test so that it passes, and associate our work with the work item, see Figure 13.
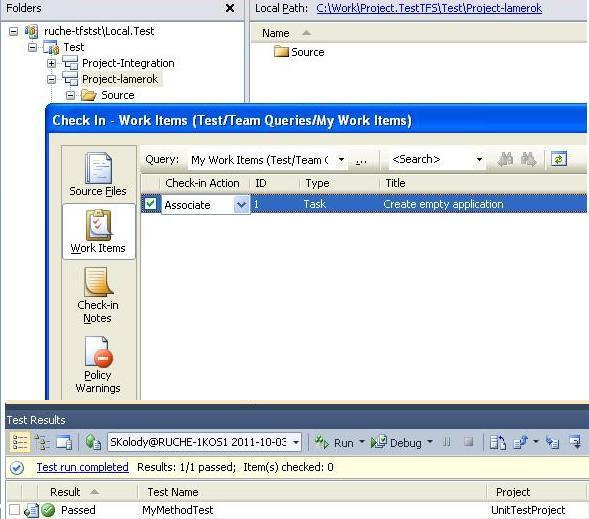
Figure 13 - Linking to the work item
Now the system has given us to check in the files and the whole team is sure that the developer’s branch always contains the code that builds without problems and does not affect the work of the rest of the system, since it passed all unit tests.
It should be noted that you can bypass the policy by checking the Override Policy box, but in this case you will have to write a reason, and your project manager or leader will receive a malicious letter describing the violation.
Such a process has repeatedly rescued the team from unauthorized changes. In the beginning, the team was a bit slow, because, before that, everything was done in haste, but over time the team got used to it, and the errors in the developed software became much less. In general, team development, and the exchange of changes in the TFS version control system, is a separate topic for a separate post ...
Useful links:
Team Development Using Visual Studio Team Foundation Server: Reference
Source: https://habr.com/ru/post/130280/
All Articles