Debugging drivers for Windows: VirtualBox + WinDbg
Foreword
Once I needed to write a driver under Windows XP SP2. Immediately there was a question of debugging. I really didn’t want to use sophisticated SoftIce, to rebuild with every error or to roll back. Therefore, it was decided to use the VirtualBox virtual machine, which I often use and is quite pleased with the characteristics, and the Microsoft Windows Debugger debugger. A few hours later, in the WinDbg window, the lines on C happily loomed, and it was decided to make a “reminder”, which turned out to be a good “HowTo”. So, let's begin...
Howto
one
[Host - machine]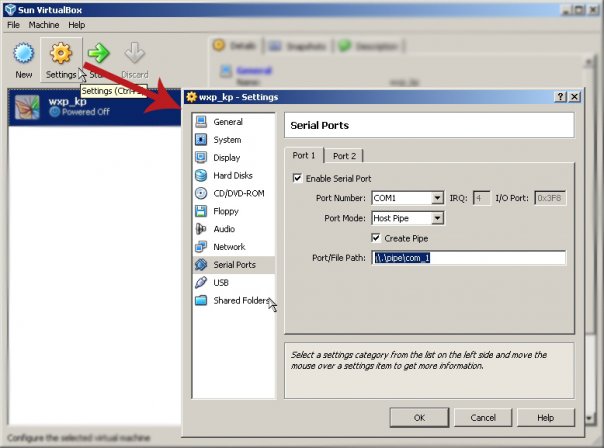
')
First you need to configure the COM port of the virtual machine.
To do this, select in [Port Mode] [Host Pipe] and write the name of the pipe (preferably \\. \ Pipe \ com_1).
Next, run the "victim".
2
[Target - machine]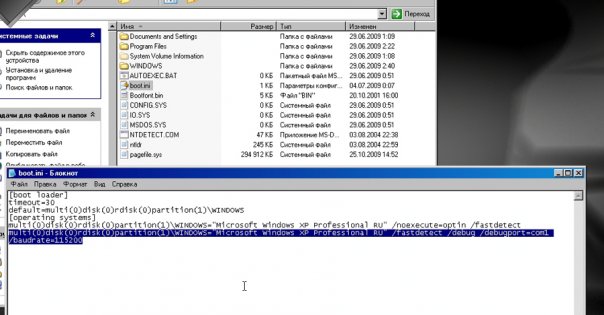
Now we’ll change boot.ini a little bit. Initially, it was only that which is not highlighted (in the picture).
Add a new line by copying the first one and adding several lines as in the picture.
If not visible, change the line of the type multi (0) disk (0) rdisk (0) partition (1) \ WINDOWS = "Microsoft Windows XP Professional RU" / noexecute = optin / fastdetect so:
multi (0) disk (0) rdisk (0) partition (1) \ WINDOWS = "Microsoft Windows XP Professional RU" / fastdetect / debug / debugport = com1 / baudrate = 115200
We are overloaded and choose from 2 points an option where in square brackets at the end there is something like “with debugger” or “With debugger”.
3
[Target - machine]
Create a driver skeleton — the make.bat, SOURCES and MAKEFILE files:
%SystemRoot%\system32\cmd.exe /c "cd %DDK_PATH%\bin\&&setenv.bat %DDK_PATH%\&&cd E:\vbg\debug\&&build -ceZ"
copy bin\i386\*.pdb %DBG_SYM_PATH%
copy *.c %DBG_SRC_PATH%
copy *.cpp %DBG_SRC_PATH%
copy *.h %DBG_SRC_PATH%
copy *.hpp %DBG_SRC_PATH%
pause
(instead of E: \ vbg \ debug \ enter the name of the folder where your driver is located)
TARGETNAME=driver
TARGETPATH=bin
TARGETTYPE=DRIVER
C_DEFINES=$(C_DEFINES)
INCLUDES=C:\WINDDK\2600\inc
SOURCES=driver.cpp
RELEASETYPE=DDK

!INCLUDE $(NTMAKEENV)\makefile.def
four
[Target - machine]
Now the driver.cpp driver itself, above the main code:
extern "C"{
#include "ntddk.h"
}
#include "struct.h"
VOID OnUnload(IN PDRIVER_OBJECT DriverObject){
DbgPrint("OnUnload called\n");
};
extern "C" NTSTATUS DriverEntry(IN PDRIVER_OBJECT theDriverObject,IN PUNICODE_STRING theRegistryPath){
AB v = {2,3};
PAB pv = &v;
_asm int 3 ;
v.a++;
pv->b++;
DbgPrint("a = %d, b = %d\n",va,vb);
theDriverObject->DriverUnload=&OnUnload;
return STATUS_SUCCESS;
}
This driver causes the debugger to interrupt int 3.
five
[Target - machine]
Auxiliary incl - file struct.h:
typedef struct _ab{
int a,b;
}AB, *PAB;
6
[Target - machine]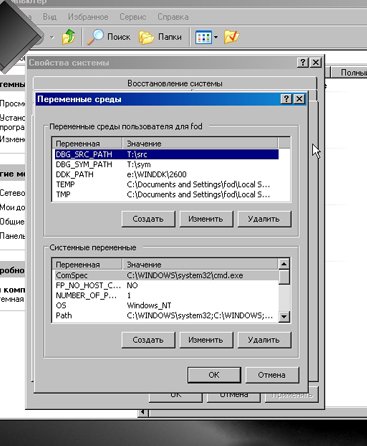
Now go to My Computer -> Properties -> Advanced -> Environment Variables and add three variables:
DBG_SYM_PATH- Path to the folder where symbol files will be placed *
DBG_SRC_PATH - Path to the folder where they will be placed with the code **
DDK_PATH - Path to DDK
** + * = In turn, these folders should be located on the previously created disk for the balls.
7
[Target - machine]
Now you can start building - do a double-click on make.bat, and if everything went fine beforehand, then a window should appear with contents similar to the top one and several additional files in the driver directory.
eight
[Host - machine]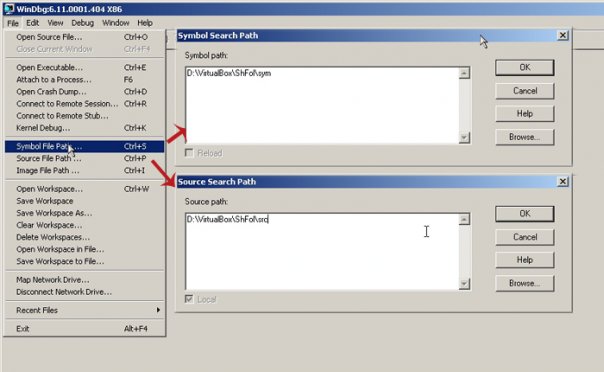
Let's write in the debugger paths to folders with symbols and code files (they should be located in the folder with the ball)
9
[Host - machine]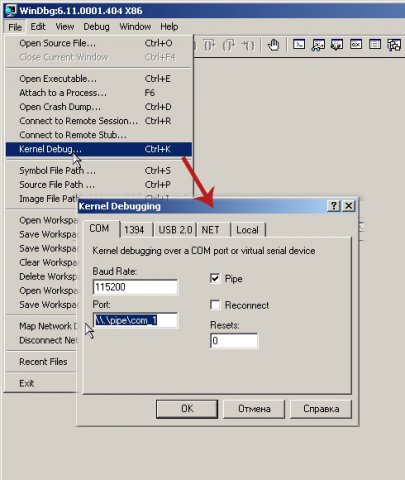
Actually we enter in Port \\. \ Pipe \ com_1 we start debugging (the debugger will write that it does not plow, but this means that it is just waiting on the target-machine for an interrupt or some other event.
ten
[Target - machine]
Download the [KmdKit] toolkit to work with any kernel and not just utensils from the KmdKit link and launch KmdManager (which is in the tools folder) - the program for installing / starting / stopping / uninstalling the driver.
After starting, write the path to the driver (you can simply drag it with the mouse) and click register + run - the system will immediately hang - this should be, because the debugger intercepted the interrupt and stopped the entire system. Go to the host machine and see the next item.
eleven
[Host - machine]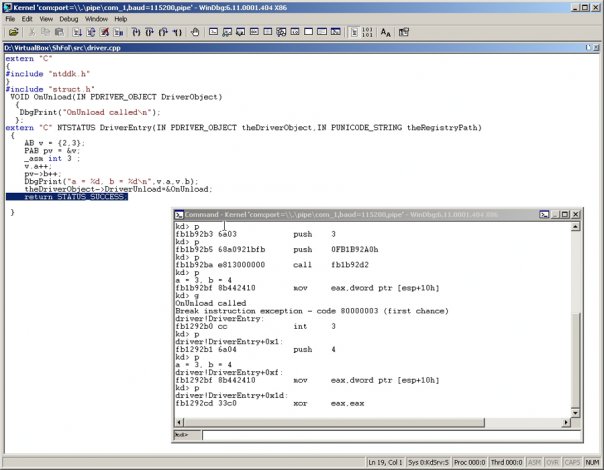
The debugger surfaced and something appeared on top (if it didn’t appear, then you have to wait a bit).
We take steps - we press F10 until we reach the end of the program and at the end in the window “Command-Kenel” we type g and we press Enter. After pressing g, the system will go to free float and the target will be unlocked.
Go to the taget-system and the next item.
12
[Target - machine]Click Stop - Unregister.
If everything went the way I wrote, then you did it. If not, ask questions. Hope this information was helpful.
Thanks for attention.
Source: https://habr.com/ru/post/130213/
All Articles