How to speed up Android emulator by 400%
For the past few months, I have been working on the Android SDK, part of the Nuxeo content management platform. Especially a lot of work was recently, with the approach of the official release of the SDK. I want to share a few practical tips on developing for Android, in particular testing and emulation. After several days of development, I realized that working with the Android emulator is not sugar, because it is monstrously slow.
Let's start with the fact that it starts up slowly, but even if you use the state snapshot to speed up the launch, the code still runs slowly, especially in debug mode.
Tweaking the parameters of Qemu didn’t help much - the emulator speed was slow, which is probably why most developers prefer to use real devices connected via USB.
')
In any case, I wanted to find a solution, because I wanted to show the result of the application on the projector and did not want the application being demonstrated to slow down.
I am not developing software for Apple's platforms, but it seems that the iPhone simulator does not have such performance problems as the Android emulator.
One of the reasons is that it does not work like a “real simulator”, because The CPU instructions used in the iPhone simulator are the same as those of the computer running the simulator (x86).
Android, on the other hand, has to emulate a real ARM architecture processor over an x86 processor. This adds a fairly significant overhead in terms of performance.
At least to demonstrate the application, I have no need to emulate ARM, I only need the ability to run Android and my application.
Fortunately, there is an open source project for porting Android to x86 processors: http://www.android-x86.org/ .
The project has several images for download, and although they do not keep up with all the official releases of the Android SDK, they provide a boot image of Android 2.3, which I was interested in.
First step: download the ISO image of Android_x86. I used
The next step: creating a virtual machine capable of running this image.
I used VirtualBox, but I heard that QEmu is also a good fit.
So, in VirtualBox you need to create a new machine:
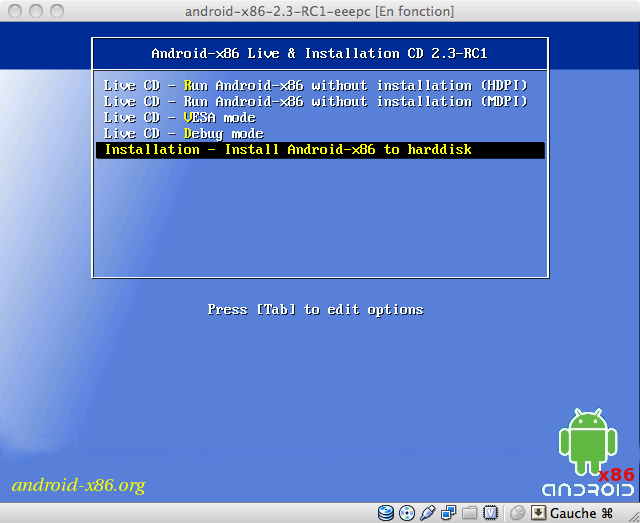
In the boot menu, select the installation on the hard disk:
The installation process will have to do the following:
When the installation is complete:
We load the virtual machine: you now have a working image of Android x86.
But since it is configured by default for the Eee PC, it is not ideal for testing applications designed for the smartphone screen.
Now we need to change the configuration under the phone screen.
Turn off VM and VirtualBox.
First step: create new resolution modes. I defined 3 modes:
Here, Android2.3 is the name of the created virtual machine.
Now that we have announced new modes, it is necessary to use them. To do this, you have to change the parameters of the kernel.
To do this, you need to restart the virtual machine and select Debug mode in the boot menu so that Android loads with the command line.
We start the virtual machine.
When it starts up, we will remount the boot partition in read / write so that we can change the configuration of Grub.
After that you can edit the menu.lst file.
Now duplicate the first menu item (3 lines) and edit the kernel parameters (the first “title” entry and the next two lines).
The default settings are:
The parameters I used are:
Name enter what you like.
If you want to choose the resolution when downloading, you can do this:
Save your menu.lst (: wq) and restart the virtual machine using the VirtualBox menu.
Now you can start the Android virtual machine, which will look like a phone.
Some tips on using a virtual machine:
The goal was to use the new virtual machine from Eclispe to test and debug applications. For this to work, it’s tedious to set up a network connection between the host operating system (where Eclipse is running) and the guest VM. For this, VirtualBox has several settings in Network settings:
When the network is configured, restart the virtual machine, enter the command line (Alt + F1) and enter:
This will display the current IP of the virtual machine. Usually it will be something like 192.168.56.101 for the guest machine, the main address is 192.168.56.1.
On the main machine, open the command line, go to the platform-tools for Android directory:
This will register the virtual machine as a new device:
Now you can run and debug your application directly from Eclipse.
As you can see, the speed increase is very noticeable:
Use the documentation located at http://www.android-x86.org/documents/sdcardhowto .
From the Android command line:
Now we restart the VM in debug mode, rewrite the partition in read + write mode, and edit menu.lst to add one kernel parameter:
It takes a little more work.
First you have to create a new hard disk in VirtualBox and connect it to a virtual machine.
Now we start the machine in debug mode. Use fdisk to create a partition. When the partition is created, you need to format it:
Now edit menu.lst and add the parameter:
While the virtual machine is working as expected, and besides the speed of the differences, I did not notice any special differences. All Android projects are installed correctly. Sample projects from the SDK are built and work fine.
The only noticeable glitch: the gallery application (Cooliris) is broken, I tried with the last nightly build of the image - it became a little better, but the problems still remain.
Another oddity: in about 10% of cases, the virtual machine does not load and it has to be rebooted. Since the download is very fast, it doesn’t bother much, but I’ll still try to understand what the matter is.
Here the differences are visible to the naked eye.
Here are some numbers to make it clearer how fast everything is:
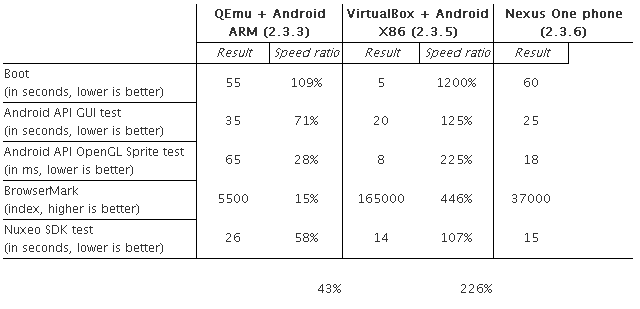
The Android emulator on ARM is about half slower than the Nexus One, and Android x86 is about twice as fast.
Let's start with the fact that it starts up slowly, but even if you use the state snapshot to speed up the launch, the code still runs slowly, especially in debug mode.
Tweaking the parameters of Qemu didn’t help much - the emulator speed was slow, which is probably why most developers prefer to use real devices connected via USB.
')
In any case, I wanted to find a solution, because I wanted to show the result of the application on the projector and did not want the application being demonstrated to slow down.
Emulation vs simulation
I am not developing software for Apple's platforms, but it seems that the iPhone simulator does not have such performance problems as the Android emulator.
One of the reasons is that it does not work like a “real simulator”, because The CPU instructions used in the iPhone simulator are the same as those of the computer running the simulator (x86).
Android, on the other hand, has to emulate a real ARM architecture processor over an x86 processor. This adds a fairly significant overhead in terms of performance.
At least to demonstrate the application, I have no need to emulate ARM, I only need the ability to run Android and my application.
Android_x86
Fortunately, there is an open source project for porting Android to x86 processors: http://www.android-x86.org/ .
The project has several images for download, and although they do not keep up with all the official releases of the Android SDK, they provide a boot image of Android 2.3, which I was interested in.
Setting up Android_x86 inside VirtualBox
First step: download the ISO image of Android_x86. I used
android-x86-2.3-RC1-eeepc.iso , which can be downloaded from http://www.android-x86.org/download .The next step: creating a virtual machine capable of running this image.
I used VirtualBox, but I heard that QEmu is also a good fit.
So, in VirtualBox you need to create a new machine:
- target OS: choose Linux
- target OS version: other
- I used 1GB RAM and 1 CPU (left the default settings)
- add hard drive: VDI drive, dynamic size, 512 Mio
- add the cdrom to which the downloaded ISO is loaded
In the boot menu, select the installation on the hard disk:
The installation process will have to do the following:
- create a new partition on the hard disk
- format it in ext3
- choose this section to install Android
When the installation is complete:
- turn off the virtual machine
- remove the CDROM device indicating the ISO image (in the VirtualBox configuration window)
We load the virtual machine: you now have a working image of Android x86.
But since it is configured by default for the Eee PC, it is not ideal for testing applications designed for the smartphone screen.
Now we need to change the configuration under the phone screen.
Turn off VM and VirtualBox.
First step: create new resolution modes. I defined 3 modes:
VBoxManage setextradata "Android2.3" "CustomVideoMode1" "320x480x16" VBoxManage setextradata "Android2.3" "CustomVideoMode2" "640x960x16" VBoxManage setextradata "Android2.3" "CustomVideoMode3" "480x720x16" Here, Android2.3 is the name of the created virtual machine.
Now that we have announced new modes, it is necessary to use them. To do this, you have to change the parameters of the kernel.
To do this, you need to restart the virtual machine and select Debug mode in the boot menu so that Android loads with the command line.
We start the virtual machine.
When it starts up, we will remount the boot partition in read / write so that we can change the configuration of Grub.
mount -o remount,rw /mnt After that you can edit the menu.lst file.
vi /mnt/grub/menu.lst Now duplicate the first menu item (3 lines) and edit the kernel parameters (the first “title” entry and the next two lines).
The default settings are:
quiet root = / dev / ram0 androidboot_hardware = eeepc acpi_sleep = s3_bios, s3_mode DPI = 240 SRC = / android-2.3-RC1
The parameters I used are:
quiet root = / dev / ram0 androidboot_hardware = generic_x86 acpi_sleep = s3_bios, s3_mode DPI = 240 UVESA_MODE = 480x720 SRC = / android-2.3-RC1
Name enter what you like.
If you want to choose the resolution when downloading, you can do this:
quiet root = / dev / ram0 androidboot_hardware = generic_x86 acpi_sleep = s3_bios, s3_mode vga = ask SRC = / android-2.3-RC1
Save your menu.lst (: wq) and restart the virtual machine using the VirtualBox menu.
Now you can start the Android virtual machine, which will look like a phone.
Some tips on using a virtual machine:
- If you do not see the mouse on the Android screen, use the VirtualBox menu to turn off mouse integration (Host + I button).
- The Windows button corresponds to the Home button in Android.
- Esc corresponds to the back button in Android
- F2 corresponds to the Menu button
- F3 matches the search button
- Alt + F1 - switch to console mode
- Alt + F7 - switch to GUI mode
Connecting the Android virtual machine, AVD and Eclipse
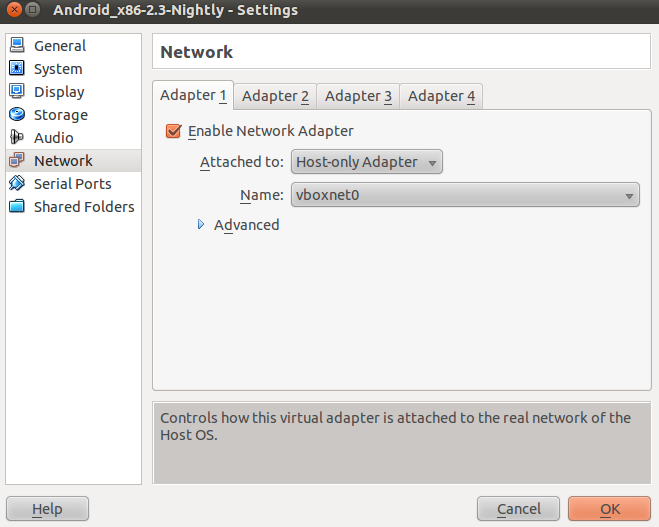
The goal was to use the new virtual machine from Eclispe to test and debug applications. For this to work, it’s tedious to set up a network connection between the host operating system (where Eclipse is running) and the guest VM. For this, VirtualBox has several settings in Network settings:
- use bridge mode: it should work, but it may require starting DHCP in the main OS
- host only network: creates a virtual network between the host and the guest; This is the easiest to use option.
When the network is configured, restart the virtual machine, enter the command line (Alt + F1) and enter:
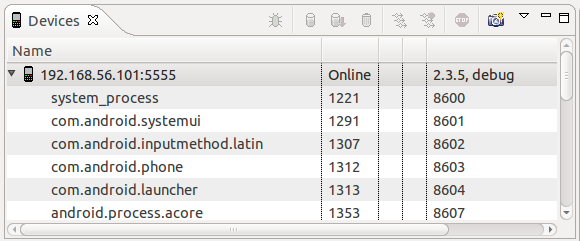
netcfg This will display the current IP of the virtual machine. Usually it will be something like 192.168.56.101 for the guest machine, the main address is 192.168.56.1.
On the main machine, open the command line, go to the platform-tools for Android directory:
./adb connect 192.168.56.101 This will register the virtual machine as a new device:
Now you can run and debug your application directly from Eclipse.
As you can see, the speed increase is very noticeable:
- Starting a VM takes 2 seconds instead of 30
- Applications run very quickly, even in debug mode (there are no brakes inherent in the ARM emulator)
Add an SD card
Use the documentation located at http://www.android-x86.org/documents/sdcardhowto .
Use the file as an SD card
From the Android command line:
dd if=/dev/zero of=/data/sdcard.img bs=1024 count=65536 (64MB image) losetup /dev/block/loop7 /data/sdcard.img newfs_msdos /dev/block/loop7 Now we restart the VM in debug mode, rewrite the partition in read + write mode, and edit menu.lst to add one kernel parameter:
Sdcard = / data / sdcard.img
We use a separate section
It takes a little more work.
First you have to create a new hard disk in VirtualBox and connect it to a virtual machine.
Now we start the machine in debug mode. Use fdisk to create a partition. When the partition is created, you need to format it:
newfs_msdos /dev/sdb1 Now edit menu.lst and add the parameter:
Sdcard = sdb1
Impressions of using Android_x86 as an environment for testing
Using
While the virtual machine is working as expected, and besides the speed of the differences, I did not notice any special differences. All Android projects are installed correctly. Sample projects from the SDK are built and work fine.
The only noticeable glitch: the gallery application (Cooliris) is broken, I tried with the last nightly build of the image - it became a little better, but the problems still remain.
Another oddity: in about 10% of cases, the virtual machine does not load and it has to be rebooted. Since the download is very fast, it doesn’t bother much, but I’ll still try to understand what the matter is.
Speed
Here the differences are visible to the naked eye.
Here are some numbers to make it clearer how fast everything is:
The Android emulator on ARM is about half slower than the Nexus One, and Android x86 is about twice as fast.
Source: https://habr.com/ru/post/130201/
All Articles