Automate Flex Applications with Java + Selenium + FlexMonkium
In this post I will describe my research, which I had to do when the project was about testing automation. The project is a web site, the client part of which is written in Flex, and the server part in Python (Django).
To begin, consider the path from the beginning, which I went through before I stopped at a bunch of Java + Selenium + FlexMonkium. And this:
The first thing I tried to use as an automation tool was Sfapi (Selenium Flex-API). It works in conjunction with Selenium RC and some programming language for which there are drivers (Java, C #, Python, Ruby). Of the benefits it should be noted that this is a free solution that really works. Among the shortcomings - a lot of code, but little result. It does not work well with dynamic elements of the application. The reason for the further search for solutions became large amounts of code that performed simple operations.
')
The next software to automate Flex applications I tried was Ranorex Studio. This is a very pleasant to use software package with an intuitive interface. Of the advantages, it is worth noting the rapid creation of tests without knowledge of a programming language using the built-in functionality and the Spy agent (which records the sequence of user actions), finishing the already created tests by converting them to any programming language from the proposed ones ) and good interaction with almost all Flex UI elements (on the forms I met complaints about incorrect work with the DataGrid element, but during the work I was not able to work with it ). Among the drawbacks is the high cost of the license, if you need to test the application on different domains (for example, test and main server), you must first make some transformations with the tests so that they start to interact correctly with the application interface. The high cost of the license was the reason for the further search for solutions.
Without waiting for the end of the Ranorex license, I continued my search in the direction of free software and on one of the forums I came across a tip to use FlexMonkey. There is a short but understandable documentation on their website, as well as a forum with active discussions and live support. The application itself is written on Adobe Air, has a clear and user-friendly interface.

As it turned out, FlexMonkey is very smart, convenient and free. It correctly supports work with almost all UI components (at least everything worked for me with a bang), but it also has one drawback - tests cannot be improved using any programming language. In fact, you can use only basic functions, such as checking the properties of components, comparing the values of these properties, etc. But, for example, it will not be possible to count letters in the mail user interface without programming tools. Here comes the next product from the creators of FlexMonkey, which works in conjunction with Selenium and is called FlexMonkium .
In order to start the automation testing of your flex-application, you need to set up a project to interact with Selenium RC + FlexMonkium, as well as prepare a programming environment (for example, I chose the Java language with the Eclipse IDE). Further, all actions are described in steps:
1. Download Selenium RC and Selenium Client Driver for a programming language in which tests will be written (in my case, Java).
2. Download FlexMonkium (in the example version 4.1.8 was used). The archive contains three components - a folder with .swc libraries, one of which will need to be connected to the Flex project, “user-extensions.js”, which is an extension for the Selenium server, thanks to which it will “understand” the control commands of the flex-application specified in the tests and .xpi plugin, extending the functionality of Selenium IDE for Firefox.
3. Open the Flex project in Flash Builder and connect the .swc library from the downloaded archive to the project. There are several such files in the archive with the same name and number at the end. The number indicates the version number of the Flex-SDK (in my case it is the fourth version, that is, you need to connect automation_monkey4.x.swc). After this, we recompile the project and voila - it is ready to interact with the Selenium server.
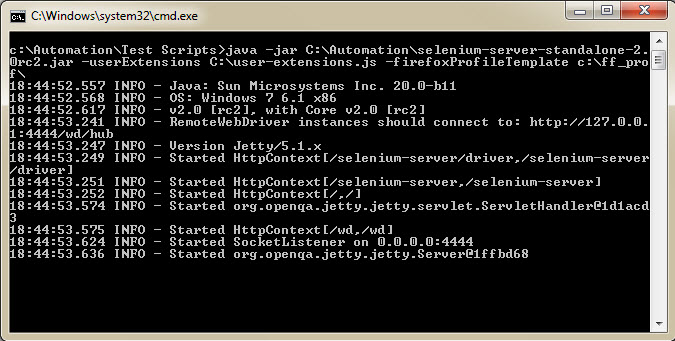
4. Now you need to start the Selenium server with the command extension file, which will allow it to “understand” the commands specific to managing the flex-application. This file is contained in the downloaded FlexMonkium archive and is called “user-extensions.js”. It is passed as a parameter in the command line when the server is started. For these purposes, I created a separate bat file with the following content:
After that, you can safely run the server. If everything was done correctly, after launching bat, a window like this will hang on the screen:
So, the application under test is ready to interact with the testing automation tools, and Selenium-RC is running and understands the flex-control commands.
As a language for writing tests, I chose Java with the Eclipse development environment in conjunction with the JUnit library. With this combination, the tests worked fine, but after each test JUnit restarted the browser, which was not desirable for me, since many of my tests were a continuation of the previous ones, and I did not like resetting the application state. After some searches on the forums, I read that this behavior cannot be disabled and I had to stop using JUnit. In the report, I just needed to know what tests failed, at what steps it happened and how many such errors occurred. For these purposes, I wrote a special function that outputs this information to the console. It is called when the test fails (when the test fails, it has a timeout) and Java generated an exception. As a result, I got this code:
This example tests sending a letter via the internal mail of the application, as well as checking its display among outgoing emails.
And now more. The “seleniumStart” and “seleniumStop” functions start and end the session. The first function initializes an instance of the Selenium class that sends commands to the server. It includes parameters such as the host and port (on which the Selenium server is running), the browser (which will be tested) and the url (on which the application under test is available).
Next comes the printError function, which takes the name of the test and the step number as parameters and outputs them to the console. This function is called when a timeout is reached at any step of the test.
In order not to write a block of duplicate code in each step, it was moved to a separate function called “testExec”. Its parameters are the name and number of the step being executed (which are transmitted to “printError” when the timeout expires), the command for the server, the path (locator) to the element in the application that we are trying to “reach out to”, and the timeout. Please note that the application path in the example above has 2 types: “VerifyProperty” and “UIEvent”. The first is used to get \ compare the values of attributes of an element, and the second to perform an action on the specified element, for example, click on the button. You can specify the UI element of the application not only by its name or id, but also by the combination of several of its properties, which are additionally specified in the tags “arg”. More detailed documentation is available on the Gorilla Logic website.
In order not to write locators manually, I wrote down the sequence of steps through FlexMonkey, exported the tests to an xml file and inserted it into Java code. The result was the following result:
Or, you can install the plug-in flexmonkium.xpi in addition to the Selenium IDE and record the tests directly from the Firefox browser.
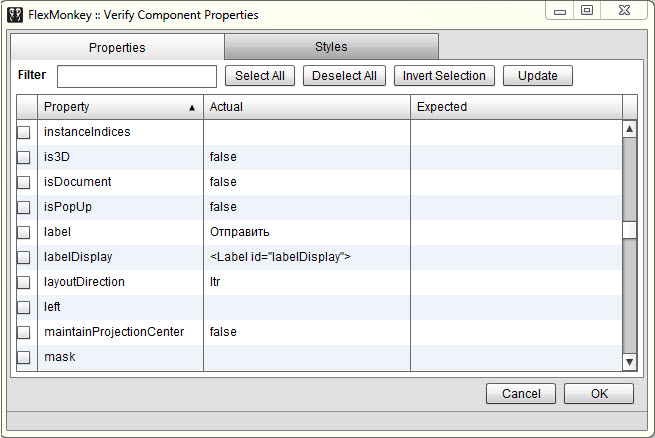
But in any case, these 2 methods do not guarantee 100% accurate test performance, especially when the application components have a dynamically generated ID. In this case, you will have to manually add additional arguments that are clearly inherent in the required component. Component properties can be viewed in the FlexMonkey or FlexMonkium Console.
At the moment, most regression tests are automated on the project. Their number was> 350, which takes about 3-4 hours.
I apologize for such a large piece of code in the example, which inflated the volume of the article.
The choice of tools for automation
To begin, consider the path from the beginning, which I went through before I stopped at a bunch of Java + Selenium + FlexMonkium. And this:
- Selenium + Sfapi
- Ranorex
- Flexmonkey
- Selenium + FlexMonkium
The first thing I tried to use as an automation tool was Sfapi (Selenium Flex-API). It works in conjunction with Selenium RC and some programming language for which there are drivers (Java, C #, Python, Ruby). Of the benefits it should be noted that this is a free solution that really works. Among the shortcomings - a lot of code, but little result. It does not work well with dynamic elements of the application. The reason for the further search for solutions became large amounts of code that performed simple operations.
')
The next software to automate Flex applications I tried was Ranorex Studio. This is a very pleasant to use software package with an intuitive interface. Of the advantages, it is worth noting the rapid creation of tests without knowledge of a programming language using the built-in functionality and the Spy agent (which records the sequence of user actions), finishing the already created tests by converting them to any programming language from the proposed ones ) and good interaction with almost all Flex UI elements (on the forms I met complaints about incorrect work with the DataGrid element, but during the work I was not able to work with it ). Among the drawbacks is the high cost of the license, if you need to test the application on different domains (for example, test and main server), you must first make some transformations with the tests so that they start to interact correctly with the application interface. The high cost of the license was the reason for the further search for solutions.
Without waiting for the end of the Ranorex license, I continued my search in the direction of free software and on one of the forums I came across a tip to use FlexMonkey. There is a short but understandable documentation on their website, as well as a forum with active discussions and live support. The application itself is written on Adobe Air, has a clear and user-friendly interface.
As it turned out, FlexMonkey is very smart, convenient and free. It correctly supports work with almost all UI components (at least everything worked for me with a bang), but it also has one drawback - tests cannot be improved using any programming language. In fact, you can use only basic functions, such as checking the properties of components, comparing the values of these properties, etc. But, for example, it will not be possible to count letters in the mail user interface without programming tools. Here comes the next product from the creators of FlexMonkey, which works in conjunction with Selenium and is called FlexMonkium .
Setting up the working environment
In order to start the automation testing of your flex-application, you need to set up a project to interact with Selenium RC + FlexMonkium, as well as prepare a programming environment (for example, I chose the Java language with the Eclipse IDE). Further, all actions are described in steps:
1. Download Selenium RC and Selenium Client Driver for a programming language in which tests will be written (in my case, Java).
2. Download FlexMonkium (in the example version 4.1.8 was used). The archive contains three components - a folder with .swc libraries, one of which will need to be connected to the Flex project, “user-extensions.js”, which is an extension for the Selenium server, thanks to which it will “understand” the control commands of the flex-application specified in the tests and .xpi plugin, extending the functionality of Selenium IDE for Firefox.
3. Open the Flex project in Flash Builder and connect the .swc library from the downloaded archive to the project. There are several such files in the archive with the same name and number at the end. The number indicates the version number of the Flex-SDK (in my case it is the fourth version, that is, you need to connect automation_monkey4.x.swc). After this, we recompile the project and voila - it is ready to interact with the Selenium server.
4. Now you need to start the Selenium server with the command extension file, which will allow it to “understand” the commands specific to managing the flex-application. This file is contained in the downloaded FlexMonkium archive and is called “user-extensions.js”. It is passed as a parameter in the command line when the server is started. For these purposes, I created a separate bat file with the following content:
java -jar C:\Automation\selenium-server-standalone-2.0rc2.jar -userExtensions C:\user-extensions.jsAfter that, you can safely run the server. If everything was done correctly, after launching bat, a window like this will hang on the screen:
So, the application under test is ready to interact with the testing automation tools, and Selenium-RC is running and understands the flex-control commands.
We create the first test
As a language for writing tests, I chose Java with the Eclipse development environment in conjunction with the JUnit library. With this combination, the tests worked fine, but after each test JUnit restarted the browser, which was not desirable for me, since many of my tests were a continuation of the previous ones, and I did not like resetting the application state. After some searches on the forums, I read that this behavior cannot be disabled and I had to stop using JUnit. In the report, I just needed to know what tests failed, at what steps it happened and how many such errors occurred. For these purposes, I wrote a special function that outputs this information to the console. It is called when the test fails (when the test fails, it has a timeout) and Java generated an exception. As a result, I got this code:
import java.awt.event.KeyEvent; import java.text.DateFormat; import java.text.SimpleDateFormat; import java.util.Date; import com.thoughtworks.selenium.DefaultSelenium; import com.thoughtworks.selenium.HttpCommandProcessor; import com.thoughtworks.selenium.Selenium; public class TestRunner { private Selenium selenium; private HttpCommandProcessor proc; private int errorsFound; // DateFormat dateFormat = new SimpleDateFormat("yyyy_MM_dd_HH_ss"); Date date = new Date(); String msg_text = dateFormat.format(date); public static void main(String[] args) { TestRunner tr= new TestRunner(); tr.errorsFound = 0; try{ tr.seleniumStart(); //---- ---- tr.goMail(); tr.postSend(); tr.outBoxVerifyMessage(); }catch(Exception ex) {} } //Starting selenium server public void seleniumStart() throws InterruptedException { proc = new HttpCommandProcessor("localhost", 4444, "*firefox3 c:\\Program Files\\MozillaFirefox3.6\\firefox.exe", "http://q/"); selenium = new DefaultSelenium(proc); selenium.start(); Thread.sleep(5000); selenium.open("/site_media/"); } //Shutting down selenium server public void seleniumStop() { if (selenium != null) { selenium.stop(); selenium = null; } System.out.println("\r\nTesting compleated. Errors found: "+errorsFound); } //Error reporter public void printError(String test, String step) { errorsFound ++; System.out.println("\r\nError in Test: '"+test+"' on step: '"+step+"'"); } //Step runner public void testExec(String testName, String step, String cmd, String locator, int time) throws Exception { for (int t = 0;; t++) { if (t >= time) printError(testName, "Step "+step); try { if (proc.getBoolean(cmd, new String[] {locator})) break; } catch (Exception e) { } Thread.sleep(500); } } //----------------------------------------------------------------------------------- //////////////////////////////////////////////////////////////////////////////// //----------------------------------------------------------------------------------- // public void goMail() throws Exception { String test = "goMail"; //Step 1. testExec(test, "1", "isFlexMonkey", "", 60); //Step 2. "" testExec(test, "2", "isFlexMonkey", "<UIEvent command=\"Select\" value=\"tabBar\"><arg value=\"\"/> </UIEvent>", 60); } //----------------------------------------------------------------------------------- // public void postSend() throws Exception { String test = "postSend"; //Step 3. "" testExec(test, "3", "isFlexMonkey", "<UIEvent command=\"Select\" value=\"buttonBarMail\"><arg value=\"\"/></UIEvent>", 60); //Step 4. testExec(test, "4", "isFlexMonkey", "<UIEvent command=\"Open\" value=\"userDataProvider\"><arg value=\"null\"/></UIEvent>", 60); //Step 5. testExec(test, "5", "isFlexMonkey", "<UIEvent command=\"Select\" value=\"userDataProvider\"><arg value=\" \"/></UIEvent>", 60); //Step 6. "" testExec(test, "6", "isFlexMonkey", "<UIEvent command=\"SelectText\" value=\"subject\"><arg value=\"0\"/><arg value=\"0\"/></UIEvent>", 60); //Step 7. testExec(test, "7", "isFlexMonkey", "<UIEvent command=\"Input\" value=\"subject\"><arg value=\"Hello, "+msg_text+"\"/></UIEvent>", 60); //Step 8. ( ) testExec(test, "8", "isFlexMonkey", "<UIEvent command=\"ChangeFocus\" value=\"subject\"/>", 60); //Step 9. testExec(test, "9", "isFlexMonkey", "<UIEvent command=\"Input\" value=\"message\"><arg value=\"Test of text message " +msg_text+"\"/></UIEvent>", 60); //Step 10. testExec(test, "10", "isFlexMonkey", "<UIEvent command=\"Click\" value=\"\"/>", 60); } //----------------------------------------------------------------------------------------------- // public void outBoxVerifyMessage() throws Exception { String test = "outBoxVerifyMessage"; //Step 1. testExec(test, "1", "isFlexMonkey", "<UIEvent command=\"Select\" value=\"buttonBarMail\"><arg value=\"\"/></UIEvent>", 60); //Step 2. testExec(test, "2", "isFlexMonkey", "<VerifyProperty value=\"subject\" propertyString=\"text\" expectedValue=\"Hello, "+msg_text+"\"/>", 10); //Step 3. testExec(test, "3", "isFlexMonkey", "<VerifyProperty value=\"message\" propertyString=\"text\" expectedValue=\"Test of text message " +msg_text+"\"/>", 10); //Step 4. testExec(test, "4", "isFlexMonkey", "<VerifyProperty value=\"fullName\" propertyString=\"text\" expectedValue=\" \"/>", 10); } } This example tests sending a letter via the internal mail of the application, as well as checking its display among outgoing emails.
And now more. The “seleniumStart” and “seleniumStop” functions start and end the session. The first function initializes an instance of the Selenium class that sends commands to the server. It includes parameters such as the host and port (on which the Selenium server is running), the browser (which will be tested) and the url (on which the application under test is available).
Next comes the printError function, which takes the name of the test and the step number as parameters and outputs them to the console. This function is called when a timeout is reached at any step of the test.
In order not to write a block of duplicate code in each step, it was moved to a separate function called “testExec”. Its parameters are the name and number of the step being executed (which are transmitted to “printError” when the timeout expires), the command for the server, the path (locator) to the element in the application that we are trying to “reach out to”, and the timeout. Please note that the application path in the example above has 2 types: “VerifyProperty” and “UIEvent”. The first is used to get \ compare the values of attributes of an element, and the second to perform an action on the specified element, for example, click on the button. You can specify the UI element of the application not only by its name or id, but also by the combination of several of its properties, which are additionally specified in the tags “arg”. More detailed documentation is available on the Gorilla Logic website.
In order not to write locators manually, I wrote down the sequence of steps through FlexMonkey, exported the tests to an xml file and inserted it into Java code. The result was the following result:
<FlexMonkey> <TestSuite name="NewTestSuite" description="" ignore="false"> <TestCase name="" description="null" ignore="false"> <Test name=" " description="null" defaultThinkTime="250" ignore="false"> <UIEvent command="Select" value="tabBar" prop="automationName" delay="1000" attempts="10"> <arg value=""/> </UIEvent> <Pause duration="10000"/> <UIEvent command="Select" value="buttonBarMail" prop="automationName" delay="1000" attempts="10"> <arg value=""/> </UIEvent> <Pause duration="1000"/> <UIEvent command="Open" value="userDataProvider" prop="automationName" delay="1000" attempts="10"> <arg value="null"/> </UIEvent> <UIEvent command="Select" value="userDataProvider" prop="automationName" delay="1000" attempts="10"> <arg value=" "/> </UIEvent> ... Or, you can install the plug-in flexmonkium.xpi in addition to the Selenium IDE and record the tests directly from the Firefox browser.
But in any case, these 2 methods do not guarantee 100% accurate test performance, especially when the application components have a dynamically generated ID. In this case, you will have to manually add additional arguments that are clearly inherent in the required component. Component properties can be viewed in the FlexMonkey or FlexMonkium Console.
Result
At the moment, most regression tests are automated on the project. Their number was> 350, which takes about 3-4 hours.
I apologize for such a large piece of code in the example, which inflated the volume of the article.
Source: https://habr.com/ru/post/129829/
All Articles