Single user authorization with support for multiple services
 When implementing one of the projects on the Yii framework, I had the task of registering and authorizing users through third-party services (Google, Facebook, Twitter, etc).
This problem has two solutions:
- Use authorization service, for example Loginza;
- Implement authorization functions independently for each service.
Advantages of using the authorization service:
- Simplicity and speed of installation;
- There is no need to learn the details of authorization through each provider.
However, self-authorization has several other advantages:
- Full control over the authorization process: what will be written in the authorization window of the provider, what data we get, etc .;
- The ability to change the appearance of the authorization widget in accordance with the design of the site;
- When authorizing via OAuth, it is possible to call API methods if the provider provides them;
- Less dependencies on third-party services - more reliability.
I chose the second option mainly because there were no ready-made extensions for yii, and I was wondering how such authorization systems are built from the inside. At the beginning, it was part of the user management module. But later this functionality was allocated in a separate extension, which can be easily used in any project.
1. Authorization system requirements
When designing the expansion, I was guided by the following principles:
- Necessity to abstract from authorization subtleties through various types of services, use of adapters for each service.
- Obtaining a unique authorization identifier that can be used to register a user in our application.
- The ability to extend the standard authorization classes to obtain additional data about the user.
- The ability to work with the social networking API by expanding the authorization class of the required service.
- Ability to customize the list of services supported by the site, override the appearance of the authorization widget. The ability to use the popup window for authorization without closing our application.
2. EAuth extension
As a result of the implementation of all the requirements above, the extension EAuth appeared.
At the moment the extension contains:
- Component containing auxiliary functions.
- A widget that displays a list of services in the form of icons and allows for authorization in a popup window.
- Base classes for adding OpenID or OAuth based services.
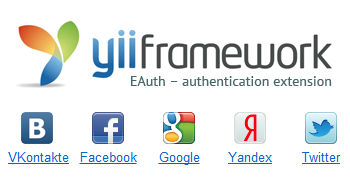
- Ready classes for authorization through Google, Yandex, Twitter, Facebook, VKontakte and Mail.ru.
3. Installation
First you need to download and unzip the extension in
`protected/extensions/eauth` .')
3.1 Dependencies
The extension uses loid and EOAuth to work with OpenID and OAuth, respectively. These extensions must be downloaded and placed in the
`protected/extensions` directory.3.2 Customization
In the configuration
`main.php` you need to add: 'import'=>array( 'ext.eoauth.*', 'ext.eoauth.lib.*', 'ext.lightopenid.*', 'ext.eauth.services.*', ), 'components'=>array( 'loid' => array( 'class' => 'ext.lightopenid.loid', ), 'eauth' => array( 'class' => 'ext.eauth.EAuth', 'popup' => true, // Use the popup window instead of redirecting. 'services' => array( // You can change the providers and their classes. 'google' => array( 'class' => 'GoogleOpenIDService', ), 'yandex' => array( 'class' => 'YandexOpenIDService', ), 'twitter' => array( 'class' => 'TwitterOAuthService', 'key' => '...', 'secret' => '...', ), 'facebook' => array( 'class' => 'FacebookOAuthService', 'client_id' => '...', 'client_secret' => '...', ), 'vkontakte' => array( 'class' => 'VKontakteOAuthService', 'client_id' => '...', 'client_secret' => '...', ), 'mailru' => array( 'class' => 'MailruOAuthService', 'client_id' => '...', 'client_secret' => '...', ), ), ), ), The extension has only two parameters:
popup and services . The popup parameter is responsible for using the popup window for authorization, instead of redirecting to the provider's site. The services parameter is a list of providers supported by our application. For each provider, you can specify your own class based on the provider’s base class. To obtain keys for OAuth providers, you must register your application with the appropriate provider.4. Usage
As an example, take the standard Yii application, generated by the
`yiic webapp create` , and add the ability to `yiic webapp create` via Google and Yandex (we will not connect OAuth providers, so as not to mess with the keys). View the finished demo .4.1 UserIdentity
To begin with, we will create a class
ServiceUserIdentity , which is responsible for the input using our extension. Class Code: <?php class ServiceUserIdentity extends UserIdentity { const ERROR_NOT_AUTHENTICATED = 3; /** * @var EAuthServiceBase the authorization service instance. */ protected $service; /** * Constructor. * @param EAuthServiceBase $service the authorization service instance. */ public function __construct($service) { $this->service = $service; } /** * Authenticates a user based on {@link username}. * This method is required by {@link IUserIdentity}. * @return boolean whether authentication succeeds. */ public function authenticate() { if ($this->service->isAuthenticated) { $this->username = $this->service->getAttribute('name'); $this->setState('id', $this->service->id); $this->setState('name', $this->username); $this->setState('service', $this->service->serviceName); $this->errorCode = self::ERROR_NONE; } else { $this->errorCode = self::ERROR_NOT_AUTHENTICATED; } return !$this->errorCode; } } Standard provider classes provide us with two attributes:
id and name . In addition, each provider has its own identifier, which is contained in the serviceName property. In the ServiceUserIdentity class ServiceUserIdentity we store these attributes in the session (and in the cookie) of the current user.4.2 Editing SiteContoller
The second step is to change the
`site/login` . Add the following code to the beginning of the action: public function actionLogin() { $service = Yii::app()->request->getQuery('service'); if (isset($service)) { $authIdentity = Yii::app()->eauth->getIdentity($service); $authIdentity->redirectUrl = Yii::app()->user->returnUrl; $authIdentity->cancelUrl = $this->createAbsoluteUrl('site/login'); if ($authIdentity->authenticate()) { $identity = new ServiceUserIdentity($authIdentity); // if ($identity->authenticate()) { Yii::app()->user->login($identity); // popup $authIdentity->redirect(); } else { // popup cancelUrl $authIdentity->cancel(); } } // - , $this->redirect(array('site/login')); } // ... } First, we check for the presence of the
$_GET['service'] variable. If there is such a variable, then create an instance of the provider class and configure paths for redirecting and canceling authorization. Then we call the `$authIdentity->authenticate()` method, which does all the magic for us. The `$authIdentity->redirect();` and `$authIdentity->cancel();` required for the popup window to close properly if it is used.4.3 Edit the view `protected/views/site/login.php`
To use a standard widget, just add a couple of lines after the main form:
<h2>Do you already have an account on one of these sites? Click the logo to log in with it here:</h2> <?php Yii::app()->eauth->renderWidget(); ?> To change the appearance of the widget, you can copy the file
`protected/extensions/eauth/views/auth.php` `[theme_name]/views/EAuthWidget/auth.php` .4.4 Result
After all the actions we have done, we can open our site and go to the Login page. After the standard authorization form, the authorization services icons will appear:

When you click, for example, on the Google icon, a popup window will open:
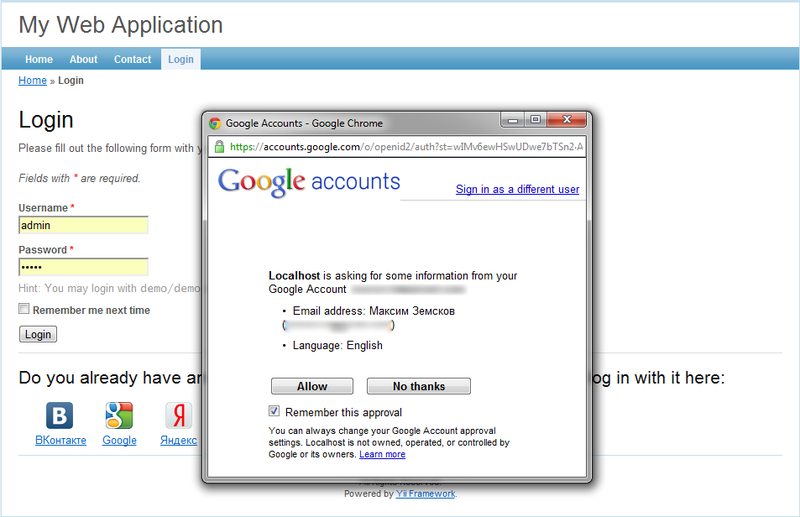
If the user confirms the authorization for our application, the user will be authorized and redirects to the
redirectUrl page (in the example, this is Yii::app()->user->returnUrl ). If the user clicks No, thanks , then the popup window will simply be closed.Conclusion
That's it, the authorization system is ready to go. What else can you do with the extension:
- Get additional information about the user by expanding the classes of providers. An example can be seen in the demo when logging in via Vkontakte;
- Integrate the extension with yii-user. In general, to register a user, it is enough to add only two fields to the
{{users}}table:serviceandidentity. The first field is the name of the authorization service (theserviceNameproperty). The second is the unique identifier of the user on this service (idproperty); - Use the extension to work with the social networking API.
Links
UPDATE: in “3.2 Setup” there was a lack of loid extension, added.
UPDATE 2: The current version and configuration instructions are available on github.com . The instructions in this article are suitable for EAuth version <= 1.1.3.
Source: https://habr.com/ru/post/129804/
All Articles