"Smart home" with their own hands. Part 2. Video surveillance
In the last article ( link ), we got acquainted with the theoretical part of building our “smart home” and decided on the technologies used. Now let's start the implementation of the practical part :)
The first victim of our interest will be a video surveillance system.
')
As I already wrote, the core of our system will be a personal computer. To him we will connect all our systems and it will be he who will manage all this. Requirements for iron come from the necessary tasks, but for us, and not very powerful. In my case, the main requirement was the noiselessness and small size of the system unit. The choice fell on a candy bar. Intel Atom - as a processor and a hard disk on the SSD to reduce noise. The operating system is Ubuntu Linux. It turns out in quite reasonable money. It looks like this:

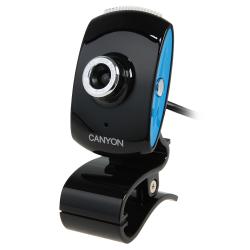
Let's return to our sheep. As I already wrote, we will build video surveillance on the basis of unpretentious USB web-cameras, an additional option of which may be a microphone. For example, such:
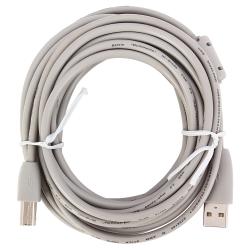
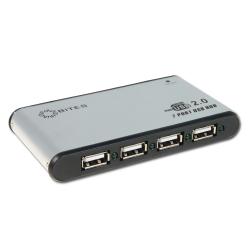
For the connection, I used long USB cables with an active amplifier, or 5-meter cables with ferrite rings and USB hubs with power supplies. Special attention must be paid to the quality of these elements.
This is quite enough for the organization of our video surveillance system. You can also consider connecting analog and IP cameras, but I proceeded from the cost of the solution and the available materials :)
We will assume that the cameras are connected to our computer - this should not cause problems. Let us turn to the most interesting - the program part.
If you purchased modern cameras, most likely you will not need any additional movements in order to be seen by the OS. In my case, 4 webcams are connected to the system. Check it out:
Apparently, the system identified them. I didn’t do anything except to connect to the USB connector. If you don’t see any devices in the output, you will most likely have to google the driver for your camera.
For myself, I decided that I would not take a video stream from the cameras, but take pictures once a second. Pluses are obvious:
For all this we will use a program called motion . Ubuntu is very easy to install:
The configuration file is by default in / etc / motion and is called, oddly enough, motion.conf :)
Open, edit, reduce to the following form:
In the threadX.conf configs, all parameters are similar to the base one, only the necessary strings are changed.
Those. the device address of the camera in the OS, the text in the image and the save directory.
I removed comments from the configuration file in order not to take up too much space. You can view them in the original configuration file motion . It is described in great detail. Changes from the original configuration file are marked with my comments.
Now we need to create the necessary directories and check the operation of the config:
We go alternately in our folders with cameras and view the files camera.jpg . If everything is done correctly, we will see different images from our cameras.
In this article, we learned how to capture images from our cameras and save them as a snapshot once a second in separate directories.
In the next part I will talk about how to teach the system to synthesize speech and understand us.
Thanks for attention ;)
UPD: Part 3
The first victim of our interest will be a video surveillance system.
What, why and why
')
As I already wrote, the core of our system will be a personal computer. To him we will connect all our systems and it will be he who will manage all this. Requirements for iron come from the necessary tasks, but for us, and not very powerful. In my case, the main requirement was the noiselessness and small size of the system unit. The choice fell on a candy bar. Intel Atom - as a processor and a hard disk on the SSD to reduce noise. The operating system is Ubuntu Linux. It turns out in quite reasonable money. It looks like this:
Let's return to our sheep. As I already wrote, we will build video surveillance on the basis of unpretentious USB web-cameras, an additional option of which may be a microphone. For example, such:
For the connection, I used long USB cables with an active amplifier, or 5-meter cables with ferrite rings and USB hubs with power supplies. Special attention must be paid to the quality of these elements.
This is quite enough for the organization of our video surveillance system. You can also consider connecting analog and IP cameras, but I proceeded from the cost of the solution and the available materials :)
Soft
We will assume that the cameras are connected to our computer - this should not cause problems. Let us turn to the most interesting - the program part.
If you purchased modern cameras, most likely you will not need any additional movements in order to be seen by the OS. In my case, 4 webcams are connected to the system. Check it out:
nix@nix-boss:~$ ls /dev/video*
/dev/video0 /dev/video1 /dev/video2 /dev/video3
Apparently, the system identified them. I didn’t do anything except to connect to the USB connector. If you don’t see any devices in the output, you will most likely have to google the driver for your camera.
For myself, I decided that I would not take a video stream from the cameras, but take pictures once a second. Pluses are obvious:
- Less traffic when browsing via WEB (sometimes you want to watch from the phone via GPRS)
- In perspective - motion detection based on image analysis and the use of neural networks for their own purposes.
For all this we will use a program called motion . Ubuntu is very easy to install:
sudo apt-get install motionThe configuration file is by default in / etc / motion and is called, oddly enough, motion.conf :)
Open, edit, reduce to the following form:
daemon off
process_id_file /var/run/motion/motion.pid
setup_mode off

# ,
videodevice /dev/video0

v4l2_palette 8
input 8
norm 0
frequency 0
rotate 0

#
width 320

#
height 240

framerate 2
minimum_frame_time 0
netcam_tolerant_check off
auto_brightness off
brightness 0
contrast 0
saturation 0
hue 0

roundrobin_frames 1
roundrobin_skip 1
switchfilter off

threshold 1500
threshold_tune off
noise_level 32
noise_tune on
despeckle EedDl
smart_mask_speed 0
lightswitch 0
minimum_motion_frames 1
pre_capture 0
post_capture 0
gap 60
max_mpeg_time 0
output_all off

output_normal off
output_motion off

#
quality 50
ppm off

ffmpeg_cap_new off
ffmpeg_cap_motion off
ffmpeg_timelapse 0
ffmpeg_timelapse_mode daily
ffmpeg_bps 500000
ffmpeg_variable_bitrate 0
ffmpeg_video_codec swf
ffmpeg_deinterlace off

#
snapshot_interval 1

locate off

# . -
text_right %Y-%m-%d\n%T-%q

#
text_left CAMERA %t

text_changes off
text_event %Y%m%d%H%M%S

#
text_double on

#
target_dir /opt/data/current/video0

# camera.jpg ( )
snapshot_filename camera

jpeg_filename camera
movie_filename %v-%Y%m%d%H%M%S
timelapse_filename %Y%m%d-timelapse

# -,
webcam_port 0
webcam_quality 50
webcam_motion off
webcam_maxrate 1
webcam_localhost on
webcam_limit 0

control_port 0
control_localhost on
control_html_output on

track_type 0
track_auto off
track_motorx 0
track_motory 0
track_maxx 0
track_maxy 0
track_iomojo_id 0
track_step_angle_x 10
track_step_angle_y 10
track_move_wait 10
track_speed 255
track_stepsize 40

quiet on

sql_log_image off
sql_log_snapshot on
sql_log_mpeg off
sql_log_timelapse off
sql_query insert into security(camera, filename, frame, file_type, time_stamp, event_time_stamp) values('%t', '%f', '%q', '%n', '%Y-%m-%d %T', '%C')

; mysql_db db
; mysql_host localhost
; mysql_user user
; mysql_password password

# 3 ;)
thread /etc/motion/thread1.conf
thread /etc/motion/thread2.conf
thread /etc/motion/thread3.conf
In the threadX.conf configs, all parameters are similar to the base one, only the necessary strings are changed.
videodevice /dev/video1
text_left CAMERA 2
target_dir /opt/data/current/video1
Those. the device address of the camera in the OS, the text in the image and the save directory.
I removed comments from the configuration file in order not to take up too much space. You can view them in the original configuration file motion . It is described in great detail. Changes from the original configuration file are marked with my comments.
Now we need to create the necessary directories and check the operation of the config:
nix@nix-boss:~$ mkdir /opt/data/current/video0 ( )
nix@nix-boss:~$ sudo motion -c /etc/motion/motion.conf
We go alternately in our folders with cameras and view the files camera.jpg . If everything is done correctly, we will see different images from our cameras.
Total
In this article, we learned how to capture images from our cameras and save them as a snapshot once a second in separate directories.
In the next part I will talk about how to teach the system to synthesize speech and understand us.
Thanks for attention ;)
UPD: Part 3
Source: https://habr.com/ru/post/129799/
All Articles