We write a simple application using GoogleMap and pumped SimpleCursorAdapter
Application development for the Android platform is becoming more and more popular. So, I recently happened to be engaged in the development of the client part of such an application, actually understanding the intricacies of this business from scratch, relying only on the basic knowledge of Java.
Here, using the example of a simple application that allows you to select a metro station from the list and display it on a map, shows some useful features of working with the adapter for ListView, the simplest work of the Google Map and the interaction with the embedded database are implemented.
The entire project can be downloaded on github via the link at the end of the article.
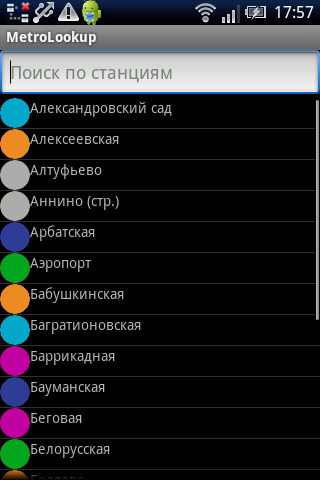
Actually, the list looks like this:
')
It includes the list of stations and the search string by stations. The tooltip in the search is implemented - when typing a sequence of letters in the list, only those stations whose name begins with this sequence remain.
Tap on the station Belarus, we get:

Now let's see what happens there.
It is easy to see that a Google Map is used here (MapView). Accordingly, it is important to remember that you need to specify Google APIs as a target when creating a project.
Now the points:
This is the base file, which describes the settings of the application and indicates what it has access to. Accordingly, in this file it is necessary to register access to the Internet, indicate that the com.google.android.maps library is used, and indicate our activations: in this case, SearchDialog, which appears at startup, and Map - activate with the map.
For convenient work with the database, you need to create a database helper that implements the methods we need to work with the database, such as filtering by first letters and searching by id.
The file RecordsDbHelper.java, as already mentioned, can be viewed at the link below. Here it is worth noting that we have implemented the methods of searching by id and by text filter, which we will use in the future.
In general, everything is as usual, no wisdom.
This is the class that implements the association of the list with the database. As a result of a query to the database, we get the table cursor. The adapter takes the cursor, the list, the names of the table fields and the id elements from item.xml (see below) that need to be correlated with each other, and fills the ListView. Inheriting from the standard SimpleCursorAdapter, in which all this is implemented, and overriding the getView method in it.
Adapter.java
In the getView method, a ready-made View of a list item (ie, a list line with the station name and a colored circle) places the id of the database table row to which the element corresponds to the tag (which each View object has). This id will be subsequently transmitted to the activit with a map with a tap on the list item.
First you need to set its Layout - namely, the frame of the visual representation of the elements we need:
search.xml
Layout of a separate element of the list (picture - a circle with the color of the metro line and the name of the station)
item.xml
Now, finally, the class Search, which describes the activity with the search. It is implemented using the inheritance from ListActivity - a special activation for lists. Data on the stations (name, coordinates and number of the metro line) are taken from the above reviewed database.
The most interesting thing here, I think, is Binder. It allows you to determine how to bind a value from a database table to a list line item, that is, for example, how to bind a branch number that is stored in a table to the corresponding picture with a circle of the desired color. The setViewValue method is called for each view specified in the cursor constructor. If the returned result is true, then the data is bound, everything is fine. If false, the system realizes that the wrong method has been called and is looking for the right one among the standard binder. In this example, it is checked whether the view passed as a parameter is the ImageView in which there should be a circle. If this is so, then we transfer the corresponding picture there, otherwise we return false, making it clear that you need to use a standard binder (since this is not a picture, and here we process only pictures).
When you activate the activation, the onCreate () method is called first, in which all the displayed elements are initialized. This is where the handler for clicks on the elements of the list is installed, which pulls the tag from the record id and passes this tag to the activation with the map (well, it actually causes this activation). A text change handler is also installed in the EditText (filter string). When the text is changed, the updateList () function is called, in which, using the helper described above, a query is thrown into the base, pulling out the filtered data, and an adapter is created for the list.
Finally go to the cards themselves. Let's start with the Layout:
map.xml
Here you need to specify the key to the GoogleMaps API. I did not shine my own :) You can read about how to get it here .
Well, actually activate the card:
Map.java
Here:
1. Standard ZoomIn and ZoomOut buttons are installed on the map (using setBuiltInZoomControls ())
2. Our DB opens.
3. From the intent that caused this activation, the id of the record that was passed in the click handler to the list item (I wrote about this above) is pulled out, and the id from the base gets the necessary line from which we need the coordinates of the station.
4. The coordinates are pulled using the getDouble method obtained as a result of the query.
5. Next, GeoPoint is created and coordinate transformations are performed (fractional data are stored in the database, and Google needs integer numbers. For this, you need to multiply 10 ^ 6 from the database and round it).
6. animateTo () and setZoom () shift the map to the right place and set the zoom level.
Fuh, in general, everything. As you can see, quite simple things are behind quite trivial things, which are not so easy for a beginner to deal with. Therefore, I really hope that the experience I shared will help someone not to lose enthusiasm because of problems at the start, and high-quality applications that optimize our lives will be more!
The entire project can be found at the link .
Here, using the example of a simple application that allows you to select a metro station from the list and display it on a map, shows some useful features of working with the adapter for ListView, the simplest work of the Google Map and the interaction with the embedded database are implemented.
The entire project can be downloaded on github via the link at the end of the article.
Actually, the list looks like this:
')
It includes the list of stations and the search string by stations. The tooltip in the search is implemented - when typing a sequence of letters in the list, only those stations whose name begins with this sequence remain.
Tap on the station Belarus, we get:
Now let's see what happens there.
It is easy to see that a Google Map is used here (MapView). Accordingly, it is important to remember that you need to specify Google APIs as a target when creating a project.
Now the points:
1. AndroidManifest
This is the base file, which describes the settings of the application and indicates what it has access to. Accordingly, in this file it is necessary to register access to the Internet, indicate that the com.google.android.maps library is used, and indicate our activations: in this case, SearchDialog, which appears at startup, and Map - activate with the map.
2. Database
For convenient work with the database, you need to create a database helper that implements the methods we need to work with the database, such as filtering by first letters and searching by id.
The file RecordsDbHelper.java, as already mentioned, can be viewed at the link below. Here it is worth noting that we have implemented the methods of searching by id and by text filter, which we will use in the future.
public Cursor getById(long id) { Cursor ccc = mDb.query(true, DATABASE_TABLE, new String[] { KEY_ROWID, KEY_NAME, KEY_X, KEY_Y, KEY_LINES }, KEY_ROWID + "=" + Long.toString(id), null, null, null, null, null); return ccc; } synchronized public Cursor fetchRecordsByQuery(String query) { Cursor ccc = mDb.query(true, DATABASE_TABLE, new String[] { KEY_ROWID, KEY_NAME, KEY_LINES }, KEY_NAME + " LIKE" + "'" + query + "%'", null, null, null, KEY_NAME, null); return ccc; }
public Cursor getById(long id) { Cursor ccc = mDb.query(true, DATABASE_TABLE, new String[] { KEY_ROWID, KEY_NAME, KEY_X, KEY_Y, KEY_LINES }, KEY_ROWID + "=" + Long.toString(id), null, null, null, null, null); return ccc; } synchronized public Cursor fetchRecordsByQuery(String query) { Cursor ccc = mDb.query(true, DATABASE_TABLE, new String[] { KEY_ROWID, KEY_NAME, KEY_LINES }, KEY_NAME + " LIKE" + "'" + query + "%'", null, null, null, KEY_NAME, null); return ccc; }
In general, everything is as usual, no wisdom.
3. Adapter
This is the class that implements the association of the list with the database. As a result of a query to the database, we get the table cursor. The adapter takes the cursor, the list, the names of the table fields and the id elements from item.xml (see below) that need to be correlated with each other, and fills the ListView. Inheriting from the standard SimpleCursorAdapter, in which all this is implemented, and overriding the getView method in it.
Adapter.java
public class Adapter extends SimpleCursorAdapter{ public Adapter(Context context, int layout, Cursor c, String[] from, int[] to) { super(context, layout, c, from, to); } @Override public View getView(int position, View convertView, ViewGroup parent) { View view = super.getView(position, convertView, parent); long id=getItemId(position); view.setTag(id); return view; } }
public class Adapter extends SimpleCursorAdapter{ public Adapter(Context context, int layout, Cursor c, String[] from, int[] to) { super(context, layout, c, from, to); } @Override public View getView(int position, View convertView, ViewGroup parent) { View view = super.getView(position, convertView, parent); long id=getItemId(position); view.setTag(id); return view; } }
In the getView method, a ready-made View of a list item (ie, a list line with the station name and a colored circle) places the id of the database table row to which the element corresponds to the tag (which each View object has). This id will be subsequently transmitted to the activit with a map with a tap on the list item.
4. List
First you need to set its Layout - namely, the frame of the visual representation of the elements we need:
search.xml
<?xml version="1.0" encoding="utf-8"?> <LinearLayout xmlns:android="http://schemas.android.com/apk/res/android" android:orientation="vertical" android:layout_width="fill_parent" android:layout_height="wrap_content" > <EditText android:id="@+id/search_text" android:layout_width="fill_parent" android:layout_height="wrap_content" android:hint="@string/search_hint" /> <ListView android:id="@android:id/android:list" android:layout_width="fill_parent" android:layout_height="wrap_content" /> </LinearLayout>
<?xml version="1.0" encoding="utf-8"?> <LinearLayout xmlns:android="http://schemas.android.com/apk/res/android" android:orientation="vertical" android:layout_width="fill_parent" android:layout_height="wrap_content" > <EditText android:id="@+id/search_text" android:layout_width="fill_parent" android:layout_height="wrap_content" android:hint="@string/search_hint" /> <ListView android:id="@android:id/android:list" android:layout_width="fill_parent" android:layout_height="wrap_content" /> </LinearLayout>
Layout of a separate element of the list (picture - a circle with the color of the metro line and the name of the station)
item.xml
<?xml version="1.0" encoding="utf-8"?> <LinearLayout xmlns:android="http://schemas.android.com/apk/res/android" android:layout_width="fill_parent" android:layout_height="fill_parent" android:orientation="horizontal" > <ImageView android:layout_width="wrap_content" android:layout_height="wrap_content" android:id="@+id/line_image" > </ImageView> <TextView android:layout_width="wrap_content" android:layout_height="wrap_content" android:text="TextView" android:id="@+id/text1" > </TextView> </LinearLayout>
<?xml version="1.0" encoding="utf-8"?> <LinearLayout xmlns:android="http://schemas.android.com/apk/res/android" android:layout_width="fill_parent" android:layout_height="fill_parent" android:orientation="horizontal" > <ImageView android:layout_width="wrap_content" android:layout_height="wrap_content" android:id="@+id/line_image" > </ImageView> <TextView android:layout_width="wrap_content" android:layout_height="wrap_content" android:text="TextView" android:id="@+id/text1" > </TextView> </LinearLayout>
Now, finally, the class Search, which describes the activity with the search. It is implemented using the inheritance from ListActivity - a special activation for lists. Data on the stations (name, coordinates and number of the metro line) are taken from the above reviewed database.
public class Search extends ListActivity { // private EditText searchText; private RecordsDbHelper recordsDBHelper; private ListView list; private Adapter notes; // Binder private Binder binder; public void onCreate(Bundle savedInstanceState) { super.onCreate(savedInstanceState); setContentView(R.layout.search); binder = new Binder(); list = getListView(); // , // intent id , //(. ), . list.setClickable(true); list.setOnItemClickListener(new AdapterView.OnItemClickListener() { @Override public void onItemClick(AdapterView<?> av, View v, int pos, long id) { Intent intent = new Intent(); intent.putExtra("ID", (Long) v.getTag()); intent.setClass(Search.this, Map.class); startActivity(intent); } }); searchText = (EditText) findViewById(R.id.search_text); // , // updateList(), searchText.addTextChangedListener(new TextWatcher() { public void afterTextChanged(Editable s) { } public void beforeTextChanged(CharSequence s, int start, int count, int after) { } public void onTextChanged(CharSequence s, int start, int before, int count) { updateList(searchText.getText().toString()); } }); // Database Helper', // . , // . list.post(new Runnable() { @Override public void run() { recordsDBHelper = new RecordsDbHelper(Search.this); recordsDBHelper.open(); updateList(searchText.getText().toString()); } }); } // Binder, SimpleCursorAdapter.ViewBinder. // . , // . private static class Binder implements Adapter.ViewBinder { public boolean setViewValue(View view, Cursor c, int i) { if (view.getId() == R.id.line_image) { Integer line = c.getInt(i); switch (line) { case 0: ((ImageView) view).setImageResource(R.drawable.line0); break; case 1: ((ImageView) view).setImageResource(R.drawable.line1); break; … … } return true; } return false; } } // // . private void updateList(String s) { if (recordsDBHelper.isReady()) { // Cursor c = recordsDBHelper.fetchRecordsByQuery(s); startManagingCursor(c); // , String[] from = new String[] { RecordsDbHelper.KEY_NAME, RecordsDbHelper.KEY_LINES }; // id (.. ImageView, // , TextView, ) int[] to = new int[] { R.id.text1, R.id.line_image }; // notes = new Adapter(Search.this, R.layout.item, c, from, to); notes.setViewBinder(binder); setListAdapter(notes); } } }The most interesting thing here, I think, is Binder. It allows you to determine how to bind a value from a database table to a list line item, that is, for example, how to bind a branch number that is stored in a table to the corresponding picture with a circle of the desired color. The setViewValue method is called for each view specified in the cursor constructor. If the returned result is true, then the data is bound, everything is fine. If false, the system realizes that the wrong method has been called and is looking for the right one among the standard binder. In this example, it is checked whether the view passed as a parameter is the ImageView in which there should be a circle. If this is so, then we transfer the corresponding picture there, otherwise we return false, making it clear that you need to use a standard binder (since this is not a picture, and here we process only pictures).
When you activate the activation, the onCreate () method is called first, in which all the displayed elements are initialized. This is where the handler for clicks on the elements of the list is installed, which pulls the tag from the record id and passes this tag to the activation with the map (well, it actually causes this activation). A text change handler is also installed in the EditText (filter string). When the text is changed, the updateList () function is called, in which, using the helper described above, a query is thrown into the base, pulling out the filtered data, and an adapter is created for the list.
5. Map
Finally go to the cards themselves. Let's start with the Layout:
map.xml
<?xml version="1.0" encoding="utf-8"?> <com.google.android.maps.MapView xmlns:android="http://schemas.android.com/apk/res/android" android:id="@+id/mapview" android:layout_width="fill_parent" android:layout_height="fill_parent" android:clickable="true" android:apiKey=<b><u> GoogleMaps API</u></b> />
<?xml version="1.0" encoding="utf-8"?> <com.google.android.maps.MapView xmlns:android="http://schemas.android.com/apk/res/android" android:id="@+id/mapview" android:layout_width="fill_parent" android:layout_height="fill_parent" android:clickable="true" android:apiKey=<b><u> GoogleMaps API</u></b> />
Here you need to specify the key to the GoogleMaps API. I did not shine my own :) You can read about how to get it here .
Well, actually activate the card:
Map.java
public class Map extends MapActivity { public MapView mapView; public MapController mapController; private RecordsDbHelper mDbHelper; @Override public void onCreate(Bundle savedInstanceState) { super.onCreate(savedInstanceState); setContentView(R.layout.map); // mapView = (MapView) findViewById(R.id.mapview); // mapView.setBuiltInZoomControls(true); mapController = mapView.getController(); // mapView.post(new Runnable() { @Override public void run() { // mDbHelper = new RecordsDbHelper(Map.this); mDbHelper.open(); // . , id , Bundle extras = Map.this.getIntent().getExtras(); if (extras != null) { long str = extras.getLong("ID"); // id Cursor cursor = mDbHelper.getById(str); startManagingCursor(cursor); cursor.moveToFirst(); double x = cursor.getDouble(cursor.getColumnIndex(RecordsDbHelper.KEY_X)); double y = cursor.getDouble(cursor.getColumnIndex(RecordsDbHelper.KEY_Y)); // GeoPoint // GeoPoint point = new GeoPoint((int) (x * 1E6), (int) (y * 1E6)); // mapController.animateTo(point); mapController.setZoom(16); } } }); } }Here:
1. Standard ZoomIn and ZoomOut buttons are installed on the map (using setBuiltInZoomControls ())
2. Our DB opens.
3. From the intent that caused this activation, the id of the record that was passed in the click handler to the list item (I wrote about this above) is pulled out, and the id from the base gets the necessary line from which we need the coordinates of the station.
4. The coordinates are pulled using the getDouble method obtained as a result of the query.
5. Next, GeoPoint is created and coordinate transformations are performed (fractional data are stored in the database, and Google needs integer numbers. For this, you need to multiply 10 ^ 6 from the database and round it).
6. animateTo () and setZoom () shift the map to the right place and set the zoom level.
Fuh, in general, everything. As you can see, quite simple things are behind quite trivial things, which are not so easy for a beginner to deal with. Therefore, I really hope that the experience I shared will help someone not to lose enthusiasm because of problems at the start, and high-quality applications that optimize our lives will be more!
The entire project can be found at the link .
Source: https://habr.com/ru/post/129234/
All Articles