HTC Hero - restoration of normal operation of the touch glass
Greetings dear readers. In this article I would like to consider a problem that quite often (if you believe the Internet resources) arises with the devices HTC Hero. The essence of the problem lies in the partial or complete failure of the lower part of the touch glass. This problem has not bypassed my apparatus. Even a small discussion was born, in the comments to one of the recent posts . Under Habrakat, I tried to explain how I (in my case - successfully) struggled with this problem.
After reading a similar topic on w3bsit3-dns.com , I learned that many solve the problem by buying a new glass on e-bay and replacing it (self or with a master). It turned out that some had already changed 3-4 glasses, because all broke down with a similar problem. I decided not to suffer from buying in ibei and not to put myself at risk to buy a “left” sensor, so I decided to try to repair the sensor myself, it’s not like you with electronics. This decision was pushed me all the same discussion in the above forum.
So, the essence of the problem lies in the fact that the contact between the touch glass and the signal loop, which is glued to the glass on conductive glue, is lost. Apparently with the latter, over time, there are some processes that lead to the detachment of the cable and the loss of contact between the conductor on the glass and the conductor in the cable. The solution is to heat the glued contacts - this glue melts a little and the contact is restored.
')
Instructions, including video, on the analysis of HTC Hero quite a lot, so let's go through only the main points. I apologize in advance for the quality of the photo - I took it on the old “soap box” in poorly lit conditions (one photo didn’t work out at all and I had to borrow it)
Turn off the six bolts under the back cover.
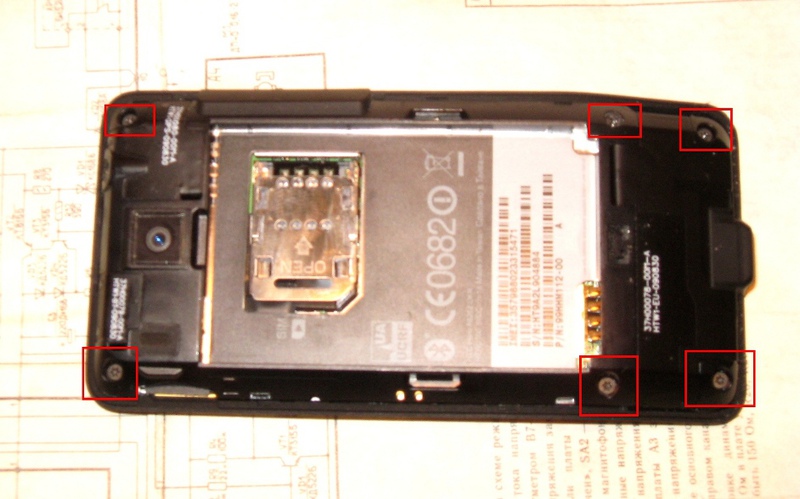
The back wall continues to hold on snaps, just hook it with a thin screwdriver and remove.
Now unscrew the bolts holding the system board and the button board (highlighted in red), and unfasten the sensor controller cables (highlighted in green) and the display (highlighted in blue).

(image taken from pdacenter.ru)
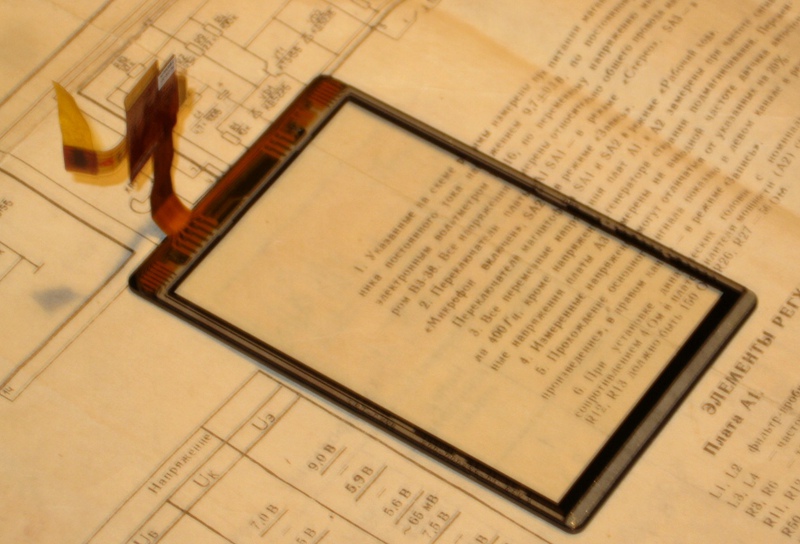
Carefully remove the board and set it aside. We got to the display, to the back of which the touchscreen controller is glued.

Fold back the controller and gently hook the display with a thin screwdriver.

Now the display can be easily removed and put aside (try not to stain the glass screen itself).
Now you need to remove the touch glass. It is simply glued to the front panel. Unfortunately, there is no photograph of this process.
The process of removing the glass consists in heating its front part, for example, with a hair dryer, and squeezing it out with your finger on the reverse side. Act carefully, do not overdo it with pressure on the glass - it begins to move away well from the body, after a thorough warm-up.
And now the glass is removed.
The problem group of contacts is located in the right corner (relative to the front part), in the place where the signal loop is suitable
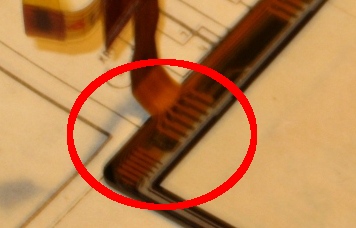
Warming up is carried out like this: take a low-power soldering iron (I used 30 wadded) and, through folded paper, press it to the contacts so that they warm up well, but again - do not overdo it. Warm up, on average, 5-6 seconds, then strongly press the heated area with your finger. The operation can be repeated several times. Everything!
Now we simply assemble the device in the reverse order, the touch glass is simply put in place and warms up again. Native glue is enough to hold the glass securely again. Make sure that after the assembly would not have extra bolts. The device is ready to work.
After all this, my “hero” again makes me happy with a perfectly working sensor. I hope that this operation will help you.
Good luck! May the force be with you!
After reading a similar topic on w3bsit3-dns.com , I learned that many solve the problem by buying a new glass on e-bay and replacing it (self or with a master). It turned out that some had already changed 3-4 glasses, because all broke down with a similar problem. I decided not to suffer from buying in ibei and not to put myself at risk to buy a “left” sensor, so I decided to try to repair the sensor myself, it’s not like you with electronics. This decision was pushed me all the same discussion in the above forum.
About the problem
So, the essence of the problem lies in the fact that the contact between the touch glass and the signal loop, which is glued to the glass on conductive glue, is lost. Apparently with the latter, over time, there are some processes that lead to the detachment of the cable and the loss of contact between the conductor on the glass and the conductor in the cable. The solution is to heat the glued contacts - this glue melts a little and the contact is restored.
Attention! All of the below you do at your own risk!
')
We begin to disassemble the phone
Instructions, including video, on the analysis of HTC Hero quite a lot, so let's go through only the main points. I apologize in advance for the quality of the photo - I took it on the old “soap box” in poorly lit conditions (one photo didn’t work out at all and I had to borrow it)
Turn off the six bolts under the back cover.
The back wall continues to hold on snaps, just hook it with a thin screwdriver and remove.
Now unscrew the bolts holding the system board and the button board (highlighted in red), and unfasten the sensor controller cables (highlighted in green) and the display (highlighted in blue).
(image taken from pdacenter.ru)
Carefully remove the board and set it aside. We got to the display, to the back of which the touchscreen controller is glued.
Fold back the controller and gently hook the display with a thin screwdriver.
Now the display can be easily removed and put aside (try not to stain the glass screen itself).
Touch glass
Now you need to remove the touch glass. It is simply glued to the front panel. Unfortunately, there is no photograph of this process.
The process of removing the glass consists in heating its front part, for example, with a hair dryer, and squeezing it out with your finger on the reverse side. Act carefully, do not overdo it with pressure on the glass - it begins to move away well from the body, after a thorough warm-up.
And now the glass is removed.
The problem group of contacts is located in the right corner (relative to the front part), in the place where the signal loop is suitable
Warming up is carried out like this: take a low-power soldering iron (I used 30 wadded) and, through folded paper, press it to the contacts so that they warm up well, but again - do not overdo it. Warm up, on average, 5-6 seconds, then strongly press the heated area with your finger. The operation can be repeated several times. Everything!
Assembly.
Now we simply assemble the device in the reverse order, the touch glass is simply put in place and warms up again. Native glue is enough to hold the glass securely again. Make sure that after the assembly would not have extra bolts. The device is ready to work.
After all this, my “hero” again makes me happy with a perfectly working sensor. I hope that this operation will help you.
Good luck! May the force be with you!
Source: https://habr.com/ru/post/129098/
All Articles